98
ORTHOPANTOMOGAPH
OP
2D
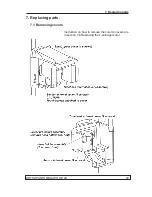
7. Replacing parts
L900 Display adapter - additional instructions
After replacing L900 and display assembly (rev 6 and
later) check that the jumpers on the board are in the
correct positions for the touch display installed in the
unit.
For touch display:
- OPTREX T-55265GD057J-LW-ACN
SW1 = on, SW2 = on
For touch display:
- SHARP LQ057Q3DG01
SW1 = off, SW2 = on
NOTICE!
When L900 and display assemblies are ordered as
spareparts, they are always preset and tested at the
factory.
The switch information is just for your information.
L1800 Generator board - additional instructions
After replacing the board use the s2terminal to recali-
brate the unit:
- calib
Refer to section
5. S2terminal and Service Functions
.
L1700 Connector board - additional instructions
After replacing the board use the s2terminal to recali-
brate the unit:
- calib
Refer to section
5. S2terminal and Service Functions
.
Summary of Contents for ORTHOPANTOMOGAPH OP 2D
Page 2: ......
Page 4: ...IV ORTHOPANTOMOGAPH OP 2D Contents...
Page 24: ...14 ORTHOPANTOMOGAPH OP 2D 2 Unit Description 2 3 Unit dimensions...
Page 32: ...22 ORTHOPANTOMOGAPH OP 2D 2 Unit Description...
Page 33: ...2 Unit Description ORTHOPANTOMOGAPH OP 2D 23 2 6 Block diagram...
Page 34: ...24 ORTHOPANTOMOGAPH OP 2D 2 Unit Description 2 7 Fuse diagram...
Page 38: ...28 ORTHOPANTOMOGAPH OP 2D 2 Unit Description...
Page 43: ...3 Circuit Boards L1200 ORTHOPANTOMOGAPH OP 2D 33 L1200 Block Diagram...
Page 46: ...36 ORTHOPANTOMOGAPH OP 2D 3 Circuit Boards L1500 L1500 Block diagram...
Page 50: ...40 ORTHOPANTOMOGAPH OP 2D 3 Circuit Board L1600 L1600 Block diagram...
Page 54: ...44 ORTHOPANTOMOGAPH OP 2D 3 Circuit Boards L1700 L1700 Block Diagram...
Page 57: ...3 Circuit Boards L1800 ORTHOPANTOMOGAPH OP 2D 47 L1800 Block diagram...
Page 61: ...3 Circuit Boards P1910 ORTHOPANTOMOGAPH OP 2D 51 P1910 Block diagram...


