MacGregor Industries
75 GLIDER
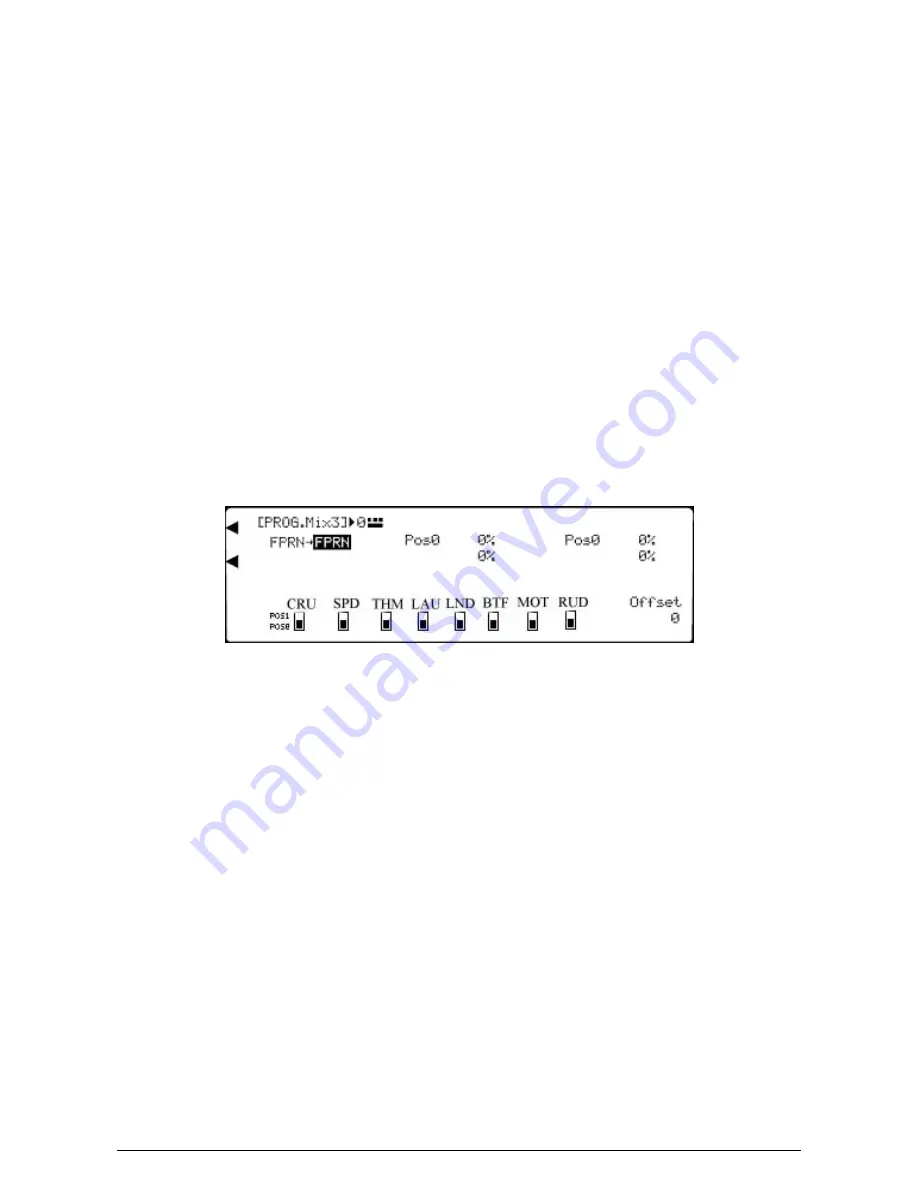
To select a Master channel,
highlight the left hand FPRN (or previously selected Master channel) by rotating the Scroll
Bar and click on it to bring up the sub menu. A browse box of the available Master channels appears with a heading of
"Mast" to indicate that the Master channel is being selected. Rotate the Scroll Bar to select the required channel and click
on it to exit the sub menu. To exit without making changes, select and click on the CANCEL menu choice. Please note
that when TIMT (The Timer bias switch) is selected as a Master input, the Slave will toggle between
±
100% with each
activation of the switch.
To select a Slave channel,
highlight the right hand FPRN (or previously selected Slave channel) by rotating the Scroll Bar
and click on it to bring up the sub menu. A browse box of the available channels appears with a heading of "Slav" to
indicate that the Slave channel is being selected. Rotate the Scroll Bar to select the required channel and click on it to exit
the sub menu. To exit without making changes, select and click on the CANCEL menu choice. Please note that if FPRN
(Flaperon, Ailerons as Flaps) is selected as a Slave, the mix causes both Aileron servos move up and down in the same
direction (like Flaps). If Aileron is selected as a Slave, the mix causes the Aileron servos to move in opposite directions
(like Ailerons).
To set a mix value,
highlight the required mix position (Pos0 or Pos1) by rotating the Scroll Bar and click on it to bring up
the sub menu. The figures are surrounded by a box to indicate that they are selected. Move the Master stick/switch/lever
to select either the top or the bottom figure and rotate the Scroll Bar to alter the setting. Note that only the mix figure for
the selected side of neutral is changed. To return the figures to the default of 0, press the clear (CLR) key at the left hand
side of the screen. When the required setting is achieved, click the Scroll Bar to exit the sub menu. Note that when the mix
is permanently on, any entries for Pos1 (position 1) are ignored.
To set an offset value,
highlight "Offset" by rotating the Scroll Bar and click on it to bring up the sub menu. The figure is
surrounded by a box to indicate that it is selected. Rotate the Scroll Bar to alter the setting. To return the figures to the
default of 0, press the clear (CLR) key at the left hand side of the screen. When the required setting is achieved, click the
Scroll Bar to exit the sub menu.
Please note that the display will only show switches for the Flight Modes activated in System Mode - DeviceSEL.
To select an activation switch,
highlight the required switch by rotating the Scroll Bar and click on it to toggle between
position "0" and position "1". The black indicator square moves between the top of the box (POS1) and the bottom of the
box (POS0) to indicate the current selection. The selection toggles between the POS0 and POS1 positions with each click.
When the required setting is achieved, click the Scroll Bar to exit the sub menu. Multiple switches may be used to select the
"Pos1:" values, but note that any switch in the POS1 position will then cause the "Pos1:" values to be used.
Notice that when a switch/Flight Mode is selected to activate/deactivate the mix, the figure to the right of [PROG.Mix] on
the top left of the screen changes from 0 to 1 as the activation switch is moved.
Switch Identification:
CRU
Cruise Flight Mode. (Appears when Flight Modes have been activated in System Mode - DeviceSEL.)
SPD
Speed Flight Mode. (Appears when SPEED Flight Mode has been activated in System Mode - DeviceSEL.)
THM
Thermal Flight Mode. (Appears when SPEED Flight Mode has been activated in System Mode - DeviceSEL.)
LAU
Launch Flight Mode. (Appears when LAUN Flight Mode has been activated in System Mode - DeviceSEL.)
LND
Land Flight Mode. (Appears when LAUN Flight Mode has been activated in System Mode - DeviceSEL.)
BTF
Butterfly (Mix/Hold) switch.
MOT
Motor (Gear) switch.
RUD
Rudder Dual Rate Switch.
Press the LIST key to return to the Function Menu. Press the enter (ENT) key to return to the Information Display Screen.
Summary of Contents for PCM9XII
Page 1: ...MacGregor Industries MACGREGOR INDUSTRIES Instruction Manual PCM9XII ...
Page 4: ...MacGregor Industries This page is intentionally blank ...
Page 43: ...MacGregor Industries 39 HELI ...
Page 65: ...MacGregor Industries 61 AERO ...
Page 85: ...MacGregor Industries 81 GLIDER ...
Page 86: ...MacGregor Industries This page is intentionally blank ...
Page 87: ...MacGregor Industries This page is intentionally blank ...


