P/N 960-100929R_Rev. 3 {EDP #148849}
© 2012, Japan CashMachine Co., Limited
6 - 1 2
Section 6
iVIZION® SeriesNext-Generation Banknote Acceptor Unit
Calibration and Testing
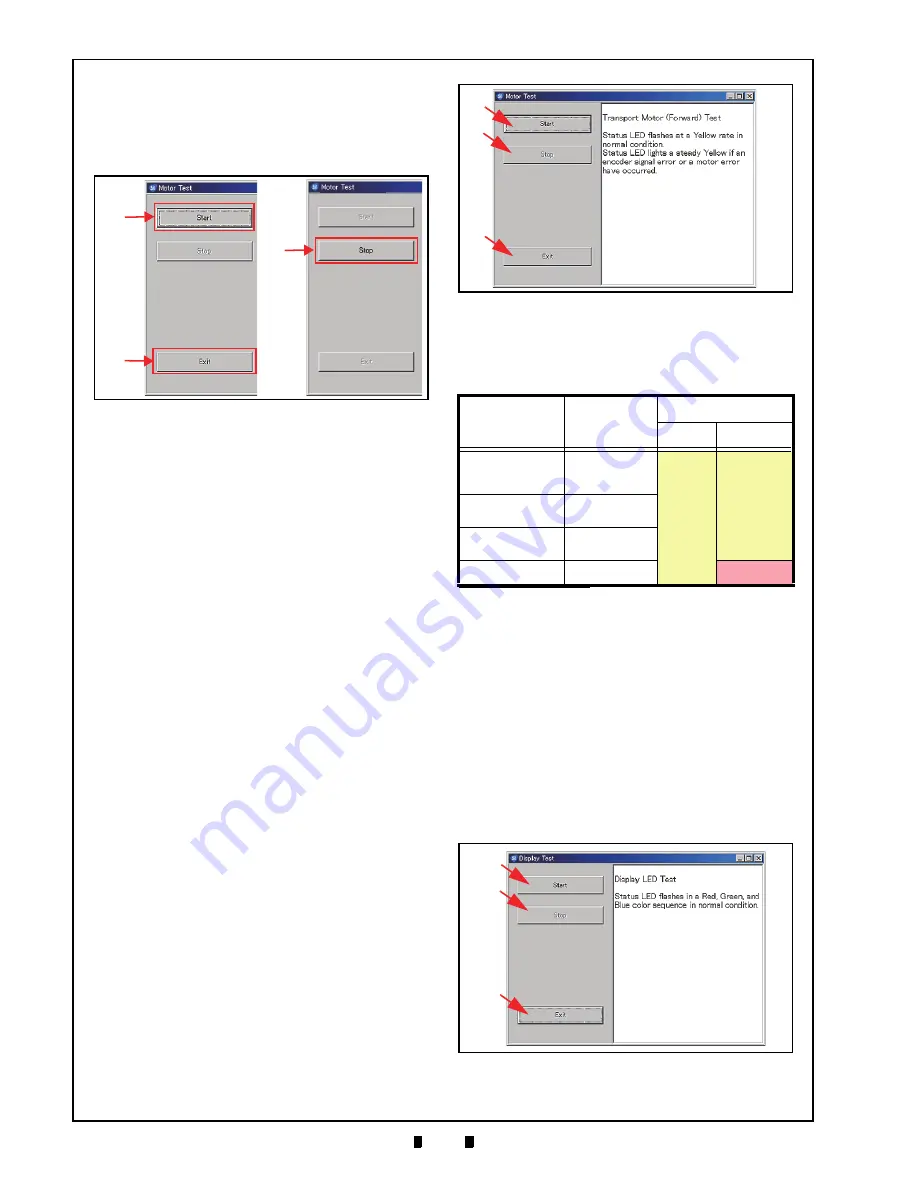
9. Mouse-click on each Screen Button to begin its
related Performance Test. A Screen similar the
Screen shown in Figure 6-59 will appear for each
Test. For more detail concerning each Perfor-
mance Test, refer to “Performance Test Items
using a PC” on page 6-11 of this Section.
10. Mouse-click on the related “
Start
” Screen Button
(See Figure 6-59 a) to begin the desired Perfor-
mance Test. When all of the desired Performance
Tests are complete, Mouse-click on the “
Stop
”
Screen Button (See Figure 6-59 b).
If a return to the “
Test Item Select
” Screen is
desired, Mouse-click on the “
Exit(C)
” Screen
Button (See Figure 6-59 c).
Performance Test Procedures
This portion provides information concerning each
Performance Test Procedure.
A
NY
M
OTOR
T
EST
Perform the following steps to test the Transport
Motor’s Normal Forward Rotation, the Transport
Motor’s Reverse Rotation, and the Stacker Motor’s
operation with a complete Cyclic Movement Test.
The following four (4) Motor Tests available:
•
Transport Motor Normal Forward Rotation Test
•
Transport Motor Reverse Rotation Test
•
Stacker Motor Test
•
Cyclic Movement Test.
To run a specific Test, proceed as follows:
1. Launch
the
“
Test Item Select
” Screen (Refer to
the “PC Performance Test Preparation” on
page 6-11 of this Section).
2. Mouse-click on the desired Test Screen Button
from the Menu Screen provided (Refer back to
Figure 6-58 a, b, c & d).
3. Mouse-click on the “
Start
” Screen Button (Refer
back to Figure 6-60 a) to begin each Test.
4. Check that the Status LED is blinking at a
Yellow
Color rate. (See Table 6-3 to identify the
various Status LED conditions).
5. Mouse-click on the “
Stop
” Screen Button
(See Figure 6-60 b) to end each Test.
6. Mouse-click on the “
Exit
” Screen Button
(See Figure 6-60 c) to return to the “
Test Item
Select
” Screen.
Table 6-3 lists the Status LED indications for each
normal or abnormal Test Item condition.
LED I
NDICATOR
T
EST
Perform the following steps to test the LED Indica-
tors.
1. Launch the “
Test Item Select
” Screen again
(Refer to “PC Performance Test Preparation” on
page 6-11 of this Section).
2. Mouse-click on the “
Display Test
” Screen
Button (See Figure 6-58 e).
3. Mouse-click on the “
Start
” Screen Button
(See Figure 6-61 a) to begin the LED Indicator
Figure 6-59
Start, Stop & Exit Screen Button
a
c
b
Table 6-3
LED Indications for each condition
Test Item
Screen Button
Status LED
Normal
Abnormal
Transport Motor
Normal Forward
Rotation
Transport motor
Forward
Yellow
Flashes
Lit Yellow or
Extinguished
(Out)
Transport Motor
Reverse Rotation
Transport motor
Reverse
Stacker Motor
Stacker motor
Forward
Cyclic Movement
*
*. Once the Cycle Movement Test is complete, transport movement will
halt for approximately 25 seconds; then re-begin the test again.
(See “Error, Jam and Reject Code Tables” on page A-2 of Appendix
A in this Service Manual when the Status LED indicates an abnormal
operating condition).
Cycle Test
Red Flashes
Figure 6-60
Transport Motor Normal Forward
Test Screen
a
b
c
Figure 6-61
LED Indicator Test Screen
a
b
c
KF srl | www.keyfuture.com | Phone +39 059313920


