background image

EonStor DS S48 Series Hardware Manual 

3.5 

SAS Expansion Configuration 


NOTE 

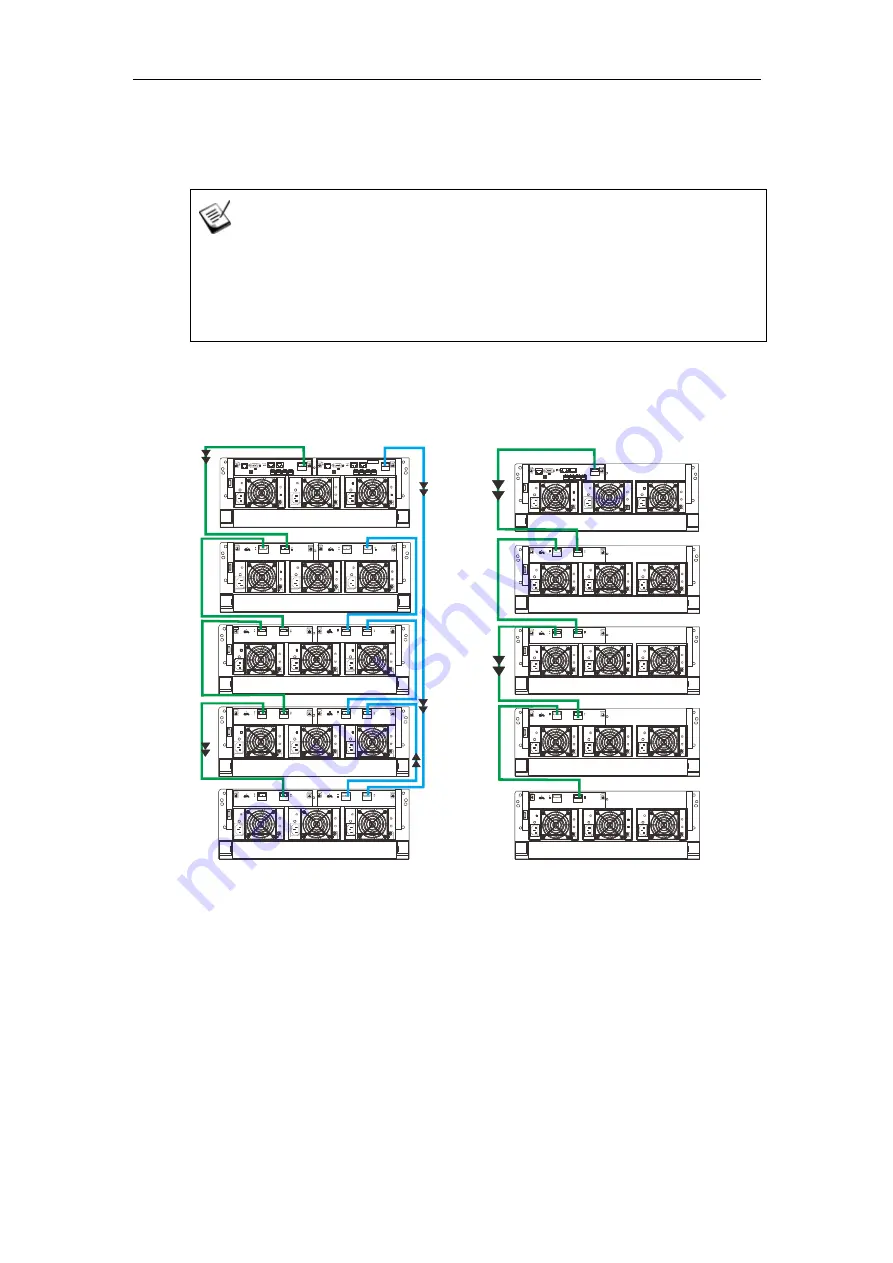
S48 4U JBODs must be connected at the end of the daisy chain. If a S48 4U JBOD is 

the first JBOD connected in the chain, it is recommended to expand ONLY using S48 

4U JBODs. 

3.5.1 

S48 RAID and S48 JBOD 

      Dual-Controller 


Single-Controller 

RAID

JBOD

ID: 1

JBOD

ID: 2

JBOD

ID: 3

JBOD

ID: 4

RAID

JBOD
ID: 1

JBOD

ID: 2

JBOD
ID: 3

JBOD
ID: 4

65 

Summary of Contents for EonStor DS S48 Series

Page 1: ...Infortrend Hardware Manual EonStor DS S48 Series Version 1 6...

Page 2: ...31 USA Tel 1 408 988 5088 Fax 1 408 988 6288 Email Technical Support Website US East Coast Office 4 Northeastern Blvd Suite 21B Nashua NH 03062 USA Tel 1 603 610 6398 Fax 1 603 610 6383 Email Technica...

Page 3: ...urthermore Infortrend Technology reserves the right to revise this publication and to make changes from time to time in the content hereof without obligation to notify any person of such revisions or...

Page 4: ...k leaving the drawers opened will affect the airflow efficiency Secure each enclosure module using its retaining screws Place power cords and other cables away from foot traffic Do not place objects o...

Page 5: ...rgents When replacing components insert them gently while assuring full engagement Vibration and shock can easily damage hard drives Only qualified service personnel should operate and maintain the en...

Page 6: ...trap and an anti static work pad to discharge static electricity when installing or operating the enclosure Avoid dust debris carpets plastic vinyl and styrofoam in your work area Do not remove any mo...

Page 7: ...ANWatch operation Consult the SANWatch User Manual in the CD ROM Revision History Version Date Description 1 0 September 2011 Initial release 1 1 September 2011 Updated the recommended minimum people...

Page 8: ...sion Enclosure Support 25 1 7 2 I2C bus 26 1 7 3 Firmware FW and SANWatch 26 1 7 4 Audible Alarms 26 1 8 Hot swapping 27 2 Hardware Installation 2 1 Installation Prerequisites 28 2 2 Installation Proc...

Page 9: ...els 81 4 2 2 LED Definitions for RAID Systems 83 4 2 3 LED Panel for JBOD Models 84 4 2 4 Drawer Drawer Fan LED 86 4 2 5 Hard Drive Failure LED 87 4 3 Controller LEDs 88 4 3 1 Controller LED for RAID...

Page 10: ...120 6 1 4 Power Supply 121 6 1 5 Dimensions 121 6 1 6 Environment 122 6 2 Pinouts 122 6 2 1 8Gbps FC Port Pinouts 123 6 2 2 GbE Ethernet Port Pinouts for iSCSI Host RAID Models 125 6 2 3 DB 9 Serial...

Page 11: ...ast data transfer and remote replication capabilities There is a 6Gbps mini SAS expansion port for users to further expand to four S48 series JBOD system for a total of 240 hard drives There are also...

Page 12: ...the front panel the S48 RAID and JBOD systems can be distinguished from the LCD panel 1 that can be found on the front panel of the RAID series enclosures On the front panel of each drawer 2 there are...

Page 13: ...els and 3 three power supplies with built in system cooling modules All host management and expansion interfaces are on the controller In the illustrations below dual controller models are on top whil...

Page 14: ...f RAID Controllers Each RAID controller comes with a pre installed DDR II DRAM module and an innovative Cache Backup Module CBM methodology which consists of a 1 flash backup module FBM and 2 battery...

Page 15: ...ould contact your system vendor immediately You can also check the status of the battery backup module via SANWatch or the firmware refer to the SANWatch or Firmware manual for more details 1 2 2 JBOD...

Page 16: ...their norm temperature Drawer Fan Drawer 1 Drawer 2 Drawer 3 System fan IDs 6 7 8 9 10 11 12 13 14 15 16 17 For details on replacing a fan module please go to this section 1 2 4 Internal Backplane An...

Page 17: ...scribed below 1 3 1 LCD Keypad Panel for RAID Models The LCD panel provides full access to RAID configuration settings and system information The LCD initial screen displays the system s model name A...

Page 18: ...ervice Mute LED button 1 a power supply status LED 2 cooling module status LED 3 temperature sensor status LED 4 System fault LED 5 and rotary ID switch 6 Please refer to LED Panel for JBOD Models WAR...

Page 19: ...f i g u r e 1 5 9 1 3 2 6 1 0 1 4 3 7 1 1 1 5 4 8 1 2 1 6 1 7 2 1 2 5 2 9 1 8 2 2 2 6 3 0 1 9 2 3 2 7 3 1 2 0 2 4 2 8 3 2 3 3 3 7 4 1 4 5 3 4 3 8 4 2 4 6 3 5 3 9 4 3 4 7 3 6 4 0 4 4 4 8 D r i v e S l...

Page 20: ...t panel of each hard drive drawer are three status LEDs and when lid they indicate 1 HDD Bay Full 2 Drive Failed and 3 Fan Failed To open the drawer place your index finger underneath the 4 unlock tab...

Page 21: ...an Ethernet port for local remote management over network For dual controller models operating in dual active mode system configuration is handled by one of the controllers In the event one controller...

Page 22: ...es or Cache Backup Module The RAID controller is built of sensitive components and unnecessary tampering can damage the controller 1 4 2 S48 JBOD The S48S J2000G R JBOD expansion system comes with two...

Page 23: ...power supply failure occurs the LED will light up red The built in cooling module contains two fans and their statuses are indicated by the 4 cooling module LEDs The PSU is secured by a 5 retention s...

Page 24: ...t failure if one cooling fan in a cooling module a PSU or a temperature sensor fails the remaining cooling fan s automatically raises its rotation speed Elevated temperature if the temperature breache...

Page 25: ...tem will sound the alarm and deliver warning messages if there is a conflict between JBOD IDs If more than one JBOD is connected to the managing RAID system each JBOD needs a unique enclosure ID set b...

Page 26: ...computer connected to the system s serial port SANWatch SANWatch is Java based graphical user interface GUI software that can be installed on a local remote computer and accessed via the network The m...

Page 27: ...y are being replaced The following components are hot swappable Controller module in dual controller models PSU including cooling modules Hard drive Drawer fan modules NOTE Normalized airflow ensures...

Page 28: ...electrostatic discharge ESD damage Tools required a Phillips screwdriver mid size b Flat blade screwdriver mid size c Flat blade screwdriver small size d Anti static wrist wrap e Host link cables Com...

Page 29: ...e of the related positions of each plug in module and interface connector Cables must be handled with care and must not be bent To prevent emission interference within a rack system and accidental cab...

Page 30: ...s you can install it into the enclosure itself only install hard drives AFTER the enclosure has been rack mounted onto the rack 6 Connect cables Use the supplied power cords to connect the system to m...

Page 31: ...a product utility CD containing the Installation and Hardware Reference Manual this document Lower level contents The enclosure is placed at the bottom of the carton Additional box es If you purchased...

Page 32: ...f S48 enclosures and depending on the position where your front rack posts 1 are secured on the chassis guide 2 you may need to install adjuster pillars so the rear end of S48 will not protrude out of...

Page 33: ...install adjuster pillars Position B You need to install the 25mm adjuster pillars Position C You need to install the 50mm adjuster pillars The rack post installation positions shown conform to the ra...

Page 34: ...ter Pillar Installation The adjuster pillars R right L left are secured at the 2U 3U position on the rack post indicated by the blue circles M5 cage nuts indicated by the blue arrows are inserted for...

Page 35: ...osure before it is installed into the rack otherwise the enclosure will become too heavy 2 5 1 Slide Rail Contents Item Description Quanti ty 01 Enclosure slide rail 2 02 Rack slide rail shipped toget...

Page 36: ...wn on the release lever indicated by the blue arrow on the side and pull the enclosure slide rail apart from the enclosure rack slide rail 1 2 2 To install the rack slide rail onto the rack posts dete...

Page 37: ...brackets Fasten the M5 x 20mm screws to secure the rack slide rail onto the front and rear posts 4 6 3 2 4 4 To attach the enclosure slide rails to the enclosure align the enclosure slide rail socket...

Page 38: ...into the rack You should hear a click sound when the enclosure slide rail engages the rack slide rail at the release lever UN L O C K UN L O C K UN L O C K 6 From here to fully insert the enclosure i...

Page 39: ...dware Manual 7 Secure the system enclosure onto the rack post by opening the side chassis ears to expose the screw holes secure using two 20mm screws and cage nuts from the accessory box as shown in t...

Page 40: ...ted capacity may actually carry different block numbers resulting in storage capacity discrepancies When configuring disk drives into a RAID array you may use a slightly smaller capacity as the Maximu...

Page 41: ...d drive circuit board side with the interface connectors pointed towards the ground the rail plate is secured onto the right side of the hard drive by using a supplied 4 flathead screw while the 2 han...

Page 42: ...f the hard drive Make sure that handles on the disk drives are positioned as shown in the figure 1 5 9 13 2 6 10 14 3 7 11 15 4 8 12 16 17 21 25 29 18 22 26 30 19 23 27 31 20 24 28 32 33 37 41 45 34 3...

Page 43: ...d performance of this logical drive will approximate the channel bandwidth If for example two 6 drive logical arrays are associated with two IDs residing on a single host channel there may be a trade...

Page 44: ...damaged by other devices e g foot traffic or fan exhaust Do not over tighten or bend the cables 3 1 1 Host Side Topologies The primary concern for configuring host side topologies is to avoid points...

Page 45: ...number of the current host nexus For example you can have four hosts A B C and D and four host IDs LUNs IDs 0 1 2 and 3 in a configuration where Host A accesses ID 0 one nexus Host B accesses ID 1 one...

Page 46: ...alue is 256 I O operations The appropriate Maximum Queued I O Count setting depends on how many I O operations the attached servers are performing This can vary according to the amount of host memory...

Page 47: ...nnel 8 5 4 25 2 125 GBd Small Form Pluggable Optical Transceiver LC wave length 850nm multi mode At 8G mode the max cable lengths is 150m with 50 m MMF IFT 9270CFCCab01 Optical FC cable LC LC MM 62 5...

Page 48: ...erformance and reliability specifications WARNING The SFP transceiver from Infortrend contains a laser diode featuring class 1 laser To ensure continued safety do not remove any covers or attempt to g...

Page 49: ...uration plan In addition to cabling topologies and list of networking components the plan can also include firmware and software maintenance details 2 Confirm that you have a Fibre Channel cable that...

Page 50: ...ps for future use 7 Carefully insert the cable into an SFP module that is already on the system The cable connector is keyed and will click into place 8 Remove the protective caps on the other end and...

Page 51: ...t server 2 Data path connection Fault tolerant data paths yet Logical partitions can not failover to a partner controller in the event of controller failure Host channel bandwidth 6400 MB s Above is t...

Page 52: ...control will be necessary in order to avoid access contention CH1 ID112 LD0 CH3 ID112 LD1 CH0 ID112 CH2 ID112 HBA 1 HBA 0 CH1 ID112 CH0 ID112 HBA 1 HBA 0 CH3 ID112 CH2 ID112 EonPath EonPath Channels C...

Page 53: ...these logical drives using more host channel IDs or LUN numbers If a server has multiple data paths to a RAID system a multi path software is necessary e g EonPath driver The two logical drives in th...

Page 54: ...BA 0 EonPath HBA 1 HBA 0 HBA 1 HBA 0 CH2 A116 CH3 A116 CH2 B117 CH3 B117 CH2 B118 CH3 B118 CH2 A119 CH3 A119 CH0 A112 CH2 A116 CH0 B114 CH2 B118 CH0 B113 CH2 B117 CH0 A115 CH2 A119 CH1 A112 CH3 A116 C...

Page 55: ...troller HBA cable or FC switch Each logical partition is redundantly mapped to multiple host channel IDs in an AAPP Active Active Passive Passive configuration The active IDs are in black while the pa...

Page 56: ...x 11x 5x 7x 1x Ethernet A 12x 6x 8x 2x 9 x 3 x 10x 4x 11x 5x 7x 1x C 12 3 4 5 6 78 91 0 11 1 2 A B 12x 6x 8x 2x 9x 3x 10x 4 x 11x 5x 7x 1x Ether net A 12x 6x 8x 2x 9x 3x 10x 4x 11x 5x 7x 1x C Channel...

Page 57: ...h logical partition is mapped to a single host channel ID If you prefer path redundancy you can map a logical partition to IDs residing on two different channels You will then need the EonPath driver...

Page 58: ...ost the connections will work in their respective speeds It maximizes the number of connections while keeping the optimum performance gained by the high speed FC link and FC switch FC NOTE To gain opt...

Page 59: ...create a volume copy mirror pair for data protection but do not want to rely on slow management LAN cable connections In such case you may link the hybrid systems using iSCSI host ports If the distanc...

Page 60: ...S external cable Mini SAS 4x to Mini SAS 4x SFF 8088 50cm IFT 9270CmSASCab2 SAS external cable Mini SAS 4x to Mini SAS 4x SFF 8088 120cm IFT 9270CmSASCab6 SAS external cable Mini SAS 4x to Mini SAS 4x...

Page 61: ...842 6 S48S J2000G Single controller single path S48FS R2842 6 S48S J2000R Dual controller fault tolerant paths Configuring enclosure IDs The configurable IDs for JBODs are from 1 to 15 Usually the num...

Page 62: ...onStor DS S48 Series Hardware Manual 62 firmware automatically manages these addresses Please use a flat blade screwdriver to manually configure the rotary ID switch refer to LED Panel for JBOD models...

Page 63: ...interfaced through a 4x wide external SAS port With data paths through separate SAS domains access to disk drives can be continued in the event of a cable link or SAS JBOD controller failure Designati...

Page 64: ...n and then to the nearest JBOD Each expander controller on the SAS JBOD controls a SAS Domain that connects one of the alternative interfaces on all of the disk drives in the enclosure For example one...

Page 65: ...ected at the end of the daisy chain If a S48 4U JBOD is the first JBOD connected in the chain it is recommended to expand ONLY using S48 4U JBODs 3 5 1 S48 RAID and S48 JBOD Dual Controller Single Con...

Page 66: ...r DS S48 Series Hardware Manual 3 5 2 S12F G R2850 RAID 2U JBOD and S48 JBOD Dual Controller Single Controller RAID ID 1 ID 2 ID 3 ID 4 ID 5 ID 6 ID 9 ID 12 ID 1 ID 2 ID 3 ID 4 ID 5 ID 6 ID 9 ID 12 RA...

Page 67: ...r DS S48 Series Hardware Manual 3 5 3 S16F G R2850 RAID 3U JBOD and S48 JBOD Dual Controller Single Controller ID 1 ID 2 ID 3 ID 4 ID 5 ID 6 ID 9 ID 12 RAID ID 1 ID 2 ID 3 ID 4 ID 5 ID 6 ID 9 ID 12 RA...

Page 68: ...re Manual 3 5 4 S24F G R2850 RAID 3U JBOD and S48 JBOD Dual Controller Single Controller CH 2 C H3 CH0 C H1 CH 2 C H3 CH0 C H1 ID 1 ID 2 ID 3 ID 4 ID 5 ID 6 ID 8 RAID CH2 C H3 CH0 CH 1 ID 1 ID 2 ID 3...

Page 69: ...troller models a standard 4 DB9 straight cable should be supplied by the user NOTE null modem may be required if you are using a 3rd party cable LAN port A LAN cable should be supplied by the user to...

Page 70: ...er refer to Installing DRAM module CBM Make sure the CBM has been properly installed refer to Installing Cache Backup Module CBM for RAID Models Hard drives Make sure hard drive brackets have been cor...

Page 71: ...included cable clamps to secure power cord connections 1 Remove power cords and cable clamps from the accessory boxes 2 Combine cable strap with cable clamp 3 Attach cable clamps to the power cords by...

Page 72: ...nual 4 Adjust the position of cable straps using the release tab 5 Adjust the position so that when a power plug is connected the barb anchor can be inserted into the anchor hole above the power socke...

Page 73: ...w the procedures below Power on by switching on the chief power switch at the back of the enclosure The power switch location is indicated by the blue arrow There is only one chief switch for all the...

Page 74: ...initialization process indicating that system status is ready System initialization and the power on self test may take up to five minutes and the system fault LED may light up during the process The...

Page 75: ...ow Initializing Please Wait This screen appears when the PSUs are turned on Power On Self Test Please Wait System is performing a self test Power on Init Completed System power on self test is complet...

Page 76: ...omputers to stop all I O access to the system 2 Flush the cache Locate the C_Dirty LED refer to Controller LED for RAID Models on the controller module to check if there is still cached data in the DR...

Page 77: ...the power Power off the system by flipping the chief power switch to the off position Once the system has powered down other devices enclosures that are connected to the system can be subsequently po...

Page 78: ...keep system managers aware of system operation statuses 4 1 Monitoring Features You may monitor the system through the following features Firmware The RAID controller in the system is managed by a pre...

Page 79: ...monitor and manage the system locally or remotely over TCP IP network via the Ethernet Management port The management session is conducted using the Ethernet management port For more details see the...

Page 80: ...LEDs are located on both the front and rear panel of the chassis For details see and subsequent sections Audible alarm Audible alarm will be triggered in case of system failures Please refer to Front...

Page 81: ...ress the 1 ESC button to skip the current event 2 Navigating the menu Press the 2 UP and 3 DOWN arrow keys to select viewing items In the bottom row of the main menu View and Edit Event Logs the most...

Page 82: ...are Manual LCD panel menu and sub menu To enter the sub menus from the ready screen press and hold the Ent button for 2 seconds Once you re in the sub menus press and up and down key indicated by arro...

Page 83: ...has failed 2 BUSY White Flashing white indicates that there is active traffic on the host drive channels OFF indicates that there is no activity on the host drive channels 3 ATTEN Attention Red Red i...

Page 84: ...serviced or is requiring services OFF indicates that the system is not being serviced nor is requiring services Press and release it immediately mutes the audible alarm Press and hold for more than tw...

Page 85: ...the internal temperature has gone over the safety threshold 5 System fault Green Amber Green indicates that the system is operating normally Amber indicates that the system has encountered abnormal co...

Page 86: ...are as below Name Color Status HDD BAYS FULL Green Green indicates the drawer is full with hard drives OFF indicates the drawer is not full HDD FAIL Red Red indicates there is a hard drive failure OF...

Page 87: ...rs to which hard drive in the drawer Users need to open the drawer and locate the failed hard drive when the front panel drawer s HDD Fail LED lights up refer to Drawer Drawer Fan LED Replace a failed...

Page 88: ...have caused system faults It is also lit during the initialization process 2 C_Dirty Amber Amber indicates the following Cache Memory is dirty Data in flash backup module is being flushed to cache Err...

Page 89: ...n Amber Green indicates the CBM module is ready Both a BBU and flash modules are present Amber indicates CBM failure meaning either BBU or flash has failed When lit it also indicates either BBU or a f...

Page 90: ...ement port is located on each controller s faceplate Two LEDs indicate Ethernet connection speed and link status Designation Color Status 1 LAN Activity Green Blinking green indicates active data tran...

Page 91: ...have two LEDs displaying their operating status Designation Color Status 1 8 4 2G Green Amber Green indicates 8Gbps connection Amber indicates 4Gbps connection OFF indicates 2Gbps speed or no connecti...

Page 92: ...SI Host Port LEDs 1 2 Designation Color Status 1 Speed Green Green indicates currently connected with GbE speed OFF means connected with 10 100 speed 2 Link Status Green Green indicates the port is li...

Page 93: ...that a component failure has occurred It is also lit during the initialization process 2 SAS Speed Green Amber Green indicates 6Gbps link speed Amber indicates 3Gbps link speed OFF indicates no conne...

Page 94: ...oon as possible For detail fan IDs please refer to this section Designation Color Status 1 PSU status LED Green Red Off Blinking green indicates the system is connected to power supply but the power s...

Page 95: ...te actions to rectify the problem The alarm can be muted by pressing the mute button on the front panel The Alarm beep pattern is described in the Troubleshooting Guide included in the CD ROM NOTE Whe...

Page 96: ...efault settings for dual controller models follow these steps 1 Stop all host I Os i Save the current configuration by using the Save NVRAM Users can use the LCD panel refer to the illustration below...

Page 97: ...ore Def LED 2 turns on and the Default Restored firmware event message appear on the LCD you may release the Restore Default button the system default has been restored iv Power off the RAID system re...

Page 98: ...functions in the firmware ID LUN mapping will be restored Or 2 Use the LCD panel to restore ID LUN mapping settings refer to the illustration below Legend Ent Press the Enter Ent button Ent Press and...

Page 99: ...he Enter Ent button Ent Press and hold the Enter Ent button for 2 seconds Press the up and down arrow to scroll to the menu you are after 3 Make a list of the existing ID LUN mapping information refer...

Page 100: ...evious ID LUN mapping settings users may use the following options 3 Use the Restore NVRAM from Disks or Restore NVRAM from Files functions in the firmware ID LUN mapping will be restored Or 4 Use the...

Page 101: ...nserting a removable module do not use excessive force Forcing or slamming a module can damage the connector pins either on the module itself or on the backplane The following components can be replac...

Page 102: ...re please refer to a EonStor DS SANWatch User Manual on Upgrading the Firmware b Firmware Manual on System Functions Upgrading Firmware c To Use the LCD panel follow the illustration below Legend Ent...

Page 103: ...nnected to the controller module 6 Loosen the screw that secures the control module s ejection levers 7 Push the ejection levers down indicated by the blue arrows The controller module will automatica...

Page 104: ...tatus LED should turn on properly refer to Power On Status Check 12 For single controller models or replacing both controllers simultaneously Restoring NVRAM data To restore previous ID LUN mapping se...

Page 105: ...r for selecting a compatible DRAM module Reusing the DRAM module removed from a failed controller is not recommended unless you have a similar RAID system to test its integrity Installing the DRAM mod...

Page 106: ...ips on both ends 1 6 6 3 To install the separately purchased DRAM module simply match the notch at the bottom of the module to the corresponding slot notch Firmly push the module down onto the slot un...

Page 107: ...non volatile flash storage can store the data indefinitely WARNING Make sure you have the replacement module s in your hand before you attempt to replace the CBM Observe all BBU Warnings and Precauti...

Page 108: ...the 4 insertion slot and lowering it into the canister The orientation is shown above Carefully orient the BBU so that the 3 golden finger connector on the BBU is properly aligned with that on the cha...

Page 109: ...from the controller chassis 4 Pull the 5 retention latch away from the 6 FBM Use your finger nails if the FBM does not easily disengage Once released the flash module will pop up You can then remove i...

Page 110: ...ocated at the rear and there are 3 LEDs 1 status LED and 2 cooling fan LED refer to PSU LEDs for LED definitions Front panel LED status indicator refer to Front Panel Audible alarm refer to Audible Al...

Page 111: ...sis Hence the airflow provided by the cooling module is also disabled With an empty module bay airflow will also be disrupted It is therefore recommended the replacement procedure is completed in less...

Page 112: ...e sides of the handle can snap onto the metal 2 anchor pins placed along the interior walls of the PSU slot Push the PSU into 3 chassis and when you feel the contact resistance use slightly more force...

Page 113: ...If a cooling module fails the system notifies you through the following indicators Front panel LED status indicator refer to Front Panel Audible alarm refer to Audible Alarms Firmware utility refer t...

Page 114: ...their metal covers and avoid touching their circuits part and interface connectors To replace a hard drive follow these steps 1 Familiarize yourself with the hard drive allocation Use the firmware uti...

Page 115: ...ing your index finger around the bracket handle 5 Remove the hard drive brackets on the failed hard drive and secure it onto the replacement hard drive refer to Installing Hard Drives 6 Insert the har...

Page 116: ...ity Poor system performance Affect storage data integrity 5 7 1 Differential Diagnosis to Determine Backplane Failure Apart from obvious damage circuit exposure extreme enclosure deformation etc an in...

Page 117: ...echnical Support before going ahead with the enclosure replacement procedure 5 7 3 Enclosure Replacement Procedure The following steps describe the enclosure replacement procedure Step 1 In extreme ra...

Page 118: ...he rack Step 7 Reinsert all modules removed into the new enclosure and reconnect all cables Step 8 Power on the system and confirm module statuses by checking all status LEDs please refer to section C...

Page 119: ...ugh two SAS 4x wide ports Drive Interface Supports up to 24 channels of 3Gbps 6Gbps SAS or 3Gbps SATA II Drive Channels All drive channels are pre configured and cannot be changed 6 1 2 RAID Configura...

Page 120: ...that logical drive assemblies exist after controller replacement Failure Indicator Faults are indicated via alarm module LED indicators LCD panel SANWatch Manager or terminal emulation 6 1 3 Fault Tol...

Page 121: ...43A Max 5 0V 28A Max Input Frequency 47 to 63Hz AC Input 100VAC 10A or 240VAC 5A with PFC Power Factor Correction Yes Hold up Time At least 20ms at 115 230VAC full load after a loss of AC input I 2 C...

Page 122: ...Operating NA Non operating 15G half sine 11ms pulse width Vibration Random Operating 5 to 500Hz 0 17Grms X Y Z 30min Non operating 5 to 500Hz 1 5Grms X Y Z 30min Sine Operating NA Non operating 5 to 5...

Page 123: ...a fault condition 3 TDIS Transmitter Disable Module electrical input disables on high or open 4 MOD_DEF 2 Module definition 2 Two wire serial ID interface data line SDA 5 MOD_DEF 1 Module definition...

Page 124: ...ect Internal pullup 30K to Vcc 10 VEER Receiver Ground 11 VEER Receiver Ground 12 RD Inverse Received DATA Out 13 RD Received Data Out 14 VEER Receiver ground 15 VCCR Receiver power 3 3V 16 VCCT Trans...

Page 125: ...ort Pinouts for iSCSI Host RAID Models Pin Name Pin Name 1 BI_DA 5 BI_DC 2 BI_DA 6 BI_DB 3 BI_DB 7 BI_DD 4 BI_DC 8 BI_DD NOTE Automatic MDI MDI X Crossover Crossover can be implemented internally at h...

Page 126: ...ta 4 DTR1 Data Terminal Ready 5 GND Ground 6 DSR1 Data Set Ready 7 RTS1 Request to Send 8 CTS1 Clear to Send 9 RI1 Ringing indicator The DB 9 to DB9 Y cable connects the COM1 serial ports on redundant...

Page 127: ...EonStor DS S48 Series Hardware Manual 6 2 4 Ethernet Management Port Pinouts for RAID Models Pin Name Pin Name 1 LAN_TXP 5 N2 2 LAN_TXN 6 LAN_RXN 3 LAN_RXP 7 N1 4 N2 8 N1 127...

Page 128: ...AS host ports comply with the SFF 8088 specification JBOD Controller Pin Name Pin Name A1 GND B1 GND A2 RX0 B2 TX0 A3 RX0 B3 TX0 A4 GND B4 GND A5 RX1 B5 TX1 A6 RX1 B6 TX1 A7 GND B7 GND A8 RX2 B8 TX2 A...

Page 129: ...cessory Fibre Host RAID Models This shielded twisted pair cable is an optional accessory item More details are shown below Description SFTP CAT5E Ethernet cable Color black Connector 8P8C plug covered...

Page 130: ...60950 1 2 nd Edition GOST R GOST R 60950 1 2005 EMC EN 55022 2006 A1 2007 EN 55024 1998 A1 2001 A2 2003 EN 61000 3 2 2006 A1 2009 A2 2009 EN 61000 3 3 2008 BSMI CNS 13438 FCC FCC Part 15 subpart B Env...

Reviews: