
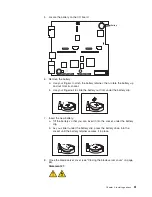

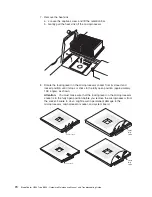


Note
the
alignment
of
the
heat-sink
retention
bracket
(the
arrow
on
the
bracket
aligns
with
the
arrow
on
the
processor
board).
You
will
need
to
align
the
bracket
the
same
way
when
reinstalling
it.
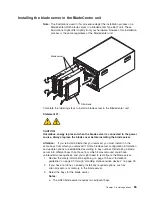
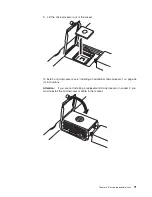
9.
Remove
the
processor
board
carefully
from
the
blade
server
chassis.
Reverse
these
steps
to
install
the
replacement
processor
board.
Note:
Two
self-adhesive
labels
come
with
the
processor
board.
Apply
one
on
top
of
the
existing
Ethernet
MAC
address
label
on
the
bottom
of
the
blade
chassis.
The
other
label
remains
with
the
owner.
I/O
board
When
replacing
the
I/O
board,
you
must
either
update
the
system
with
the
latest
firmware
or
restore
the
pre-existing
firmware
that
the
customer
provides
on
a
diskette
or
CD
image.
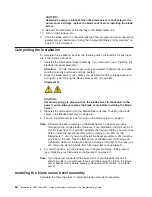
Note:
v
Read
“Installation
guidelines”
on
page
33.
v
Read
the
safety
notices
beginning
on
page
109.
v
Read
“Handling
electrostatic
discharge-sensitive
devices”
on
page
112.
Complete
the
following
steps
to
remove
the
I/O
board:
1.
Shut
down
the
operating
system,
and
turn
off
the
blade
server
(see
“Turning
off
the
blade
server”
on
page
7).
2.
Remove
the
blade
server
from
the
BladeCenter
unit
(see
“Removing
the
blade
server
from
the
BladeCenter
unit”
on
page
39).
3.
Remove
the
blade
server
bezel
assembly
(see
“Removing
the
blade
server
bezel
assembly”
on
page
42).
4.
Remove
the
blade
server
cover
(see
“Opening
the
blade
server
cover”
on
page
40)
or
SCSI
storage
expansion
unit
(see
“Installing
a
SCSI
storage
expansion
unit”
on
page
51).
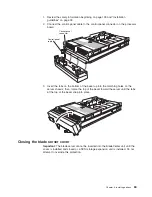
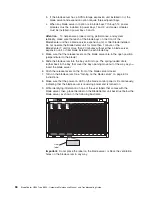
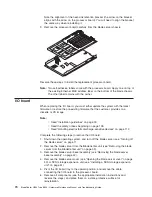
5.
Pivot
the
I/O
board
tray
to
the
upward
position,
and
remove
the
cable
connecting
the
I/O
board
to
the
processor
board.
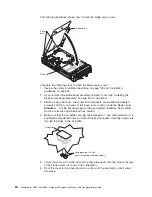
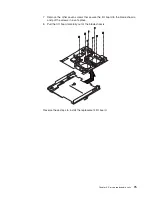
6.
Remove
all
components
(see
the
appropriate
installation
instructions
and
reverse
the
steps),
and
place
them
on
a
static-protective
surface
for
reinstallation.
74
BladeCenter
HS40
Type
8839:
Hardware
Maintenance
Manual
and
Troubleshooting
Guide
Summary of Contents for HS40 - BladeCenter - 8839
Page 1: ...BladeCenter HS40 Type 8839 Hardware Maintenance Manual and Troubleshooting Guide ERserver...
Page 2: ......
Page 3: ...BladeCenter HS40 Type 8839 Hardware Maintenance Manual and Troubleshooting Guide ERserver...
Page 6: ...iv BladeCenter HS40 Type 8839 Hardware Maintenance Manual and Troubleshooting Guide...
Page 10: ...viii BladeCenter HS40 Type 8839 Hardware Maintenance Manual and Troubleshooting Guide...
Page 20: ...10 BladeCenter HS40 Type 8839 Hardware Maintenance Manual and Troubleshooting Guide...
Page 30: ...20 BladeCenter HS40 Type 8839 Hardware Maintenance Manual and Troubleshooting Guide...
Page 42: ...32 BladeCenter HS40 Type 8839 Hardware Maintenance Manual and Troubleshooting Guide...
Page 86: ...76 BladeCenter HS40 Type 8839 Hardware Maintenance Manual and Troubleshooting Guide...
Page 114: ...104 BladeCenter HS40 Type 8839 Hardware Maintenance Manual and Troubleshooting Guide...
Page 131: ...Appendix B Safety information 121...
Page 132: ...122 BladeCenter HS40 Type 8839 Hardware Maintenance Manual and Troubleshooting Guide...
Page 133: ...Appendix B Safety information 123...
Page 134: ...124 BladeCenter HS40 Type 8839 Hardware Maintenance Manual and Troubleshooting Guide...
Page 135: ...Appendix B Safety information 125...
Page 136: ...126 BladeCenter HS40 Type 8839 Hardware Maintenance Manual and Troubleshooting Guide...
Page 137: ...Appendix B Safety information 127...
Page 149: ...Appendix B Safety information 139...
Page 150: ...140 BladeCenter HS40 Type 8839 Hardware Maintenance Manual and Troubleshooting Guide...
Page 151: ...Appendix B Safety information 141...
Page 152: ...142 BladeCenter HS40 Type 8839 Hardware Maintenance Manual and Troubleshooting Guide...
Page 153: ...Appendix B Safety information 143...
Page 154: ...144 BladeCenter HS40 Type 8839 Hardware Maintenance Manual and Troubleshooting Guide...
Page 166: ...156 BladeCenter HS40 Type 8839 Hardware Maintenance Manual and Troubleshooting Guide...
Page 171: ......
Page 172: ...Part Number 25K8105 Printed in USA 1P P N 25K8105...