background image

FusionModule5000 Smart Modular Data Center 
Installation Guide (Single-Row Aisle Containment with 
2000 mm High Cabinets, ECC800) 

6 Installing the Contained Aisles 


Issue 01 (2019-03-05) 

Huawei Proprietary and Confidential                                     

Copyright © Huawei Technologies Co., Ltd. 

86 


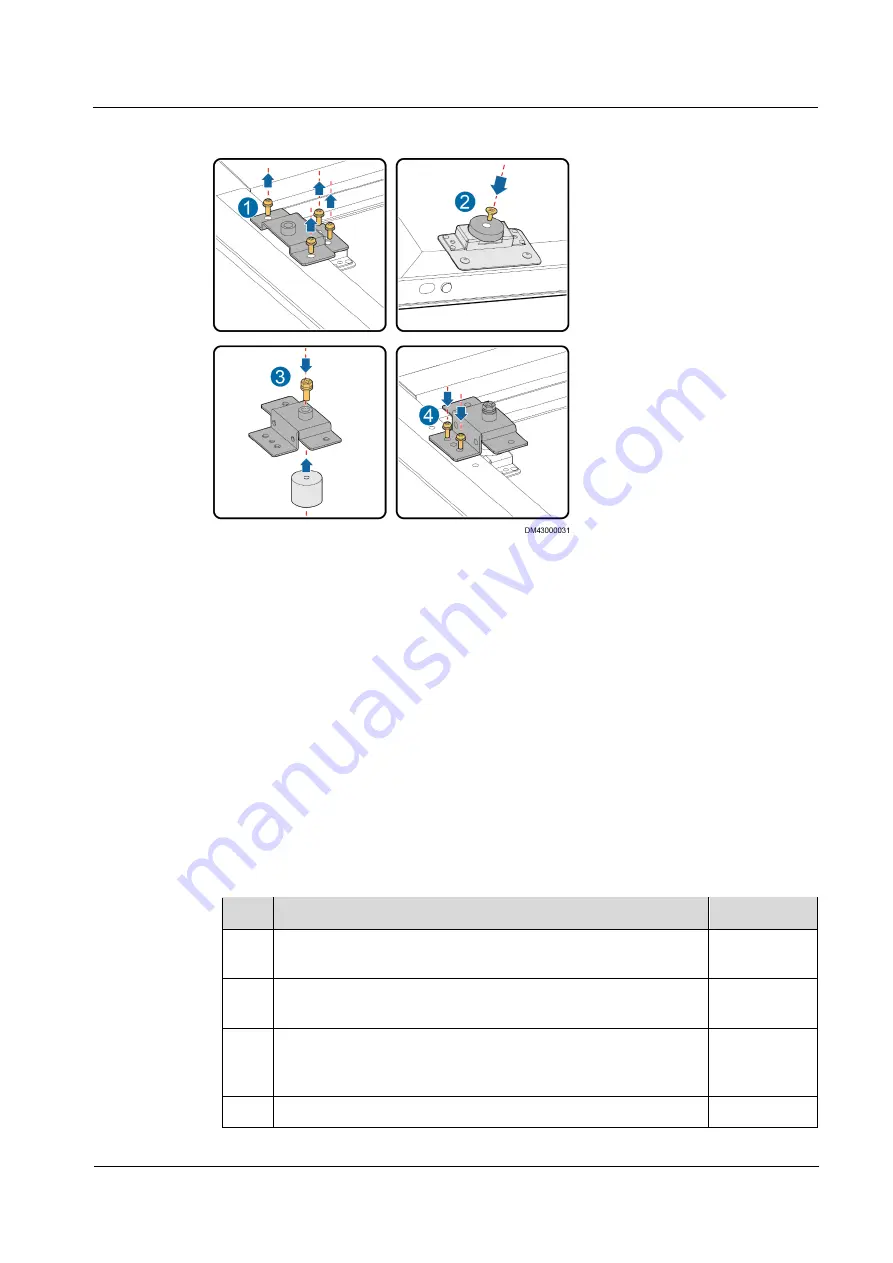
Figure 6-11


Installing a skylight magnetic lock 


Step 2


Secure the lock magnet to the magnet fixing base using one M4x10 countersunk screw, as 
shown by (2) i

Figure 6-11

. 

Step 3


Secure the magnetic lock to the lock base using one M6x16 screw, as shown by (3) i

Figure 

6-11

. 

Step 4


Secure the magnetic lock base to the rotating skylight using two M4x12 screws, as shown by 
(4) i

Figure 6-11

. 

----End 

6.3 Installing End Doors 

Table 6-1

 lists the items to be checked before end door installation.  

Table 6-1


Pre-installation checklist 

No. 

Check Item 

Result 

The cabinets are leveled. The height between the cabinet top and 
the floor surface is 2000 mm (+3 mm). 

□ Compliant 
□ Incompliant 

The distance between cabinet doors and enclosure plates inside 
the aisle containment is 1225 mm (±3 mm). 

□ Compliant 
□ Incompliant 

The cabinets and enclosure plates at both ends of an smart module 
are placed with a front-backward deviation no greater than 1.5 
mm. 

□ Compliant 
□ Incompliant 

The height deviation between the floor surface and support top is 

□ Compliant 

Summary of Contents for FusionModule5000

Page 1: ...FusionModule5000 Smart Modular Data Center V100R001 Installation Guide Single Row Aisle Containment with 2000 mm High Cabinets ECC800 Issue 01 Date 2019 03 05 HUAWEI TECHNOLOGIES CO LTD ...

Page 2: ... Huawei and the customer All or part of the products services and features described in this document may not be within the purchase scope or the usage scope Unless otherwise specified in the contract all statements information and recommendations in this document are provided AS IS without warranties guarantees or representations of any kind either express or implied The information in this docum...

Page 3: ...mbols that may be found in this document are defined as follows Symbol Description Indicates an imminently hazardous situation which if not avoided will result in death or serious injury Indicates a potentially hazardous situation which if not avoided could result in death or serious injury Indicates a potentially hazardous situation which if not avoided may result in minor or moderate injury Indi...

Page 4: ...is Document Issue 01 2019 03 05 Huawei Proprietary and Confidential Copyright Huawei Technologies Co Ltd iii Symbol Description deterioration Change History Changes between document issues are cumulative The latest document issue contains all updates made in previous issues Issue 01 2019 03 05 This issue is the first official release ...

Page 5: ...llation Process 15 2 Scenario Description Power Supply and Distribution Cabinet 17 3 Scenario Description New Main Way 19 4 Hardware Installation Preparations 21 4 1 Optional Installing Bases 21 4 1 1 Installing Adjustable Bases 21 4 1 1 1 Base Specifications 21 4 1 1 2 Precautions for Installing the Base 21 4 1 1 3 Optional Installing the Support for a Cabinet 22 4 1 1 3 1 Assembling a Base 22 4 ...

Page 6: ...t Bases 65 5 3 Installing Cabinets Without Bases 66 5 4 Installing Cabinet Accessories 70 5 4 1 Optional Taking Out PDU2000 Cables and Industrial Connectors 70 5 4 2 Optional Installing Branch Ground Copper Bars 72 5 4 3 Optional Installing the Vertical Ground Bar 73 5 4 4 Optional Setting a Mechanical Coded Lock 74 6 Installing the Contained Aisles 77 6 1 Installing Sealing Plates 77 6 2 Installi...

Page 7: ...9 8 3 Installing an Alarm Beacon 131 9 8 4 Optional Installing a Revolving Door Magnetic Lock 132 9 8 5 Installing Buttons 137 9 8 6 Installing the Pad Mounting Kit 138 9 8 6 1 Installing a Fingerprint and Card Reader 139 9 8 6 2 Installing a Fingerprint and Card Reader with a Keypad 140 9 8 6 3 Installing a Card Reader with a Keypad 141 9 8 6 4 Installing an IC Card Reader 142 9 8 6 5 Installing ...

Page 8: ...n Commissioning Process 195 14 2 Commissioning the Power Supply and Distribution System Power Supply and Distribution Cabinet 195 14 3 Commissioning the Power Supply and Distribution System New Main Way 196 14 4 Commissioning the Cooling System 196 14 5 Commissioning the Management System Power Supply and Distribution Cabinet 197 14 6 Commissioning the Management System New Main Way 198 A Appendix...

Page 9: ...Issue 01 2019 03 05 Huawei Proprietary and Confidential Copyright Huawei Technologies Co Ltd viii A 8 Cable Routes Inside an IT Cabinet 230 A 9 Optional Connecting the Linkage Cables Between the Fire Extinguishing System and Access Actuator 234 B Common Screw Torques 235 C Installation Verification 237 D Acronyms and Abbreviation 240 ...

Page 10: ...tion Insert the forks of the pallet truck in the middle position to ensure balance Choose railways sea or a road with good condition during transportation No excessive tilt or jolt is allowed during the transportation and the maximum tolerance of the tilting angle during loading and unloading is 15 as shown in Figure 1 1 To prevent the cabinet from falling over secure it to a pallet truck using ro...

Page 11: ...Arranging components 1 2 Unpacking and Acceptance Context Unpack and inspect all cabinets mechanical parts and components Check that all the items are intact and comply with the packing list on the presence of both the project supervisor and customer Procedure Step 1 Unpack the carton labeled Contain Packing List and take out the Packing List Step 2 Check all items against the Packing List Step 3 ...

Page 12: ...vironment meets the requirements before installation Table 1 1 Installation environment checklist Check Item Requirement Check Result Floor bearing capacity Standard live load of the equipment room 8 12 kN m2 If the battery cabinet is contained in the module use the standard live load of the equipment room as a reference Suspended load of the equipment room 1 2 kN m2 Standard live load of the UPS ...

Page 13: ...ce exceeds 10 ohms ensure that the equivalent ground radius of the ground grid exceeds 5 m Ground bars must be deployed over the cable tray or under the raised floor Compliant Incompliant Monitoring port One LAN switch Ethernet port connects to the customer subnet to monitor devices inside the module Optional Two fire control dry contacts access actuator and PDC fire control terminal connect to th...

Page 14: ... a single row aisle containment Figure 1 3 shows the height of each component in the smart module The maximum height of the module is the height when the skylight is open The maximum height is not exceeded if the camera support or fire extinguisher support is installed The clearance for fire extinguishing nozzles is subject to specific fire extinguishing requirements and is not considered in this ...

Page 15: ...module Figure 1 4 Smart module layout requirement 1 5 Site Requirements New Main Way Equipment Room Height Requirement Figure 1 5 shows the height of each component in single row aisle containment if 2000 mm high cabinets and the new main way are used The clearance for fire extinguishing nozzles is subject to specific fire extinguishing requirements and is not considered in this section Table 1 2 ...

Page 16: ...ntial Copyright Huawei Technologies Co Ltd 7 When the base is configured the equipment room net height equals the equipment room net height without base plus the base height Figure 1 5 Smart module height Cabinet height L1 2000 mm First row new main way height L2 455 mm Second row new main way height L3 675 mm Smart module layout requirement Figure 1 6 shows the layout requirement for the smart mo...

Page 17: ...e engineering designer or technical support engineer Quick Reference Guide to the Smart Modular Data Center Smart Module Quick Installation Guide describes the unpacking sequence installation procedure and installation precautions Smart Module Management System Wiring Diagram describes how to route cables for the management system The document is delivered with the device or you can click Download...

Page 18: ...ery arrangement and cable connections Delivered with battery cables iBAT 2 0 CIM01C2 User Manual Describes the installation cable connection and power on operations for the CIM and BIM Click Download ECC800 Data Center Controller ECC Version User Manual Describes the overview of the ECC800 and its ports installation commissioning user interfaces maintenance and troubleshooting The ECC version depe...

Page 19: ...e Protective gloves Marker Measuring tape 5 m Level Step ladder 2 m Phillips screwdriver M4 M6 and M8 Phillips screwdriver M4 length 100 mm Flat head screwdriver 2 5 mm Adjustable wrench 6 Socket wrench M4 M6 M8 M12 Hex key Box end wrench M6 M8 and M12 Torque wrench 28 mm Solid wrench 12 13 18 Cotton cloth Labels Electric screwdriver Hand drill Φ3 Φ3 7 Φ4 Φ4 5 Φ5 Φ6 Φ10 and Φ12 drill bits Hammer d...

Page 20: ...Huawei Technologies Co Ltd 11 Name Specifications and Appearance tape Needle nose pliers Diagonal pliers RJ45 crimping tool Crimping tool Wire stripper Hydraulic pliers Wire clippers Cable ties Multimeter Electroprobe Brush Claw hammer Vacuum cleaner Hacksaw Handsaw Right angle Heat shrink tubing Network cable tester Rubber mallet Adjustable socket screwdriver Flashlight Clamp meter Phase sequence...

Page 21: ...tion personnel and technical support personnel should prepare tools based on site requirements Table 1 5 Transportation and unpacking tools Tool Appearance Specifications and Name Pallet truck Diesel forklift Lifting rope bearing capacity 400 kg Lever bearing capacity 400 kg Table 1 6 Air conditioner tools Tool Appearance Specifications and Name 36 mm adjustable wrench 2 PCS Socket wrench M10 M12 ...

Page 22: ...cations and Name Fluorine injection hose Reducing valve N A N A N A N A 1 8 Tools Delivered with Equipment Marking off Template A marking off template is used for drawing lines to determine an installation position There are two types of marking off templates which are available in the No 0 package The two types of marking off templates are used respectively for cabinets that are 1100 mm and 1200 ...

Page 23: ...tainment with 2000 mm High Cabinets ECC800 1 Installation Preparations Issue 01 2019 03 05 Huawei Proprietary and Confidential Copyright Huawei Technologies Co Ltd 14 Figure 1 7 Marking off template for a 1100 mm deep cabinet Figure 1 8 Marking off template for a 1200 mm deep cabinet ...

Page 24: ...erstand basic safety precautions are allowed to install and operate a modular data center Huawei will not be liable for any consequence caused by the violation of this document The requirements are as follows Customers installation personnel must be trained by Huawei and understand how to install and operate a modular data center The number of installation personnel varies depending on the project...

Page 25: ...er Installation Guide Single Row Aisle Containment with 2000 mm High Cabinets ECC800 1 Installation Preparations Issue 01 2019 03 05 Huawei Proprietary and Confidential Copyright Huawei Technologies Co Ltd 16 Figure 1 10 Installation process ...

Page 26: ... diagram and actual objects The PDC in smart module A is an integrated UPS with batteries deployed inside the aisle containment The PDC in smart module B is a precision PDC with batteries and UPS deployed outside the aisle containment The PDC in smart module A with batteries deployed outside is an integrated UPS with batteries deployed outside the aisle containment It is recommended that two air c...

Page 27: ...e 01 2019 03 05 Huawei Proprietary and Confidential Copyright Huawei Technologies Co Ltd 18 Figure 2 1 Floor plan of the single row aisle containment 1 2 m deep IT cabinet Figure 2 2 Exterior of the single row aisle containment 1 End door 2 Flat or rotating skylight 3 Control skylight 4 Cable trough 5 Smart ETH gateway 6 Cabinet 7 For the alarm beacon 8 For the pad 9 For the access control ...

Page 28: ...and actual objects The PDC in smart module A is an integrated UPS with batteries deployed inside the aisle containment The PDC in smart module B is a precision PDC with batteries and UPS deployed outside the aisle containment The PDC in smart module A is an integrated UPS with batteries deployed outside the aisle containment It is recommended that two air conditioners with the heating and humidifi...

Page 29: ...Confidential Copyright Huawei Technologies Co Ltd 20 Figure 3 1 Floor plan of the single row aisle containment 1 2 m deep IT cabinet Figure 3 2 Exterior of the single row aisle containment 1 General input unit 2 Control skylight 3 For the alarm beacon 4 Power distribution unit 5 Busbar trunking unit 6 Flat or rotating skylight 7 Cable trough 8 Cabinet 9 For the pad 10 For the access control 11 End...

Page 30: ...abinets For details about the base dimensions click Download 4 1 1 2 Precautions for Installing the Base The bearing capacity of each base is 2 tons or more Assume that each row of cabinets is configured with N bases If N is less than 5 you can install all the bases at a time After installation check that the total length of each row of bases is the sum of nominal widths of all bases tolerance 3 m...

Page 31: ...ate locations you are advised to determine base locations using a laser locator before installing bases L1 L2 5 mm L3 L4 5 mm Figure 4 1 Base layout unit mm 4 1 1 3 Optional Installing the Support for a Cabinet 4 1 1 3 1 Assembling a Base Before installing a base assemble it first Procedure Step 1 Adjust the base height 1 Measure the distance H between the concrete floor and the upper surface of t...

Page 32: ...wei Proprietary and Confidential Copyright Huawei Technologies Co Ltd 23 Figure 4 2 Measuring the floor height 2 Adjust the base height to H based on the measured value as shown by 1 in Figure 4 3 3 Partially tighten the height locking bolts on two sides as shown by 2 in Figure 4 3 Figure 4 3 Partially tightening the height locking bolts Step 2 Assemble the base as shown in Figure 4 4 ...

Page 33: ...s and then tighten all bolt assemblies using a Phillips screwdriver as shown by 2 in Figure 4 4 4 Tighten all height locking bolts using a torque wrench as shown by 3 in Figure 4 4 End 4 1 1 3 2 Positioning Bases Procedure Step 1 Determine the correct installation position for the smart module based on the onsite engineering layout diagram Step 2 Use a laser locator to mark two lines that are perp...

Page 34: ...ositioning in the one row cabinet scenario 1 Cabinet outline 2 Laser locator 3 Contained aisle Step 4 Use a right angle to position the end cabinet base and ensure that the outline of the upper surface of the base aligns with the cabinet bottom outline on the floor as shown in Figure 4 6 Figure 4 6 Positioning the first base Step 5 Use the end cabinet base as the reference and place other cabinet ...

Page 35: ...nfidential Copyright Huawei Technologies Co Ltd 26 Figure 4 7 Positioning combined bases Step 7 Check that L1 L2 L3 and L4 meet the following requirements L1 L2 5 mm and L3 L4 5 mm as shown in Figure 4 8 Figure 4 8 Base layout unit mm Step 8 Use a marker to mark the hole positions as shown by 2 in Figure 4 7 End 4 1 1 3 3 Securing Bases Prerequisites The positions for installing bases have been de...

Page 36: ...ound mark the positions again and drill new holes Step 3 Deploy the base again adjust the base position and partially tighten the expansion bolts Step 4 Measure the levelness of the base using a level as shown by 1 in Figure 4 10 Step 5 If the base is not level put spacers under it as shown by 2 in Figure 4 10 Step 6 Tighten the four expansion bolts using a torque wrench as shown by 3 in Figure 4 ...

Page 37: ...awei Technologies Co Ltd 28 Figure 4 11 Connecting bases End Result After securing bases ensure that adjacent bases are in close contact with each other and the gap is even 4 1 2 Installing Fixed Size Bases 4 1 2 1 Deploying a 300 mm Wide Air Conditioner Base Context A 300 mm wide fixed base adapts to a 300 mm wide air conditioner The BOM number for a 300 mm wide fixed base is 21152146 Figure 4 12...

Page 38: ...ing upwards After deploying the base check that the adjustable feet for the base should be installed at the front door of the air conditioner Figure 4 12 300 mm wide fixed base Procedure Step 1 Adjust the adjustable feet for the base 1 Remove the four M6 screws from the support to split the adjustable feet from the base as shown in Figure 4 13 and set aside the screws Figure 4 13 Removing adjustab...

Page 39: ... 14 Figure 4 14 Reinstalling adjustable feet 4 Deploy the adjustable base on the concrete floor based on the site engineering layout diagram End 4 1 2 2 Deploying Bases for a 600 mm wide IT Cabinet Battery Cabinet Network Cabinet The 600 mm wide fixed bases are used for the 600 mm wide IT cabinet network cabinet and battery cabinet The BOM number is 21151123 Figure 4 15 shows a 600 mm wide fixed b...

Page 40: ...00 4 Hardware Installation Preparations Issue 01 2019 03 05 Huawei Proprietary and Confidential Copyright Huawei Technologies Co Ltd 31 Figure 4 15 600 mm wide fixed base 4 1 2 3 Deploying the 600 mm Wide PDC Base Context Figure 4 16 shows a 600 mm wide adjustable base Figure 4 16 600 mm wide adjustable base used for a PDC ...

Page 41: ...DC base to the cabinet rear close to the rear door of the cabinet This section takes adjusting the adjustable legs of the PDC in hot aisle containment as an example to illustrate how to adjust adjustable legs Procedure Step 1 Remove the four M6 screws from the support to split the adjustable feet from the base as shown in Figure 4 17 Figure 4 17 Removing adjustable feet Step 2 Move the adjustable ...

Page 42: ...ploy the adjusted 600 mm wide base on the concrete floor based on the installation layout Step 5 Deploy other 600 mm wide adjustable bases in the same way End 4 1 2 4 Deploying 800 mm Wide Fixed Bases The 800 mm wide fixed bases are used for 800 mm wide IT cabinets and network cabinets The BOM number is 21151125 Figure 4 19 shows an 800 mm wide fixed base Deploy 800 mm wide fixed bases on the conc...

Page 43: ...ing the four supports of the base and secure the base to the concrete floor using four expansion bolts 800 mm wide fixed base 300 mm wide fixed base Drill holes at positions for installing the six supports of the base and secure the base to the concrete floor using six expansion bolts 600 mm adjustable base Procedure Step 1 Optional If the ground is not flat place a washer 0 5 mm 1 0 mm or 2 0 mm ...

Page 44: ... bolt as shown in Figure 4 21 1 Vertically insert an expansion bolt into a hole and drive the expansion bolt completely into the hole using a rubber mallet 2 Rotate the expansion bolt clockwise using a wrench until the expansion sleeve fully expands 3 Rotate the expansion bolt counterclockwise to remove it together with the spring washer and flat washer Figure 4 21 Installing an expansion bolt Ste...

Page 45: ...the adjacent bases using two M8 screws and nuts as shown in Figure 4 23 Figure 4 23 Connecting the base to the adjacent bases Step 9 Follow the preceding steps to install other bases End 4 2 Preparing for Installing Air Conditioners 4 2 1 Material Preparations Materials are classified to Huawei provided self purchased and onsite prepared materials which are marked as mandatory optional and enginee...

Page 46: ...nner diameter 25 mm Engineering purchasing Humidifier water inlet pipe Connects to the hose pagoda connector rubber hose and hose clamp Connects to the rigid pipe connector PPR pipe or galvanized pipe Engineering purchasing Condensate water pump drainpipe DN4 external diameter Φ 6 mm Standard configuration delivered with the product Automatic condensate drainpipe Rubber hose rigid PPR or aluminum ...

Page 47: ... follows Applicable to all pipe materials Anaerobic metal pipe thread sealant with PTEF as the padding Glycol solution resistant fit for threads and pipes Maximum gap 0 5 mm Pressure resistance above 3 MPa Compliant with the industry standard JB T7311 2008 Technical Specification for the Application of Anaerobic Glue in Engineering Machinery Engineering purchasing Flange and sealing gasket DN80 En...

Page 48: ...sion level 2 5 Operating environment 40 C to 70 C Temperature influence 0 4 10 C operating temperature 20 C 5 C Test pressure range 1 2 2 5 MPa Engineering purchasing based on the system solution Figure 4 24 Pipe support unit mm Height of the U shaped clamp H Pipe diameter with thermal insulation foam 5 mm When the pipe is straight add a support every 2500 mm When the direction of the pipe is chan...

Page 49: ...f EPDM or other materials to be purchased Table 4 3 and Figure 4 26 illustrate how to connect water inlet and outlet pipes to reserved ports in the cabinet Table 4 3 Method for connecting water inlet and outlet pipes Category Required Materials Operation A in Figure 4 26 Pagoda connector clamp Insert the lower part of the water pipe conversion adapter into the rubber hose and secure them using a c...

Page 50: ... 1 Reserved port 1 inch BSPT external threaded connector 2 Pagoda connector DN25 standard configuration delivered with the product 3 Clamp standard configuration delivered with the product 4 Rubber hose DN25 recommended to be purchased 5 Conversion adapter 1 inch BSPP the inner screw thread joint to be purchased 6 Rigid PPR or aluminum plastic pipe DN32 recommended to be purchased 7 Stainless corr...

Page 51: ...configuratio n delivered with the product NetCol500 0 C030H7 with heating and humidificat ion Common power cable power cable 300 V 500 V 3x6 0 mm2 black 3 core cable colors blue brown and yellow green Backup power cable power cable 300 V 500 V 3x2 5 mm2 black 3 core cable colors blue brown and yellow green 2 PCS Optional Cord end terminal of the common power cable 6 0 mm2 Cord end terminal of the ...

Page 52: ...idificat ion Minimum specifications for the common power cable AC circuit breaker 230 400 V 40 A 2P C feature 1 PCS Engineering purchasing Minimum specifications for the backup power cable AC circuit breaker 230 400 V 10 A 2P C feature 1 PCS Engineering purchasing Teamwork networking and monitoring cable 10 m 1 PCS Standard configuratio n delivered with the product PE cable outside the cabinet 6 m...

Page 53: ...t the air filters Step 3 Take out the desiccant bag in the inner side of the post in the lower right corner of the rear door Step 4 Open the exhaust valve shown in Figure 4 28 and release gas through the hose Before opening exhaust value open the chilled water vale to the maximum scale If gas emits the system is normal Slowly open the exhaust valve to discharge nitrogen and close the valve when th...

Page 54: ...d water valve is tightly wrapped by thermal insulation foam 4 2 3 Installing Water Pipe Adapters Context As illustrated in Table 4 3 and Figure 4 26 there are three methods to connect water inlet or outlet pipes to reserved ports in the cabinet Accordingly there are three methods to install water pipe adapters If the NetCol520 is deployed use method A shown in Figure 4 26 to connect water inlet or...

Page 55: ... the other 36 mm wrench to tighten the nut to avoid pipe deformation The wrench securing the plug is shown by 3 in Figure 4 30 4 Remove the sealant residues from the threaded joints using a steel brush Ensure that the residues do not fall into the water pan Clean the threaded connector as shown by 4 in Figure 4 30 5 For internal screw threads apply thread sealant to the first to third thread circl...

Page 56: ...en heating the screw threads avoid burning the component and labels around Figure 4 30 Removing a plug and installing a conversion adapter Routing pipes from the bottom is used as an example in Figure 4 30 and it is the same as routing pipes from the top Step 3 Install the side panels End 4 2 4 Removing Transportation Fasteners for the Air Conditioner Context This step applies to the model with 11...

Page 57: ...Ltd 48 Procedure Step 1 Optional Remove the two transportation fasteners from the front door using a Phillips screwdriver as shown in Figure 4 31 Figure 4 31 Removing transportation fasteners End 4 3 Removing Pallets To avoid personal injury three to four persons need to work together when moving a cabinet When moving a cabinet verify that any open doors do not fall off The cabinet with castors ca...

Page 58: ...ndition and the PDC needs to be stored for a long time after it is unpacked take measures to prevent dust It is recommended that the PDC be wrapped with the original plastic coat Procedure Step 1 Use a forklift truck to transport the PDC to the installation position Step 2 Check whether the PDC packing is intact Step 3 Cut and remove the binding tape and remove the packing Step 4 Remove the plasti...

Page 59: ...Copyright Huawei Technologies Co Ltd 50 Figure 4 32 Removing the L shaped bracket Ensure that the sliding plates are properly installed in step 2 in Figure 4 32 Otherwise the sliding plates may shift when the PDC is unloaded Step 7 Raise the four leveling feet using an adjustable wrench as shown in Figure 4 33 Figure 4 33 Raising the leveling feet Step 8 Move the PDC over its castors to the instal...

Page 60: ...nd IT cabinet Refer to this section when removing the cabinet pallets When removing the pallet for a 2000 mm high cabinet adjust the anchor bolts counterclockwise using a wrench until the cabinet castors come in contact with the floor so that the cabinet can be moved over the castors Procedure Step 1 Move the cabinet to the planned installation position Step 2 Remove the screws that secure the cab...

Page 61: ...lts securing the connecting kit at the rear door of the cabinet to the pallet 2 Remove the two M12 bolts securing the connecting kit at the rear door of the cabinet to the cabinet 3 Pull out the connecting kit Step 2 Open the front door Use the method described in Step 1 to remove the kit connecting the plate to the cabinet at the front door as shown in Figure 4 35 Properly store the bolts If a su...

Page 62: ...Ltd 53 persons carry the equipment Force bearing area is shown in Figure 4 36 The other two hold it to prevent tilting Then install the side panel Exercise caution when moving the cabinet to prevent falling down Figure 4 36 Transport End 4 4 Adjusting the Baffle Plate for the Air Conditioner Context Perform the following procedure to change the position of the baffle plate if required Procedure St...

Page 63: ...e 4 37 Step 3 Rotate the baffle plate 60 degrees After the direction is adjusted secure the removed screw to the other reserved hole and tighten the other two screws as shown by 3 in Figure 4 37 End 4 5 Optional Adjusting IT Cabinet Side Plates Context IT cabinets are not furnished with all side plates Before installing an IT cabinet adjust the side plate position based on the side plate labels an...

Page 64: ...low up Procedure After adjusting side plates remove the labels on the plates 4 6 Optional Adjusting Battery Cabinet Side Plates If an auxiliary battery cabinet no circuit breaker is deployed in the smart module remove the plate on one side of the main battery cabinet and install the side plate on the outer side of the auxiliary cabinet based on the label on the main battery cabinet Ensure that the...

Page 65: ...pyright Huawei Technologies Co Ltd 56 4 7 Optional Installing the PDC Tail Frame Context A tail frame is used to increase the depth of a PDC to 1200 mm Its bill of materials BOM number is 21242025 Figure 4 39 shows the effect of tail frame installation Figure 4 39 Installed tail frame 1 Tail frame Procedure Step 1 Use eight M5 tapping screws to secure the tail frame accessories to the tail frame a...

Page 66: ...ry and Confidential Copyright Huawei Technologies Co Ltd 57 Figure 4 40 Securing the tail frame accessories Step 2 Use four M5 tapping screws to secure one upper sealing plate to the tail frame as shown in Figure 4 42 There are two upper sealing plates and the one used in this step has a gap Figure 4 41 shows the upper sealing plates of a tail frame Figure 4 41 Upper sealing plates of a tail frame...

Page 67: ...19 03 05 Huawei Proprietary and Confidential Copyright Huawei Technologies Co Ltd 58 Figure 4 42 Installing the upper sealing plates of a tail frame Step 3 Open the PDC rear door and remove it as shown in Figure 4 43 When removing the cabinet rear door remove the ground cable between the cabinet and the rear door from the cabinet Figure 4 43 Removing the cabinet rear door ...

Page 68: ...ates from the PDC rear door as shown in Figure 4 44 Put aside the hinges and connecting plates as they are needed in follow up installation processes Figure 4 44 Removing the PDC rear door mounting kit Step 5 Move the tail frame installed with accessories and upper sealing plates to the cabinet rear door and adjust the anchor bolts of the tail frame so that the fail frame top is flush with the cab...

Page 69: ...uld face the cabinet bottom Figure 4 45 Securing the tail frame Step 7 Install the hinges and connecting plates removed in Step 4 on the corresponding positions on the tail frame Step 8 Install the PDC rear door on the tail frame After installing the PDC rear door ensure that ground cables are properly connected to the cabinet and PDC rear door End 4 8 Routing Air Conditioner Pipes Preinstall the ...

Page 70: ...inment with 2000 mm High Cabinets ECC800 4 Hardware Installation Preparations Issue 01 2019 03 05 Huawei Proprietary and Confidential Copyright Huawei Technologies Co Ltd 61 Simplified Edition The documents are delivered with the product You can also download them by clicking Download ...

Page 71: ...p of the cabinet and the floor is 2000 mm 3 mm for a 2000 mm high cabinet Use a level to check that the cabinet is level Do not remove the anchor bolts Otherwise rework is required if the cabinet height does not meet requirements Anchor bolt adjustment method Wrench an anchor bolt clockwise to elevate a cabinet leg or wrench an anchor bolt anticlockwise to lower it The anchor bolts can be adjusted...

Page 72: ...and Confidential Copyright Huawei Technologies Co Ltd 63 Figure 5 1 Leveling a cabinet 1 Level Step 3 Interconnect adjacent cabinets as shown in Figure 5 2 1 Remove the M5x10 tapping screws that secure the connecting kits and then remove the connecting kits 2 Remove M4x10 screw assemblies from the position for combining cabinets 3 Secure the connecting kit using the M4x10 screw assemblies ...

Page 73: ... Row Aisle Containment with 2000 mm High Cabinets ECC800 5 Installing the Cabinet Issue 01 2019 03 05 Huawei Proprietary and Confidential Copyright Huawei Technologies Co Ltd 64 Figure 5 2 Interconnecting cabinets Step 4 Secure the cabinet Figure 5 3 Securing a cabinet ...

Page 74: ...Determine the correct installation position for the smart module based on the onsite engineering layout diagram Step 2 Use a laser locator to mark two lines that are perpendicular to each other in a corner of the planned installation position If no laser locator is available use a right angle and thin rope for marking the two perpendicular lines Step 3 Place one corner of the marking off template ...

Page 75: ... the floor mark only the outline of the marking off template Figure 5 4 Using a laser locator for positioning 1 Marking off template 2 Contained aisle 3 Laser locator Step 4 Use a measuring tape to measure the aisle distance and mark the position for the end cabinet in the other row in the same way Step 5 Optional Drill holes into the marked hole positions and install expansion bolts The M12 expan...

Page 76: ... bolts Otherwise rework is required if the cabinet height does not meet requirements Anchor bolt adjustment method Wrench an anchor bolt clockwise to elevate a cabinet leg or wrench an anchor bolt anticlockwise to lower it The anchor bolts can be adjusted within a range of 0 8 mm Levelness check standard Ensure that the cabinet is level in width and depth directions when leveling the cabinet Put a...

Page 77: ...and Confidential Copyright Huawei Technologies Co Ltd 68 Figure 5 6 Leveling a cabinet 1 Level Step 3 Interconnect adjacent cabinets as shown in Figure 5 7 1 Remove the M5x10 tapping screws that secure the connecting kits and then remove the connecting kits 2 Remove M4x10 screw assemblies from the position for combining cabinets 3 Secure the connecting kit using the M4x10 screw assemblies ...

Page 78: ...th 2000 mm High Cabinets ECC800 5 Installing the Cabinet Issue 01 2019 03 05 Huawei Proprietary and Confidential Copyright Huawei Technologies Co Ltd 69 Figure 5 7 Interconnecting cabinets Step 4 Install other cabinets in a similar way Step 5 Optional Secure the cabinets as shown in Figure 5 8 ...

Page 79: ...opyright Huawei Technologies Co Ltd 70 Figure 5 8 Securing a cabinet End 5 4 Installing Cabinet Accessories 5 4 1 Optional Taking Out PDU2000 Cables and Industrial Connectors Prerequisites PDU2000s are equipped with industrial connectors Procedure Step 1 Remove the rodent proof mesh on the top of the PDU2000 in a cabinet and take out the two PDU2000 industrial connectors from the top as shown in F...

Page 80: ...l connectors Step 2 Lay out the PDU2000 industrial connectors and cables on the cabinet top and reinstall the rodent proof mesh as shown in Figure 5 10 Cut the rodent proof mesh based on the cable thickness using diagonal pliers If the opening is too large unwanted things may fall into the cabinet through the opening Figure 5 10 Laying out PDU2000 industrial connectors and cables Repeat the preced...

Page 81: ... bar over ground cables with a minimum cross sectional area of 16 mm2 If many cabinets are deployed branch ground copper bars can be installed in certain cabinets so that nearby cabinets can be grounded by connecting to the ground bars Install one branch ground copper bar with a BOM number of 21170398 inside the battery cabinet or IT cabinet closest to the PDC for each row of cabinets Procedure St...

Page 82: ... Technologies Co Ltd 73 Figure 5 12 Installing a ground bar End 5 4 3 Optional Installing the Vertical Ground Bar Context The BOM number for the vertical ground bar is 21241363 Procedure Step 1 Open the rear cabinet door and secure the ground bar to the right rack rail by installing four M4 screws respectively at the 04 U 14 U 29 U and 39 U positions Note that a screw should be secured to the midd...

Page 83: ... and Confidential Copyright Huawei Technologies Co Ltd 74 Figure 5 13 Installing a vertical ground bar End 5 4 4 Optional Setting a Mechanical Coded Lock Context The mechanical coded lock for a cabinet can be unlocked with a key or password Unlocking with a Key Step 1 Insert the cabinet key into the lock hole and turn it for 180 degrees counterclockwise to unlock as shown in Figure 5 14 ...

Page 84: ...Cabinet Issue 01 2019 03 05 Huawei Proprietary and Confidential Copyright Huawei Technologies Co Ltd 75 Figure 5 14 Unlocking with a key End Unlocking with a Password Step 1 Enter the password and turn the knob for 180 degrees counterclockwise to unlock as shown in Figure 5 15 The preset password is 0 0 0 Figure 5 15 Unlocking with a password ...

Page 85: ... Ltd 76 End Changing the Password Step 1 Enter the old password and turn the knob to unlock If you forgot the password use the cabinet key to unlock and change the password in the same way Step 2 After the knob indicator indicates Open turn the knob for 15 degrees counterclockwise to change the password as shown in Figure 5 16 Figure 5 16 Changing the password Step 3 Turn the knob for 15 degrees c...

Page 86: ...wide and 2000 mm high Sealing plates 21500720 apply to cabinets that are 800 mm wide and 2000 mm high If sealing plates should be less than 300 mm away from a wall adjust the installation sequence of the aisle containment 1 Secure the sealing plates and skylight connective plates for the end cabinets 2 Secure the sealing plates to the floor 3 Install the skylights 4 Install other sealing plates an...

Page 87: ...a sealing plate keep the smooth plane facing the outside of the contained aisle Keep the end with rivet nuts facing upward and the end with holes facing downward Ensure that the side of cabinets is on the same plane as the side of the sealing plates Step 3 Optional If the floor is uneven add a 1 0 mm or 2 0 mm high pad under the lower sealing plate as shown by 1 in Figure 6 1 Step 4 Secure the sea...

Page 88: ... Place adjacent sealing plates in the same way Step 6 Interconnect adjacent sealing plates using three M6x16 screws with flat washers and nuts as shown by 3 in Figure 6 1 Step 7 Install other sealing plates in the same way End 6 2 Installing Skylights 6 2 1 Skylight Overview 6 2 1 1 600 mm Wide Control Skylight Figure 6 2 shows a 600 mm wide control skylight Its BOM number is 21242009 Figure 6 2 6...

Page 89: ...wide control skylight Its BOM number is 21242012 Figure 6 3 800 mm wide control skylight 1 Skylight connective plate 2 Control skylight panel 3 Cable separation panel The 800 mm wide control skylight is used to install monitoring components such as the camera multi functional sensor or smoke detector It is used with 800 mm wide cabinets at the end of the smart module 6 2 1 3 600 mm Wide Flat or Ro...

Page 90: ...t 1 Magnetic lock fixing base 2 Skylight connective plate 3 Flat skylight panel Figure 6 5 600 mm wide rotating skylight 1 Magnetic lock 2 Skylight connective plate 3 Rotating skylight panel 6 2 1 4 800 mm Wide Flat or Rotating Skylight The BOM numbers of 800 mm wide rotating and flat skylights are the same 21501039 The rotating skylight requires a magnetic lock but the flat skylight does not Figu...

Page 91: ...etary and Confidential Copyright Huawei Technologies Co Ltd 82 Figure 6 6 800 mm wide flat skylight 1 Magnetic lock fixing base 2 Skylight connective plate 3 Flat skylight panel Figure 6 7 800 mm wide rotating skylight 1 Magnetic lock 2 Skylight connective plate 3 Rotating skylight panel 6 2 1 5 300 mm Wide Flat Skylight Figure 6 8 shows a 300 mm wide flat skylight Its BOM number is 21501040 ...

Page 92: ...ylights one by one from one end of the smart module based on the onsite engineering layout diagram The recommended skylight layout is as follows Install control skylights at the outermost positions at both ends of the aisle Deploy rotating skylights and flat skylights alternately Preferentially deploy rotating skylights beside control skylights Procedure Step 1 Keep the skylight connective plates ...

Page 93: ...nnective plates as shown by 2 and 3 in Figure 6 9 The number of M6x16 screws must be the same as the number of rivet nuts on the end plane of the skylight connective plates When placing a flat or rotating skylight panel put the part with a magnetic lock fixing base on the cabinet side Place the skylight based on the Keep direction label on the flat or rotating skylight Step 3 Install adjacent skyl...

Page 94: ...igure 6 10 Connecting adjacent skylight connective plates Step 5 Install other skylights in the same way Step 6 Tighten the screws on the skylight connective plates End 6 2 3 Installing a Rotating Skylight Magnetic Lock Context The BOM number of a rotating skylight magnetic lock is 02070140 Procedure Step 1 Remove the four M4x12 screws set aside from the magnetic lock base and take off the lock ba...

Page 95: ... the magnetic lock base to the rotating skylight using two M4x12 screws as shown by 4 in Figure 6 11 End 6 3 Installing End Doors Table 6 1 lists the items to be checked before end door installation Table 6 1 Pre installation checklist No Check Item Result 1 The cabinets are leveled The height between the cabinet top and the floor surface is 2000 mm 3 mm Compliant Incompliant 2 The distance betwee...

Page 96: ...m of a 2000 mm high cabinet placed at the end of an aisle containment and consist of five components as shown in Figure 6 12 Figure 6 12 Assembled cabinet lower mounting kits 1 Side sealing plate 2 Front or rear sealing plate The front and rear sealing plates are each assembled by two components The length after assembly can be 600 mm or 800 mm Procedure Step 1 Take the six components of the aisle...

Page 97: ...ght Huawei Technologies Co Ltd 88 Figure 6 13 Assembling the front and rear sealing plates Step 2 Secure the front and rear sealing plates to the cabinet using four M5x10 tapping screws as shown by 1 in Figure 6 14 Figure 6 14 Securing a sealing plate Step 3 Place the side sealing plate with the side with dents upward and snap the side sealing plate into the front and rear sealing plates as shown ...

Page 98: ...d upper frame mounting kit with six M6 screw assemblies as shown by 3 in Figure 6 15 3 After the assembly is complete verify that the posts are flush with the upper frame mounting kit Store the side plates you removed from the door frame Figure 6 15 Assembling a door frame Step 2 Install the door frame 1 Stand the assembled door frame 2 Partially secure do not fully tighten the fasteners left and ...

Page 99: ...ary and Confidential Copyright Huawei Technologies Co Ltd 90 Figure 6 16 Installing a door frame 4 Tighten all screws on the door frame Step 3 Secure the door panels Before securing door panels measure the door panel size The door panels should be 2045 mm 2 mm long and 600 5 mm 2 mm wide 1 Stand the door panels and remove the four rubber strips from the two door panels as shown in Figure 6 17 ...

Page 100: ...Copyright Huawei Technologies Co Ltd 91 Figure 6 17 Removing rubber strips from door panels 2 Secure the door panels to the door posts using three M6 countersunk hex socket screws for each hinge as shown in Figure 6 18 Secure the hinges on the upper part and then those on the lower part This facilitates hinge adjustment After fixing the door hinges install the rubber covers onto the screws as show...

Page 101: ...nets ECC800 6 Installing the Contained Aisles Issue 01 2019 03 05 Huawei Proprietary and Confidential Copyright Huawei Technologies Co Ltd 92 Figure 6 18 Installing door panels 3 Secure each hinge on the side of the door post using two M4 screw assemblies as shown in Figure 6 19 Figure 6 19 Installing door panels ...

Page 102: ...t and posts are tilted because the floor is uneven For details about the adjusting method see Step 4 1 Varying gap between door panel and door header One post has tilted or the door does not match with the upper frame mounting kit due to a manufacturing error For details about the adjusting method see Step 4 2 Door mismatch The left and right cabinets onto which the upper frame is hung are not on ...

Page 103: ... Huawei Technologies Co Ltd 94 Figure 6 20 Door panels tilting at both sides 2 Figure 6 21 shows a door with a varying gap between the door panel and upper frame mounting kit a corner tilts downwards You can push up the lower part of the post or add a spacer between the upper frame mounting kit and the post Pull the lower end of the post outwards if a corner of a door panel tilts upwards Figure 6 ...

Page 104: ...es of door boxes are available 1100 mm long and 1200 mm long These two types of door boxes are packed with the revolving door When installing the door boxes pay attention to the left right and length labels on the door boxes The two types of door boxes can be installed in a similar way The following installation procedure uses the 1200 mm long door box as an example 1 Put a door box hanging kit on...

Page 105: ... box is evenly and properly placed as shown in Figure 6 24 secure it using M5 screws as shown by 2 in Figure 6 22 If the door box is tilted adjust it as described in Step 7 Figure 6 24 Door boxes in place Step 7 Adjust the gaps After the door boxes are placed the gaps between the door boxes and the posts may be uneven and need to be adjusted as shown in Figure 6 25 and Figure 6 27 Table 6 3 Door b...

Page 106: ...ly the front is higher than the rear adjusting method see Step 7 1 Door box tilted with a Λ shaped gap The top front and rear of the cabinet are not on the same level Usually the front is lower than the rear For details about the adjusting method see Step 7 2 1 Figure 6 25 shows a tilted door box Turn the M6 door box screw in the leveling corner piece furthest from the door frame clockwise to lift...

Page 107: ...etary and Confidential Copyright Huawei Technologies Co Ltd 98 2 Figure 6 27 shows a tilted door box Turn the M6 door box screw in the leveling corner piece nearest to the door frame clockwise to lift the door box until the Λ shaped gap disappears as shown by 1 in Figure 6 28 Figure 6 27 Λ shaped gap Figure 6 28 Adjusting the Λ shaped gap Step 8 Adjust the positions of the door box fasteners ...

Page 108: ... screws on a door box fastener but do not remove them as shown by 2 in Figure 6 28 2 Lower the fastener until it touches the cabinet as shown by 3 in Figure 6 28 3 Tighten the screws to secure the fastener Step 9 Secure the door box to the cabinet using six M5 screws as shown by 4 in Figure 6 28 If the door box rubs against the fixing screws in the top panel of the cabinet remove the screws in the...

Page 109: ...i Proprietary and Confidential Copyright Huawei Technologies Co Ltd 100 Figure 6 29 Cabinet labels Step 2 Attach a label to the dented imprint on the skylight connective plate If there is no dented imprint on the skylight connective plate attach a label at the accurate position shown in Figure 6 30 Figure 6 30 Position for attaching a label Ensure that labels are properly aligned End ...

Page 110: ...ce W between a light tube and a side of the aisle based on the actual length of the contained aisle in the module W L 872 x N 2 L is the actual length of the contained aisle N is the number round down the value of L 872 of light tubes installed in a single row Round down the value of W A maximum of 12 aisle lights can be connected in series If the number exceeds 12 they should be installed in diff...

Page 111: ...wei Proprietary and Confidential Copyright Huawei Technologies Co Ltd 102 Figure 6 32 Interconnecting light tubes Procedure Step 1 Secure light holders to the skylight plate using M3 screws as shown by 1 in Figure 6 33 Ensure that each light tube is secured by three holders Figure 6 33 Installing a light tube Step 2 Install a light tube onto the holders as shown by 2 in Figure 6 33 ...

Page 112: ...on Guide Single Row Aisle Containment with 2000 mm High Cabinets ECC800 6 Installing the Contained Aisles Issue 01 2019 03 05 Huawei Proprietary and Confidential Copyright Huawei Technologies Co Ltd 103 Step 3 Install other light tubes in the same way End ...

Page 113: ...nment with 2000 mm High Cabinets ECC800 7 Optional Installing the New Main Way Issue 01 2019 03 05 Huawei Proprietary and Confidential Copyright Huawei Technologies Co Ltd 104 7 Optional Installing the New Main Way Install the new main way by referring to the documents delivered with it ...

Page 114: ...s 21501142 Figure 8 1 600 mm wide cable trough 1 Partition plate 2 Vertical plate 3 Tray When installing cable troughs be aware of PDU2000 cables and industrial connectors Cold aisle scenario Install cable troughs above the front door of a cabinet first When installing cable troughs above the rear door move the cables to the open area of the cable troughs After installing cable troughs above the r...

Page 115: ...o the contained aisle Figure 8 2 PDU2000 cable routing on the top of a cabinet 1 Weak current cable trough 2 Strong current cable trough Procedure Step 1 Keep a vertical plate of the cable trough flush with the top surface of the cabinet and clamp the clasps into the mounting holes in the first row counting from the front door to the rear door as shown in Figure 8 3 Figure 8 3 Clamping a vertical ...

Page 116: ...ole in the second row counting from the front door to the rear door in the same way Install one M5x10 tapping screw inside each of the two vertical plates to ensure equipotential bonding with the cabinet as shown in Figure 8 5 Figure 8 5 Installing the other vertical plate Step 4 Press a supporting plate along the two vertical plates down to the place between the four clasps and the cable bridge a...

Page 117: ...des of the V shaped partition plate with hands to decrease the angle to a proper degree and clamp the clasps at the bottom into the nearby holes as shown in Figure 8 7 By default clamp the clasps into the two holes in the middle In actual conditions you can select holes as required Figure 8 7 Installing a partition plate Step 6 Install adjacent cable troughs in the same way Step 7 Rotate the inter...

Page 118: ...ight Huawei Technologies Co Ltd 109 Figure 8 8 Installing an interconnecting wrench 1 Interconnecting wrench Step 8 Install the cable trough above the rear door in a similar way End 8 2 Installing a 300 mm Wide Cable Trough Context A 300 mm wide cable trough is installed on the top of a 300 mm wide cabinet after a 600 mm wide cable trough is installed Figure 8 9 shows a 300 mm wide cable trough It...

Page 119: ...l plates upright on the top of the 300 mm wide cabinet and press a tray along the two vertical plates down to the clasps at the bottom Step 2 Press both sides of the V shaped partition plate with hands to decrease the angle to a proper degree and clamp the clasps at the bottom into the square holes nearby Step 3 Align the assembled cable trough with the adjacent 600 mm wide cable troughs and rotat...

Page 120: ...9 03 05 Huawei Proprietary and Confidential Copyright Huawei Technologies Co Ltd 111 8 3 Installing an 800 mm Wide Cable Trough An 800 mm wide cable trough BOM number 21501140 is installed on the top of an 800 mm wide cabinet The installation method is similar to the method for installing a 600 mm wide cable trough For details see 8 1 Installing a 600 mm Wide Cable Trough ...

Page 121: ...e layout in the network cabinet Relocate the cable manager in the rear door position as high as the device to be installed Use a flat head screwdriver to insert floating nuts into the device mounting holes in the rack rails of the network cabinet Ensure that the floating nuts on both sides are on the same horizontal line Before connecting power cables for the device use the ground cable delivered ...

Page 122: ...9 03 05 Huawei Proprietary and Confidential Copyright Huawei Technologies Co Ltd 113 Figure 9 2 Connecting a device ground cable 9 2 Optional Installing a Server Context The following installation procedure uses an RH2288 V2 server as an example For more information see the documents delivered with the server Procedure Step 1 Install guide rails as shown in Figure 9 3 ...

Page 123: ...s installed using the upper mounting holes insert rubber plugs tightly into the holes at the middle If a server is installed using mounting holes at the middle insert rubber plugs tightly into the upper holes Behind the guide rails Insert rubber plugs tightly into the upper mounting holes 3 Optional To enhance the rigidness and seismic proof performance of a server you can install bolts at the rea...

Page 124: ...r cables to the PDU2000 The server uses dual power supplies Connect the two power cables to different PDU2000s Figure 9 5 Connecting power cables for the server End 9 3 Optional Installing a VCN500 Procedure Step 1 Determine the mounting holes for the VCN500 based on the network cabinet device layout adjust the guide rails and install floating nuts Step 2 Place the VCN500 into the network cabinet ...

Page 125: ... 116 Figure 9 6 Placing the VCN500 Step 3 Tighten the captive screws in the ears using a Phillips screwdriver and close the mounting ear buttons as shown in Figure 9 7 Figure 9 7 Installing the VCN500 Step 4 Connect the VCN500 power cable to the PDU2000 End 9 4 Optional Installing a LAN Switch Procedure Step 1 Determine the mounting holes for the LAN switch based on the network cabinet device layo...

Page 126: ...e installation method The actual product appearance prevails Figure 9 8 Installing a LAN switch Step 3 Connect the LAN switch power cable to the PDU2000 The positions of power cable ports vary depending on the LAN switch models Connect the power cable based on the actual power port of the LAN switch End Follow up Procedure If a 24 port LAN switch is configured two power modules need to be installe...

Page 127: ...ion as shown by 1 in Figure 9 10 Step 3 Secure the ECC800 in the network cabinet by tightening the M6 screws on the left and right mounting ears clockwise as shown by 2 in Figure 9 10 Figure 9 10 Installing an ECC800 Step 4 Optional Remove the ECC800 main control module and install the SIM card in the correct slot of the control module as required 1 Loosen the captive screws on both sides of the E...

Page 128: ... network cabinet in the aisle containment Optional Attach the 3G antenna to the skylight connective plate or the network cabinet top plate outside the aisle containment as shown in Figure 9 13 2 Route the 2 4G antenna cable through the cable hole in the skylight plate through the rodent proof mesh and sponge strip on the top of the cabinet and into the correct port on the ECC800 Optional Route the...

Page 129: ...e 01 2019 03 05 Huawei Proprietary and Confidential Copyright Huawei Technologies Co Ltd 120 Figure 9 14 Connecting an antenna cable Figure 9 15 Antenna route inside a cabinet Step 6 Connect the ECC800 power cable to the PDU2000 End 9 6 Optional Installing a Rack Environment Unit Context Install a rack environment unit on the rack rail of the cabinet rear door ...

Page 130: ...bar If no ground copper bar is installed on the top of the rack rail install a rack environment on the top of the rack rail Procedure Step 1 Determine the mounting holes for the rack environment unit in the cabinet based on the engineering layout diagram and install floating nuts Step 2 Secure the rack environment unit to the cabinet by tightening the M6 screws on the left and right mounting ears ...

Page 131: ... top of the control skylight plate to block the holes If no monitoring component is installed on the control skylight plate attach sponge to the mounting holes outside the top of the control skylight plate to block the holes Black sponge is available in the fitting bag of the control skylight 9 7 1 Installing a Camera Prerequisites A camera and tools for installing it have been prepared Context Th...

Page 132: ...ietary and Confidential Copyright Huawei Technologies Co Ltd 123 Figure 9 18 Removing front and inner covers 2 Gently insert the micro SD card into the SD card slot as shown in Figure 9 19 Figure 9 19 Installing an SD card Step 2 Align the holes in the camera base with those in the control skylight and secure the camera to the control skylight using three M3 screws as shown in Figure 9 20 ...

Page 133: ...n Connect the auxiliary video cable delivered with the camera to a display device such as the monitor Rotate the camera 0 355 degrees horizontally 0 75 degrees vertically or 0 355 degrees in the revolving direction to achieve an appropriate angle Figure 9 21 shows the adjustment methods Figure 9 21 Triple axis adjustment Step 3 Before installing the inner cover adjust the infrared light panel of t...

Page 134: ... Issue 01 2019 03 05 Huawei Proprietary and Confidential Copyright Huawei Technologies Co Ltd 125 Figure 9 22 Installing the inner cover Step 4 Install the front cover of the camera in the direction shown in Figure 9 23 and tighten the screws on the front cover Remove the protective film from the transparent cover Figure 9 23 Installing the front cover End ...

Page 135: ...o the appropriate hole in the control skylight using M3x10 screws as shown by 1 in Figure 9 24 Figure 9 24 Installing the smoke detector Step 2 Align the mounting holes in the smoke detector and its base with each other and then rotate the smoke detector until it is secured as shown by 2 and 3 in Figure 9 24 End 9 7 3 Optional Installing the Multi Functional Sensor Context The BOM number of a mult...

Page 136: ...ssue 01 2019 03 05 Huawei Proprietary and Confidential Copyright Huawei Technologies Co Ltd 127 Figure 9 25 Installing a multi functional sensor End 9 8 Optional Installing Monitoring Components on the End Door 9 8 1 Monitoring Component Layout for the Revolving Door Figure 9 26 shows the installation positions for monitoring components on the revolving door ...

Page 137: ...ctuator 4 For the access actuator 5 For the skylight actuator 6 For the WiFi converter 7 For the AC actuator 8 For the revolving door magnetic lock 9 For the pad power connector 10 For the alarm beacon 11 Pad mounting kit 12 For the pad 13 For the access control device 14 For the light button 9 8 2 Installing an Actuator or Converter Context This section describes how to install a monitoring actua...

Page 138: ...ht actuator 52271875 If one skylight actuator is configured install it in the upper frame mounting kit for the network cabinet in the smart module If two skylight actuators are configured install them in the upper frame mounting kits for the front and rear end doors respectively Procedure Step 1 Remove the fastener remove M4 screws and take off the rear plate as shown in Figure 9 27 Figure 9 27 Re...

Page 139: ...on the two sides of the WiFi converter to stop the movement of the converter as shown in Figure 9 29 Figure 9 29 Installing stop blocks Step 4 Install other actuators Install other actuators in place in a similar way and secure them using stop blocks Step 5 The WiFi antenna can be installed using the magnet on its base Attach one WiFi antenna to the upper frame mounting kit in the aisle containmen...

Page 140: ...pyright Huawei Technologies Co Ltd 131 Figure 9 30 Installing WiFi antennas End Follow up Procedure After connecting actuator or converter cables reinstall the rear plate for the upper frame mounting kit as shown in Figure 9 31 Figure 9 31 Installing a rear panel 9 8 3 Installing an Alarm Beacon Context The BOM number of an alarm beacon is 22010028 By default one micro module is equipped with one ...

Page 141: ...ep 2 Route the alarm beacon cable through the door box cable hole Step 3 Secure the alarm beacon to the door box using two M3 screws Figure 9 32 Installing an alarm beacon End 9 8 4 Optional Installing a Revolving Door Magnetic Lock Context The BOM number for a revolving door magnetic lock is 02070037 Procedure Step 1 Remove the cover of the magnetic lock The cover of the magnetic lock is located ...

Page 142: ...four screws at the bottom of the mounting kit and keep the screws aside as shown by 1 in Figure 9 33 2 Remove the mounting plate of the magnetic lock cover as shown by 2 in Figure 9 33 3 Remove the four screws on the mounting plate of the magnetic lock cover and remove the cover of the magnetic lock as shown by 3 in Figure 9 33 Figure 9 33 Removing the cover of the magnetic lock Step 2 Remove the ...

Page 143: ...te to the upper frame mounting kit using eight M4 countersunk screws as shown by 1 in Figure 9 35 Pay attention to the orientation of the magnetic lock fixing plate and ensure that the protruded surface of the magnetic lock faces the magnet Step 4 Install the magnetic lock Route cables of the magnetic lock into the upper frame mounting kit and secure the magnetic lock to the fixing plate using the...

Page 144: ...fitting bag insert the positioning pins of the magnetic into the magnet using a rubber mallet as shown in Figure 9 37 Figure 9 37 Installing positioning pins of the magnetic 2 Insert the assembled magnet into the magnetic lock base on the revolving door and secure the magnet to the door using the screws on the door and the white washer delivered with the magnet lock as shown in Figure 9 38 When se...

Page 145: ... it 2 The revolving door magnetic lock is aligned with the magnet face to face 3 No gap exists between the revolving door magnetic lock and the magnet If any of the preceding conditions is not met the magnetic lock fails to attract the magnet Troubleshoot the magnet as follows 1 Check the circuit and rectify any circuit fault 2 Adjust the magnet base and the door panel to align the magnetic lock w...

Page 146: ...on green provide the automatic reset function Its BOM number is 16050101 The emergency exit button red needs to be manually reset Its BOM number is 16050102 The light button exit button and emergency exit button can be installed in the same way Procedure Step 1 Remove the side panel from the post as shown by 1 in Figure 9 40 Step 2 Remove the buckle from the button mounting position as shown by 2 ...

Page 147: ...or the post as shown by 4 in Figure 9 40 End 9 8 6 Installing the Pad Mounting Kit The BOM number of the pad mounting kit is 21242016 Install the pad mounting kit on the end door hanger at the PDC Figure 9 41 Pad mounting kit Table 9 2 Pad mounting kit No Name Description 1 Pad mounting kit Provides the position for installing the pad and access control 2 Baffle plate with the cable hole in the lo...

Page 148: ...ersunk screw Used for securing the baseplate of the fingerprint and card reader the fingerprint and card reader with a keypad or the card reader with a keypad 8 M3x8 screw Used for securing the IC card reader 9 Cable baffle Used for covering monitoring cables When securing monitoring components to the pad mounting kit do not use the screws delivered with the monitoring components 9 8 6 1 Installin...

Page 149: ... M2 5 screws set aside of the fingerprint and card reader and take off the baseplate as shown by 3 and 4 in Figure 9 42 Step 4 Secure the baseplate to the baffle plate using two M3x8 countersunk screws as shown by 5 in Figure 9 42 Step 5 Route the fingerprint and card reader cable through the cable hole in the baffle plate as shown by 6 in Figure 9 42 Step 6 Secure the fingerprint and card reader ...

Page 150: ...2 5 screws set aside of the fingerprint and card reader with a keypad and take off the baseplate as shown by 3 and 4 in Figure 9 43 Step 4 Secure the baseplate to the baffle plate using two M3x8 countersunk screws as shown by 5 in Figure 9 43 Step 5 Route the cable of the fingerprint and card reader with a keypad through the cable hole in the baffle plate as shown by 6 in Figure 9 43 Step 6 Secure...

Page 151: ... kit Step 3 Remove the M2x5 screws set aside of the card reader with a keypad and take off the baseplate as shown by 3 and 4 in Figure 9 44 Step 4 Secure the baseplate to the baffle plate using two M3x8 countersunk screws as shown by 5 in Figure 9 44 Step 5 Route the cable of the card reader with a keypad through the cable hole in the baffle plate as shown by 6 in Figure 9 44 Step 6 Secure the car...

Page 152: ...plate flush with the end plane of the pad mounting kit Step 3 Remove the screws from the IC card reader cover set aside and take off the cover as shown by 3 and 4 in Figure 9 45 Step 4 Route the IC card reader cable through the cable hole in the baffle plate as shown by 5 in Figure 9 45 Step 5 Keep the screw holes of the cover at the bottom and use two M3x8 screws to secure the IC card reader to t...

Page 153: ...repare the materials listed in Table 9 3 Table 9 3 Material list Name Exterior Description Pad power connector The BOM number is 14190892 Pad power connector The BOM number is 14190242 Pad power connector holder Obtain it from the pad mounting kit materials BOM number 21242016 Procedure Step 1 Assemble the pad power connector holder as shown in the following figure 1 Clamp the power connector to t...

Page 154: ...ssue 01 2019 03 05 Huawei Proprietary and Confidential Copyright Huawei Technologies Co Ltd 145 Figure 9 46 Assembling a pad power connector holder BOM number 14190892 Figure 9 47 Assembling a pad power connector holder BOM number 14190242 Step 2 Connect cables from the power connector to the AC actuator and route the cables as shown in the following figure ...

Page 155: ...Co Ltd 146 Figure 9 48 Connecting power connector cables BOM number 14190892 Figure 9 49 Connecting power connector cables BOM number 14190242 Step 3 Secure the pad power connector holder as shown in Figure 9 50 1 Remove the baffle plate from the power connector mounting holes in the door box 2 Secure the pad power connector holder to the door box using two M4x12 screw assemblies Figure 9 50 Secur...

Page 156: ...9 51 2 Adjust the foot symmetrically until it is as wide as the pad as shown by 2 in Figure 9 51 3 Tighten the M4x12 screws on the foot as shown by 3 in Figure 9 51 Figure 9 51 Adjusting the foot Step 2 Remove the M4 nut spring washer and flat washer from the baffle plate on the first cable hole counting down from the pad mounting kit and take off the baffle plate as shown by 1 in Figure 9 52 Step...

Page 157: ...yright Huawei Technologies Co Ltd 148 Figure 9 52 Installing a pad End 9 8 6 7 Securing the Pad Mounting Kit Procedure Step 1 Lay out the cables of monitoring components on the pad mounting kit as shown by 1 in Figure 9 53 Step 2 Clamp the pad mounting kit to the hanging kit as shown by 2 in Figure 9 53 Step 3 Secure the pad mounting kit to the hanging kit using two M5x10 tapping screws as shown b...

Page 158: ... the pad mounting kit Step 4 Insert the pad power adapter into the power connector Bind the access monitoring cable at the bottom of the power connector holder Route the access monitoring cable along the outer side of the power connector holder and route the cable out through the cable hole in the door box as shown in Figure 9 54 Skip this step if no pad is installed Route the access monitoring ca...

Page 159: ...05 Huawei Proprietary and Confidential Copyright Huawei Technologies Co Ltd 150 Figure 9 54 Routing the access monitoring cable a pad is configured 1 Access monitoring cable 2 Pad power adapter cable Figure 9 55 Routing the access monitoring cable no pad is configured Step 5 Tighten two M3 captive screws to secure the baffle plate to the hanging kit as shown in Figure 9 56 ...

Page 160: ...nd installation accessories such as the guide rail delivered with the smart ETH gateway and screws The number of smart ETH gateways to be installed and their installation positions have been specified Context Components marked in the same background color should be connected to the same smart ETH gateway Table 9 4 Scenario 1 Scenario Rules for Deploying Smart ETH Gateways No rack environment unit ...

Page 161: ...ng Smart ETH Gateways No rack environment unit deployed Module length 7 m number of air conditioners 4 Deploy 2 PCS for each end cabinet and IT cabinet in the middle in the smart module not for other cabinets A total of 6 PCS should be deployed as shown in Figure 9 58 Figure 9 58 Layout of smart ETH gateways in scenario 2 Table 9 6 Scenario 3 Scenario Rules for Deploying Smart ETH Gateways Rack en...

Page 162: ...semblies to secure the guide rail for the smart ETH gateway to the planned position as shown in Figure 9 60 Step 2 Connect one end of the ground cable available in the smart ETH gateway package to the ground point at the lower part of the cable trough using one M4 screw and connect the other end to the ground point on the side of the smart ETH gateway as shown in Figure 9 60 The M4 screw used for ...

Page 163: ...ensors Context Temperature sensors should be installed inside cabinets The number of temperature sensors to be installed inside each cabinet depends on the customer requirement This section describes how to install six temperature sensors inside each cabinet Six temperature sensors should be respectively installed at the 9 U 26 U and 40 U positions in the front and rear door frames of each cabinet...

Page 164: ...les behind the sensors to the cabinet keeping them 20 mm away from the sensor probes The temperature sensor must not be in touch with metal parts or cabinets Ensure that the temperature sensors are installed on the side without a PDU2000 on the cabinet rear Keep the temperature sensors facing the inside of the cabinets to ensure accurate measurement of cabinet interior temperatures Figure 9 61 Ins...

Page 165: ...oners In this scenario categorize the cabinets evenly as shown in Figure 9 63 Components in the background with the same color belong to the same area Figure 9 63 Categorizing an even number of cabinets Step 2 Assign T H sensors by area Assign three T H sensors to each area as follows 1 Assign the first T H sensor to the cabinet furthest from the air conditioner as shown by 1 in Figure 9 64 and Fi...

Page 166: ... conditioner are not recommended When a cold aisle containment is configured it is advised to adopt cold aisle control when a hot aisle containment is configured it is advised to adopt hot aisle control Term description Supply air control by air conditioner The air conditioner controls the temperature at front doors of air conditioners so that the temperature is close to the temperature set on the...

Page 167: ... the ground as shown in Figure 9 66 If the air conditioner implements cold aisle control install the temperature and humidity sensor on the door frame of the IT cabinet front door If the air conditioner implements hot aisle control install the temperature and humidity sensor on the door frame of the IT cabinet rear door Procedure Step 1 Use two M5x10 tapping screws to secure the T H sensor base to...

Page 168: ...tioner pipes are routed from the top water detectors are installed in the network cabinet and its opposite cabinet and bound to the rack rail at the rear door using cable ties The binding position is 5 U away from the cabinet bottom When the air conditioner pipes are routed from the bottom the water detector is installed in the network cabinet and bound to the rack rail at the rear door using cabl...

Page 169: ...ed to the conversion cable 6 Water detection cable Procedure Step 1 Connect the water detection cable to the conversion cable as shown in Figure 9 68 Figure 9 68 Connecting cables 1 Conversion cable end B connected to the water detection cable 2 Water detection cable end A connected to the conversion cable The water detection cable and conversion cable are interconnected through the male and femal...

Page 170: ... the rear door using cable ties The binding position is 5 U away from the cabinet bottom Figure 9 70 shows how the water detection cable is laid out Figure 9 70 Laying out a water detection cable top pipe routing 1 ECC800 2 Network cable 3 Water detector 4 Water detection cable Do not contact the water detection cable to metal for this action will cause a false alarm Take protective measures when ...

Page 171: ...loor Figure 9 71 Installing a fastener When securing the water detection cable to the concrete floor use the cable nail clips delivered with the cable to secure the cable Figure 9 72 Installing a cable nail clip Step 3 Place the water detection cable onto the fastener secure the fastener and keep the water detection cable in close contact with the floor as shown in Figure 9 73 If multiple water de...

Page 172: ... pipes are routed from the bottom the water detector is installed in the network cabinet and bound to the rack rail at the rear door using cable ties The binding position is 5 U away from the cabinet bottom Figure 9 74 shows how the water detection cable is laid out Figure 9 74 Laying out a water detection cable bottom pipe routing 1 ECC800 2 Network cable 3 Water detector 4 Water detection cable ...

Page 173: ...r a 1 meter long water detection cable Step 2 Tear off the protection paper from the rear of the fastener and then securely attach the fastener to the floor Figure 9 75 Installing a fastener When securing the water detection cable to the concrete floor use the cable nail clips delivered with the cable to secure the cable Figure 9 76 Installing a cable nail clip Step 3 Place the water detection cab...

Page 174: ...ation Guide Single Row Aisle Containment with 2000 mm High Cabinets ECC800 9 Installing Monitoring Devices Issue 01 2019 03 05 Huawei Proprietary and Confidential Copyright Huawei Technologies Co Ltd 165 Figure 9 77 Securing a water detection cable End ...

Page 175: ... 2000 mm High Cabinets ECC800 10 Optional Installing In Room Cable Trays Issue 01 2019 03 05 Huawei Proprietary and Confidential Copyright Huawei Technologies Co Ltd 166 10 Optional Installing In Room Cable Trays Install the in room cable trays by referring to Indoor Cable Tray Installation Guide ...

Page 176: ...1 Cabinet sealing plate specifications Type BOM Number Description 600 mm wide cabinet sealing plate 21242005 Applies to cabinets that are 600 mm wide and 2000 mm high 800 mm wide cabinet sealing plate 21242301 Applies to cabinets that are 800 mm wide and 2000 mm high 300 mm wide air conditioner sealing plate Available in the materials for 300 mm wide air conditioners Applies to 300 mm wide air co...

Page 177: ...ure 11 1 Installing a cabinet sealing plate Step 2 Install another sealing plate for the cabinet rear door in the same way End Installing 300 mm Wide Air Conditioner Sealing Plates Step 1 Use two M5x10 tapping screws to secure a 300 mm wide air conditioner sealing plate to a cabinet as shown in Figure 11 2 Figure 11 2 Installing 300 mm Wide Air Conditioner Sealing Plates Step 2 Install another sea...

Page 178: ...cable fitting bag to both ends of the cable by wrapping the ends The cable labels must completely wrap the cable without wrinkles Attach the cable labels 20 mm away from the plug except for special circumstances For example a label shall not be attached to the bending part of a cable or attached in some positions that may affect cable installation If a label conflicts with a cable tie attach the l...

Page 179: ...an unnoticeable position as shown in Figure 12 2 Figure 12 2 Cable organizer 3 Route and lay out a larger number of cables in different areas to ensure neat cabling and facilitate cable search and maintenance 4 Route several flat cables along the same path or overlap them as one 5 Arrange cables on distinct layers and prevent cable tangles that are avoidable when cables in different colors are bou...

Page 180: ...on shielded signal cables Keep the cable spacing greater than 20 mm or use ground metal for isolation purposes Do not bind the cables together Preferably route the cables along different sides of cabinets 2 Do not bind AC or DC power cables with any non shielded signal cables 3 There is no limit on the spacing between diverse shielded signal cables Safety and Reliability Requirements for Routing a...

Page 181: ...rnatively ensure that the holes are rounded free from burrs or sharp edges 6 Keep cables far away from heat sources such as radiators and heat vents If unavoidable take heat resistant measures 7 Keep cables far away from operating components such as fan blades and do not bind cables to an airflow path of fans 8 Prevent rotating components such as doors from squeezing or pulling cables Cable Bindin...

Page 182: ...nologies Co Ltd 173 Figure 12 6 Cutting off the excess part of a cable tie 3 Do not use cable ties at a place where the cables are bent Otherwise the cable cores may break due to strong stress as shown in Figure 12 7 Figure 12 7 Binding cables in a bending area 4 Ensure that the cable ties are wrapped and secured in the same direction and do not generate interference with subsequent operations as ...

Page 183: ...ntial Copyright Huawei Technologies Co Ltd 174 Figure 12 8 Direction for securing cable ties 12 2 Cable Routes for the Single Row Aisle Containment Scenario Power Supply and Distribution Cabinet Figure 12 9 shows how power cables and signal cables are routed in the single row aisle containment Ensure that strong current cables and weak current cables are at least 100 mm away from each other ...

Page 184: ...i Technologies Co Ltd 175 Figure 12 9 Routing power cables and signal cables in the single row aisle containment scenario 1 Power cable 2 Signal cable 3 Optical fiber 4 Smart ETH gateway 5 Network cabinet 6 PDC 12 3 Cable Routes for the Single Row Aisle Containment Scenario New Main Way Figure 12 10 shows how cables are routed in the single row aisle containment scenario when you are configuring t...

Page 185: ...idential Copyright Huawei Technologies Co Ltd 176 Ensure that strong current cables and weak current cables are at least 100 mm away from each other Connect the power cables from the general input unit side to the smart module Figure 12 10 Routing power cables and signal cables 1 General input unit 2 Power distribution unit 3 Conversion unit 4 Signal cable 5 Network cabinet 6 Power cable ...

Page 186: ...ogies Co Ltd 177 12 4 Cable Routing for Cabinet Door Monitoring Components Figure 12 11 and Figure 12 12 respectively show the cable routing for a cabinet electronic door and door status sensor Figure 12 11 Cabling routing for an electronic lock A To the COM1 12V or COM2 12V port on the rack environment unit Figure 12 12 Cabling routing for a door status sensor A To the AI DI1 or AI DI2 port on th...

Page 187: ...e 12 13 shows the cable routing inside the network cabinet Route cables neatly inside the network cabinet by following instructions in 12 1 System Cabling Rules Figure 12 13 Cable routing for the network cabinet 1 Power cable 2 Signal cable 12 6 Cable Routes for Revolving Door Monitoring Components Figure 12 14 shows the cable routes for the exit button emergency button access control device and a...

Page 188: ...ietary and Confidential Copyright Huawei Technologies Co Ltd 179 Figure 12 14 Cable routes for monitoring components 1 Alarm beacon 2 Pad 3 Access control 4 Light button 5 Exit button 6 Emergency exit button 7 Revolving door magnetic lock 8 Actuator or converter 12 7 Cable Routes for the Aisle Lighting System Figure 12 15 shows the cable routes for the aisle lighting system ...

Page 189: ... aisle lighting system 1 AC actuator 2 Light 3 Light button After aisle lights are installed connect cables by performing the following steps Interconnect the male and female connectors of lights in the same group For lights in the same group only the light in either end needs to be connected to the power supply For lights in different groups power must be supplied to each group separately Figure ...

Page 190: ...oute the cable out of the aisle containment as shown by 2 in Figure 12 17 The cable outlets for aisle lights are on the outermost skylight plate 3 Connect the cut end to the multi wire terminal onsite as shown by 3 in Figure 12 17 When connecting the cables mark the L brown and N blue wires to ensure correct connection 4 Route the other end of the connected cable as shown by B in Figure 12 17 thro...

Page 191: ...nna cable to the antenna port on the modem Do not use the antenna delivered with the modem Step 3 Connect the serial cable Connect a cable from the modem to an idle serial port on the server For the position of the serial port see the documents delivered with the server For the connection method see the documents delivered with the modem If the serial port on the server does not match the connecto...

Page 192: ...modem is in transmission mode Off The SMS modem is deactivated Step 5 Install the modem drive program For details see the documents delivered with the modem Normally there is no need to install the modem drive program Install it if required according to the documents delivered with the modem End 12 9 Connecting the Ground Cables for the Smart Module The grounding system of the Smart Module must be...

Page 193: ...e only to the PDC scenario You need to customize it if you want to use this solution Figure 12 20 shows the cabinet ground points Connect cabinet ground cables as follows Connect the cabinet ground bar or ground point to the branch ground bar of the battery cabinet or IT cabinet near the PDC and then connect the branch ground bar to the general ground bar inside the PDC If no branch ground bar is ...

Page 194: ...rietary and Confidential Copyright Huawei Technologies Co Ltd 185 Figure 12 20 Cabinet ground points 1 Cabinet branch ground copper bar 2 Cabinet main ground copper bar Figure 12 21 S type grounding 12 9 2 Optional Connecting Base Ground Cables Figure 12 22 shows the base ground points Select either of the following base grounding solution depending on the actual situation ...

Page 195: ...d cable to any of the base ground points shown by 1 in Figure 12 22 and connect the other end to the general ground copper bar of the equipment room Connect one end of the base ground cable to any of the base ground points shown by 1 in Figure 12 22 and connect the other end to the ground copper bar at the rear door bottom inside the cabinet as shown in Figure 12 23 Then connect the module ground ...

Page 196: ... To remove the battery trays perform the following operations a Remove the battery trays from top to bottom b Install batteries and connect cables from bottom to top When installing batteries install battery trays at first and then place batteries onto the trays and connect cables Do not move all the batteries into the cabinet after placing them on the trays and connecting cables When placing batt...

Page 197: ...l direction as shown by 1 in Figure 12 26 Route and secure cables between layers along the tray supporting beam in the horizontal direction as shown by 2 in Figure 12 26 Figure 12 26 Cable routes Optional When battery cabinets are installed adjacent to each other remove the upper side plates from the battery cabinets for routing cables to the corresponding ports Correct Method for Connecting Batte...

Page 198: ...idential Copyright Huawei Technologies Co Ltd 189 Figure 12 27 Directly connecting two batteries When the length of a battery cable is longer than the distance between two battery terminals connect the cable in the way shown in Figure 12 28 To prevent misshaping battery terminals do not connect the cable in the way shown in Figure 12 29 Figure 12 28 Correct battery cable connection method ...

Page 199: ...he circuit breaker is OFF Connect cables to the circuit breaker as follows 1 Optional If the intelligent battery monitoring system is deployed knock off the cover on the CIM indicator hole on the circuit breaker panel as shown by 1 in Figure 12 30 2 Remove the circuit breaker panel as shown by 2 in Figure 12 30 3 Connect the battery cables N and as shown by 3 in Figure 12 30 4 Connect the UPS cabl...

Page 200: ...ry monitoring system is not deployed use a 04080376 cable to connect the J1 port on the battery control board BIB to the corresponding port on the UPS Alternatively use a 04080377 cable for cascading and use a 04080376 cable for connecting to the corresponding port on the UPS Figure 12 31 Connecting monitoring cables for the circuit breaker 7 Optional If the intelligent battery monitoring system i...

Page 201: ...els 12 10 2 Connecting Cables to Power Supply and Distribution Devices To connect cables to power supply and distribution devices see the documents delivered with the devices Table 12 3 lists the reference documents Table 12 3 Reference documents for power supply and distribution devices Device Name Reference Industrial connector cable connection optional A 6 Optional Connecting Cables to Industri...

Page 202: ...delivered with the devices Table 12 4 lists the reference documents Table 12 4 Reference documents for the cooling system Device Name Reference NetCol5000 C 30 kW Chilled Water In Row Precision Air Conditioner NetCol5000 C 30 kW Chilled Water In Row Precision Air Conditioner Quick Guide Simplified Edition The document is delivered with the device or you can click Download 12 12 Connecting Cables f...

Page 203: ... Row Aisle Containment with 2000 mm High Cabinets ECC800 13 Installation Verification Issue 01 2019 03 05 Huawei Proprietary and Confidential Copyright Huawei Technologies Co Ltd 194 13 Installation Verification C Installation Verification lists the items to be checked ...

Page 204: ...ess Figure 14 1 shows the power on commissioning process Figure 14 1 Power on commissioning process 14 2 Commissioning the Power Supply and Distribution System Power Supply and Distribution Cabinet For details about how to commission each device in the power supply and distribution system see the documents delivered with it Table 14 1 lists the reference documents Table 14 1 Device Reference Integ...

Page 205: ...ule is located in a humid environment and condensation appears outside the doors of the cold aisle containment lower the discharge air temperature of the air conditioner or dehumidify the room To commission a cooling device follow instructions in the documents delivered with it Table 14 2 lists the reference documents Set the initial temperature to 20º C and relative humidity to 50 for air conditi...

Page 206: ...missioning Guide NetEco Version The NetEco version depends on the version in use Click on the NetEco WebUI to obtain the NetEco version in use Click Download Table 14 3 lists the devices deployed in the management system Table 14 3 Devices configured in the management system of the equipment room Category Device Name Power distribution Precision PDC Integrated UPS Cooling NetCol5000 C 30 kW Monito...

Page 207: ... NetEco version depends on the version in use Click on the NetEco WebUI to obtain the NetEco version in use Click Download For details about devices configured in the management system see Table 14 4 Table 14 4 Devices configured in the management system of the equipment room Category Device New main way General input unit Power distribution unit Cooling NetCol5000 C 30 kW Monitoring VCN500 Server...

Page 208: ...to http support huawei com to obtain the hotline of the desired region Network Log in to http support huawei com and click to obtain help Before logging in to http support huawei com register a device user account by entering information about the Huawei product that you purchased If access to documents is unavailable upgrade the access rights as prompted A 2 Installing Expansion Sleeves Procedure...

Page 209: ...s Co Ltd 200 Step 4 Rotate the expansion bolt counterclockwise to remove it together with the spring washer and flat washer Put aside the removed expansion bolt for securing the cabinet Figure A 1 Expansion bolt 1 M12 bolt 2 Spring washer 3 Flat washer 4 Expansion sleeve Figure A 2 Drilling a hole and installing an expansion sleeve unit mm End A 3 Installing a Floating Nut Figure A 3 shows how to ...

Page 210: ...ing a Monitoring Cable Prerequisites A network cable cord end terminals and RJ45 connectors are prepared The following tools are prepared Wire stripper Crimping tool RJ45 crimping tool Electrician s knife Insulation tape Preparing a Cord End Terminal Figure A 4 shows how to prepare a cord end terminal 1 Strip the insulation layer of cable B to expose cable core C 2 Put cable core C through cord en...

Page 211: ... A Appendix Issue 01 2019 03 05 Huawei Proprietary and Confidential Copyright Huawei Technologies Co Ltd 202 Figure A 4 Preparing a Cord End Terminal A Cord end terminal connector B Insulation layer C Copper core wire Preparing an RS485 Monitoring Cable Figure A 5 shows how to prepare a monitoring cable for the ECC collector ...

Page 212: ...ector Preparing a Dry Contact Monitoring Cable The method for preparing a dry contact monitoring cable is similar to the method for preparing an RS485 monitoring cable Prepare cord end terminals on both ends of each required cable core based on the number of dry contacts A 5 Scenario with a Column 600 mm Wide IT Cabinets Scenario A 5 1 Scenario Description This section describes the column positio...

Page 213: ...i Proprietary and Confidential Copyright Huawei Technologies Co Ltd 204 Figure A 6 Positions of the column and components in the smart module 1 Cabinet 2 Single layer of cable tray 3 Double layer of cable trays 4 Flat or rotating skylight 5 Adjustable skylight 6 Two connected sealing plates with the concave sides facing rightwards 7 Column in the equipment room ...

Page 214: ... in the aisle containment A 800 mm Cabinet places on the column side are left blank and sealed by sealing plates Directions of the concave sides of the sealing plates are shown in Figure A 7 Install cable trays over the cabinets on both sides of the blank cabinet place for routing strong current and weak current cables Install an adjustable skylight over the aisle containment The area to be covere...

Page 215: ...part of a cabinet place A 800 mm and B 400 mm Cabinet places on the column side are left blank and sealed by sealing plates Directions of the concave sides of the sealing plates are shown in Figure A 8 Install cable trays over the cabinets on both sides of the blank cabinet place for routing strong current and weak current cables Install an adjustable skylight over the aisle containment The area t...

Page 216: ... the column side are left blank and sealed by sealing plates Directions of the concave sides of the sealing plates are shown in Figure A 9 Install cable trays over the cabinets on both sides of the blank cabinet place If the cable trays cannot be installed in combined mode install them in layered mode the upper for routing weak current cables while the lower for routing strong current cables Insta...

Page 217: ...lumn side are left blank and sealed by sealing plates Directions of the concave sides of the sealing plates are shown in Figure A 10 Install cable trays over the cabinets on both sides of the blank cabinet place If the cable trays cannot be installed in combined mode install them in layered mode the upper for routing weak current cables while the lower for routing strong current cables Install an ...

Page 218: ... plates Directions of the concave sides of the sealing plates are shown in Figure A 11 Install cable trays over the cabinets on both sides of the blank cabinet place If the cable trays cannot be installed in combined mode install them in layered mode the upper for routing weak current cables while the lower for routing strong current cables Install flat or rotating skylights over the aisle contain...

Page 219: ...tary and Confidential Copyright Huawei Technologies Co Ltd 210 A 5 2 Installation Process for Scenarios with Columns Figure A 12 Installation flowchart A 5 3 Installing a Cabinet Bottom Sealing Plate Context The cabinet bottom sealing plate installed in the scenario with a column is the same as the mounting kit installed under the end cabinet The BOM number is 21242007 ...

Page 220: ...ocedure Step 1 Install the cabinet bottom sealing plate by following the instructions in 6 3 1 Installing a Cabinet Lower Mounting Kit End A 5 4 Installing Sealing Plates Near the Aisle Context Because of the column it is inevitable that several cabinet places in one or two rows of the aisle containment are not suitable for installing cabinets Therefore sealing plates need to be installed to ensur...

Page 221: ... the adjustable skylight based on the actual installation environment and the description in A 5 1 Scenario Description Step 2 Install the sealing plates near the aisle Install the sealing plates near the aisle containment first and then the sealing plates near the smart module exterior 1 Secure the two sealing plates using three M6 screws and nuts 2 Place the connected sealing plates at the speci...

Page 222: ...Copyright Huawei Technologies Co Ltd 213 Figure A 14 Installing sealing plates near the aisle 1 Column End A 5 5 Installing the Adjustable Skylight An adjustable skylight comprises the following components Figure A 15 Components of an adjustable skylight 1 Skylight connective plates 2 Polycarbonate PC plate fasteners 3 L shaped mounting bracket 4 PC plate clip 5 PC plate supports 6 PC plate ...

Page 223: ...dges A 5 5 1 Installing the Skylight Connective Plate Prerequisites The sealing plates near the aisle have been installed and secured Procedure Step 1 Secure skylight connective plates to sealing plates or cabinets using eight M8 bolts Figure A 16 Installing a skylight connective plate 1 Column End A 5 5 2 Installing the Telescopic Edges Procedure Step 1 Extend the two telescopic edges to an appro...

Page 224: ...ts ECC800 A Appendix Issue 01 2019 03 05 Huawei Proprietary and Confidential Copyright Huawei Technologies Co Ltd 215 Figure A 17 Adjusting the length of a telescopic edge Step 2 Secure the two telescopic edges to the skylight connective plate using four M6 screws Figure A 18 Installing telescopic edges 1 Column End ...

Page 225: ...stalling an Adjustable Skylight Side Sealing Plate Prerequisites A cut tool is prepared This section cites a hook knife as an example Figure A 19 Hook knife Context An adjustable skylight side sealing plate is trimmed from a PC plate Figure A 20 shows the installation position of the adjustable skylight side sealing plate Figure A 20 Installation position of the adjustable skylight side sealing pl...

Page 226: ...ure Step 1 Trim the PC plate to an appropriate size using a hook knife To ensure a neat section after trimming trim the PC plate using the aisle check tool in the Num 0 packing box Figure A 21 Trimming a PC plate 1 PC plate Step 2 Attach the PC plate fastener to the trimmed PC plate Figure A 22 Attaching a PC plate fastener to a trimmed PC plate Step 3 Secure the PC plate fastener and the trimmed ...

Page 227: ...End A 5 5 4 Installing the PC Plate Support and PC Plate Procedure Step 1 Select positions for installing PC plate supports As shown in Figure A 24 PC plate support 1 should be installed closely to the column and PC plate support 2 should be installed in the middle between PC plate support 1 and the edge of the adjustable skylight If the space between the right side of the column and the right sid...

Page 228: ...ietary and Confidential Copyright Huawei Technologies Co Ltd 219 Figure A 24 Adjustable skylight top view 1 Column 2 PC plate support 1 3 PC plate support 2 Step 2 Secure the two PC plate supports to the telescopic edges of the adjustable skylight using four M6 screws and nuts Figure A 25 Installing PC plate supports 1 Column Step 3 Install L shaped mounting brackets ...

Page 229: ...t To ensure a neat section after trimming trim the PC plate using the aisle check tool in the Num 0 packing box 2 Mark a line on the column where the PC plate closely attaches to the column using a marker 3 Move the PC plate Drill holes on the column and secure the L shaped mounting brackets to the column using plastic expansion bolts Figure A 26 Securing L shaped mounting brackets 1 Column Step 4...

Page 230: ...dential Copyright Huawei Technologies Co Ltd 221 Figure A 27 Installing PC plates 1 PC plate End A 5 6 Installing Cable Trays Prerequisites Determine the position and mode combined or layered for installing cable trays based on the actual installation environment and the description in A 5 1 Scenario Description Context Cable trays can be installed in two modes Combined installation ...

Page 231: ...Installation Guide Single Row Aisle Containment with 2000 mm High Cabinets ECC800 A Appendix Issue 01 2019 03 05 Huawei Proprietary and Confidential Copyright Huawei Technologies Co Ltd 222 Figure A 28 Combined installation Layered installation ...

Page 232: ... Issue 01 2019 03 05 Huawei Proprietary and Confidential Copyright Huawei Technologies Co Ltd 223 Figure A 29 Layered installation Procedure Step 1 Assemble cable trays Place four cable tray supports at the coated positions on the cable trays Secure each support to the cable trays using four M8 screws Figure A 30 Assembling cable trays ...

Page 233: ...e A 31 Securing a cable tray This section describes how to secure a single row of cable trays End A 5 7 Installing a Sealing Plates away the Aisle Prerequisites The adjustable skylight and cable tray have been installed Context Secure the sealing plates away the aisle by combining them with the cabinet to keep the elegance of the smart module Stand outside the smart module during the installation ...

Page 234: ...n position facing the correct direction Step 3 Secure the parallel plate obtained from the sealing plate fitting bag to the sealing plate using M4 screws and then secure the sealing plate to the cabinet Figure A 32 Installing the sealing plates away the aisle 1 Column End A 6 Optional Connecting Cables to Industrial Connectors Figure A 33 to Figure A 34 show only the cable connection methods The i...

Page 235: ...strial connector five core cable A 7 Optional Connecting PDU2000 Cables Context If the PDU2000 is not provided with industrial connectors connect the PDU2000 cables and lay out the cables on the cabinet top If new main ways are configured connect cables to new main ways and then route the cables to the PDU2000s along cabinets Procedure Step 1 Refer to Figure A 35 Figure A 37 to connect the PDU2000...

Page 236: ...Single Row Aisle Containment with 2000 mm High Cabinets ECC800 A Appendix Issue 01 2019 03 05 Huawei Proprietary and Confidential Copyright Huawei Technologies Co Ltd 227 Figure A 35 Connecting PDU2000 cables method 1 Figure A 36 Connecting PDU2000 cables method 2 ...

Page 237: ...Containment with 2000 mm High Cabinets ECC800 A Appendix Issue 01 2019 03 05 Huawei Proprietary and Confidential Copyright Huawei Technologies Co Ltd 228 Figure A 37 Connecting PDU2000 cables method 3 Step 2 Optional Route cables for the half sized PDU2000 as shown in Figure A 38 ...

Page 238: ...etary and Confidential Copyright Huawei Technologies Co Ltd 229 Figure A 38 Routing half sized PDU2000 cables Step 3 Remove the rodent proof mesh from the top of the cabinet use diagonal pliers to cut openings that allow cables to run through and take out the PDU2000 cables through the openings as shown by 1 2 and 3 in Figure A 39 Figure A 39 Taking out PDU2000 cables ...

Page 239: ...Follow up Procedure Before connecting the power plug of a device to the PDU2000 loosen the locking device on the PDU2000 After connecting the power plug tighten the locking device A 8 Cable Routes Inside an IT Cabinet Route cables neatly inside the IT cabinet by following instructions in 12 1 System Cabling Rules Signal cables or weak current cables inside cabinets are sorted by cable managers cab...

Page 240: ...es Co Ltd 231 The small cable ring is optional and used to manage the cable routes in the vertical direction The cable manager is installed in the front of a cabinet by default You can install it in the rear of a cabinet if necessary Figure A 41 Cable route along a cable tray 1 Cable tray 2 Big cable ring 3 Customer equipment The cable tray is optional and used to lead cables from the cabinet fron...

Page 241: ...2 Figure A 42 Cable route along a depth directed cable tray 1 Cable tray 2 Depth directed cable tray 3 Big cable ring 4 Customer equipment The cable tray is optional and used to lead cables from the cabinet front to the cabinet rear The depth directed cable tray is optional and used to manage the cable routes on the side of a cabinet Figure A 43 and Figure A 44 show the routes of the cables out fr...

Page 242: ...tallation Guide Single Row Aisle Containment with 2000 mm High Cabinets ECC800 A Appendix Issue 01 2019 03 05 Huawei Proprietary and Confidential Copyright Huawei Technologies Co Ltd 233 Figure A 43 Power cable route Figure A 44 Signal cable route ...

Page 243: ...tinguishing system and access actuator the access actuator opens data center doors when the fire extinguishing system generates an alarm signal Fire alarm signals are dry contact signals generated by the fire extinguishing system selected by the customer Fire alarm signals are valid only when the dry contact is ON Connect fire alarm signal cables to the DI and DI terminals at AI DI_1 port or AI DI...

Page 244: ... M3 captive screw 3 8 4 2 Captive M2 5 3 M3 6 Guide rail installation Cross recessed pan head thread forming screw M5 GB T 6560 1986 30 Subrack or box type module installation M3 screw assembly mounting ear 6 M4 countersunk screw mounting ear 12 M6 panel screw 20 Grounding M4 14 M6 48 M8 120 Cabinet or chassis installation cable tray upper fastener or antiseismic enhancement installation cabinet c...

Page 245: ...ion bolt tension implosion 250 M12 M12 expansion bolt tension implosion 450 DB style connector 2 56 M2 5 2 5 4 40 M3 metal head or plastic head 4 Positive and negative battery terminals M6 40 60 M8 130 150 M10 150 200 OT terminal for power cables M2 screw assembly 2 5 M3 screw assembly 6 M4 screw assembly 16 M5 screw assembly 40 M6 screw assembly 50 M8 screw assembly 80 M10 screw assembly 150 M12 ...

Page 246: ...connection Flat washers and spring washers are installed properly Compliant Incompliant 4 The cabinet is clean Compliant Incompliant 5 The cabinet is clear and complies with dustproof requirements Compliant Incompliant 6 The paint on the cabinet exterior is intact If paint flakes off repaint that area to avoid corrosion Compliant Incompliant 7 The cabinet door and lock work properly Compliant Inco...

Page 247: ...wer is on and the skylight drops naturally when the power is off Compliant Incompliant 9 All labels are correct clear and complete Compliant Incompliant 10 There are no adhesive tape cable ties paper or packing materials left around the aisle Compliant Incompliant 11 The aisle is clean inside and outside Compliant Incompliant 12 The paint on the cabinet exterior is intact If paint flakes off repai...

Page 248: ...ncompliant 2 Ground cables AC input power cables and internal cables are connected in accordance with the circuit diagram and screws are secured No short circuit occurs on power inputs or outputs Compliant Incompliant 3 Power cables and ground cables are not coiled and extra parts are cut off Compliant Incompliant 4 Lugs for power cables and protective ground cables are soldered or crimped securel...

Page 249: ...es Co Ltd 240 D Acronyms and Abbreviation A AC Alternating Current ATS Automatic Transfer Switch B BCB Battery Circuit Breaker BIB Battery Control I O Board BIM Battery Interface Module BSPP British Standard Pipe Parallel Thread BSPT British Standard Taper Pipe Thread C CIM Communication Interface Module D DC Direct Current E ECC Energy Control Center EPDM Ethylene Propylene Diene tripolymer EPE E...

Page 250: ...echnologies Co Ltd 241 FE Fast Ethernet I iBAT ibattery IC Integrated Circuit IT Internet Technology N NTC Negative Temperature Coefficient P PDF Power Distribution Frame PDU Power Distribution Unit PE Protective Earthing PoE Power over Ethernet PP R Polypropylene Random PVC Polyvinyl Chloride S SD Secure Digital SIM Subscriber Identity Module U UPS Uninterruptible Power System V VCN Video Cloud N...

Reviews: