


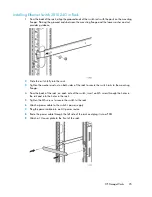


NOTE:
You must connect to the keyboard and monitor ports when performing Quick Restore
(keyboard and monitor not included).
g.
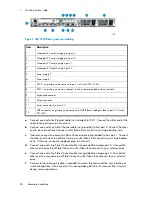
Connect one end of an Ethernet cable to NIC2. Connect the other end of the cable to port
1 of Switch 2810–24G (see
Figure 6
).
h.
Connect one end of a USB cable to the USB port. Connect the other end of the cable to the
USB/Ethernet adapter. Connect an Ethernet cable to the Ethernet end of the adapter, then
connect the Ethernet cable to port 1 of Switch 2510–24 (see
Figure 7
).
i.
Connect a power cable to each power supply and to a PDU. If possible, connect each power
supply to a separate PDU to provide redundancy.
j.
Begin routing the cables through the cable ties that shipped with the racks.
NOTE:
Automigration cabling occurs on the Fibre Channel switch on the existing EVA, therefore,
it is not addressed in this procedure.
HP StorageWorks
29
Summary of Contents for StorageWorks 12000
Page 14: ...14 ...
Page 102: ...Operation 102 ...
Page 110: ...User Interfaces 110 ...
Page 150: ...Management 150 ...
Page 168: ...Monitoring 168 ...
Page 198: ...Component Identification 198 ...
Page 222: ...Support and Other Resources 222 ...
Page 232: ...Troubleshooting 232 ...
Page 236: ...Specifications 236 ...
Page 244: ...Bulgarian Notice Czech Notice Danish Notice Dutch Notice Regulatory Compliance Notices 244 ...
Page 245: ...Estonian Notice Finnish Notice French Notice German Notice HP StorageWorks 245 ...
Page 246: ...Greek Notice Hungarian Notice Italian Notice Latvian Notice Regulatory Compliance Notices 246 ...
Page 247: ...Lithuanian Notice Polish Notice Portuguese Notice Romanian Notice HP StorageWorks 247 ...
Page 249: ...Battery Replacement Notices Dutch Battery Notice HP StorageWorks 249 ...
Page 250: ...French Battery Notice German Battery Notice Regulatory Compliance Notices 250 ...
Page 251: ...Italian Battery Notice Japanese Battery Notice HP StorageWorks 251 ...
Page 252: ...Spanish Battery Notice Regulatory Compliance Notices 252 ...


