10. USER CHARTS
10-4
When you insert an object, the following is done in the [User Chart] dialog box:
- Name of the object button appears in the [Object] window
- Latitude and longitude position of the object is displayed
- Total object count is updated
6. To enter a name for the object, click the appropriate location in the [Name] window
then use the software keyboard to enter a name.
Note:
The name entered for circles and areas can be shown inside the area or
circle on the screen. For details, see paragraph 4.3.4.
7.
Label, line, clearing line
,
area, circle
: Click the corresponding box in the [Radar]
column to hide or show the checkmark to display or don’t display the object on the
radar overlay.
Note:
The clearing line setting is fixed to ON. (The checkmark is grayed out.)
8.
Label, line, clearing line
,
area, circle
: Click the corresponding box in the [Dan-
ger] window to hide or show the checkmark to use or don't use the object in chart
alert calculation. For the tidal mark, go to step 9.
9. L
ine, area, circle
: Do as shown below to add Notes data. For other objects go to
step 10.
1) Enter the text for the Notes in the [Description] box.
2) Click the box in the [Notes] window of the [User Chart] dialog box to set the
message display method.
• E: Message appears when your ship approaches the user chart object. For
a line, message appears when you are “x” miles from the line, which is set
with [Range of notes].
• P: Message appears when your ship is 10NM beyond the user chart object.
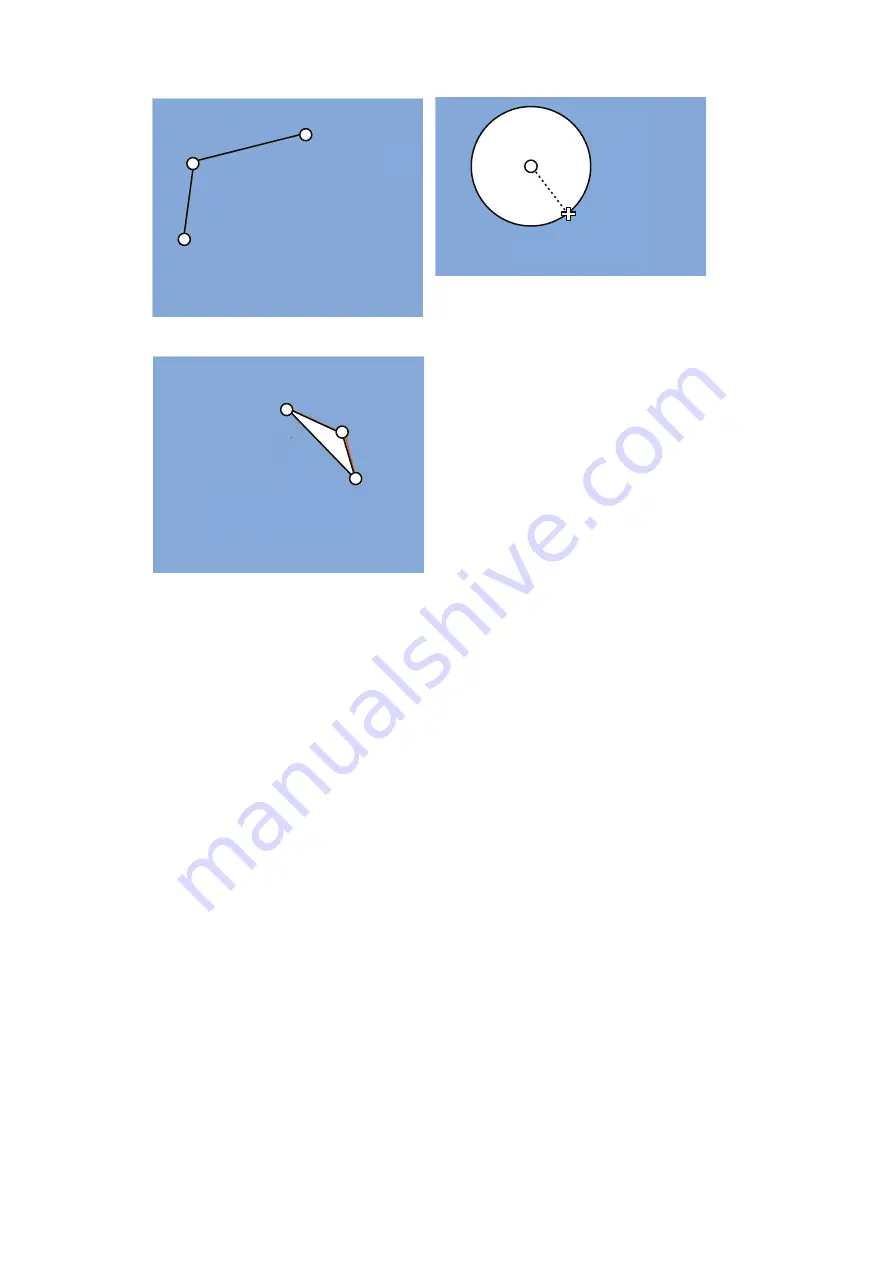
(3) Click
(2) Click
(1) Click
(4) Right-click;
select Finish.
How to create a line
1) Put cursor where to locate center of circle
then click.
2) Drag cursor to set radius; double-click to set.
How to create a circle
(1) Click
(2) Click
(3) Click
How to create an area
(4) Right-click;
select Finish.
(2) Drag cursor;
double-click
to set.
(1) Click
Summary of Contents for FMD3100
Page 36: ...1 INTRODUCTION 1 20 This page is intentionally left blank ...
Page 70: ...2 OPERATIONAL OVERVIEW 2 34 This page is intentionally left blank ...
Page 128: ...5 VECTOR S57 CHARTS 5 12 This page is intentionally left blank ...
Page 140: ...7 C MAP BY JEPESSEN CHARTS 7 6 This page is intentionally left blank ...
Page 206: ...11 HOW TO MONITOR ROUTES 11 16 This page is intentionally left blank ...
Page 230: ...13 TRACKED TARGET TT FUNCTIONS 13 10 This page is intentionally left blank ...
Page 244: ...14 AIS TARGET FUNCTIONS 14 14 This page is intentionally left blank ...
Page 250: ...15 AIS SAFETY NAVTEX MESSAGES 15 6 This page is intentionally left blank ...
Page 294: ...19 RECORDING FUNCTIONS PLAYBACK FUNCTIONS 19 14 This page is intentionally left blank ...
Page 312: ...20 ALERTS 20 18 This page is intentionally left blank ...
Page 332: ...22 SETTINGS MENU 22 16 This page is intentionally left blank ...
Page 338: ...23 MAINTENANCE AND TROUBLESHOOTING 23 6 This page is intentionally left blank ...
Page 395: ......


