


2. INSTALLATION
Page 23
© 2011 Fluke Calibration
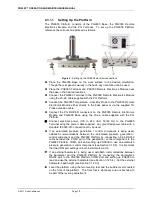
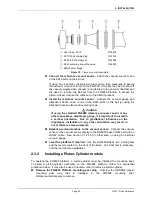
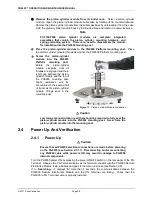
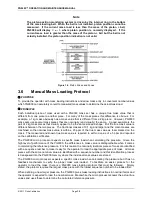
To use the supplied accessories to make the AMH drive air supply connection
proceed as follows:
Connect the quick-connector to one end of the PFA tube. Loosen the 1/8 in.
swage nut on the assembly slightly. Slip the PFA tube into the nut until it
stops. Tighten the nut to swage the tube.
Connect the other end of the PFA tube to an appropriate drive air supply (see
Section 2.2.2.1). If desired, use the 1/8 in. Swage x 1/4 in. NPT M adaptor.
Insert the quick-connector stem into the AMH DRIVE connection quick-
connector, located on the rear of the PG9000 Base (color coded with red band).
Press firmly until the stem clicks into place.
Apply drive air pressure to the connection and check for leaks.
Note
The quick-connect stem seals when disconnected so the drive
air supply may be applied before the quick-connect stem is
inserted into the quick-connector.
Caution
Do not operate the AMH with drive pressure lower than 275 kPa
(40 psi). Damage to the AMH could result.
2.3.1.5.2
Connecting AMH Vent
If operating the PG9000 in vacuum reference mode with AMH-100-VAC it is
necessary to connect the AMH VENT to vacuum supply. The AMH accessories
kit includes hardware to facilitate the connection of the drive vacuum supply (see
Table 4) Locate the drive vacuum connection accessories including:
•
Quick-connector stem (with blue band) and three way sleeve valve
assembly.
•
2 meter 1/4 inch O.D. PFA tubing.
•
2 meter 3/8 inch O.D. PFA tubing.
•
3/8 inch Swagelok
®
x 1/4 inch tube reducer.
•
3/8 inch Swagelok
®
tee.
•
3/8 inch Swagelok
®
connector.
Use the supplied accessories to make the AMH drive vacuum supply connection,
proceed as follows:
Connect the blue banded quick-connector / sleeve valve assembly to one
end of the PFA tube. Loosen the 1/4 in. Swage nut on the assembly slightly.
Slip the PFA tube into the nut until it stops. Tighten the nut to swage the
tube.
Connect the other end of the 1/4 inch PFA tube to an appropriate vacuum
supply (see Section 2.2 Automated Mass Handler, Vacuum Supply). If
desired, use the 3/8 in. x 1/4 in. reducer, 3/8 in. Swage Tee and Port
Connector. The Tee and Port Connector are particularly useful if the vacuum
supply is from a Fluke Calibration PPC/MPC Vacuum Kit. Install the Tee on
the 3/8 in. PFA tube between the vacuum pump and the PPC or MPC.
Insert the quick-connector stem into the drive vacuum connection quick-
connector located on the rear of the PG9000 Base (color coded with blue
band). Press firmly until the stem clicks into place. Use only a “SESO” type
stem (not self sealing).
Check that the three-way sleeve valve is in the GAUGE position (drive
vacuum not applied to the AMH). Apply drive vacuum and check for leaks.
Summary of Contents for PG9000 Series
Page 10: ...PG9602 OPERATION AND MAINTENANCE MANUAL 2011 Fluke Calibration Page X Notes...
Page 128: ...PG9602 OPERATION AND MAINTENANCE MANUAL 2011 Fluke Calibration Page 118 Notes...
Page 164: ...PG9602 OPERATION AND MAINTENANCE MANUAL 2011 Fluke Calibration Page 154 Notes...
Page 188: ...PG9602 OPERATION AND MAINTENANCE MANUAL 2011 Fluke Calibration Page 178 Notes...
Page 192: ...PG9602 OPERATION AND MAINTENANCE MANUAL 2011 Fluke Calibration Page 182 Notes...


