background image

74 

8 Operation in general 


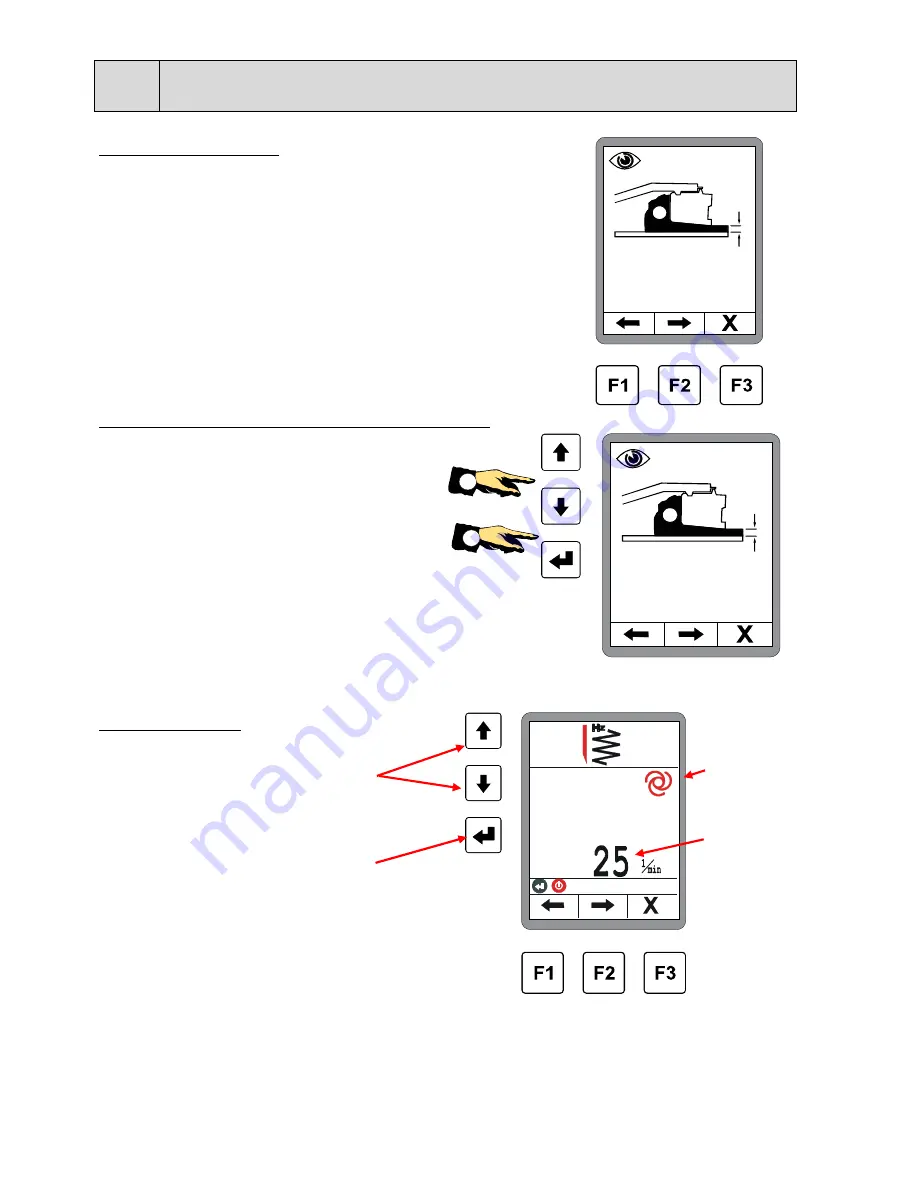
Layer thickness display: 
 
This window appears only if the layer thickness has been 
activated, and the corr. Sensors are connected. 
(See also 8.11.1 Configuration menu) 


Quick adjustment of the layer thickness display: 


Adjustment of the displayed layer 
thickness as following: 
 
1.)  Press and hold ENTER key, and  
2.)  to adjust the value in parallel 

with the UP / DOWN buttons. 


Tamper frequency: 
The nominal value can be changed using the 
up/down buttons. 
 
The ENTER button changes over the operating 
mode of the control circuit. 
(Manual   <--->   Automatic) 
 

ATTENTION!

 Press any button to accept the 

adjusted settings. 


Operating 
mode 
 
 
Nominal value 


c m

11. 2

c m

11. 2

2

1

Summary of Contents for Dynapac SCREED-CONTROL

Page 1: ...OPERATION Dynapac SCREED CONTROL Pavemanager Keep for later use in document compartment 4812019539 A5 04 0616 Valid for _________________ bis _________________ _________________ bis _________________ ...

Page 2: ...www dynapac com ...

Page 3: ...ng personnel 19 2 7 Special risks 20 2 8 Safety facility 22 2 9 Behaviour in the event of danger and accidents 23 2 10 Signs 23 3 Transportation packaging and storage 24 3 1 Transportation inspection 24 3 2 Transportation 25 3 3 Storage 25 4 Product description 26 5 Design system overview and function 27 5 1 Design 27 5 2 System overview and function 28 6 Controls and displays operating modes 33 6...

Page 4: ...5 8 5 2 AUTO control system with material sensor 66 8 5 3 AUTO control system without material sensor 67 8 5 4 Reverse control system 68 8 6 Conveyor menu 69 8 6 1 MANUAL control system 69 8 6 2 AUTO control system with material sensor 70 8 6 3 AUTO control system without material sensor 71 8 6 4 Reverse control system 72 8 7 View menu 72 8 8 Crowning menu 76 8 8 1 Manual control system 77 8 8 2 A...

Page 5: ... beam search 119 9 8 7 Controlling with the power mast and prop laser receiver 121 9 9 Working with the 3D TPS 122 9 9 1 Installation and set up 122 9 9 2 Controlling with the 3D TPS 123 9 10 Working with the 3D GNSS 124 9 10 1 Installation and set up 124 9 10 2 Controlling with the 3D GNSS 125 9 11 Working with the 3D slope sensor 126 9 11 1 Installation and set up 126 9 11 2 Actual value reset 1...

Page 6: ...6 Table of contents 14 Help in the event of malfunctions 150 14 1 Safety instructions 150 14 2 Troubleshooting and malfunction rectification 151 15 Definitions Glossary 164 ...

Page 7: ...nance care These operating instructions form part of the product and must be passed on to third parties or subsequent owners along with the product if necessary They must be available and accessible to the operating personnel at the product s operating location at all times Adherence to the local accident prevention regulations applicable to the product s area of application the general safety reg...

Page 8: ...ication Under certain circumstances these modifications may not correspond to these operating instructions In this case ask the manufacturer for up to date operating instructions We accept no liability for malfunctions failures and damages arising as a result of these Figures The figures contained in these operating instructions serve to improve understanding It may be the case that the figures co...

Page 9: ...oid accidents personal injury and material damage DANGER refers to an immediately hazardous situation which leads to death or severe injuries if it is not avoided WARNING refers to a possibly hazardous situation which may lead to death or severe injuries if it is not avoided CAUTION refers to a possibly hazardous situation which may lead to minor or slight injuries if it is not avoided CAUTION ref...

Page 10: ...E emphasises useful tips and recommendations plus information for efficient and trouble free operation Step by step Step by step instructions which are to be carried out by the operating personnel are numbered 1 2 3 Lists Lists are marked with a black dot ...

Page 11: ...fied and trained personnel Use of unauthorised spare parts and accessories Conversions carried out on the product In the event of special versions and the selection of additional order options or due to the latest technical modifications the actual scope of delivery may deviate from the explanations and illustrations described here 1 4 Copyright In this regard refer to page 2 of these operating in...

Page 12: ...lures and may impair safety Therefore Only use genuine spare parts from the manufacturer Ask the manufacturer about genuine spare parts 1 7 Final decommissioning rendering useless During final decommissioning the remote control components must be protected against re commissioning particularly by unauthorised third parties by rendering them useless 1 Switch off the product s voltage supply 2 Disco...

Page 13: ...val Scrap metal material residues Dispose of electronic components according to the locally applicable regulations CAUTION Risk of injury due to improper disposal of the product Burning plastic parts leads to the occurrence of toxic gases which may cause people to fall ill Therefore Dispose of the product properly according to the applicable national country specific disposal regulations CAUTION R...

Page 14: ...erating instructions do not contain any warranty commitments The warranty regulations form part of the manufacturer s Conditions of sale and delivery 1 10 Customer service The manufacturer and its service network will be happy to provide technical information ...

Page 15: ...reference level and or reference slope using rotary laser or ultrasonic sensors Monitoring of the screed inclination with a slope sensor Monitoring of the vibration tamper and auxiliary compactor frequency using impulse sensors installed in the screed Monitoring of the screed crowning with a cable sensor Monitoring of the material quantity in the area of the auger using ultrasonic material sensors...

Page 16: ...safety facilities Removal of information panels or warning signs Opening the product unless expressly permitted for specific purposes Conversions on or modifications to the product Commissioning the product following misappropriation Use of the product when obvious defects or damage are recognisable Use of the product with unauthorised accessories from third party manufacturers Use of the product ...

Page 17: ...ions 2 3 Modifications to and conversions on the product To avoid hazards and to ensure optimal performance neither modifications attachments or conversions which have not been expressly approved by the manufacturer may be carried out on the product 2 4 Content of the operating instructions Each person who is commissioned to carry out work on or with the product must have read and understood the o...

Page 18: ... assessment These must be implemented in the form of operating instructions for the operation of the product These operating instructions must be stored in the immediate vicinity of the product and must be accessible to the persons working on and with the product at all times The owner must clearly define the responsibilities of the operating personnel The owner must ensure that the operating pers...

Page 19: ...nformed of the tasks transferred to him and the possible hazards in the event of improper behaviour and has been trained on the job if necessary and who has been instructed in the necessary safety facilities and protective measures by the owner or the manufacturer Qualified specialist personnel Qualified specialist personnel in the sense of the operating instructions refers to persons who are fami...

Page 20: ...m electrical systems If working in such systems is vitally necessary inform the departments or authorities responsible for these systems prior to carrying out this work and follow their instructions Moving components CAUTION Risk of injury due to moving vehicle parts During screed control and regulation vehicle parts and assembles are moved manually or automatically Rotating vehicle components and...

Page 21: ...vere injuries to persons in the vehicle s working area or material damage Therefore Make sure that the vehicle is operated controlled and monitored by a qualified and experienced operator The operator must be able to implement emergency measures such as e g an emergency stop Keep persons away from the working area of the vehicle or the screed Remove objects from the working area of the vehicle or ...

Page 22: ...which has been dropped any other impermissible stress or a modification may lead to significant material damage Therefore Do not use products which are obviously damaged Before reusing a component which has been dropped carry out a control measurement 2 8 Safety facility The remote control is equipped with a separate higher level safety facility in the form of an emergency off switch Integration o...

Page 23: ...plement first aid measures Rescue persons from the danger zone Inform the parties responsible at the operating location Notify a physician and or the fire brigade Clear access routes for rescue vehicles 2 10 Signs WARNING Risk of injury due to illegible symbols Over time stickers and symbols on the product may become soiled or illegible in another manner Excessive mechanical strain may cause stick...

Page 24: ...ansportation damage Proceed as follows in the event of externally recognisable transportation damage Do not accept the delivery or only accept it conditionally Note the extent of the damage on the transportation documents or on the freight forwarder s delivery note Institute a complaint Do not commission products which are obviously damaged Complain about each defect as soon as it is discovered Cl...

Page 25: ...rtation containers and cardboard shipping boxes or corresponding packaging The packaging protects the product against impacts and vibrations 3 3 Storage Only store the product in well ventilated dry rooms protect against moisture during storage and use the original packaging to do this wherever possible Avoid severe temperature fluctuations during storage The formation of condensation may cause th...

Page 26: ...maximum system safety It also enables central operation of the system in a very simple manner and thanks to its modular design the successive extension of this For example new sensors can be retrofitted without problem at any time depending on the application requirement The remote control is the core element of the system and automatically detects connected sensors on switching on Product identif...

Page 27: ... is required for each control circuit or side of the vehicle The user can compile his system individually depending on the vehicle and application To do this he simply selects a sensor which best meets the relevant requirement from the large pool of available sensors and combines it with the Dynapac remote control The CAN bus enables several sensors to be connected simultaneously to one remote con...

Page 28: ...m The sensors which are evaluated include Tamper frequency vibration frequency auxiliary compactor frequency left auger material sensor right auger material sensor left screed width sensor right screed width sensor It additionally undertakes and monitors all bi directional communication with the tractor s higher level control system The digital slope sensor SLOS 0150 slope sensor operates with a h...

Page 29: ... values measured by the five ultrasonic sensors of the Sonic Ski plus In the case of cable sensing the Sonic Ski plus is not only able to measure the distance from the reference but can additionally detect the position of the cable or an edge beneath the sensor heads over its entire working width of approx 25 cm 25 cm Conventional simple sensing Mean value formation by the Sonic Ski Direction of t...

Page 30: ...onal cases mean value formation can also be carried out using just two sensors e g Sonic Ski plus at the front and rear Once small areas of unevenness and foreign bodies have been neutralised by the mean value formed by each individual Sonic Ski plus the Big Sonic Ski set up now additionally determines and reduces undulations and small elongated differences in height in the ground s longitudinal p...

Page 31: ...tters helium neon and infrared transmitters It is used for square construction etc and is equipped with a reception range of 29 cm Power masts are only used in combination with laser receivers Power Mast ETM 900 significantly increases the reception range of a laser receiver as the sensor can be guided over the lifting cylinder s entire adjustment range One further advantage offered by the power m...

Page 32: ...value and to maintain it at this value regardless of any malfunctions which may occur To perform the control task the control variable s momentary value the actual value must be measured and compared with the nominal value If variances occur readjustment must be carried out in a suitable manner External malfunction Sollwert Feststellung einer Abweichung Korrekturmaß nahmen Messung des Ist Wertes Ä...

Page 33: ...e control and therefore the central component of the system An understanding of basic operation of the remote control is required in the sections dealing with the operation of the individual sensors The remote control contains all buttons required to operate the system a few function lamps and a 3 5 TFT display from which the current status of the system can be read off at any time ...

Page 34: ... The controls and displays operating modes LED display Left hand levelling system Function buttons Left auger right conveyor Traction point adjustment Horn Display EMERGENCY OFF Right hand levelling system Left conveyor right auger Horn Screed width ...

Page 35: ...ng in particular differ in this case Left hand levelling system Left auger Left remote control Right remote control Left conveyor Right conveyor Right hand levelling system Right auger 6 1 2 Emergency stop switch By actuating the emergency off switch the emergency off chain is interrupted and the higher level control system automatically ensures the implementation of safety shut off ...

Page 36: ...ut runs through cycle with large pulse width Small control variance RAISE controller output runs through cycle with small pulse width No control variance Controller outputs not activated Small control variance LOWER controller output runs through cycle with small pulse width Medium control variance LOWER controller output runs through cycle with large pulse width Large control variance LOWER contr...

Page 37: ...1 Currently selected sensor 2 Set sensitivity of the currently selected sensor 3 Position of the cable beneath the sensor with Sonic Ski plus cable only 4 Configurable info line 5 Value currently measured by the sensor actual value 6 Currently selected operating mode manual mode automatic mode locking is active 7 Set value to which the machine is to be regulated nominal value 8 Physical measuremen...

Page 38: ...refix i e appears on the display The lateral slope direction arrows only appear if the digital slope sensor has been selected as the active sensor The slope direction of the displayed arrow is the prefix for the digital slope sensor value left slope or right slope Both arrows only appear simultaneously together with the display 0 0 The resolution and the physical unit of measurement for the displa...

Page 39: ...the menus it serves to confirm the relevant menu item which has been selected Auto button The auto manual button serves to switch between manual and automatic operating modes Manual mode In manual operating mode the screed is moved directly using the up down buttons on the remote control The function LED integrated into the button is off in manual mode Automatic In automatic operating mode the scr...

Page 40: ...them in the display making navigation in the individual menus clear and simple A blank text field above a function button means that this has no function in the current menu In the operating window the buttons have the following functions Function of button F1 here calling up sensor selection Function of button F2 here calling up the view menu Function of button F3 here calling up the user menu Bu...

Page 41: ...anual mode additionally ends any AUTO mode which may previously have been active Reverse button The REVERSE button switches the auger or conveyor drive to so called reverse mode i e the auger or the conveyor runs in the opposite direction in this case Reverse mode is only maintained as long as the button is kept depressed and ends automatically on releasing the button Auto button The AUTO button s...

Page 42: ...tarted 6 1 8 Traction point adjustment toggle switch The screed can be moved to the desired working position using the toggle switch In manual mode the toggle switch moves the traction point in the relevant direction of actuation The toggle switch has no function in automatic mode 6 1 9 Screed width toggle switch left and right The screed width on the left and right hand sides can be shifted using...

Page 43: ...th an LED arrow 1 similar to that on the remote control Depending on the operating mode to which the remote control to which it is connected is set the function of the laser receiver LED arrow differs In manual operating mode it serves as a positioning aid in automatic operating mode it indicates the status of the valve outputs ...

Page 44: ... Variance Action No laser beam hits the receiver The laser beam hits the receiver above the centre Shift the laser receiver or mast up The laser beam hits the receiver max 2 cm above the centre Shift the laser receiver or mast up slightly The laser beam hits the receiver centrally The laser beam hits the receiver max 2 cm below the centre Shift the laser receiver or mast down slightly The laser be...

Page 45: ...rol variance RAISE controller output constantly on Medium control variance RAISE controller output runs through cycle with large pulse width Small control variance RAISE controller output runs through cycle with small pulse width No control variance Controller outputs not activated Small control variance LOWER controller output runs through cycle with small pulse width Medium control variance LOWE...

Page 46: ...ue for the relevant control circuit is changed using the up down buttons on the remote control If comparison of the measured actual value and the set nominal value results in a difference the remote control independently actuates the outputs until this difference has been compensated Flashes Semi automatic 1 In semi automatic operating mode the nominal value for the relevant control circuit can be...

Page 47: ...f the screed 6 5 2 Operation with semi automatic In semi automatic and automatic operating modes nominal value adjustment using the up down buttons is carried out continuously in 1 mm steps as long as the relevant button remains pressed In semi automatic operating mode the screed is not initially actuated as the outputs are locked in this operating mode If the system is switched from semi automati...

Page 48: ...ter 5 seconds the value on the display is automatically accepted as the zero point i e the nominal value and the actual value are both set to 0 0 The description of operating the different sensors in these instructions is based on standard operation of the remote control Specific differences in the operating variants such as e g the additional semi automatic operating mode or the different step si...

Page 49: ...y to the levelling system operating window By pressing any levelling system button assigned to the side the display immediately switches to the levelling system menu Precondition This type of direct switching to the levelling system menu only functions in the case of one of the following menus Auger Conveyor Lateral slope display Layer thickness display If the remote control is set to the one of t...

Page 50: ...g system on the other side of the screed to be remotely controlled The advantage of this is that the operator does not have to move to the other side of the screed to operate the opposite side e g traction point adjustment nominal value change Precondition Cross operation is based on the direct menu changeover described above i e both remote controls must be set to one of the following menus Level...

Page 51: ...scription refers to mode 2 The following example describes how the right hand remote control remotely controls the left hand remote control cross operates it Cross operation in the opposite direction is carried out in line with this Switching the display over Left remote control Right remote control If under the above described preconditions any button on the left levelling system block is pressed...

Page 52: ...hangeover this first push of a button only ever leads to the activation of cross operation The buttons only have their described levelling system functions again after switching to the operating window on the other side To prevent confusion from occurring during operation a red flashing arrow appears in the display during active cross operation pointing to the other cross operated side c m 1 2 3 9...

Page 53: ...y leads to cancellation Ends automatically after 5 sec If no button on the left levelling system button block is actuated within this time cross operation ends itself automatically due to safety reasons Press button F3 cancellation Press any button on the right levelling system button block Press any button on the conveyor button block Press any button on the auger button block On completion of cr...

Page 54: ... to operate both sides in parallel In addition the crowning slope is also displayed If the corresponding sensors are present in the system The only way to return to the working menu is by pressing F3 cancellation In contrast to mode 2 there is no automatic time reset The display for two separate control circuits is described below in greater detail ...

Page 55: ...n configure the working menu with the display of two control circuits The current side is always configured with the levelling system The other side can be configured with F1 e g with levelling or with the control circuit for the crowning as when making the sensor selection 2 35 1 50 00 00 00 00 00 00 00 00 00 00 00 00 cm cm cm cm F1 selects the second control circuit levelling or crowning Levelli...

Page 56: ...ail in point 8 7 View menu Press F3 to end the two column visualisation and go back to the normal working menu As well as activating the second control circuit by pressing any button of the other side as described above the display of 2 separate control circuits can also be activated directly from the crowning see 8 8 Crowning menu ...

Page 57: ... manufacturer CAUTION Danger due to incorrect installation and initial commissioning Unauthorised vehicle conversions due to the installation of the product and mistakes during installation may impair the function and safety of the vehicle therefore leading to hazardous situations or material damage Therefore Have installation and initial commissioning carried out exclusively by personnel with the...

Page 58: ...ion of the product 8 1 Safety instructions The product may only be operated by trained persons Basic information WARNING Danger due to improper operation Improper operation may lead to severe personal injury or material damage Therefore Have the product operated exclusively by personnel with the required qualifications Carry out all operating steps in accordance with the information contained in t...

Page 59: ...bjects are located in the area of the screed or other moving parts when switching on 8 2 1 Switching on Switch on the supply voltage The activation message initially appears for approx 4 seconds If any button is pressed during the activation message the version number of the software appears on the remote control display for approx 4 seconds The side recognition is then shown for approx a further ...

Page 60: ...If the sensor with which work was last carried out is connected again the view in the display then switches to the operating window If the sensor which was last used has been changed over or disconnected the remote control indicates this with the symbol shown below in the operating window When switching on it should be pointed out to the user that the sensor is no longer available Select another s...

Page 61: ...nsor selection is only available in manual operating mode The active sensor is changed as follows Call up Press function button F1 in the operating window The sensor selection window opens The symbol appears at the top left of the window cm 12 3 9 8 2 40 6 Select another sensor using the up down buttons If more sensors than fit in the display are connected the system automatically scrolls forwards...

Page 62: ...62 8 Operation in general The new sensor is ready to operate 6 2 4 0 2 4 0 2 4 0 ...

Page 63: ... ROTS 0300 Dual Sonic Sensor DUAS 1000 Prop laser receiver LS 3000 5 channel laser receiver Prop laser receiver with Power Mast ETM 900 5 channel laser receiver with Power Mast ETM 900 Big Sonic Ski from SKIS SKIS SKIS Big Sonic Ski from SKIS ROTS SKIS Big Sonic Ski from SKIS DUAS SKIS Big Sonic Ski from SKIS n c SKIS Big Sonic Ski from DUAS DUAS DUAS Big Sonic Ski from DUAS SKIS DUAS Big Sonic Sk...

Page 64: ...ontrol is always initially switched to manual operating mode on switching off even if automatic operating mode was switched on when the system was switched off Nevertheless always switch the remote control to manual operating mode when leaving the vehicle During long work breaks and at the end of work the voltage supply must be disconnected and the system removed or reliably secured to prevent rea...

Page 65: ...less be described in the following 8 5 1 MANUAL control system Resting function Button function Display In this mode the auger is actuated at full speed The manual button has 2 functions Turning the manual button briefly activates the mode A green function LED integrated in the button shows the user that this mode is currently active Activating the manual mode also terminates any hitherto active a...

Page 66: ...ariance The auger is actuated proportionate to the calculated control variance This mode is activated by pressing the AUTO button The green function LED integrated into the button indicates to the user that this mode is currently active Activation of AUTO mode additionally ends any MANUAL mode which may previously have been active The nominal value can be changed using the and buttons The display ...

Page 67: ... button indicates to the user that this mode is currently active Activation of the AUTO mode additionally ends any MANUAL mode which may previously have been active The nominal value can be changed using the and buttons The display only switches automatically to the auger window when the buttons are pressed When the AUTO button is pressed no display appears 5 0 Menu symbol Operating mode Sensor me...

Page 68: ...tuated at full speed in the reverse direction This mode is activated by pressing the reverse button Reverse mode is only maintained as long as the button is kept depressed and ends automatically on releasing the button The manual mode does not need its own separate display message The button is simply released for deactivation ...

Page 69: ...MANUAL control system Resting function Button function Display In this mode the conveyor is actuated at full revs The MANUAL button has 2 functions Turning the MANUAL button briefly activates the mode A green function LED integrated in the button shows the user that this mode is currently active Activating the MANUAL mode also terminates any hitherto active AUTO mode The MANUAL button is pressed a...

Page 70: ...ance The conveyor is actuated proportionate to the calculated control variance This mode is activated by pressing the AUTO button The green function LED integrated into the button indicates to the user that this mode is currently active Activation of the auto mode additionally ends any manual mode which may previously have been active The nominal value can be changed using the and buttons The disp...

Page 71: ... the button indicates to the user that this mode is currently active Activation of the AUTO mode additionally ends any MANUAL mode which may previously have been active The nominal value can be changed using the and buttons The display switches automatically to the auger window when the buttons are pressed When the AUTO button is pressed no display appears Menu symbol Operating mode Sensor measure...

Page 72: ...oes not need its own separate display message The button is simply released for deactivation 8 7 View menu Whilst working with any sensor the measured values of other connected sensors can be viewed without interrupting the control system The view menu is always available irrespective of whether the levelling system is set to manual or automatic operating mode The various windows in the view menu ...

Page 73: ...d width Auger Emergency control Material calculation The view menu contains many different menus organised consecutively Press F1 to go directly to the menus at the end of the list Lateral slope display The first window shows the current lateral slope Only if a slope sensor is available Navigation in the menu Navigate through the view menu using function buttons F1 and F2 End menu Press function b...

Page 74: ... display Adjustment of the displayed layer thickness as following 1 Press and hold ENTER key and 2 to adjust the value in parallel with the UP DOWN buttons Tamper frequency The nominal value can be changed using the up down buttons The ENTER button changes over the operating mode of the control circuit Manual Automatic ATTENTION Press any button to accept the adjusted settings Operating mode Nomin...

Page 75: ...s following on after the crowning menu are fundamentally different and therefore described separately Other menus in the view menu Crowning menu Basic screed width Auger Emergency control Material calculation The following section describes the menus for the crowning base screed width and for the auger more information about the emergency control and material calculation can be found in chapters 1...

Page 76: ...may appear as follows Only manual adjustment can be selected in the menu Function Manual adjustment involves direct adjustment of the crowning at the push of a button If a crowning sensor is connected auto adjustment can also be selected Function Auto adjustment automatically adjusts the crowning to a previous ly input slope The 3rd menu item travel dependent adjustment can also be selected with a...

Page 77: ...eed is under load it is still possible for it to adjust to a value that deviates somewhat from the calibration The displayed actual value can be adjusted to correct this offset To this end adjust the actual value to the correct setting using the two up down buttons 2 while holding the input button 1 0 84 If no crowning sensor is available no current value is displayed Crowning adjustment can still...

Page 78: ... prompt appears Adjustment to the previously set nominal value only takes place when start button F2 is pressed again ATTENTION The crowning is now adjusted directly to the set value by the control system 2 40 0 84 Press the stop button F1 to cancel the control F2 activates the display with 2 control circuits Here it is possible to show the crowning control and levelling at the same time Press fun...

Page 79: ... the enter button Use the up down buttons to enter the nominal value for the desired crowning slope This target crowning slope is also displayed in the info line Press button F2 0 84 2 40 2 40 the travel input window opens Use the up down buttons to enter the distance to which the crowning is to be switched Press F2 again to go to the crowning menu F1 cancellation F2 start Go to Security check F3 ...

Page 80: ...dent adjustment the remaining distance to be covered is displayed in the header Display of the target value to the end Currently measured actual value Nominal value currently calculated for the present position Gets gradually closer to the target value when moving forwards F1 cancellation F2 change to display with 2 control circuits F3 exit the crowning window to the main menu while the activated ...

Page 81: ...rts Change values Change the brightness with the up down buttons Navigation in the menu Navigate through the user menu using function buttons F1 and F2 End menu Press function button F3 to leave the menu 8 10 Auger height adjustment This menu is used to raise and lower the auger The left auger can be raised or lowered using the up down buttons of the left button block The right up down buttons are...

Page 82: ... user menu Value settings are accepted by pressing any function button A selection is accepted directly by pressing the enter button Settings are changed as follows in the user menu Press function button F3 in the standard view Display brightness The first window shows the display brightness setting Change values Change the brightness with the up down buttons Navigation in the menu Navigate throug...

Page 83: ...nsible combination of the dead band and prop band parameters determined in a long series of tests The value tables can be found on the following page The sensitivity value must be set separately for distance and slope sensors and is subsequently automatically loaded when a sensor is switched If the remote control operates too erratically in automatic mode the sensitivity of the corresponding remot...

Page 84: ... 3 6 14 0 4 3 4 12 0 5 3 0 10 0 6 2 4 8 0 7 2 0 6 0 8 1 6 5 0 9 1 2 4 0 10 1 0 3 0 Sensors Digital rotary sensor Sensitivity Dead band mm Prop band mm 1 4 0 18 0 2 3 4 16 0 3 3 0 14 0 4 2 4 12 0 5 2 0 10 0 6 1 4 8 0 7 1 0 6 0 8 0 8 5 0 9 0 6 4 0 10 0 4 3 0 Sensors Digital slope sensor Sensitivity Dead band Prop band 1 0 40 1 60 2 0 30 1 40 3 0 20 1 20 4 0 14 1 00 5 0 10 0 80 6 0 06 0 60 7 0 04 0 5...

Page 85: ...ic sensor s sound beam driving over a cable bracket etc and technical faults reference cable torn etc To avoid these undesired measuring errors and the vehicle s resulting extreme control actions the measured values of all distance sensors can be placed into a so called control window If a control variance which occurs is greater than the range set here this variance is recognised as an error In t...

Page 86: ...ay instead of a numerical value Hydraulic system data record If the remote control is to be used on different vehicles hydraulic system parameter settings can be stored by trained specialist personnel for up to X different vehicle types the maximum possible number of hydraulic system records may be limited in the system s basic settings The saved settings can then be loaded for the relevant vehicl...

Page 87: ... to the sensor constellation Press function button F3 in the standard view Navigate through the user menu using function buttons F1 and F2 and switch to the configuration menu Selectable configurations include Layer thickness display Units of measure for distance measurement Units of measure for slope measurement Configuration of the operating windows Select the menu item using the up down buttons...

Page 88: ...r deactivate the layer thickness display If the layer thickness display has been activated entering the following parameters is vital for correctly calculating the value Currently measured layer thickness Distance from the rear edge of the screed to the centre of the first sensor Distance from the centre of the first sensor to the centre of the second sensor Check the layer thickness display durin...

Page 89: ...n with the enter button or press function button F3 to leave the user menu 0 0 01 m 0 0 1 m 0 1 cm 1 cm 0 1 in in c h 0 0 1 ft fe e t Unit of measurement for slope measurement Select the resolution and the physical unit of measurement for the slope measurements from the available alternatives The selection made here applies to all slope measurement sensors Select the desired unit of measurement us...

Page 90: ...available alternatives i e the forms for showing the actual value and nominal value 9 87 cm 12 34 cm 12 34 cm 9 87 cm 12 34 XX X X XX X X XX X X Standard view Actual value small Nominal value large Alternative view Actual value large Nominal value large Classic view Manual operating mode actual value only Automatic operating mode nominal value only Use F1 and F2 to navigate After configuring the o...

Page 91: ...to the next configuration setting the info line The info line offers additional information to be shown in the normal working menu Use the up down buttons to activate or deactivate the info line default active XX X X 2 40 Once you have activated the info line select the additional information that you want displayed from the following selection menu Here is an overview of the variables that can be...

Page 92: ...erial still required Material calculation quantity of applied material Actual traction points value if sensor present Actual coat thickness measurement if sensors present and activated Depending on the coding of temperature sensors per a separate temperature measurement for left and right or the same value is displayed on the remote controls Actual material temperature if sensor present Actual val...

Page 93: ...he digital slope sensor should be mounted parallel to the lower edge of the screed As this is not always 100 possible in practice however and an offset occasionally remains the sensor is then reset in the system After determining the offset between the measured value and reality the digital slope sensor then reflects the precise slope of the screed This is referred to as actual value reset Actual ...

Page 94: ...vely 2 30 2 30 Step 3 Press and hold down the enter button and the displayed value is corrected to the actual value 2 30 determined in 2 using the UP DOWN buttons 2 3 6 2 4 Repeat steps 1 to 3 if necessary until the set nominal value and the paved slope are identical to each other For optimal working results the actual value display must be checked and if necessary corrected at regular intervals A...

Page 95: ...ed to the working position using the up down buttons or the toggle switch on the remote control 4 Press the enter button The nominal value has a black background and the current actual value is taken over as the nominal value 5 Use the auto manual button to switch the controller to automatic operating mode The controller maintains the screed at the set value 6 In automatic mode the up down buttons...

Page 96: ...cifications This process is referred to as calibration to zero Preparation To do this 1 Manually move the lower edge of the screed to calibration height i e to the level which is significant for the subsequent operation level of the layer to be paved and set your traction points to the desired height 2 Position the distance sensor s above the reference If working with laser receivers shift these u...

Page 97: ... Select the distance sensor to be calibrated from the remote control s sensor selection 4 Press the calibration button on the remote control and keep it pressed until the actual value and the nominal value initially have a black background on the display and both values change to 0 0 after approx a further 2 seconds The distance sensor s current measured value actual value has been taken over as t...

Page 98: ...ensing the Sonic Ski plus must be operated transversely to the vehicle s direction of travel Align the sensor centrally above the cable So that the cable is shown for the correct side beneath the Sonic Ski plus sensor heads the sensor must be mounted on both sides as shown in the sensor symbol i e with the connector pointing to the left in each case viewed in the direction of travel The cable is o...

Page 99: ...ound and cable sensing lies between 30 cm and 40 cm In this range the actual value shown on the remote control display is constantly on outside of this range the display flashes positioning aid The Sonic Ski plus should be set to a distance of approx 35 cm from the reference Ground Cable Approx 35 cm ...

Page 100: ...e reference as described in the section entitled Installation and set up 5a Press the enter button The nominal value has a black background and the current actual value is taken over as the nominal value 5b Keep the enter button pressed for approx 2 seconds The actual value and the nominal value initially have a black background The actual value and the nominal value are set to 0 0 6 Use the auto ...

Page 101: ... reference as described in the section entitled Installation and set up 5a Press the enter button The nominal value has a black background and the current actual value is taken over as the nominal value 5b Keep the enter button pressed for approx 2 seconds The actual value and the nominal value initially have a black background The actual value and the nominal value are set to 0 0 6 Use the auto m...

Page 102: ...easured value recording See also the following drawings Sensing from the cable The sensing tube is used for sensing from the cable By screwing in or out set the counterweight so that the sensing tube exercises slight pressure on the cable from above If the tension of the cable which is used as the reference is too low it is possible to guide the sensing tube beneath the cable To do this the counte...

Page 103: ...s described in the section entitled Installation and set up 5a Press the enter button The nominal value has a black background and the current actual value is taken over as the nominal value 5b Keep the enter button pressed for approx 2 seconds The actual value and the nominal value initially have a black background The actual value and the nominal value are set to 0 0 6 Use the auto manual button...

Page 104: ...e further it moves away from the sensor When working with the dual sonic sensor clearance of 20 cm around the sound beam axes must therefore be maintained to reliably avoid interfering reflections throughout the entire specified working area Working area The optimal working area for the dual sonic sensor lies between 30 cm and 40 cm The dual sonic sensor should be set to a distance of approx 35 cm...

Page 105: ... in the section entitled Installation and set up 5a Press the enter button The nominal value has a black background and the current actual value is taken over as the nominal value 5b Keep the enter button pressed for approx 2 seconds The actual value and the nominal value initially have a black background The actual value and the nominal value are set to 0 0 6 Use the auto manual button to switch ...

Page 106: ...ystem On vehicles with a CAN bus wired in the factory the connection of 3 sensors to form a Big Sonic Ski poses no problem as correspondingly coded connection plugs are normally provided at the front in the centre and at the rear of the side wall on these vehicles The connection of a Big Sonic Ski on a vehicle which is not yet equipped with a factory wired CAN bus is more complex In this case the ...

Page 107: ... sequence 6 An overview of the permissible Big Sonic Ski constellations is again provided in the following Only those alternatives which are possible with the currently installed sensors are available for selection in the sensor selection menu SKIS SKIS SKIS SKIS ROTS SKIS SKIS DUAS SKIS DUAS DUAS DUAS DUAS SKIS DUAS DUAS ROTS DUAS SKIS n c SKIS DUAS n c DUAS Only identical ultrasonic sensors are ...

Page 108: ...erefore be aligned longitudinally to the vehicle s direction of travel mean value formation Ultrasonic sensor working area The optimal working area of the ultrasonic sensors must also be taken into consideration when working with the Big Sonic Ski Each of the ultrasonic sensors which is used should be set to a distance of approx 35 cm from the reference Direction of travel Ground Approx 35 cm ...

Page 109: ...o the reference as described in the section entitled Installation and set up 5a Press the enter button The nominal value has a black background and the current actual value is taken over as the nominal value 5b Keep the enter button pressed for approx 2 seconds The actual value and the nominal value initially have a black background The actual value and the nominal value are set to 0 0 6 Use the a...

Page 110: ...point the laser beam into other persons eyes Operate the laser transmitter clearly above eye level Improper installation CAUTION Risk of injury due to improper installation Occasionally laser transmitters and laser receivers have to be installed at heights significantly above ground level Installation using unsuitable aids may lead to injuries Therefore Do not climb on the vehicle or mast Use suit...

Page 111: ...ver the roof of the vehicle No reflective surfaces e g windows motor vehicle glazing may be located in the area of the laser beam To minimise the occurrence of reflections it is advisable to cover the laser transmitter except for the circular cut out which is actually required The laser transmitter s specified range must not be exceeded note environmental influences Working point Commission a suit...

Page 112: ...on 6 2 The prop laser receiver displays in this regard Only in this way can the nominal value subsequently be adjusted over the full range of 14 cm when working In principle the working point can be taken over in any laser receiver position Depending on the planned application this may actually be sensible Due to an asymmetrical working point the available adjustment range in one direction raise o...

Page 113: ...ce as described in the section entitled Installation and set up 5a Press the enter button The nominal value has a black background and the current actual value is taken over as the nominal value 5b Keep the enter button pressed for approx 2 seconds The actual value and the nominal value initially have a black background The actual value and the nominal value are set to 0 0 6 Use the auto manual bu...

Page 114: ...eir instructions Laser beams CAUTION Risk of eye injury due to laser beams Laser transmitters operate with high intensity light beams Looking directly into the laser beam may lead to eye injuries Therefore Do not look directly into the laser beam Do not point the laser beam into other persons eyes Operate the laser transmitter clearly above eye level Improper installation CAUTION Risk of injury du...

Page 115: ...es e g windows motor vehicle glazing may be located in the area of the laser beam To minimise the occurrence of reflections it is advisable to cover the laser transmitter except for the circular cut out which is actually required The laser transmitter s specified range must not be exceeded note environmental influences Working point Commission a suitable laser transmitter wavelength between 600 an...

Page 116: ...The laser beam search can be carried out automatically Also see the next section 9 8 3 The mast menu 9 8 3 The mast menu If the power mast with laser receiver is selected as the active sensor helpful additional functions are available to the user These additional functions are called up from the operating window using function button F2 As long as the power mast with laser receiver is selected a s...

Page 117: ...ft of the window Select the desired menu item using the up down buttons and confirm the selection using the enter button Or use function button F2 to continue to the familiar view menu with the current measured values for all connected sensors The symbol appears at the top left of the window The mast menu functions are described on the next few pages 10 15 cm 9 8 6 2 3 1 ...

Page 118: ...with the enter button Press function button F3 to leave the menu The illustrated window opens The symbol appears at the top left of the window Move the mast using the up down buttons in order e g to set the laser receiver up using its positioning aid The value shown on the display mast length extend power mast Pressing both buttons together automatically retracts the power mast retract power mast ...

Page 119: ...er button Press function button F3 to leave the menu The illustrated window opens The symbol appears at the top left of the window Start the automatic laser beam search using the up down buttons The mast stops when the laser beam hits the laser receiver centrally search up If both buttons are pressed at the same time the search is first carried out upwards automatic search direction switch search ...

Page 120: ...lst searching up whilst searching down laser beam found laser beam not found Note on height measurement using the power mast The third menu item is used for height measurement with the machine As height measurement with the machine makes no sense on the paver finisher the description of the function is omitted at this point ...

Page 121: ...on If the laser beam is located in an arbitrary position in the laser receiver s reception area the power mast is moved in such a way that the laser beam hits the centre of the laser receiver The nominal value has a black background and the current actual value is taken over as the nominal value 5b Keep the enter button pressed for approx 2 seconds The actual value and the nominal value initially ...

Page 122: ...ption of the installation wiring and configuration of the system components ascertaining the vehicle dimensions and entering them in the 3D software calibration of the mast slope sensor and above all a description of how the 3D software works goes beyond the scope of these operating instructions Separate instructions for working with MOBA 3D are available from your dealer ...

Page 123: ...utton The nominal value has a black background and the current actual value is taken over as the nominal value 4b Keep the enter button pressed for approx 2 seconds The actual value and the nominal value initially have a black background The actual value and the nominal value are set to 0 0 5 Use the auto manual button to switch the controller to automatic operating mode The controller adjusts the...

Page 124: ...MOBA 3D GNSS 1 system according to its operating instructions A description of the installation wiring and configuration of the system components ascertaining the vehicle dimensions and entering them in the 3D software calibration of the mast slope sensor and above all a description of how the 3D software works goes beyond the scope of these operating instructions Separate instructions for working...

Page 125: ...button The nominal value has a black background and the current actual value is taken over as the nominal value 4b Keep the enter button pressed for approx 2 seconds The actual value and the nominal value initially have a black background The actual value and the nominal value are set to 0 0 5 Use the auto manual button to switch the controller to automatic operating mode The controller adjusts th...

Page 126: ...BA 3D system according to its operating instructions A description of the installation wiring and configuration of the system components ascertaining the vehicle dimensions and entering them in the 3D software calibration of the mast slope sensor and above all a description of how the 3D software works goes beyond the scope of these operating instructions Separate instructions for working with MOB...

Page 127: ...ntroller to move the screed to the nominal value defined by the 3D system for the current position 4 Use the auto manual button to switch the controller to automatic operating mode The controller adjusts the screed to the values stated by the 3D system depending on the screed position When working with the 3D slope sensor the up down buttons on the controller cannot be used to adjust the nominal v...

Page 128: ...h the digital slope sensor In this case a required lateral slope is adjusted according to the covered distance The following section refers to this kind of control as delta slope control If the delta slope sensor is selected during on going slope control the slope control operating hitherto continues in auto mode After making the selection the system asks first for the target slope and then for th...

Page 129: ...or example if the digital slope sensor has not been installed absolutely parallel to the lower edge of the tool see also chapter 9 1 2 Actual value reset 9 12 3 Controlling with the travel dependent digital slope sensor Press F1 to call up the sensor selection menu If the normal slope control was active before as shown on the right selecting the delta slope sensor does not deactivate the slope con...

Page 130: ... button F2 the travel input window opens Use the up down buttons to enter the distance to which the slope is to be switched Press F2 to go to the delta slope menu The functions in the delta slope menu are F1 cancel F2 start F3 change to user menu Press F2 to activate travel dependent control 1 00 1 00 50 0 2 00 m 50 0 50 0 2 00 1 00 2 00 2 00 ...

Page 131: ...for the present position Gets gradually closer to the target value when moving forwards F1 cancellation F2 change to view menu F3 change to user menu Use the auto manual button to activate deactivate the control This picture shows delta slope control just before reaching the target On reaching the target travel 0 the control automatically changes over to normal travel independent slope control The...

Page 132: ...rgency control provides information on activating and using these functions With the emergency control only the button information of the remote controls is sent to the overriding control system and processed there Overall control in the various modes is also carried out by this higher level system The various modes will nevertheless be described in the following Before activation Please note that...

Page 133: ...ture of the menu sequences are already described in detail in point 8 7 View menu Call up Press function button F2 in the standard view Here again is a brief overview of the view menu Lateral slope display Layer thickness display Tamper frequency Vibration Auxiliary compactor Screed temperature Crowning menu Auger Emergency control Material calculation cm 5 0 6 5 0 1 1 ...

Page 134: ...leasing the remote control Open emergency functions Press ENTER to open the emergency functions Navigation in the menu Navigate through the menu using function buttons F1 and F2 End menu Press function button F3 to leave the menu Emergency functions opened The emergency functions remain open until the vehicle starts up again ...

Page 135: ...to leave the menu Vario speed The operating mode can be changed with the ENTER button ON OFF Navigation in the menu Navigate through the menu using function buttons F1 and F2 End menu Press function button F3 to leave the menu Automatic steering unit The operating mode can be changed with the ENTER button ON OFF Navigation in the menu Navigate through the menu using function buttons F1 and F2 End ...

Page 136: ...n block open and close the right hopper Navigation in the menu Navigate through the menu using function buttons F1 and F2 End menu Press function button F3 to leave the menu Screed The screen can be raised and lowered with the up down buttons Navigation in the menu Navigate through the menu using function buttons F1 and F2 End menu Press function button F3 to leave the menu ...

Page 137: ...nu offers you a choice of the following two functions Calculating the applied material This calculates and displays the total applied material from a start ing point that you have to enter Advance material planning calculation This function calculates the total amount of material still required up to a point in time that you have to enter 11 1 Calculating the applied material Use the up down butto...

Page 138: ...ted volume of material Calculated weight The values shown here are calculated on the basis of the following values Distance Working width Course thickness Material density Press F2 to enter these values Enter the distance covered from the start or set the value to ZERO by press UP and DOWN at the same time F2 takes you to the next input ...

Page 139: ... are used for this calculation F2 takes you to the next input Enter the paved working width screed width Any measurements for the width available in the system are used for this calculation F2 takes you to the next input Finally enter the material density ρ to convert the volume into weight Press F2 to go back to the overview ...

Page 140: ...140 11 Material calculation After all values have been entered once the overview shows the amount of material already applied ...

Page 141: ...planning After making the selection first the overview page appears Distance still to be covered Entered course thickness Calculated volume of material Calculated weight The values shown here are calculated on the basis of the following values Distance Working width Course thickness Material density Press F2 to enter these values ...

Page 142: ...rozen in the display when you call up the input window Now use the up down buttons to adjust this value to the planned value F2 takes you to the next input Enter the paved working width screed width If there are measurements for the width already in the system the current measurement is frozen in the display when you call up the input window Now use the up down buttons to adjust this value to the ...

Page 143: ... go back to the overview After all values have been entered once the overview shows the amount of material still required When the vehicle moves this automatically reduces the distance shown in the header The remaining amount of material still required is updated permanently according to the remaining distance ...

Page 144: ...ting the applied material are always the same Press F1 to go from the overview page to changing the units The units can be changed using the up down buttons 500 t m3 cm 10 5 1500 0 3000 0 t m3 cm 10 5 1500 0 3000 0 500 Changing the units of measurement for the distance There is a choice between Meter m Foot ft Yard yd F2 takes you to the next input ...

Page 145: ...xt input Changing the units of measurement for the paving width There is a choice between Meter m Foot ft Yard yd F2 takes you to the next input Changing the units of measurement for material density There is a choice between Kilogram cubic meter kg m Pound Cubic foot lb ft Pound Gallon US lb gal Pound Gallon GB lb gal F2 takes you to the next input ...

Page 146: ...t for material volume There is a choice between Cubic meter m Cubic foot ft Cubic yard yd Register ton reg tn F2 takes you to the next input Changing the units of measurement for material weight There is a choice between Ton t Short ton US tn sh Long ton GB tn l ...

Page 147: ...d over accordingly at the driver s dashboard Internal levelling is deactivated for external levelling This is shown with a grey nominal value in the working menu All other functions are still accessible with function buttons F1 F3 If you try to activate internal levelling while external levelling is in progress the nominal value is replaced with a warning for approx 3 seconds cm 0 0 9 8 2 40 6 ...

Page 148: ...ible damage and soiling 13 1 Safety instructions Servicing and maintenance work on the product may only be carried out by qualified specialist personnel CAUTION Risk of injury due to improperly executed maintenance work Improper maintenance may lead to severe personal injury or material damage Therefore Have maintenance work carried out exclusively by personnel with the required qualifications Ens...

Page 149: ...isplays using agents which contain abrasive substances The surface becomes scratched and matte as a result of this making the display more difficult to read Clean and dry the products at a maximum temperature of 40 Only repackage the equipment again when it is completely dry Cables The plug contacts and the threads of the plug connections and the cable connections must be kept free of dirt grease ...

Page 150: ...unnecessary downtimes 14 1 Safety instructions Malfunction rectification on the product may only be carried out by qualified specialist personnel For malfunction rectification purposes always switch the remote control off or if the voltage supply is required for rectification switch it to manual operating mode CAUTION Risk of injury due to improper malfunction rectification Improper malfunction re...

Page 151: ...is shown for each individual component If automatic operating mode was active at the time at which a warning message occurred Automatic operating mode remains active The valve outputs are switched off The entire LED arrow flashes If the cause of the malfunction disappears independently insect in the measuring range of an ultrasonic sensor vehicle drives over a pin etc the remote control immediatel...

Page 152: ... mode Remedy Realign the sensor to the reference Cause The active sensor s control variance is greater than the set control window Control outputs The outputs are locked in automatic mode Remedy Realign the sensor via the reference Specifically when working with the laser receiver Cause The laser receiver receives several signals from the laser transmitter due to reflections in its environment Con...

Page 153: ... recharge the battery Cause Restricted accuracy of the measurement Control outputs The outputs are still actuated in automatic mode Remedy Press any button to acknowledge the error message Make sure that the prism is clean and in the direct field of vision of the total station Check the distance between total station and vehicle measuring accuracy can be impaired in the range above 250 m air flick...

Page 154: ...e is a clear sky and that there are no trees signs roofs etc over or in the direct vicinity of the antenna Cause The battery of the base station is low on charge Control outputs The outputs are still actuated in automatic mode Remedy Press any button to acknowledge the error message Replace or recharge the battery Cause Poor radio link between basis station and GNSS receiver on the vehicle Control...

Page 155: ...es error messages appear in the operating window at the position of the currently active sensor s actual value In the case of sensor combinations Big Sonic Ski power mast with laser receiver etc a separate error message is shown for each individual component E g c m 6 1 2 3 OUT 1 3 2 c m 6 1 2 3 1 3 2 If automatic operating mode was active at the time at which a warning message occurred Automatic ...

Page 156: ...mum temperature Consequence The device continues to heat up but switches off automatically on reaching the permissible maximum temperature Remedy Acknowledge the error message with any button the remote control initially continues to operate as normal Prevent further heating shading cooling different installation location etc Cause The temperature in the interior of the remote control approaches t...

Page 157: ...he sensor if necessary Specifically when working with the power mast Cause The power mast is equipped with its own internal measuring system with which it can determine how far it is currently extended at any time In exceptional situations the mast may forget this current position Control outputs The outputs are locked in automatic mode Remedy Retract the power mast completely once so that it can ...

Page 158: ... as follows Cause No laser beam hits the laser receiver Control outputs The outputs are locked in automatic mode Remedy Realign the laser receiver to the laser beam Cause The laser receiver is acyclically hit by laser beams or is hit simultaneously by several laser pulses Control outputs The outputs are locked in automatic mode Remedy Cover the laser transmitter apart from the actually required ci...

Page 159: ...revolutions per second Control outputs The outputs are locked in automatic mode Remedy Reduce the laser transmitter s rotational speed if it is equipped with a speed control Remove reflective surfaces motor vehicle glazing windows etc from the laser beam s area of influence or cover these surfaces Legend LED is off LED flashes LED is on ...

Page 160: ...utomatic mode Remedy Please be patient for a moment the prism search can take a little time If necessary start the total station extended search 3D Cause An unspecified 3D error has occurred Control outputs The outputs are locked in automatic mode Remedy Please comply with the information about the error given on the total station and system computer displays Cause The total station battery is fla...

Page 161: ...e correction to be received The correction signal should be received in a cycle once per second Cause The GPS cannot produce a valid position because there are not enough satellites Control outputs The outputs are locked in automatic mode Remedy Please be patient for a moment the search for the number of satellites necessary for certain position definition can take a little time If the error messa...

Page 162: ...GNSS receiver on the vehicle is interrupted Control outputs The outputs are locked in automatic mode Remedy Check the wiring and the power supply for the radio devices Make sure that that the base station is working and that there are no screening metallic surfaces directly in front of it ...

Page 163: ...cable incl plug connector for damage and exchange if necessary replace the remote control Manual side changeover Manual changeover of the side recognition is possible to finish any ongoing work in the event of this error This example shows a remote control fitted on the right which has imported wrong side recognition On the wrong remote control press and hold the 3 UP DOWN ENTER buttons at the sam...

Page 164: ...that the measured value of the sensor actual value corresponds with the stipulated value nominal value Dead band A symmetrical area around the working point where there is no activation of the output It is used to achieve stable behaviour of the screed in the working point Max pulse Activation pulse defining the maximum permitted working speed of a hydraulic cylinder Min pulse Minimum activation p...

Page 165: ...outlets if you encounter any operational problems or have enquiries about spare parts Our trained specialist staff will ensure that you receive prompt attention and repairs in the event of any ac cident or malfunction you may encounter Factory Advisory Service If ever for any reason our dealership network encounters limits to what it is able to do for you please always feel free to contact us dire...

Page 166: ...www dynapac com ...

Reviews: