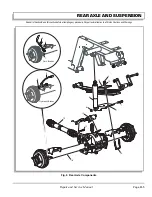
REAR AXLE AND SUSPENSION
Page M-2
Repair and Service Manual
Read all of Section B and this section before attempting any procedure. Pay particular attention to all Notes, Cautions and Warnings
REAR AXLE
Maintenance
The rear axle is provided with a lubricant level fill plug
located on the passenger side at rear of housing. Unless
leakage is evident, an annual lubricant check is suffi-
cient.
Checking Lubrication Level
Tool List
Qty. Required
Ratchet, 3/8" drive ....................................................... 1
Torque wrench, 3/8" drive, ft. lbs. ................................ 1
Socket, 7/16", 3/8" drive .............................................. 1
Hose ............................................................................ 1
Funnel ......................................................................... 1
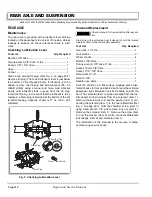
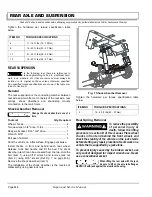
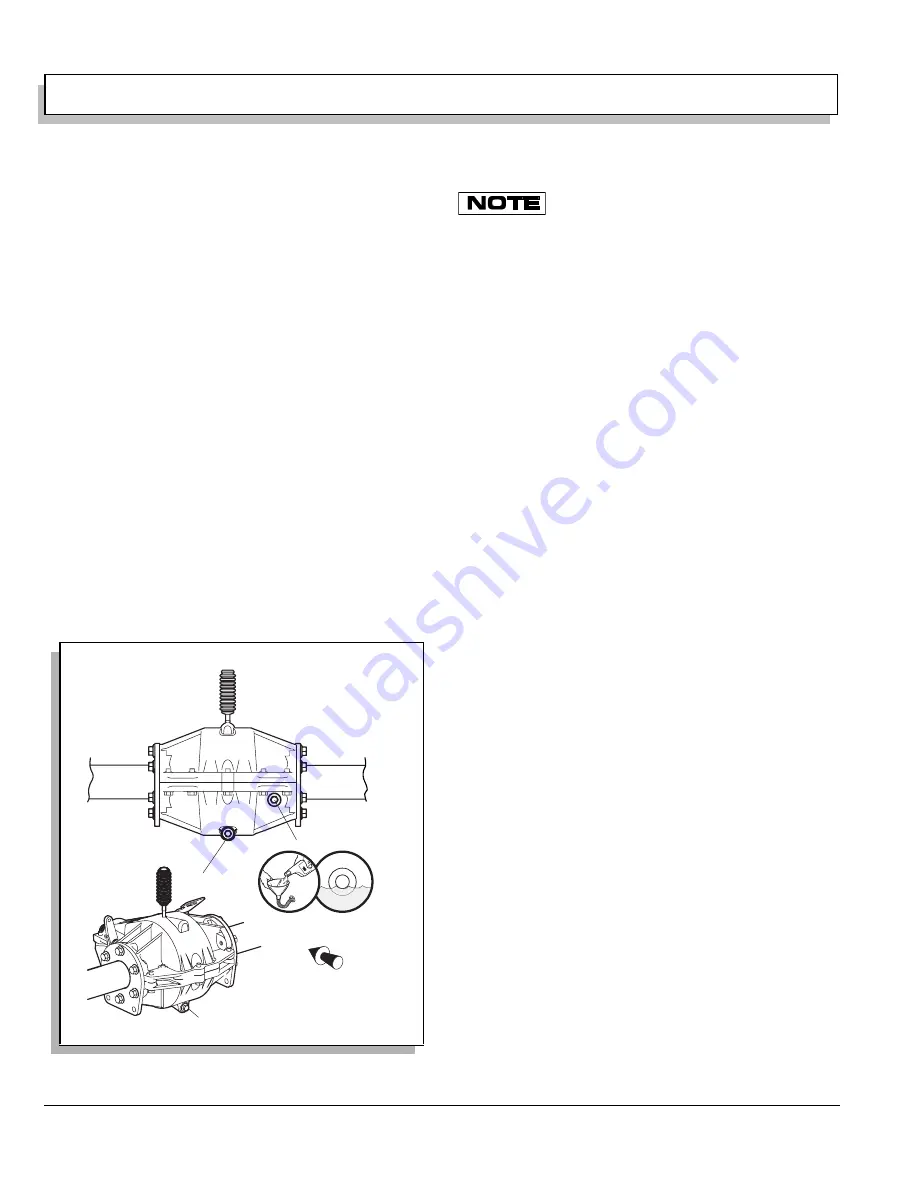
Clean area around fill plug (Ref Fig. 2 on page M-2).
Remove fill plug (The correct lubricant level is just below
the bottom of the threaded hole). If lubricant is to be
added, remove the fill plug and add lubricant (80 - 90
GEAR LUBE) using a funnel and hose. Add lubricant
slowly until lubricant starts to seep from the fill plug.
Install the fill plug. In the event that the lubricant is to be
replaced, a drain plug is provided at the bottom of the dif-
ferential housing. Capacity of axle is 17 oz. (500 - 525
milliliters).
Solenoid Replacement
Check solenoid for free actuation after assem-
bly.
Drain hole in the protective boot (solenoid) should be located
towards bottom of the vehicle after assembly.
Tool List
Qty. Required
Floor jack, 1 1/2 ton ..................................................... 1
Jack stands.................................................................. 2
Wheel chocks .............................................................. 4
Ratchet, 3/8" drive .......................................................1
Torque wrench, 3/8" drive, ft. lbs. ................................ 1
Socket, 10mm, 3/8" drive............................................. 1
Socket, 7/16", 3/8" drive .............................................. 1
Allen wrench, 1/8"........................................................ 1
Wrench, 3/8" ................................................................ 1
Needle nose pliers .......................................................1
Park the vehicle on a flat surface. Engage park brake.
Install chocks in front and behind each rear wheel. Raise
passenger seat. Release truck bed handle and lift the
bed. The solenoid (item 1) can be accessed from the top.
Disconnect wiring harness from the solenoid (item 1).
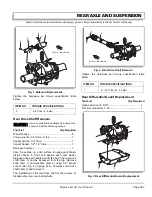
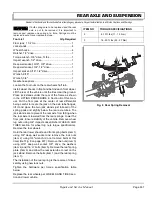
Remove the screw (item 2) and the washer (item 3) con-
necting the solenoid (item 1) to the rear differential (Ref
Fig. 3 on page M-3). Hold the shoulder screw (item 5)
using Allen wrench 1/8" and remove lock nut (item 4).
Remove the solenoid (item 1). Remove the screw (item
7) and the washer (item 8) which connects differential
lock linkage (item 6) and solenoid (item 1).
The installation of the solenoid is the reverse of disas-
sembly using new lock nuts.
Fig. 2 Checking Lubrication Level
Drain Plug
Front of the Vehicle
Check/Fill Plug
Drain Plug
Summary of Contents for ST 4X4
Page 6: ...Page iv Repair and Service Manual TABLE OF CONTENTS Notes...
Page 10: ...Repair and Service Manual SAFETY INFORMATION Page viii Notes...
Page 12: ...GENERAL INFORMATION ROUTINE MAINTENANCE Page A ii Repair and Service Manual Notes...
Page 24: ...SAFETY Page B ii Repair and Service Manual Notes...
Page 34: ...BODY AND TRUCKBED Page C ii Repair and Service Manual Notes...
Page 50: ...BRAKES Page D ii Repair and Service Manual Notes...
Page 68: ...CONTINUOUSLY VARIABLE TRANSMISSION CVT Page E ii Repair and Service Manual Notes...
Page 74: ...DIRECTION AND DRIVE SELECTOR Page F ii Repair and Service Manual Notes...
Page 80: ...ELECTRICAL Page G ii Repair and Service Manual Notes...
Page 114: ...FRONT SUSPENSION AND STEERING Page J ii Repair and Service Manual Notes...
Page 128: ...FUEL SYSTEM Page K ii Repair and Service Manual Notes...
Page 136: ...PAINT Page L ii Repair and Service Manual Notes...
Page 142: ...REAR AXLE AND SUSPENSION Page M ii Repair and Service Manual Notes...
Page 152: ...SPEED CONTROL Page N ii Repair and Service Manual Notes...
Page 160: ...TROUBLESHOOTING Page P ii Repair and Service Manual Notes...
Page 168: ...WHEELS AND TIRES Page R ii Repair and Service Manual Notes...
Page 174: ...GENERAL SPECIFICATIONS Page S ii Repair and Service Manual Notes...
Page 180: ...LIMITED WARRANTY Page T ii Repair and Service Manual Notes...
Page 182: ...Page T 2 Repair and Service Manual LIMITED WARRANTY Notes...

