142
x
Platemaking / Master Feed / Ejection Section
chap.4
R8S04009
R8S04010
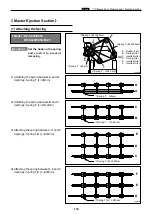
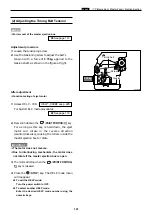
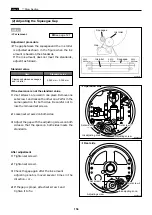
Adjustment procedure
1.
Loosen the tension set screw.
2.
Use the set screw to adjust the belt's tension to
about 1kg.
After Adjustment
Be sure to adjust the B/C mode
after installation to the printer.
IMPORTANT :
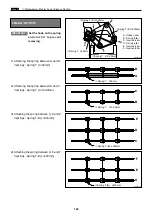
When tensioning the timing belt, ensure that the
bracket is positioned so that the upper surface of
the master clamp opening/closing lever is aligned
(to within 0.5mm) with the rim of the positioning
hole.
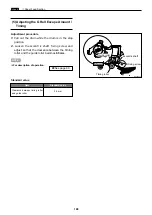
When tensioning the timing belt, ensure that the
bracket is positioned so that the upper surface (2
places) of the master clamp opening/closing lever is
aligned (to within 0.5mm) with the rim of the posi-
tioning hole.
Tension
Screws
Position hole
Master ejection master
clamp opening/closing lever
Positioning hole
Master feed master clamp
opening/closing lever
Master Clamp Opening/Closing Section
(1) Adjusting the Timing Belt Tension
(2) Positioning the Master Clamp
Opening / Closing Levers
¡
For removal of master clamp opening / closing unit.
\
See page 114
NOTE :
After Adjustment
Be sure to adjust the B/C mode
after installation to the printer.
IMPORTANT :
¡
For removal of master clamp opening / closing unit.
\
See page 114
NOTE :
1kg
1. Master feed master clamp opening/closing lever
2. Master ejection master clamp opening/closing
lever
Aligned (to within 0.5mm)
Bracket
Positioning hole
Summary of Contents for DP-S Series
Page 1: ......
Page 9: ......
Page 11: ......
Page 16: ...x Dimensions chap 1 15 R8S01001 xDimensions 622 1360 510 228 1080 710 980 688 370 mm...
Page 22: ...v Part Names and Their Functions chap 1 21 44000A1e 2A 2B 2C R8S01006a 2Detailed drawing...
Page 33: ...32 z Scanner Section chap 2 Circuit R8S02E03e...
Page 87: ...86 m Drum Section chap 2 2 Circuit R8S02E30...
Page 171: ...170 MEMO...
Page 193: ...192 MEMO...
Page 195: ...194 z Help mode List chap 7 z HELP Mode List...
Page 243: ...242 c HELP Mode Function and Operation Procedures chap 7...
Page 270: ...269 c HELP Mode Function and Operation Procedures chap 7...
Page 281: ...280 MEMO...
Page 293: ...292 z Electrical Parts Layout and Their Functions chap 9 MEMO...
Page 295: ...309 294 x Overall Wiring Layout chap 9 Overall Wiring Layout 1 Main PCB 2 2...
Page 297: ...311 296 x Overall Wiring Layout chap 9 Overall Wiring Layout 2 Drive PCB 2 2...

