background image

vPad-IV OPERATORS MANUAL

4.5.6  AutoSequence Steps

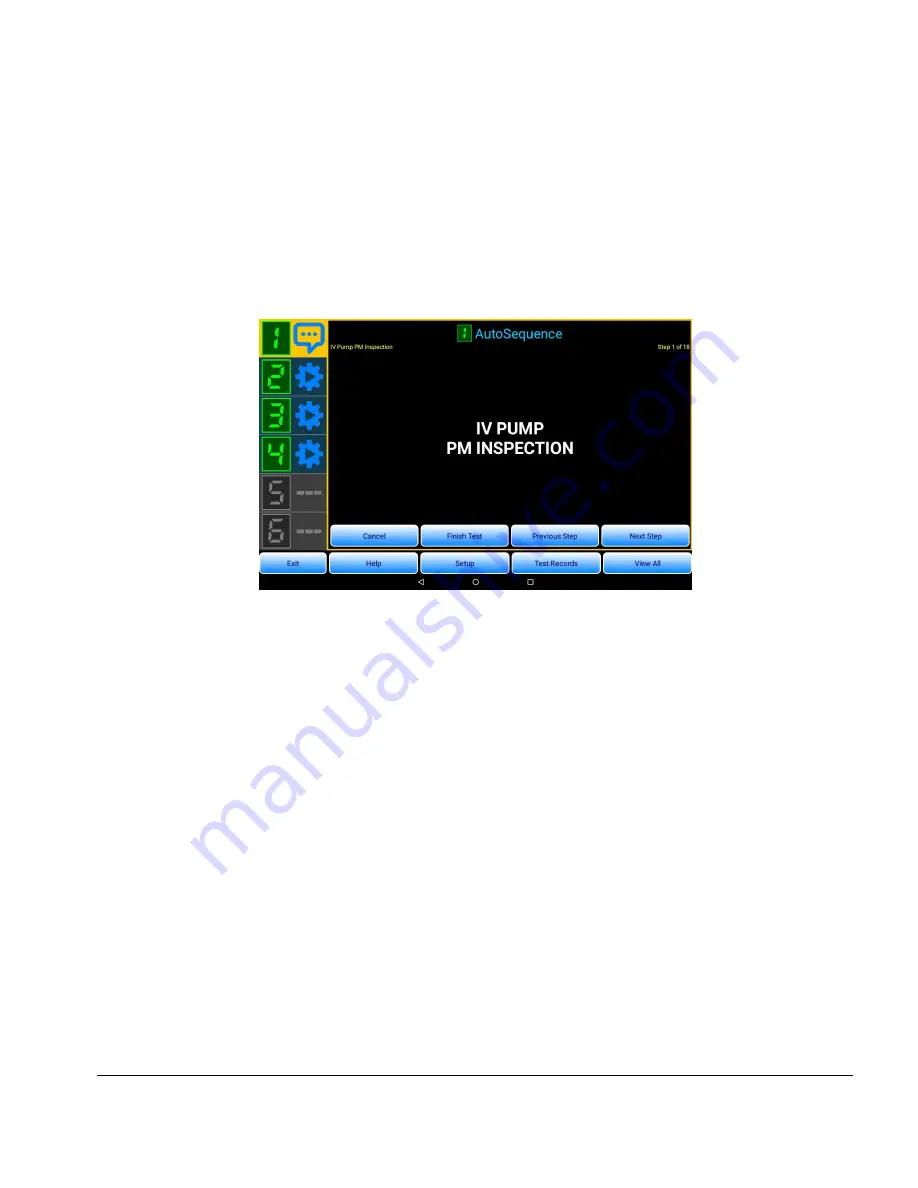
A vPad-IV AutoSequence will proceed through each pre-programmed step in order, from first step to last.
While an AutoSequence is running, the sequence title and progress (for example, "Step 1 of 5") is shown
just below the channel display. Users can step through the AutoSequence with the control buttons at the
bottom of the screen.

Referring to 

Figure 37

, the sequence control buttons are:

Next Step

Proceed to the next step of the AutoSequence

Previous Step

Go back and repeat the previous step of the AutoSequence

Finish Test

End the AutoSequence before all steps are completed. A Test Record may be
saved, but the Record will be assigned a "FAIL". This mode is intended for
creating a record of a failed device inspection in a maintenance system (CMMS),
where the failure could not be addressed at the time of inspection but must wait
until the required maintenance and subsequent re-inspection can be completed at a
later time.

Cancel

Abort the AutoSequence and return to test setup

 
AutoSequences are intended to follow the steps of an infusion device inspection or maintenance procedure
("PM"). Accordingly, an AutoSequence may include steps which display instructions to the user or which
request a visual inspection of an item or feature of the infusion device. Autsequences may also include steps
which measure flow, volume and occlusion pressure, as described below.

Figure 37

Operation/Chapter 4 

#

 Page 49

Summary of Contents for vPad-IV

Page 1: ...Operating Manual MN 138a vPad IV Modular Infusion Device Analyzer App Version 1 05 0 ...

Page 2: ......

Page 3: ...sion Device Analyzer Operating Manual 2021 Datrend Systems Inc Unit 130 4020 Viking Way Richmond BC CANADA V6V 2L4 Tel 800 667 6557 North America only or 1 604 291 7747 Fax 1 604 294 2355 e mail CustomerService datrend com ...

Page 4: ......

Page 5: ... number and accessories are eligible for partial refund and or credit Non serialized parts and accessory items cables carrying cases auxiliary modules etc are not eligible for return or refund In order to receive a partial refund credit the product must not have been damaged and must be returned complete meaning all manuals cables accessories etc within 90 days of original purchase and in as new a...

Page 6: ...per power supply such as low voltage incorrect voltage defective wiring or inadequate fuses Accident alteration abuse or misuse of the instrument Fire water damage theft war riot hostility acts of God such as hurricanes floods etc Only serialized products those items bearing a distinct serial number tag and their accessory items are covered under this warranty PHYSICAL DAMAGE CAUSED BY MISUSE OR P...

Page 7: ...eal before you have contacted us Following these steps will help ensure that you will retain the original warranty on your instrument without interruption WARNING Unauthorized user modifications or application beyond the published specifications mayresultinelectrical shock hazards or improper operation Datrend Systems will not be responsible for anyinjuries sustained due to unauthorized equipment ...

Page 8: ...Page iv ...

Page 9: ...4 1 5 Environment for Use 4 1 6 Dimensions 4 1 7 Weight 4 1 8 Standard Accessories 5 1 9 Optional Accessories 5 1 10 Compliance With Standards 6 2 OVERVIEW 7 2 1 Modules and Channels 8 2 2 Test Setup 8 2 3 Test Types 9 2 4 Automatic Testing 9 2 5 Manual Testing 9 2 6 Test Monitoring 10 2 7 AutoSequences 10 2 8 Test Records 10 2 9 Equipment Records 10 2 10 Settings and Options 11 3 SETUP 13 3 1 Ass...

Page 10: ... 4 1 General setup 32 4 3 4 2 Windowed data analysis 33 4 3 5 Piggyback KVO Test Setup 36 4 3 6 PCA Pump Test Setup 37 4 3 7 Occlusion Pressure Test Setup 39 4 3 8 AutoSequence Test 40 4 4 Editing Equipment Details 41 4 4 1 Equipment Information Editor 41 4 4 2 Equipment ID or Control Number 42 4 4 3 Work Order Type 42 4 4 4 Next Test Due Date 42 4 4 5 Recall Last Device 43 4 4 6 Equipment Records...

Page 11: ...Data Log 60 4 8 System Setup 61 4 8 1 Password Setup 61 4 8 2 vPad Secure Support 62 4 8 3 Tablet Setup 62 4 8 4 vPad Settings App 62 4 8 5 List Editor 65 4 8 6 AutoSequence Editor 67 4 8 6 1 Create and edit 67 4 8 6 2 Editor actions 68 4 8 6 3 Step types 68 4 8 6 4 Step editors 69 4 8 7 More Settings 71 4 8 7 1 Pressure measurement settings 71 4 8 7 2 Flow measurement settings 71 4 8 7 3 Equipmen...

Page 12: ...vPad IV OPERATORS MANUAL APPENDIX A SAMPLE TEST RECORD 79 Table of Contents Page viii ...

Page 13: ...r the tablet to work with up to five additional Modules in the system A vPad IV system will always include at least the Controller See also Module Data Log A text file in comma separated variables or CSV format which contains the individual measurements of time volume flow and or pressure acquired over the course of a test Dose A preset volume of medication or other solution to be dispensed from a...

Page 14: ...edication has been delivered See also piggyback infusion and secondary dose Priming The act of preparing a vPad IV module for use purging air within the module by filling it completely with water psi Pounds per square inch Occlusion pressure The maximum pressure which can be developed by an infusion device when delivering into an IV line that has been completely blocked or occluded Most infusion d...

Page 15: ...t dose of medication or other solution to be dispensed from an infusion device After the VTBI is delivered the infusion device will automatically stop pumping or alternatively change to KVO delivery mode See also Dose and KVO μl microliter Definitions Page xi ...

Page 16: ...bserve these instructions may result in damage to the internal flow sensor which is not covered under warranty Further instructions with respect to the test fluid may be found in Section 3 5 of this manual In some cases cleaning the flow sensor may overcome the detrimental effects of contamination by an incompatible fluid refer to Chapter 5 Calibration and Maintenance for further instructions INPU...

Page 17: ...l h for volume 10 ml 1 1 2 Volume Measurement Method Volume is measured directly in sample sizes of 20 µl Range 0 to 9999 ml Maximum display resolution 0 01 ml Accuracy 1 1 LSD at 0 1 9 9 ml h for volume 100 µL 1 1 LSD at 10 1200 ml h for volume 1 ml 2 1 LSD at 1201 3000 ml h for volume 10 ml 1 1 3 PCA Bolus or Piggyback Dose Measurement Method See volume measurement above Min detectable bolus or ...

Page 18: ...o 240 hours Elapsed Time Accuracy 0 5 seconds Elapsed Time Format HHH MM SS PCA Lockout Time Range 1 to 240 minutes PCA Lockout Time Accuracy 0 05 minutes 1 1 6 Fluid Ports Input Luer lock female Output Hose barb for 1 8 I D tubing Material Stainless or nickle plated steel 1 1 7 Communication Interface Ports Controller Module To Tablet USB A receptacle PC Remote USB B receptacle vPad XBUS RJ12 6p6...

Page 19: ...screen Wired Connectivity microUSB OTG or USB Type C tablet model dependent shared with analyzer interface Wireless Connectivity WiFi 802 11 Bluetooth Memory Internal Minimum 1 GB available for user data storage Memory Expansion By micro SD Card 8 GB or more tablet model dependent FAT32 LFN format Specifications Chapter 1 Page 3 ...

Page 20: ...figuration 16 3 x 20 0 x 23 6 cm 6 4 x 7 9 x 9 3 in Three channel configuration 21 3 x 20 0 x 23 6 cm 8 4 x 7 9 x 9 3 in Four channel configuration 26 4 x 20 0 x 23 6 cm 10 4 x 7 9 x 9 3 in Five channel configuration 31 5 x 20 0 x 23 6 cm 12 4 x 7 9 x 9 3 in Six channel configuration 36 6 x 20 0 x 23 6 cm 14 4 x 7 9 x 9 3 in 1 7 Weight Single channel configuration 1 34 kg 2 95 lbs Dual channel con...

Page 21: ... 474 India South Africa Type M 3000 007 Chile Type L 3000 475 vPad IV input output tubing set one per module P N 7300 004 USB A OTG adaptor According to tablet model P N 3140 390 microUSB or P N 3140 391 USB C USB A to tablet cable According to tablet model P N 3140 396 microUSB or P N 3140 500 USB C Interconnection cable provided with secondary optional module only P N 3140 071 Accessory Bag prov...

Page 22: ...or Measurement Control and Laboratory Use Part 1 General Requirements UL Std No 61010 1 2nd Edition Safety Requirements for Electrical Equipment for Measurement Control and Laboratory Use Part 1 General Requirements Following manufacture all units are subjected to and have passed the requirements of the Routine Tests defined in Annex F of the above Standard s Specifications Chapter 1 Page 6 ...

Page 23: ...erred to as channels Figure 1 shows an example vPad IV system providing the maximum number of channels vPad IV enables users to conduct tests on up to six different infusion devices simultaneously Channels may be optionally linked to streamline testing of infusion devices which incorporate multiple pumps within a single unit AutoSequence mode provides user customizable protocols which integrate in...

Page 24: ...ighlighted number icons at left disconnected or absent Modules are represented by greyed out icons and the corresponding channels are not selectable Once the app has started up each enabled channel is then monitored by the app and its status is represented as an icon beside the channel number A icon setup and run means the corresponding Module is idle and is ready to perform a test A icon alert ty...

Page 25: ...lly the Occlusion Pressure Test determines the maximum pressure developed by an infusion device when it pumps into a blocked IV line While any test is in progress vPad IV periodically displays measurements of flow volume and pressure which are then summarized on completion of the test to create a Test Record 2 4 Automatic Testing After selecting a test type a channel may be configured to perform t...

Page 26: ...en channels are linked for testing of a multi pump infusion device the results from the linked channels are combined into a single Test Record identified by the device ID Users may view and manage Test Records with the vPad Record Manager a standard app included with each vPad product 2 9 Equipment Records Each time vPad IV completes a test and saves a Test Record an Equipment Record is also saved...

Page 27: ... customizable settings for analyzer operation user convenience and organizational needs Under the Settings menu of the app you will find AutoSequence customization Test Record preferences and editors for pick lists used by the equipment information menu Overview Chapter 2 Page 11 ...

Page 28: ...vPad IV OPERATORS MANUAL Overview Chapter 2 Page 12 ...

Page 29: ...y depressing the left thumb lock and sliding the panel toward you see Figure 3 Slide and lock additional secondary Modules into place next to the Controller in order starting with Module 2 and proceeding up to Module 6 as identified by removable adhesive labels on the front of each secondary Module Figure 3 through Figure 10 below show the assembly of an example system providing three channels ass...

Page 30: ...to the front of each Module may now be removed Check the completed assembly to verify that all components are fitted snugly and securely together 3 2 Connect Cables and Power Supply If you are assembling a multi channel analyzer use the interconnect cables provided with the Modules to connect the vPad IV bus jacks at the rear of the assembly for example as shown Figure 7 for a three channel setup ...

Page 31: ...e USB to tablet port on the rear panel to the USB port of the tablet Figure 8 and Figure 9 If you prefer the tablet to control the analyzer via Bluetooth then this USB connection is not needed Note however the USB connection may be used to recharge the tablet when it becomes necessary to do so Connect the power supply provided with the Controller to the 12VDC input on the rear panel Figure 10 then...

Page 32: ...or the screen becomes lit then release the button Figure 12 Once tablet startup is complete and the HOME screen is displayed run the vPad Settings app Under Device Setup on the left select vPad IV Pump Tester Verify Connected status appears at the upper right corner of the tablet Figure 13 Close vPad Settings after verifying the connection Figure 12 Figure 13 Setup Chapter 3 Page 16 ...

Page 33: ...tead use a syringe to inject air into the input until all water within the unit has been ejected as observed at the output of the Module Disassemble the analyzer by reversing the assembly procedure Power OFF the system then disconnect all cables and tubing sets Note that when input and output fluid connections are removed if the Module is not already empty it will self drain and release a small vo...

Page 34: ...ture in a closed container to prevent contamination with dust mould and bacteria Keep the storage container away from direct sunlight to avoid stimulation of algal growth DO NOT use a medical solution such as physiological saline lactated Ringer s injection dextrose in water D5W or D50W TPN solution and similar fluids with vPad IV DO NOT connect IV administration sets or other tubing which may hav...

Page 35: ...moved if desired although test results may be accordingly affected Use of the needle is recommended particularly when testing infusion devices that have an intermittent or pulsatile delivery characteristic Connect the 1 8 ID tubing to the barbed output port of the Module Place the other end of the output tubing in an open collection vessel having a volume of 500 mL or larger To avoid an unintentio...

Page 36: ...ert status usually means the channel requires priming see below for further instructions 3 5 4 Priming CAUTION use only distilled water or clean drinking water with vPad IV Refer to Section 3 5 1 for further instructions and warnings Connect input and output tubing provided with vPad IV to the Module see Figure 15 Fill the syringe included in the tubing kit with distilled water or clean domestic i...

Page 37: ...ly primed If no air bubbles are detected in the Module flow sensor you will then be permitted to set up and run a test If air bubbles are detected during the status check you will be instructed to prime the channel again When priming or flushing a channel always inject into the Module and DO NOT use the syringe to withdraw water from the input Figure 18 Excessive or extreme suction applied at the ...

Page 38: ...d of wetting which may be the preferred method if vPad IV has spent a significant amount of time in dry storage is to clean the instrument according to the instructions given in the maintenance chapter specifically Section 5 3 on page 76 After cleaning a Flow Rate Test at 400 ml h for about one minute will prepare the flow sensor for subsequent tests to follow Once a vPad IV Module has been primed...

Page 39: ... One or more Modules not powering up Make sure the Module interconnect cables and the power supply are firmly plugged into their respective jacks at the rear of the analyzer see Figure 7 Figure 10 and Figure 11 Some of my Modules show the same channel number Reassign Module channel numbers so that they are unique a Apply power to the analyzer If the analyzer is already powered up disconnect the DC...

Page 40: ...bove fails restart the tablet For wireless Bluetooth connection a In vPad Settings app select the Bluetooth option for vPad IV Pump Tester From the drop down list select the BT ID Bluetooth ID that you will find printed on the rear panel of the Controller Module b If the Controller s Bluetooth ID is not in the vPad Settings list enter the Android Settings menu and pair the Controller with the tabl...

Page 41: ...pter explains how to use vPad IV to perform infusion pump testing Test Record management is also covered in this chapter 4 1 HOME Screen The Android HOME screen is displayed approximately 20 seconds after switching the tablet ON Operation Chapter 4 Page 25 ...

Page 42: ... Use this menu to configure sound display touchscreen and wireless setup of the tablet Near bottom center on the screen press the Apps button to access more apps which are installed on the tablet If this button is not shown by your tablet try a swipe up gesture from the bottom of the screen to view the Apps page At bottom center on the screen press the Home button to return from an app to the Home...

Page 43: ... screen along with their current status The channel number on the screen will match the channel number displayed by the LED readout on the front of the Module Each Module incorporates a pressure transducer which will be zeroed at startup if the Module contains no water An accurate zero reference is obtained if the Module input port is open to the atmosphere during the startup process Refer to Sect...

Page 44: ...n keyboard or with a barcode scanner or by selecting items from lists displayed by the Choose buttons on the menu See Section 4 4 1 on page 41 for further information on the Equipment Information Editor If the entered device ID is known from a previous test the app will prompt you to recall the Equipment Record Recalling the Equipment Record will load the equipment information and test setup that ...

Page 45: ...uration menus as described below 4 3 3 1 Test types Flow Rate Test This test measures the output of a single infusion or dose delivery The Test Record will include the volume delivered on completion of the test and the average flow rate Piggyback KVO Test This test measures the output of an infusion having two distinct deliveries which for a piggybacked infusion means delivery of a secondary dose ...

Page 46: ...n menus display a real time reading of the pressure that is currently being sensed by the vPad IV Module Figure 23 Prior to starting a Flow Rate Piggyback or PCA Pump Test the pressure display enables monitoring of a back pressure which may be optionally applied to the infusion device as part of the protocol Testing with an applied back pressure requires connecting the output of the vPad IV Module...

Page 47: ...e test setup to confirm no significant pressure or vacuum is being applied to the Module when the Zero button is pressed To assist the user in zeroing the Module appropriately the app displays a confirmation dialog if the change in the zero offset will exceed 25 mmHg from its current setting As previously stated zeroing of the pressure measurement should be done only when pressures at the input an...

Page 48: ...r the manufacturer s inspection procedure or other test protocol stop the test when the pump s volume to be infused VTBI is delivered stop the test when a set time limit or duration is reached stop the test when a target volume is reached stop the test when a target volume or time limit is reached whichever happens first Input the Set Rate and the Set VTBI that the infusion device will be set to f...

Page 49: ...further details on zeroing After zeroing apply a back pressure to the DUT if this is required by the protocol following instructions given in Section 3 5 2 on page 19 Once the settings are input run the test with the Start button If the objective is to determine a volume as delivered from the device under test start vPad IV first then start the infusion device If the objective is to determine accu...

Page 50: ...d IV will determine the pass fail result of the test based on the volume and flow measured from TSTART to the end of the test Optionally the Flow Rate Test may be configured to include the pre test window data in the Test Summary and assess these values to determine the pass fail result Windowed analysis per Figure 25 is enabled by a checkbox which is shown when the Stop Test condition is set to w...

Page 51: ...ine the flow during the startup phase The manufacturer s protocol is configured as shown in Figure 26 and Figure 27 The Set Rate is 125 ml h and the Test Duration is set to 15 30 45 minutes TSTART 15 minutes is input via the menu of Figure 27 As shown in Figure 26 the pass fail tolerance of the test is set to 7 4 3 to 7 4 11 per the manufacturer s specifications Also as shown in Figure 26 the VTBI...

Page 52: ...elivered Piggyback and KVO tests are thus analogous and involve measurement of two different infusions designated by vPad IV as 1 and 2 within a single protocol Although a Piggyback KVO Test may be run manually an automatic test is preferred since the app will verify the test settings are valid before the test is started Input Set Rate 1 and Set VTBI 1 for the first delivery of the infusion schedu...

Page 53: ...re input run the test with the Start button With a piggyback or KVO test always start vPad IV first then start the infusion device Refer to Section 4 5 3 on page 45 for more information on how the test begins after the Start button is pressed 4 3 6 PCA Pump Test Setup Use the PCA Pump Test to determine the ability of a patient controlled analgesia PCA device to accurately infuse a set Bolus Volume...

Page 54: ... lockout settings according to the manufacturer s inspection procedure or other protocol d Select the channel in the vPad IV app Choose the PCA Pump Test and select manual or automatic testing For an automatic test enter the following test parameters Basal Rate or input 0 0 ml h for no basal infusion Bolus Volume minimum 0 5 ml Lockout Time between bolus deliveries minimum 1 minute Test Duration T...

Page 55: ... will begin by outputting a trigger to the PCA device to initiate infusion of the first bolus The PCA Pump Test proceeds automatically with vPad IV triggering delivery of each bolus and measuring the lockout interval between the bolus infusions 4 3 7 Occlusion Pressure Test Setup Use the Occlusion Pressure Test to measure the pressure developed by an infusion device when it pumps into an IV line t...

Page 56: ...rence After zeroing the Module may be refilled and the test started If the purpose of the test is to check the pressure transducer in the Module rather than test an infusion device it is not necessary to refill the Module with water in this case verification of the Module s pressure measurement may be optionally performed with compressed air Users can stop an occlusion pressure test in progress at...

Page 57: ...quipment ID Most of the text input fields of the Equipment Information have an associated pick list which is displayed by a corresponding Choose button Pick lists are not intended to replace a database but are meant to provide selectable favourites which may need to be entered frequently Items may be added or removed from these pick lists by the List Editor of vPad IV see Section 4 8 5 on page 65 ...

Page 58: ...on 4 8 5 on page 65 4 4 4 Next Test Due Date This text field is for input of a future date on or before which a scheduled maintenance inspection of the equipment should be performed For example you may choose a due date equal to today s date plus 12 months Similar to other equipment information if you input a due date then it will then appear in the Test Record which is saved at the end of the tes...

Page 59: ...st function Description Manufacturer Model Facility Technician Next Test Due Date Work Order Type The following fields are not modified by Recall Last Control No ID Serial Number Work Order 4 4 6 Equipment Records Each time vPad IV completes a test and saves a Test Record an Equipment Record is also saved by the app Equipment Records are identified by ID or control number and include all the text ...

Page 60: ...t in progress Piggyback KVO Rate 1 delivery in progress Piggyback KVO Rate 2 delivery in progress PCA Pump bolus delivery in progress PCA Pump lockout in progress Measurement of Occlusion Pressure or Back Pressure in progress Automatic test done Test encountered an error or channel unprimed Test result PASS Test result FAIL AutoSequence INFORMATION shown AutoSequence INSPECTION required Operation ...

Page 61: ...ure flow enter a special Synchro Start state at the beginning of a test or when the test is reset On the screen the Volume and Flow displays initially appear grey and the test timer remains frozen while waiting for the device under test to begin infusing Figure 34 After starting a test the vPad IV app will not measure flow volume and time until the sensor in the vPad IV Module detects fluid delive...

Page 62: ...w are the Volume delivered from the device under test and the Average Flow which equals the indicated Volume divided by the Elapsed Time of the test The Flow Rate Test displays the Volume and Average Flow since the start of the delivery as detected by the synchro start test feature see Section 4 5 3 page 45 The Piggyback KVO Test displays the Volume and Average Flow for the first or second deliver...

Page 63: ...g principal readout alternating once every few seconds between the DUT setting and the pass fail range Time Remaining Time until the end of the test duration as defined in the AutoSequence Flow Errors Flow measurement error based on the ml h rate setting of the device under test 4 5 4 4 Readout update interval When testing flow the frequency of display update will depend to some extent on the rate...

Page 64: ...on the test in progress as follows Graph Type Applicable Tests Graph Description Instantaneous Flow Flow Rate Piggyback KVO and PCA Pump Tests Flow measured over short intervals T ranging from 10 to 60 seconds as set by the instantaneous flow window of the More Settings menu Section 4 8 7 1 page 71 Average Flow Flow Rate Test Ratio of the total volume delivered to the elapsed test time Average Ins...

Page 65: ...ted A Test Record may be saved but the Record will be assigned a FAIL This mode is intended for creating a record of a failed device inspection in a maintenance system CMMS where the failure could not be addressed at the time of inspection but must wait until the required maintenance and subsequent re inspection can be completed at a later time Cancel Abort the AutoSequence and return to test setu...

Page 66: ...d Figure 16 on page 20 Pressure Monitor Similar to back pressure the pressure monitor shows real time pressure readings while displaying the average maximum and minimum value of the pressure The user may manually control whether the channel input is blocked or occluded or otherwise remains open Pump Test Runs a flow piggyback PCA or occlusion test according to a preset configuration which is defin...

Page 67: ...bited when the tablet receives external power via its USB port In this case the vPad IV app will continue to log data to memory even if the tablet screen is switched OFF while a test is running When Bluetooth communication is being used and if a test will require several minutes to an hour or more to complete consider powering the tablet with the battery charger provided with the vPad IV system Th...

Page 68: ...e previously completed as part of an AutoSequence If the test was performed in manual mode vPad IV will not have sufficient information to evaluate the test results automatically Users are asked at the end of the test to manually assign at their discretion a PASS or FAIL result before the summary is shown For tests which measure flow and volume vPad IV requires the input of infusion device setting...

Page 69: ... Test contains a separate result for each bolus delivery and for each lockout period observed during the test 4 6 2 2 Flow or PCA statistics Summaries may optionally include a statical analysis of the measurement data recorded during the test The analysis is enabled by the Include statistics checkbox near the top of the Summary screen Figure 39 Flow Statistics Mean Equivalent to average flow or to...

Page 70: ...e 40 is a method of statistical analysis specified in the IEC 60601 2 24 standard for infusion devices The trumpet analysis attempts to illustrate the worst case variability of the flow over specific intervals or observation windows which range from 2 minutes up to 31 minutes As the observation window increases in duration flow rate deviation from the overall mean is expected to decrease The trump...

Page 71: ...e test vPad IV monitors the fluid pressure in the IV line and records the peak measured value The test summary therefore includes the peak pressure as well as the time at which it occurred The summary also shows the pressure and time at the end of the test depending on how the test was stopped this may be simply the time and pressure at which the automatic test ended or alternatively the time and ...

Page 72: ...span should contain at least one hour of data for a full trumpet analysis per IEC 60601 2 24 If trumpet end time exceeds the test duration analysis will stop at the end of the test A new trumpet analysis is performed whenever the beginning and or end times are changed Depending on the amount of recorded data the trumpet analysis may require a few seconds to complete If windowed data analysis has b...

Page 73: ...Figure 42 In addition to saving the measurement results this menu may be used to add work order information and labor related information to the Test Record before it is saved In addition to saving the Test Record the Save Test Record menu enables you to save the current test setup as an AutoSequence file on the tablet The data log of the test may also be optionally saved If label printing has bee...

Page 74: ...completion code is entered into the text field or is chosen from the associated pick list then it will be included with the results in the Test Record file The use of two or three character codes is common in managed systems The default Choose list for completion code includes these items and numerous other examples INI which means incoming inspection has passed PMP which means preventive maintena...

Page 75: ...a test this setting is maintained until the end of the test and it will then appear in the due date field of the Save Test Record menu 4 7 7 Test Report Title Information shown by this text field is inserted at the beginning of each Test Record The report title is shared by all vPad apps so any changes made to this field in vPad IV will be seen in other apps Typically the title is set to the name ...

Page 76: ...are stored in this folder on the tablet Datrend vPad IV DataLogs The data log recording function controlled via the Save data log checkbox of Figure 42 is a sticky setting which retains its state between tests Once enabled by the menu of Figure 42 data log recording may be optionally disabled later on via the More Settings menu of the app under the Test Record settings see Section 4 8 7 4 on page ...

Page 77: ... menu will be displayed To create or modify the password press Edit Password on the Setup menu to display the Edit Password dialog An active password can be disabled by clearing the password field on dialog then pressing Save and Exit As indicated on the dialog you can long press on the text field to erase the password In the event a password is entered but is later forgotten you can enter an over...

Page 78: ...etwork and connect to it pair the tablet with a Bluetooth device such as a barcode scanner printer or vPad analyzer change the Language and choose and or configure Input devices such as soft keyboards unmount a USB flash drive which has been connected to the tablet Menu options and usage will depend on the Android version as specified under About tablet Once the version is known further informatio...

Page 79: ...ch that on the back of the Controller press the selector to display a pop up list of Bluetooth devices and change the name accordingly If the tablet s Bluetooth is OFF or if the Bluetooth name of the Controller is not included in the pop up list shown by vPad Settings then press the Bluetooth Settings button This will open the Bluetooth Settings menu of the tablet itself from which you can enable ...

Page 80: ...th label printers that work directly with the tablet through Bluetooth or WiFi connectivity for example Brother PT 950NW and PT 750W models Label media Sets label size for those printers which accept a range of label stock Label title For printers which support a title this will be printed at the top of the label in a larger font Typically this would be set to the name of the equipment owner an in...

Page 81: ...ee Section 4 4 1 page 41 or other user interface menu provided by vPad IV By means of the vPad IV text editor items may be added or deleted from any of the following pick lists Device manufacturers Device models model number and or name Device descriptions IV pump PCA pump enteral feeding pump etc Facilities e g institutions hospitals clinics Facility locations e g departments wards room numbers T...

Page 82: ... tablet Datrend vPad IV Tables Lists are not intended to replace a database but are meant to provide selectable favourites which may be entered frequently during use of the app Accordingly lists may be edited so that the most frequently chosen items appear first Operation Chapter 4 Page 66 ...

Page 83: ... be edited is selected by pressing the corresponding row While viewing the list an undesired AutoSequence may be deleted by long press gesture on the row Create New AutoSequence Opens the editor with a generic AutoSequence template After choosing an existing AutoSequence to edit the editor will open the corresponding file and display the steps comprising the sequence An example sequence which has ...

Page 84: ...an AutoSequence prompt Displays instructions for test setup or other information check Intended for visual inspections of the infusion device Requires user selection of a result chosen from the options which is then saved to the Test Record PASS Result is acceptable FAIL Result is not acceptable SERVICE Repair or other service was performed to obtain an acceptable result N A Task does not apply to...

Page 85: ...ile displaying the average maximum and minimum value of the pressure The user may manually control whether the channel input is blocked or occluded or otherwise remains open Average maximum and minimum pressures are saved to the Test Record when the step is completed Further details of the above step types in particular how these steps will appear and function during execution of the sequence are ...

Page 86: ...is not possible in an AutoSequence Back Pressure Editor A backpr step in an AutoSequence enables users to monitor a back pressure or vacuum that has been externally applied to the infusion device via the output port of the Module As the step is being executed users may adjust the applied pressure or vacuum until a value required by the test protocol is reached A back pressure step typically precee...

Page 87: ...w a menu which displays the current zero offset for each channel Via the Pressure Offsets menu zero offsets may be reset individually or collectively 4 8 7 2 Flow measurement settings During a test instantaneous flow is calculated from the incremental increase in volume V which is observed over a preselected measurement time or window T The instantaneous flow window provides selections of 10 30 or...

Page 88: ...th of the folder in this box Records should be stored somewhere within the Datrend folder so that vPad Record Manager will be able to find them Disable signature date Disabled By default Test Records include an underlined space for a technician to sign and date when a paper copy of the Test Record is printed Enable this setting to omit this line in the Test Record Omit next test due date Disabled ...

Page 89: ...ndividual measurements of time volume flow and or pressure acquired over the course of a test This setting enables saving of such detailed data in CSV format when a Test Record is saved or for an AutoSequence as each test step of the sequence is completed Operation Chapter 4 Page 73 ...

Page 90: ...ete Test Record files saved by vPad RF Record Manager can also be used to convert Test Records to Adobe PDF documents Note that PDF is a format which enables vPad Record compatibility with other Android apps for example e book readers and document printing apps Press on the Android HOME screen to launch the Record Manager app Refer to MN 087 6100 081 vPad RM Operators Manual for further informatio...

Page 91: ...es return of the Module s to a Datrend Authorized Service Center for repair Opening the case of a vPad IV Module for any reason other than according to the instructions of Section 5 4 will void the warranty and may compromise user safety The exterior of the Module may be cleaned with a soft lint free damp cloth using a mild detergent Use of other cleaning agents on the touchscreen of the vPad tabl...

Page 92: ... water attracting characteristics Use only the cleaning agents specified below as others may have unintended side effects on operation of the instrument or may cause damage to internal plastic components Cleaning solution Rating Preparation Micro 90 in water 1 Add 10 ml Micro 90 detergent to 190 ml distilled water Mix gently to avoid foaming Note Micro 90 is manufactured by International Products ...

Page 93: ...he syringe s lubricant c Discharge the entire syringe into the Module at about 2 ml per second Refill the syringe and then repeat Under no circumstances should you quickly draw solution back into the syringe as the excessive suction may damage internal sensors d Let the cleaning solution sit in the Module for about 10 to 15 minutes DO NOT leave the cleaning solution in the unit for an extended per...

Page 94: ...y making it unnecessary for the user to return the damaged Module to an Authorized Service Center for repair The field repair procedure requires a Flow Sensor Cleaning Kit part number 7500 155 which contains the necessary tools and instructions A single kit may be used to service multiple vPad IV Modules To request a 7500 155 kit contact your Datrend distributor or Datrend Customer Service as spec...

Page 95: ...8765 Phone 123 456 7890 Ext 123 File CN1234_20200910_144147_P txt Date 2020 Sep 10 Time 14 41 47 vPad IV ID My vPad IV Module SN IVM2020070138 Cal Date 2020 07 23 Equipment Information Control No ID CN1234 Description INFUSION PUMP Manufacturer ABBOTT Model PLUM XL Serial Number 78560 45221 Location ICU Facility St Josephs Hospital Work Order WO1234 Work Order Type PM Preventive Maintenance Comple...

Page 96: ...ys Data Result PASS ___________________________________________________________________ Task Check battery and battery charger Data Result PASS ___________________________________________________________________ Task Check air in line sensor Data Result PASS ___________________________________________________________________ Task Run Flow Rate Test Data Set Rate ml h 400 0 tolerance 5 to 5 Set VTB...

Page 97: ...Task Run Occlusion Pressure Test Data Time of peak pressure hh mm ss 00 00 46 Peak Pressure psi 20 0 limit 22 00 max Pump alarm test stopped hh mm ss 00 00 43 Final Pressure psi 20 0 Result PASS END OF RECORD Appendix A Page 81 ...

Page 98: ...vPad IV OPERATORS MANUAL Appendix A Page 82 ...

Reviews: