background image

Clearing Paper Jams

2-12

2

T

roub

leshooting

4

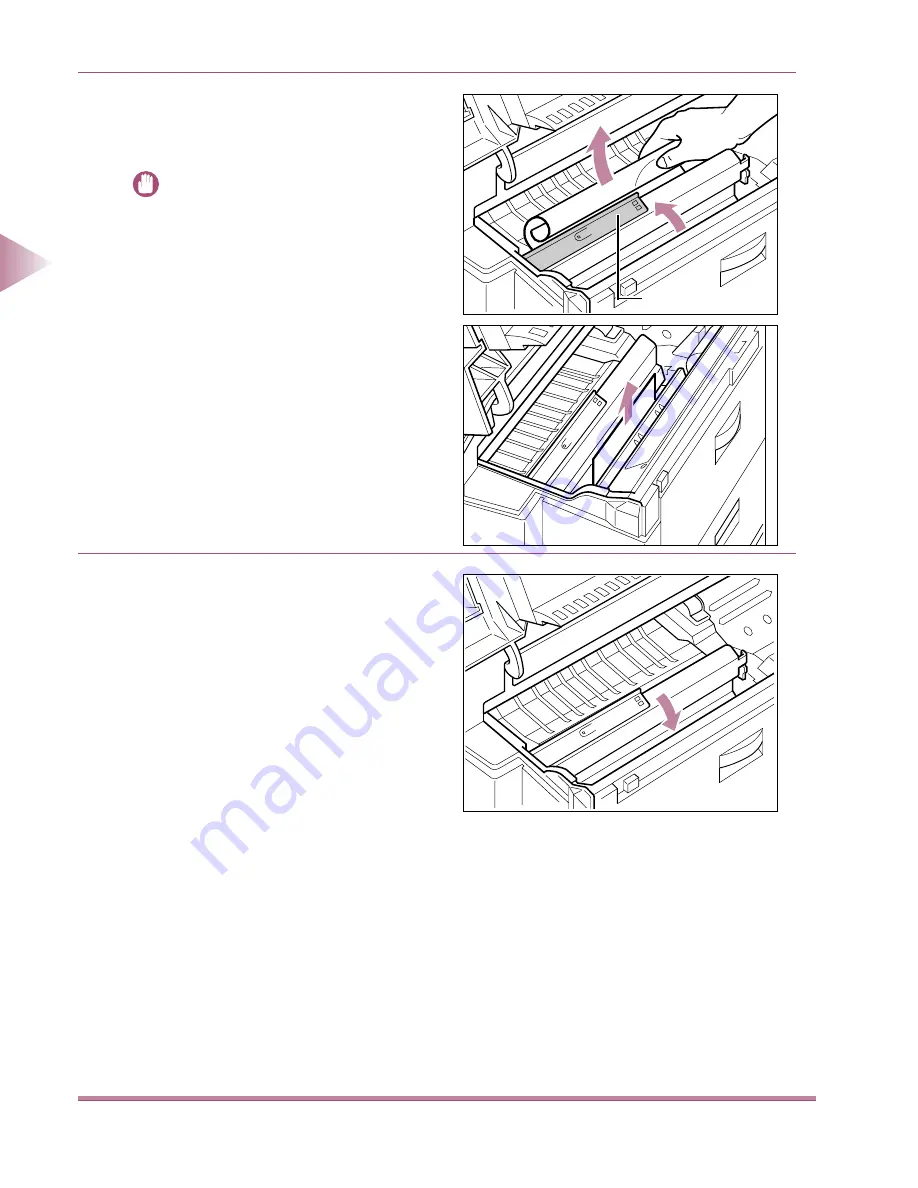
Use the green handle to open the 
transfer guide, and remove the jammed 
paper.

IMPORTANT

• Do not lift up the transfer guide lock tray 

beyond its upright position (90 degrees) 
as it may damage the imaging area.

5

Press the green handle back and close 
the transfer guide area.

Handle

Summary of Contents for IR3250

Page 1: ...Maintenance Guide Please read this guide before operating this equipment After you finish reading this guide store it in a safe place for future reference...

Page 2: ...iR3250 Maintenance Guide...

Page 3: ...product with which this manual has been included If you have a need for an exact specification please contact Canon for the current specification Copyright 2000 Canon Inc ALL RIGHTS RESERVED Note This...

Page 4: ...man Dutch 801 Bold Fixed Pitch 810 Courier 10 Pitch Text Fixed Pitch 810 Cou rier Bold 10 Pitch Text33 Other company or product names used in this manual and not included in the above list are trade m...

Page 5: ...ance Guide describes how to load paper and toner clean the machine remove paper jams and solve other hardware problems with the machine Remote UI User s Guide The Remote UI User s Guide describes the...

Page 6: ...lacing the cartridge and cleaning the machine Chapter 2 Troubleshooting Describes how to solve problems with the machine such as how to clear jammed paper Chapter 3 Optional Equipment Describes how to...

Page 7: ...Platen Glass 1 26 Cleaning the Feeder Belt 1 27 Cleaning the Touch Panel Display 1 27 When an Original or Print Becomes Dirty 1 28 Supplies 1 33 Chapter 2 Troubleshooting Clearing Paper Jams 2 2 Loca...

Page 8: ...cations 3 17 Supplies 3 17 Duplex Unit DU 82 3 18 Parts and Their Functions 3 18 Paper Jam in the Duplex Unit 3 19 Specifications 3 24 Envelope Feeder EF 9 3 25 Parts and Their Functions 3 25 Loading...

Page 9: ...Combination Image Separation Two sided Copy Booklet and Multi PG Enlarge modes from the first pages and work your way forward Place the original face down so that the original s top edge is against t...

Page 10: ...the machine Output can be printed for copying printed from data sent from a personal computer printed from documents received by fax or internet fax referred to as I fax in this manual transmission o...

Page 11: ......

Page 12: ...t Paper 1 2 Loading Paper in the Internal Paper Drawers 1 3 Adjusting a Paper Drawer to Hold a Different Size Paper 1 6 Using the Stack Bypass 1 9 Paper Delivery 1 19 Setting the Paper Stopper 1 20 Re...

Page 13: ...paper Carbon paper Coated paper Follow these simple rules when you handle and load paper in the paper drawers or stack bypass Never use moist paper or paper that has been folded clipped or stapled or...

Page 14: ...d because the printer is out of paper it will automatically resume as soon as paper is loaded in the selected paper drawer To change the paper size or paper drawer selection use the Select Paper scree...

Page 15: ...per drawer do not hold it by the exposed metal plate inside the drawer This may cause injury to your hands IMPORTANT Opening or closing the paper drawers while printing will adversely affect the quali...

Page 16: ...rl before the paper is placed in the paper drawer For high quality copies and printouts use paper recommended by Canon When loading paper in the stack bypass the surface that was up in the package sho...

Page 17: ...r in a paper drawer by setting the paper guides to the desired size 1 Pull out the paper drawer and remove all loaded paper IMPORTANT When raising the metal paper guide take care not to get your finge...

Page 18: ...th the desired paper size marker then insert the other end of the guide into the paper drawer 4 Turn the dial to the right to unlock the paper width guide Position the guide at the desired size indica...

Page 19: ...he left to lock the paper width guide 6 Remove the paper size card in the folder NOTE If the paper size card does not have a seal affixed showing the size of paper that is in the paper drawer remove a...

Page 20: ...aper do not use the paper drawers Feed this type of paper stock manually using the stack bypass This section describes how to place paper in the stack bypass 7 After the paper is loaded in a paper dra...

Page 21: ...5 ISO C5 YOUGATA 4 4 1 8 x 9 1 2 105 mm x 240 mm IMPORTANT Note the following points when using the stack bypass Copy quantity 1 to approximately 100 sheets stack about 3 8 high 10 mm high Paper weigh...

Page 22: ...oes not exceed the limit mark When printing from the stack bypass and using paper that is curled paper jams tend to occur Make sure to remove any curl before loading the paper Before printing manually...

Page 23: ...f the paper you are using Set the slide guides so that they contact the paper lightly If they are set too tightly this may cause poor paper feeding or paper jams 4 The Paper Select screen will appear...

Page 24: ...n the fuser unit after you have fin ished printing envelopes Failure to do this may reduce printing quality 1 Turn the control panel power switch to OFF then turn the scanner unit and printer unit pow...

Page 25: ...s are horizontal CAUTION The area around the fuser unit and the output area are subject to high temper atures Take adequate precautions to avoid burns when removing jammed paper Do not touch any other...

Page 26: ...Maintenance 5 Turn the scanner unit and printer unit power switches to ON NOTE For instructions on turning the power to ON see Main Power Supply in the User s Guide 6 Open the stack bypass 7 Pull out...

Page 27: ...nvelopes on a flat sur face and press down on the stack to remove the air then make sure the edges are creased and the envelopes are flat 9 Make sure that the corners are not stuck together and elimin...

Page 28: ...ure that the height of the envelope stack does not exceed the limit mark Do not try to print on the back of enve lopes If using ISO B5 envelopes close the flap and feed top first as shown 12 Set the s...

Page 29: ...hen press the OK key IMPORTANT Make sure to enter the correct settings Entering the wrong setting may cause a paper jam When you are finished printing envelopes turn the power to OFF and follow the sa...

Page 30: ...finisher Plain paper recycled paper colored paper rough paper bond paper plain paper 2 letterhead or thin paper will be sent to the finisher Heavy transparency and level will be output to the center t...

Page 31: ...er size If set to a smaller size large size paper will block the opening curl up and may cause a paper jam The full paper sensor informs the machine when a certain amount of paper is output to the cen...

Page 32: ...artridge later press the Recover Later key Even if the cartridge is empty you can still process Copy jobs by the Remote Copy function or process Send jobs After the job is finished go to the Status sc...

Page 33: ...carefully to prevent toner from scatter ing and entering your eyes or mouth If toner enters your eyes or mouth wash immediately with cold water and con sult a physician 3 Remove the new cartridge fro...

Page 34: ...ently to remove it with the black sheet 5 Rock the cartridge five or six times gently to distribute the toner evenly NOTE If toner is not evenly distributed inside the cartridge this can cause streaki...

Page 35: ...m water will set the toner and make it impossible to remove the toner stains Be careful to avoid cutting your fingers on the sealing tape Touching or scratching the photosensitive drum with the hands...

Page 36: ...go 9 Set the cartridge back into the original position 10 Close the top cover IMPORTANT If the top cover does not close properly do not force it This may cause damage to the machine Open the top cove...

Page 37: ...ed with a mild cleansing agent Do not use alcohol benzene paint thinner or other flammable substances If flammable substances come into contact with the electrical parts inside the machine this may re...

Page 38: ...d as you wipe it with a cloth dampened with water or a mild cleaning agent then wipe with a dry cloth Wipe the touch panel display with a cloth dampened with water or a mild cleaning agent then wipe w...

Page 39: ...cleaning by repeatedly feeding blank originals through the feeder NOTE It takes about ten seconds to clean the feeder 1 Call up the desired screen as follows key Adjustment Cleaning Feeder Cleaning 2...

Page 40: ...show small black spots the cause is probably a dirty roller The following procedure describes how to clean the roller 1 Call up the desired screen as follows key Adjustment Cleaning Roller Cleaning 1...

Page 41: ...leaning sheet lengthwise in the stack bypass with the white margin toward the machine 5 Press the Start key to start the clean ing process 6 Place the cleaning sheet in the stack bypass once again thi...

Page 42: ...s of paper in the paper drawer or stack bypass before you start cleaning Clean the rollers with six sheets of paper If the optional duplex unit is installed clean the rollers with three sheets of pape...

Page 43: ...1 Maintenance Routine Cleaning 1 32 3 Press the Done key Repeat until the Additional Functions screen closes...

Page 44: ...efore supplies run out In addition to plain paper the machine uses colored paper transparencies label stock and other media For details contact your service representative NOTE For high quality copies...

Page 45: ......

Page 46: ...r Area 2 10 Paper Jam in the Stack Bypass 2 14 Paper Jam in the Right Cover Area 2 15 Paper Jam in the Paper Drawers 2 17 Paper Jam in the Feeder 2 19 If Paper Jams Are Occurring Frequently 2 23 Clean...

Page 47: ...removing jammed paper in each part of the machine read the rest of this section If you want to remove the jammed paper later press the Recover Later key This will enable you to process Copy jobs with...

Page 48: ...ome into contact with your hands or clothing as this will soil them If they become dirty wash immediately with cold water Washing with warm water will set the toner and make it impossible to remove th...

Page 49: ...hat is referenced Feeder See p 2 19 Paper drawers See p 2 17 Left cover See p 2 6 Right cover See p 2 15 Stack bypass See p 2 14 Top cover see p 2 10 Center tray See p 2 5 Buffer path unit See p 3 9 S...

Page 50: ...below and the procedure that appears in the touch panel display to remove the jammed paper 1 Gently pull out any jammed paper as shown IMPORTANT If the jammed paper cannot be easily removed do not fo...

Page 51: ...imilar to the one shown appears in the touch panel display Check where the jam occurred and follow the procedure below and the procedure that appears in the touch panel display to remove the jammed pa...

Page 52: ...Clearing Paper Jams 2 7 2 Troubleshooting 1 Open the left cover...

Page 53: ...s 2 8 2 Troubleshooting 2 Gently remove any jammed paper from these areas IMPORTANT Always pull the paper gently to avoid tear ing or leaving pieces of paper inside the printer unit which could cause...

Page 54: ...aper in the fuser unit press down the green tab to open the cover and pull the jammed paper straight out Release the tab to close the cover 4 Press the green tab back and close the cover 5 Close the l...

Page 55: ...ea are subject to high temper atures Take adequate precautions to avoid burns when removing jammed paper Do not touch any other areas except the designated areas for this purpose 1 Lift up the output...

Page 56: ...dge IMPORTANT Touching or scratching the photosensitive drum with the hands can lead to poor printing quality Never open the protective shutter over the drum After the cartridge is removed it should b...

Page 57: ...handle to open the transfer guide and remove the jammed paper IMPORTANT Do not lift up the transfer guide lock tray beyond its upright position 90 degrees as it may damage the imaging area 5 Press the...

Page 58: ...Clearing Paper Jams 2 13 2 Troubleshooting 6 Replace the cartridge 7 Close the top cover 8 Lower the output tray 9 Follow the instructions in the touch panel display...

Page 59: ...where the jam occurred and follow the procedure below and the procedure that appears in the touch panel display to remove the jammed paper 1 Remove any non jammed paper remaining in the stack bypass 2...

Page 60: ...nstructions in the touch panel display If a paper jam occurs in the right cover area a display similar to the one shown appears in the touch panel display Check where the jam occurred and follow the p...

Page 61: ...the jammed paper Upper paper drawer feed Lower the green lever as shown to open the cover then remove the jammed paper Lower paper drawer feed Remove the jammed paper directly 3 Close the right cover...

Page 62: ...emove the jammed paper IMPORTANT Before you remove jammed paper in the paper drawers open the right cover to make sure that the paper jam is not in the paper drawer feed area If a paper jam has occurr...

Page 63: ...2 18 2 Troubleshooting 3 Gently remove any jammed paper 4 Make sure that the remaining paper is correctly loaded then replace the paper drawer 5 Close the right cover 6 Follow the instructions in the...

Page 64: ...r a display similar to the one shown appears in the touch panel display Check where the jam occurred and follow the procedure below and the procedure that appears in the touch panel display to remove...

Page 65: ...Clearing Paper Jams 2 20 2 Troubleshooting 2 Fully open the feeder cover and remove any jammed originals 3 Open the inner cover and remove any jammed originals...

Page 66: ...Troubleshooting 4 Remove all jammed originals and close the inner cover and feeder cover 5 Lift up the feeder holding it by its center on its left side and remove any jammed originals 6 Remove the or...

Page 67: ...Clearing Paper Jams 2 22 2 Troubleshooting 7 Gently lower the feeder 8 Follow the instructions in the touch panel display...

Page 68: ...ct to high temperatures Take ade quate precautions to avoid burns when cleaning paper jams Do not touch any other areas except the designated areas for this purpose CAUTION HOT SURFACE To avoid burns...

Page 69: ...anel power switch to OFF then turn the scanner unit and printer unit power switches to OFF NOTE For instruction on turning the power to OFF see Control Panel Power Switch and Main Power Supply in the...

Page 70: ...be stored in its protective wrapper 4 Remove the blue cleaning brush located inside the machine on the right 5 Pass the cleaning brush up and down several times to clean the corona wires IMPORTANT Wh...

Page 71: ...ubleshooting 6 Replace the cartridge and cleaning brush inside the machine 7 Close the top cover 8 Turn the scanner unit and printer unit power switches to ON NOTE For instruction on turning the power...

Page 72: ...Fading If the toner supply in the cartridge is low or unevenly distributed white streaks or patches or faded characters may appear on printouts and copies You will need to distribute the toner evenly...

Page 73: ...the top cover IMPORTANT If the top cover does not close properly do not force it This may cause damage to the machine Open the top cover again remove the cartridge and reinsert it Make sure the cartri...

Page 74: ...s the fixing roller inside the fuser unit may be dirty When this happens clean the fixing rollers by printing on cleaning paper using the Additional Functions mode NOTE If printed documents have small...

Page 75: ...ve the cartridge rock it gently five or six times and try to print or copy again If this does not solve the problem replace the cartridge See Replacing the Cartridge on p 1 21 Envelopes wrinkle excess...

Page 76: ...r the machine See Loading Paper in the Internal Paper Drawers on p 1 3 Are the levers on the fuser unit still in the raised position If so lower the levers to their original positions Change the Speci...

Page 77: ...AUTION Always disconnect the power cord by holding the power plug Pulling on the power cord may expose the wires or break the cord causing a current leak leading to fire or electric shock If the machi...

Page 78: ...eshooting 1 Turn the main power switches on the printer and scanner units to OFF wait 3 seconds then turn both switches back to ON NOTE For instructions on turning the main power supply to OFF and ON...

Page 79: ...he main power switches on the printer unit and the scanner unit to OFF and disconnect the power plug then contact your service representative See Contacting Your Service Representative on p 2 35 NOTE...

Page 80: ...ormally as described in the preceding section Service Call Error Messages turn the main power switches on the scanner unit and printer unit to OFF disconnect the power plug then call your service repr...

Page 81: ......

Page 82: ...ple Jams in the Finisher 3 14 Specifications 3 17 Supplies 3 17 Duplex Unit DU 82 3 18 Parts and Their Functions 3 18 Paper Jam in the Duplex Unit 3 19 Specifications 3 24 Envelope Feeder EF 9 3 25 Pa...

Page 83: ...nctions Output trays Paper is output here Output type can be specified by setting a designated tray See Setting the Initial Screen in the Reference Guide Tray A Tray B Tray C Front cover Open to chang...

Page 84: ...stack of output printed pages reaches the stack height limit of the tray the machine changes the output to another available output tray If all available output trays have reached the stack height li...

Page 85: ...Document Placed on the Platen Glass Document Placed in the Feeder NOTE EXEC B5R A5R pages cannot be corner stapled LGL EXEC B5R A5R pages cannot be double stapled Staple location Staple locations Sta...

Page 86: ...g pen Adding Staples If the finisher runs out of staples a message appears in the touch panel display telling the user to change the staple cartridge When this message appears during a Copy operation...

Page 87: ...er G1 3 6 3 Optional Equipment 1 Open the front cover of the finisher 2 Tilt the stapler unit forward CAUTION Never insert your fingers all the way into the open compartment 3 Lift out the staple cart...

Page 88: ...Finisher G1 3 7 3 Optional Equipment 4 Load a new staple cartridge and press the sta pler unit back to its original position 5 Press the test button...

Page 89: ...ront cover 7 The output door will open Insert a sheet of LTR size paper NOTE If the output door does not open open the front cover of the finisher and press the test button again 8 The paper inserted...

Page 90: ...ays check the printer unit after removing the jammed paper in the finisher Paper Jam in the Finisher If a paper jam occurs in the paper feed area of the finisher a display similar to the one shown app...

Page 91: ...uipment 2 Lift the guide and remove the jammed paper Close the guide after removing the jammed paper 3 Close the top cover of the finisher 4 Gently pull the finisher away from the main unit Be careful...

Page 92: ...Finisher G1 3 11 3 Optional Equipment 5 Remove paper from the paper feeding area If the jammed paper is difficult to remove go to step 6 6 Open the buffer path unit...

Page 93: ...Finisher G1 3 12 3 Optional Equipment 7 Gently remove the jammed paper...

Page 94: ...r If it is difficult to remove the paper slowly raise the paper guide and remove the jammed paper CAUTION Never insert your fingers into the paper output slot 10 Once you have removed the jammed paper...

Page 95: ...uch panel display to remove the jammed paper CAUTION Always be careful when handling sta ples Staple points can cause injuries NOTE Only replace the staple cartridge when the finisher has run out of s...

Page 96: ...original position IMPORTANT Do not move the stapler unit with your hand this may damage the unit 4 Tilt the stapler unit forward 5 While holding down the green lever lift up the staple jam release pl...

Page 97: ...injury Handle jammed staples with care after they are removed as they may cause injury NOTE Staples are normally straight prior to stapling The jam is removed when all bent or skewed staples have been...

Page 98: ...et Stapled Paper sizes 3 7 8 to 11 11 16 99 mm to 297 mm W 7 1 2 to 17 191 mm to 432 mm L 11 x17 LGL LTR EXEC A3 B4 A4 B5R A5R Acceptable paper stock Plain paper recycled paper colored paper rough pap...

Page 99: ...E You cannot use envelopes heavyweight paper transparencies or labels in the duplex unit Parts and Their Functions CAUTION Do not touch the power cord socket It may cause damage to the machine Power c...

Page 100: ...the procedure below and the procedure that appears in the touch panel display to remove the jammed paper CAUTION The area around the fuser unit and the output area are subject to high tempera tures Ta...

Page 101: ...t DU 82 3 20 3 Optional Equipment 2 Gently remove the jammed paper IMPORTANT If jammed paper is difficult to remove go to step 3 3 Close the front cover pressing the cover until it clicks 4 Open the l...

Page 102: ...Duplex Unit DU 82 3 21 3 Optional Equipment 5 Press down the green tab to unlock the duplex unit 6 Use both hands to pull the duplex unit out until the guide plate can be moved to a vertical position...

Page 103: ...al Equipment 7 If the paper is already inside the duplex unit gently pull the paper straight up to remove 8 Slowly lift the guide plate and gently remove the jammed paper Lower the guide plate back to...

Page 104: ...nto the printer unit then gently push it down to lock into place IMPORTANT Do not push the metal part at the back of the duplex unit This may deform the metal plate resulting in paper misfeeds or pape...

Page 105: ...82 Paper sizes 11 x17 LGL LTR EXEC A3 B4 A4 B5R A5R Acceptable paper stock Plain paper recycled paper colored paper rough paper bond paper plain paper 2 letterhead thin paper Paper weight 16 to 28 lb...

Page 106: ...at one time Parts and Their Functions The envelope feeder can hold the following types of envelopes COM10 Monarch DL ISO B5 ISO C5 YOUGATA 4 4 1 8 x 9 7 16 105 mm x 240 mm Envelope side guide Adjust...

Page 107: ...icks into place NOTE Pull the auxiliary tray out regardless of the type of envelopes you are loading 2 Set the envelope side guides to a position slightly wider than the width of the enve lopes 3 Set...

Page 108: ...nvelope Feeder EF 9 3 27 3 Optional Equipment 4 Make sure that the corners are not stuck together and eliminate any curl 5 Align the envelopes on a flat surface 6 Angle the stack of envelopes slightly...

Page 109: ...performed If using ISO B5 envelopes close the flaps and feed top first as shown 8 Load the remaining envelopes and lower the envelope pressure plate IMPORTANT Make sure that the height of the envelope...

Page 110: ...jam occurred and follow the procedure below and the procedure that appears in the touch panel display to remove the jammed paper 1 Raise the envelope pressure plate and remove the envelopes from the e...

Page 111: ...er to remove the jammed enve lope 5 To reinstall the envelope feeder align the tabs on the envelope feeder with the slots on the printer unit Gently position the envelope feeder into the slot as far a...

Page 112: ...t to change due to product improvement Name Envelope Feeder EF 9 Envelope sizes COM10 DL Monarch ISO B5 ISO C5 YOUGATA 4 Feeder capacity Approx 100 envelopes within stack height of 2 13 16 73 mm Dimen...

Page 113: ...Normal standby or operating state Red flashing Paper jam has occurred or the paper deck is disconnected from the machine Red Indicates a failure has occurred Cover handle Use to open the paper deck c...

Page 114: ...ck 1 Open the cover of the paper deck 2 Unwrap and remove the paper 3 Place the paper between the left and right paper guides with the open side of the stack on top NOTE Make sure the height of the pa...

Page 115: ...or A4 size paper To change the paper size posi tion the guides to accommodate the new paper size 4 Close the cover of the paper deck NOTE To close the cover press down from the cen ter Do not close t...

Page 116: ...Sheet Paper Deck D1 3 35 3 Optional Equipment 3 Raise the paper guides and move them to the marks indicating the new paper size 4 Replace and tighten the screws removed in step 2 A 4 L T R L T R A 4...

Page 117: ...t 5 Close the cover of the paper deck 6 Grip the handle of the paper deck then pull the paper deck away from the machine 7 Remove the paper size card from the holder IMPORTANT The size card must be ch...

Page 118: ...n on the size card must always be the same as the paper size loaded in the paper deck 9 Slide the paper deck back to its original position If a paper jam occurs in the 1000 Sheet Paper Deck a display...

Page 119: ...Paper Deck D1 3 38 3 Optional Equipment 1 Open the paper deck cover 2 Gently remove the jammed paper If the paper is jammed deep inside do not use excessive force Go to step 3 3 Close the cover of the...

Page 120: ...he paper deck then pull the paper deck away from the machine 5 Gently remove the jammed paper 6 Close and open the right cover NOTE If there is a paper jam in this area follow the procedures in Paper...

Page 121: ...structions in the touch panel display Name 1000 Sheet Paper Deck D1 Paper sizes LTR A4 Paper weight 17 to 28 lb bond 64 to 105 g m2 Capacity 1000 sheets 17 lb bond 64 g m2 stack height 4 5 16 110 mm D...

Page 122: ...4 1 4 Appendix Appendix Index 4 2 C H A P T E R 4...

Page 123: ...Appear 1 29 The Corona Wires 2 23 The Feeder 1 28 The Feeder Belt 1 27 The Platen Glass 1 26 The Touch Panel Display 1 27 When Documents Passing Through the Feeder Become Dirty 1 28 Cleaning Sheet 2 2...

Page 124: ...21 H Hardware Troubleshooting Chart 2 30 Heavyweight Paper 1 10 I Irregular Size Paper 1 10 L Loading Envelopes in the Stack Bypass 1 13 Paper in the Stack Bypass Tray 1 10 The Envelope Feeder EF 9 3...

Page 125: ...0 PaperJam in the 1000 Sheet Paper Deck D1 3 37 in the Envelope Feeder EF 9 3 29 Parts and Their Functions 1000 Sheet Paper Deck D1 3 32 Duplex Unit DU 82 3 18 Envelope Feeder EF 9 3 25 Finisher G1 3...

Page 126: ...3 3 17 T Top Cover 3 2 Top Cover Area Paper Jam 2 10 U Using the Stack Bypass 1 9 V Viewing Window in 1000 Sheet Paper Deck D1 3 32 W When Black Spots or White Specks Appear 2 29 When Originals or Pri...

Page 127: ......

Page 128: ...ON U K LTD Woodhatch Reigate Surrey RH2 8BF United Kingdom CANON DEUTSCHLAND GmbH Europark Fichtenhain A10 47807 Krefeld Germany CANON ITALIA S p A Palazzo L Strada 6 20089 Milanofiori Rozzano MI Ital...

Reviews: