Chapter 1
1-25
1.2.4 Maintenance by the User
1.2.4.1 Cleaning
0019-5678
If the original is not copied clearly, clean the machine. For high-quality printouts, we recommend cleaning the machine once or twice a month.
Exterior
Clean the exterior of the machine.
1) Turn OFF the main power switch and disconnect the power cord.
2) Wipe the machine’s exterior with a clean, soft, lint-free cloth dampened with water or diluted dishwashing detergent solution.
3) Wait for the machine to dry, then reconnect the power cord and turn ON the main power switch.
Interior
Clean the machine’s print area periodically to prevent toner powder and paper dust from accumulating inside.
Cleaning the Fixing Unit
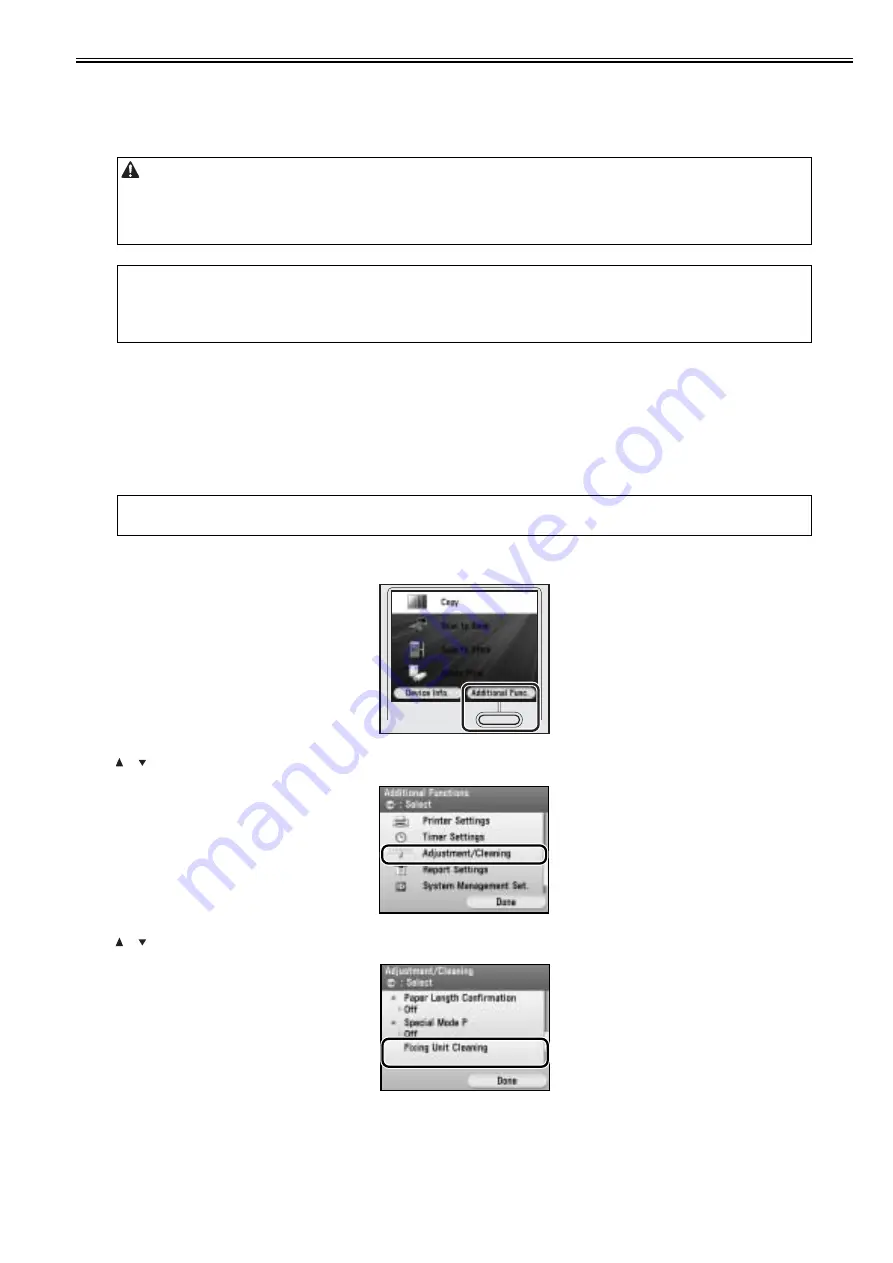
If black streaks appear on printed output, the fixing unit may be dirty. Also, you should use the Fixing Unit Cleaning procedure every time the toner cartridge is
replaced. Print the cleaning pattern on LTR paper for cleaning the fixing unit.
1) Press (Main Menu).
2) Press the right Any key to select <Additional Func>.
F-1-9
3) Use [ ], [ ], or (Scroll Wheel) to select <Adjustment/Cleaning>, then press [OK].
F-1-10
4) Use [ ], [ ], or (Scroll Wheel) to select <Fixing Unit Cleaning>, then press [OK].
F-1-11
5) Confirm that <Start Cleaning> is displayed, then press [OK].
Printing starts.
- Do not use alcohol, benzene, paint thinner, or other solvents for cleaning. Doing so may result in damage to the plastic parts.
- Do not use tissue paper, paper towels, or similar materials for cleaning; they can stick to the components or generate static charges.
- Disconnect the power cord from the power outlet regularly, and clean the area around the base of the power plug’s metal pins and the power outlet with a dry cloth
to ensure that all dust and grime is removed. If the power cord is connected for a long period of time in a damp, dusty, or smoky location, dust can build up around
the power plug and become damp. This may cause a short circuit and result in a fire.
MEMO:
-
You cannot send or receive documents when the main power switch is turned off or the power cord is disconnected.
- If the main power switch is turned ON, all jobs waiting in the print queue will be erased.
- Documents received into memory and documents stored for delayed send will be retained for approximately 60 minutes after the power cord has been disconnected.
MEMO:
- As cleaning paper, LTR or A4 paper must be loaded in the paper drawer or the stack bypass tray.
- Cleaning the fixing unit takes approximately 60 seconds.
Summary of Contents for iR C1020 Series
Page 1: ...Sep 8 2008 Service Manual iR C1020 Series iR C1021i ...
Page 2: ......
Page 6: ......
Page 18: ...Contents ...
Page 19: ...Chapter 1 Introduction ...
Page 20: ......
Page 22: ......
Page 57: ...Chapter 2 Installation ...
Page 58: ......
Page 60: ......
Page 73: ...Chapter 3 Basic Operation ...
Page 74: ......
Page 76: ......
Page 81: ...Chapter 4 Main Controller ...
Page 82: ......
Page 84: ......
Page 97: ...Chapter 5 Original Exposure System ...
Page 98: ......
Page 100: ......
Page 112: ......
Page 113: ...Chapter 6 Original Feeding System ...
Page 114: ......
Page 116: ......
Page 132: ......
Page 133: ...Chapter 7 Laser Exposure ...
Page 134: ......
Page 136: ......
Page 143: ...Chapter 8 Image Formation ...
Page 144: ......
Page 146: ......
Page 180: ......
Page 181: ...Chapter 9 Pickup and Feed System ...
Page 182: ......
Page 213: ...Chapter 9 9 29 F 9 79 1 2 3 ...
Page 214: ......
Page 215: ...Chapter 10 Fixing System ...
Page 216: ......
Page 218: ......
Page 233: ...Chapter 11 External and Controls ...
Page 234: ......
Page 263: ...Chapter 12 e maintenance imageWARE Remote ...
Page 264: ......
Page 266: ......
Page 275: ...Chapter 12 12 9 F 12 27 ...
Page 280: ......
Page 281: ...Chapter 13 Maintenance and Inspection ...
Page 282: ......
Page 284: ......
Page 286: ......
Page 287: ...Chapter 14 Measurement and Adjustments ...
Page 288: ......
Page 290: ......
Page 293: ...Chapter 15 Correcting Faulty Images ...
Page 294: ......
Page 296: ......
Page 317: ...Chapter 16 Error Code ...
Page 318: ......
Page 320: ......
Page 331: ...Chapter 16 16 11 ...
Page 332: ......
Page 333: ...Chapter 17 Special Management Mode ...
Page 334: ......
Page 336: ......
Page 343: ...Chapter 17 17 7 ...
Page 344: ......
Page 345: ...Chapter 18 Service Mode ...
Page 346: ......
Page 348: ......
Page 388: ......
Page 389: ...Chapter 19 Upgrading ...
Page 390: ......
Page 392: ......
Page 396: ...Chapter 19 19 4 3 Click Next F 19 4 4 Select a USB connected device and click Next F 19 5 ...
Page 397: ...Chapter 19 19 5 5 Click Start F 19 6 6 Click Yes F 19 7 Download will be started F 19 8 ...
Page 399: ...Chapter 19 19 7 ...
Page 400: ......
Page 401: ...Chapter 20 Service Tools ...
Page 402: ......
Page 404: ......
Page 407: ...Sep 8 2008 ...
Page 408: ......


