background image

64 

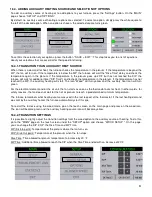
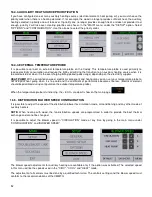
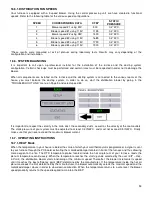
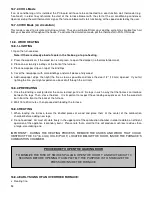
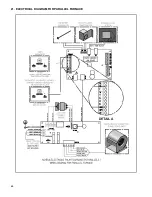
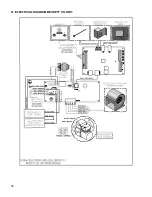
21.  ELECTRICAL DIAGRAM FOR PARALLEL FURNACE 


Summary of Contents for PF01015

Page 1: ...naces available on the market We are confident that your furnace will provide years of comfort and safe operation Please keep this document Verified and tested for Canada and the United States by an accredited laboratory This manual is available for free download on the manufacturer s web site It is a copyrighted document Re sale is strictly prohibited The manufacturer may update this manual from ...

Page 2: ...NSTALLATION 21 11 8 THERMOSTAT INSTALLATION 21 11 9 OPERATING INSTRUCTIONS 21 12 ELECTRICAL DIAGRAM FOR SERIAL FURNACE VIA CONTROL 22 13 ELECTRICAL DIAGRAM FOR SERIAL FURNACE VIA MOTOR 24 CADDY WOOD ONLY FURNACE OR COMBINED WOOD ELECTRIC OR PARALLEL ADD ON PF01015 26 14 INSTALLATION INSTRUCTIONS 27 14 1 BLOWER INSTALLATION 27 14 2 LINK BOARD INSTALLATION AND CONNECTION 27 14 3 TOUCHSCREEN INSTALLA...

Page 3: ...PARTMENT 55 17 MAINTENANCE 56 17 1 MAINTENANCE OF THE EXCHANGERS 56 17 2 CHIMNEY MAINTENANCE 57 17 3 SMOKE PIPE INSPECTION 57 17 4 BLOWER MOTOR MAINTENANCE 57 17 5 FILTERS 57 17 5 1 AIR FILTER DIMENSIONS 57 17 6 DOOR GASKET MAINTENANCE 57 17 6 1 DOOR ADJUSTMENT PROCEDURE 57 18 REPLACEMENT PARTS 58 18 1 DOOR GLASS 58 18 2 GASKET 58 19 TROUBLESHOOTING 58 19 1 VALIDATING STATUS 59 19 1 1 DISTRIBUTION...

Page 4: ...ERIFICATION PROCEDURE 74 28 6 2 ELECTRODES SETTING 75 28 7 APPLIANCE START UP 76 28 8 PROLONGED CLOSING 76 29 TECHNICAL DATA 76 29 1 UH CADDY 76 30 MAINTENANCE 77 30 1 MAINTENANCE 77 30 2 SERVICE 77 30 3 FILTERS 77 31 ELECTRICAL DIAGRAM BECKETT OIL UNIT 78 32 ELECTRICAL DIAGRAM RIELLO OIL UNIT 79 33 LINK BOARD OPTIONS CONNECTIONS 80 33 1 ELECTRICAL CONSUMPTION 80 33 2 OUTDOOR PROBE 80 33 3 24V ADD...

Page 5: ...od seasoned cordwood The Caddy furnace was tested and approved according to the CSA B415 1 10 Standard To optimize the efficiency of your furnace here is some advice that you should follow when installing or operating your Caddy Respect the local codes when in doubt consult your local dealer Make sure your furnace is installed according to the instructions on the certification label All controls a...

Page 6: ...ve a significant impact in making heat circulation optimum 1 Values are as measured per CSA B415 1 10 except for the recommended heating area firebox volume maximum burn time and maximum input capacity Performances based on a fuel load prescribed by the standard at 10 lb ft and with moisture content between 18 and 28 2 Input value at 10lb ft fuel loading density and dry energy value of 8 600BTU lb...

Page 7: ...luded with optional blower assembly 14 in x 25 in x 1 in 356 mm x 635 mm x 25 mm Filter quantity 1 Particulate emission standard EPA CSA B415 1 10 USA standard safety UL 391 UL 1995 UL 727 Canadian standard safety CSA B366 1 CSA C22 2 no 236 CAN CSA B140 4 East west through the door you see the longitudinal sides of the logs north south through the door you see the tips of the logs Mobile home Can...

Page 8: ...llo 87 Burner standard Beckett AFG Burner other brands approved Riello Burner location Left or right Burner recommended clearance for maintenance 24 in Burner Mandatory connector pipe diameter Wood oil 7 in Burner Mandatory exhaust pipe diameter 5 in Burner location of exhaust pipe Left or right Burner capacity at input 1 90 000 BTU 26 4 kW Burner orifice at input 1 0 55 gal h X 60 W 2 08 L h Burn...

Page 9: ...T TEMP VAR STATIC PRESSURE FILTER VENT MOT VIT CFM OF MIN MAX 1 H2O CADDY WITH BLOWER CADDY ADD ON PARALLEL DD 10 1 3 4 1 900 78 0 2 0 5 25 x 14 x 1 CADDY ADD ON SERIAL N AP N AP N A P N AP 78 0 2 0 5 N AP 6 FURNACE DIMENSIONS ADD ON AND WOOD ONLY WOOD ELECTRIC WOOD OIL ...

Page 10: ...10 ADD ON WOOD ONLY WOOD ELECTRIC WOOD OIL ...

Page 11: ...T THE FIRE DO NOT BURN WOOD COATED WITH PAINT GLUE OR CHEMICAL PRODUCTS DO NOT BURN WASTES OR FLAMMABLE LIQUIDS SUCH AS GASOLINE NAPHTHA MOTOR OIL OR OTHER UNSUITABLE MATTERS DO NOT STORE WOOD IN THE VICINITY OF THE FURNACE RESPECT THE REQUIRED CLEARANCES BETWEEN COMBUSTIBLE MATERIALS AND THE SOURCE OF HEAT WARNING THE ASH DRAWER AND EXCHANGERS ACCESS PANEL GET VERY HOT DO NOT MANIPULATE WITH BARE...

Page 12: ...gh during the fire start up to prevent the fire from smouldering which could stain the glass An intense fire will help keep the glass clean However in the event that your glass gets stained which should not occur under normal operating conditions you will have to clean it using a wet cloth and a fireplace glass cleaner Clean the glass ONLY when the unit has cooled down Do not use abrasive cleanser...

Page 13: ...13 INSTALLATION AND OPERATION INSTRUCTIONS CADDY ADD ON SERIAL INSTALLATION PF01015 ...

Page 14: ...speed of the motor may be increased or decreased CAUTION THE BLOWER OF THE EXISTING FURNACE ITSELF SHALL NOT BE CHANGED WARNING THE ELECTRICAL CURRENT FLOWING THROUGH THE BLOWER MOTOR SHALL NOT EXCEED THE NAME PLATE RATING 11 APPLIANCE INSTALLATION If the exiting furnace must be modified the following standards must be respected Wood oil NFPA 31 Standard for the installation of oil burning equipme...

Page 15: ...e furnace and cannot be directed downward Do not install connecting ducts in a way that would allow inversion of the air flow see example 1 and 3 The transfer duct between the existing furnace and the add on must be at least 435 square inches 0 28 m2 and deviations radius must be at least 6 152 mm See OPTION 1 and 2 Option 1 Option 2 Minimum duct size 435 square inches 0 28 m2 R Minimum radius 6 i...

Page 16: ...16 Option 3 Option 4 ...

Page 17: ...17 EXAMPLE 1 EXAMPLE 2 ...

Page 18: ...e is obtained by subtracting the cold air return temperature from that of the air exiting in the hot air plenum The result t will be needed for next step 3 Make the following verifications Existing oil electric or gas furnace Q ______q_____ 1 08 x T2 T1 Q Flow in cubic feet min q Heat flow in BTU h T1 Fresh air return temperature oF T2 Hot air outlet temperature oF 11 2 PARALLEL INSTALLATION Paral...

Page 19: ...8 mm 11 3 2 MINIMUM CLEARANCES TO COMBUSTIBLES MATERIALS FOR AIR RETURN DUCT See Section 14 7 2 MINIMUM CLEARANCES TO COMBUSTIBLES MATERIALS FOR AIR RETURN DUCT 11 3 3 MINIMUM CLEARANCES TO COMBUSTIBLES MATERIALS FOR HOT AIR PLENUM See Section 14 7 3 MINIMUM CLEARANCES TO COMBUSTIBLES MATERIALS FOR HOT AIR PLENUM 11 3 4 FLOOR PROTECTION See Section 14 7 4 FLOOR PROTECTION ...

Page 20: ...most cases the use of a 6 connecting pipe and chimney is recommended if the wood furnace evacuates into a separate chimney It is strictly forbidden to connect a solid fuel burning appliance to a chimney already connected to a propane or natural gas appliance Regulation CAN CSA B365 1 In some cases if the furnace is connected to an oil furnace and both appliances must share the same chimney the chi...

Page 21: ...operate satisfactorily when needed On the wood furnace the thermostat controls the air inlet damper When the thermostat calls for heat the damper opens and the combustion is stirred up When the furnace gets hot enough the RTD probe activates the blower motor at the speed selected for wood heating When there is no call for heat the air inlet damper must be completely closed and the chain must be af...

Page 22: ...l to use the three 3 SBI 51035 relays to make the connection as in 3 relay diagrams It is possible to use two relay White Rodger SPNC SPNO 90 380 for the two relay diagram The use of another brand or model of relay is not recommended since very limited technical support may be provided ...

Page 23: ...23 REQUIRES 2 RELAY SPNO SPNC WHITE ROGERS P N 90 380 NOT INCLUDED AND 24V AVAILABLE ON EXISTING FURNACE ...

Page 24: ...24 13 ELECTRICAL DIAGRAM FOR SERIAL FURNACE VIA MOTOR REQUIRES 1 RELAY 51035 WITH 1 JUNCTION BOX NOT INCLUDED ...

Page 25: ...25 REQUIRES 2 RELAY SPNO SPNC WHITE ROGERS P N 90 380 WITH 1 JUNCTION BOX NOT INCLUDED AND 24V AVAILABLE ON EXISTING FURNACE ...

Page 26: ...26 INSTALLATION AND OPERATION INSTRUCTIONS FOR CADDY WOOD ONLY FURNACE OR COMBINED WOOD ELECTRIC OR PARALLEL ADD ON PF01015 CADDY FURNACE WOOD ONLY CADDY FURNACE COMBINED WOOD ELECTRIC ...

Page 27: ...by NFI National Fireplace Institute or in Canada by WETT Wood Energy Technical Training or in Quebec by APC Association des Professionnels du Chauffage Inspect the furnace to make sure that nothing has been damaged in the shipping Pull out the wiring kit and the instructions manual from the firebox of the furnace and the accessories from the flue pipe The following section contains installation in...

Page 28: ...d housing the holes on the side of the furnace Use the screws removed in the previous step to secure the housing to the furnace Once installed the link board must be connected to the system with the telecommunication wire of the power board The wire is located in the blower box To access it remove the air return box ...

Page 29: ...ng board is installed Once the telecommunication wire is out on the desired side run it along the back of the furnace and pass it through the grommet at the bottom of the link board housing Complete the connection by plugging the 8 strands telecommunication wire in the right connector shown by the arrow ...

Page 30: ...ce To do so open the cover of the power board housing Connect the power cord to the terminals N Neutral F Ground L Line Refer to wiring diagram for connecting components When done secure the wires with a BX connector not included and replace the blower box cover ...

Page 31: ...link board with the touch screen using the telecommunication wire provided with the user manual Plug the telecommunication wire in connector labeled LCD and pull it out of the board housing through the top grommet Simply run the wire on the side of the furnace using the plastic ties supplied with the user manual Replace the access panel of the link board Note that the touch screen is removable if ...

Page 32: ...UITABLE FOR 75 C not included STEP 1 Remove the two screws already secured to the furnace B on the side where you have chosen to install the link board Then secure the RTD support A using the two screws you previously removed STEP 2 Using a drill and a 9 32 bit drill a hole in the hot air plenum so that the RTD rod can pass into it STEP 3 and 4 Secure the RTD in place on the hot air plenum using t...

Page 33: ...VOMOTOR INSTALLATION AND CONNECTION Your Caddy furnace is equipped with a servomotor To install it simply screw it in place in the two pre drilled holes in the front of the furnace using two screws as shown below ...

Page 34: ...ncluded 14 6 UNIT LOCATION For a safe and quiet operation the furnace must be leveled in both directions and supported evenly to ensure stability The furnace must be installed where outside air supply will be sufficient for proper combustion In airtight houses it might be necessary to install an outside air inlet See Section 14 11 COMBUSTION AIR AND FRESH AIR INTAKE ADAPTER INSTALLATION OPTIONAL T...

Page 35: ... FOR AIR RETURN DUCT The return air duct should be at least equal in size to the return air plenum The air return duct can be installed at zero clearance to combustibles 14 7 3 MINIMUM CLEARANCES TO COMBUSTIBLES MATERIALS FOR HOT AIR PLENUM Plenums installed on the furnace must be made of metal in accordance with NFPA 90B 2 1 3 The hot air duct can be passed through the side wall with a clearance ...

Page 36: ...8 203 mm N A Canada only D 8 203 mm Note 1 N A Canada only E N A USA only Note 2 Steel with a minimum thickness of 0 015 0 38 mm or ceramic tiles sealed together with grout No protection is required if the unit is installed on a non combustible floor ex concrete Note 1 The floor protection at the back of the furnace is limited to the furnace s required clearance A if such clearance is smaller than...

Page 37: ...7 reducer must be installed at the flue outlet of the furnace If the draft exceeds 0 06 IN W C a barometric control must installed Never install a manual damper Secure the exhaust pipe to the flue adapter with three screws WOOD ONLY Diameter 6 WOOD OIL Reducer 7 to 6 Diameter 7 Unit oil Max Caddy pipe For a proper installation follow the advice below All the exhaust pipe joints must be secured wit...

Page 38: ...etermine if an additional fresh air supply is necessary are not appropriate for all the situations When in doubt it is recommended to install a fresh air supply A fresh air supply may be needed if Solid fuel units present anomalies such as irregular draft smoke return bad combustion and or reversed draft whether there is combustion or not Existing solid fuel units such as a stove or fireplace rele...

Page 39: ...sure it does not create a depression in the room where the furnace is installed For more information regarding the installation of fresh air intake adapter refer to the option s manual 14 12 HOT AIR PLENUM The hot air plenum coming out of the furnace is to have a minimum height of 24 610 mm if the top of the first vertical section is not flush with the first horizontal section Otherwise the minimu...

Page 40: ...enum CANADA The installation in parallel i e the Caddy furnace combined with another using the same system of hot air ducts is not allowed in Canada UNITED STATES The installation in parallel i e the Caddy furnace combined with another using the same hot air duct system is allowed the United States Conditional to o The maximum input power of the existing gas oil or electric furnace should be equal...

Page 41: ...ives the same signal It will tell the Caddy to either not start or to go into a shut down cycle if the furnace was already heating when the demand for heat was sent The wiring for an Add on installation is shown below The existing furnace s thermostat must be connected to the Rh and Aux terminals of the link board on the Caddy furnace Those two wires must come from the R and W terminals of the exi...

Page 42: ... thermostat will stop and the Caddy furnace will resume getting orders from its own thermostat 14 13 ELECTRICAL ELEMENT INSTALLATION OPTIONAL 14 13 1 INTRODUCTION Three electrical elements are available for the Caddy 15 kW 18kW and 20kW These options include all components necessary for the installation Instructions for installing the electrical elements are provided with the electrical element WA...

Page 43: ...must be connected to the power board See Section 22 ELECTRICAL DIAGRAM FOR ELECTRIC UNIT For security reasons the electrical element has a manual reset thermostatic sensor that is located inside the electrical unit If the temperature of the electric unit exceeds the high limit the thermostatic sensor will disengage the elements After finding and fixing the problem that has caused the unit to overh...

Page 44: ...teries it is not necessary to connect the C common terminal to the thermostat Refer to the electrical diagram If you want to provide power to the thermostat note that the connections may differ depending on the thermostat Some thermostats need Rc and C while others require Rh and C in this case verify the need for a jumper between Rc and Rh in the thermostat user manual No jumper is required with ...

Page 45: ...necessary to control the wood furnace and any other auxiliary heating source Installing the thermostat is done the same way as if the furnace was wood only See Section 16 4 1 TRANSITION TO AN AUXILIARY HEAT SOURCE to learn how to make it work It is also possible to use 2 thermostats one for wood one for alternate heat go in parameters gear button then press on SETUP OPTIONS INSTALL TYPE 2ND THERMO...

Page 46: ...46 It is recommended to have a difference of at least 4 C 7 F between the two set points of the thermostats Ex 21 C 70 F for electric or oil unit and 25 C 77 F for the wood ...

Page 47: ...ditioning unit the main thermostat must be a heat cool type Furthermore the desired distribution blower speed must be programmed on the touch screen in the blower speed menu See Section 16 5 DISTRIBUTION BLOWER SPEED CONFIGURATION Installing the A C coil in the furnace fresh air return will create condensation inside the furnace and will make it rust Therefore this type of installation is forbidde...

Page 48: ...es to indicate that the electrical element is operating at the same time as the heat pump The same icon is used when a thermostat with 2 heating stages is connected and the electric unit is activated at the same time as the heat pump A thermostat with auxiliary or emergency mode is recommended to deactivate the heat pump in cold weather without having to use a temperature sensor or switch on the f...

Page 49: ... furnace is equipped with three main electronic components the link board the power board and the touch screen The power board is already installed on the furnace The power board is used to supply current to the different electrical components in particular Supply current to the different electronic boards Supply current to the distribution fan Supply current to the sequencers of the electrical un...

Page 50: ... mode Electrical Element Green Unit on Yellow On hold Heat pump Green Unit on Yellow On hold Oil unit Green Unit on Yellow On hold Settings Temperature in the hot air plenum Distribution blower is in circulation mode CIRC Possible states of the furnace HEAT When the word HEAT is green the furnace is in heating mode COOL When the word COOL is green the furnace is in cooling mode OFF The furnace is ...

Page 51: ... auxiliary heating will start The icon Wood will turn yellow and the auxiliary heat icon will turn green For the electrical element and or the oil unit the fan starts as soon as the thermostat asks for heat In other words for safety reasons the fan does not wait for the hot air plenum to reach a predetermined minimum temperature The furnace remembers what heating source was used in the last reques...

Page 52: ...MP With a combination wood electrical component and heat pump you can set your temperature probe to not use your heat pump when it is too cold and the coefficient of performance becomes too low Electrical element should be prioritized during configuration the outdoor temperature probe When the temperature probe is functioning the ECO mode will show on the main page 16 5 DISTRIBUTION BLOWER SPEED C...

Page 53: ...age 5 and select speed 4 It is important to respect the velocity in the main duct the secondary ducts as well as the velocity at the room outlets The static pressure of your system must be adjusted to at least 0 2 IN W C and must not exceed 0 5 IN W C Finally make sure that you never exceed the maximum blower current 16 7 OPERATING INSTRUCTIONS 16 7 1 HEAT Mode When the temperature in your house i...

Page 54: ...e door 1 2 13 mm opened If you fail lighting the fire you might experience a back draft through the air inlets 16 8 2 PREHEATING 1 Once the kindling is well ignited or the coals revived put 2 or 3 fire logs in such a way that the flames can interlace between the logs Then close the door It is important to respect these loading sequences so that the wood will burn from the front to the back of the ...

Page 55: ...e cause of the smoke spillage 16 8 6 PROLONGED POWER FAILURE In case of prolonged power failure over 10 minutes to reduce the risk of overheating it is recommended to heat moderately and to open the furnace filter compartment in order to facilitate air circulation by natural gravity around the firebox of the Caddy wood furnace 16 8 7 CHIMNEY FIRES This might occur when the fire gets extremely hot ...

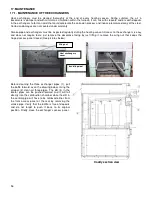
Page 56: ...asy and does not require tools just remove the decorative facing by just lifting it remove the wing nut that keeps the hinged access panel closed See pictures below Before cleaning the three exchanger pipes 1 pull the baffle forward as on the drawing below Using the scraper 2 clean all three pipes The dirt 4 in the lateral pipes can be pushed forward and it will fall directly into the combustion c...

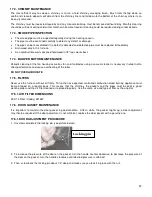
Page 57: ...uum cleaner is necessary in order not to affect performance and cause overheating of the latter DO NOT OVERLUBRICATE 17 5 FILTERS Never use the furnace without air filters To function as expected controlled combustion wood burning appliance must be maintained on a regular basis This means that the chimney the gaskets and the pipes must be kept in good working order and the air filter cleaned or re...

Page 58: ... thoroughly apply a high temp adhesive silicone 650 oF sold for that particular use and put the new gasket onto the door Wait for at least 4 hours before lighting your furnace 19 TROUBLESHOOTING When you have issues with your furnace your first reaction may be to call technical support This section will help you save time and money by enabling you to solve simple problems by yourself Most common p...

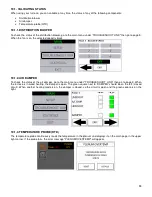
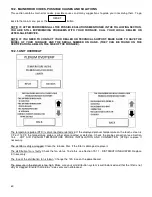
Page 59: ...IR DAMPER To check the status of the air damper go to the main menu under TROUBLESHOOT LINK then go to page 3 When the furnace is in wood heating the damper is open The green square next to DAMPER should be on the left closed circuit When another heating mode is on the damper is closed so the circuit is open and the green square is on the right 19 1 3 TEMPERATURE PROBE RTD The temperature probe co...

Page 60: ...T OVERHEAT The temperature probe RTD is disconnected or defective If the displayed plenum temperature on the touch screen is 0 F or 1140 F the temperature probe is either disconnected or defective Check the probe connection see Section 14 4 HOT AIR PLENUM TEMPERATURE PROBE INSTALLATION AND CONNECTION RTD or replace if necessary The air filter is dirty or clogged Clean the furnace filter If the fil...

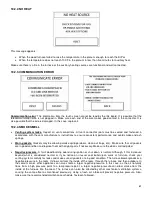
Page 61: ... be allowing smoke spillage doors clean out traps etc Make sure that all gaskets are in good condition and replace them with original parts if necessary Make sure the door is well adjusted Negative pressure A faint wood burning odor during ignition or shut down is normal Although if this increases beyond what is considered normal or if you notice an unusual soot build up on walls or furniture chec...

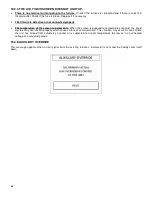
Page 62: ...ure of the screen is below zero When the screen is exposed to temperatures too cold the liquid crystals may not function properly which causes a loss of communication This situation may occur in cases where the unit has arrived from outside by a carrier or is subjected to a room temperature too low as in an unheated cottage or a very cold garage 19 2 6 AUXILIARY OVERRIDE This message appears when ...

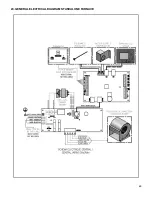
Page 63: ...63 20 GENERAL ELECTRICAL DIAGRAM STANDALONE FURNACE ...

Page 64: ...64 21 ELECTRICAL DIAGRAM FOR PARALLEL FURNACE ...

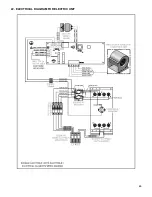
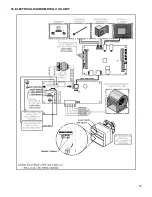
Page 65: ...65 22 ELECTRICAL DIAGRAM FOR ELECTRIC UNIT ...

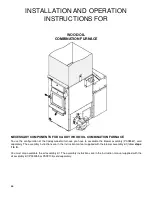
Page 66: ...addy wood oil furnace you have to assemble the blower assembly PA08567 sold separately The assembly instructions are in the instruction manual supplied with the blower assembly kit follow steps 1 to 5 You must also assemble the oil assembly kit The assembly instructions are in the instruction manual supplied with the oil assembly kit PA03055 or PA03105 sold separately ...

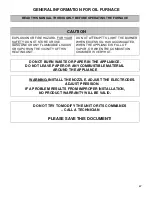
Page 67: ... THE BURNER WHEN EXCESS OIL HAS ACCUMULATED WHEN THE APPLIANCE IS FULL OF VAPOR OR WHEN THE COMBUSTION CHAMBER IS VERY HOT DO NOT BURN WASTE OR PAPER IN THE APPLIANCE DO NOT LEAVE PAPER OR ANY COMBUSTIBLE MATERIAL AROUND THE APPLIANCE WARNING INSTALL THE NOZZLE ADJUST THE ELECTRODES ADJUST PRESSION IF A PROBLEM RESULTS FROM IMPROPER INSTALLATION NO PRODUCT WARRANTY WILL BE VALID DO NOT TRY TO MODI...

Page 68: ...AN CSA B139 NFPA 31 standard regarding installation of oil burning heating appliances The installation of the connecting pipes to the oil unit must be done and approved by a professional NOTE The barometric damper provided with the appliance must be properly installed on the flue pipe of the oil burning unit The purpose of the damper is to adjust the draft in the evacuation pipe of the oil burning...

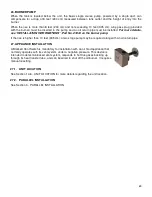
Page 69: ...o 21844 on the burner pump If the rise is higher than 10 feet 305 cm a two stage pump may be required along with an oil return pipe 27 APPLIANCE INSTALLATION A Blocked Vent Switch is mandatory for installation with an oil fired appliance that normally operates with its vent system under a negative pressure This device is intended to detect a blocked vent system responds to hot flue gases backing u...

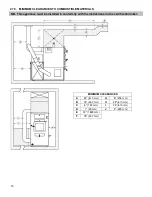
Page 70: ...MATERIALS N B This appliance must be installed in conformity with the instructions on the certification label MINIMUM CLEARANCES A 24 610 mm G 8 203 mm B 18 457 mm H 24 610 mm C 6 152 mm I 24 610 mm D 1 25 mm J 9 229 mm E 72 1829 mm F 18 457 mm ...

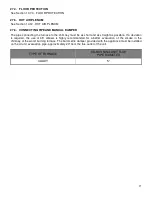
Page 71: ...st be as short and as straight as possible If a deviation is required the use of 45o elbows is highly recommended for a better evacuation of the smoke in the chimney of the wood burning furnace The barometric damper provided with the appliance must be installed on the oil unit evacuation pipe approximately 24 from the flue outlet of the unit TYPE OF FURNACE OIL BURNING UNIT FLUE PIPE DIAMETER CADD...

Page 72: ...72 27 7 DIFFERENT INSTALLATION 27 8 COMBUSTION AIR See Section 14 11 COMBUSTION AIR AND FRESH AIR INTAKE ADAPTER INSTALLATION OPTIONAL ...

Page 73: ...e and cut the fuel supply to the burner for 60 seconds After this delay the control goes back to IGNITION mode If the flame goes out 3 times in a row the control will switch to the LOCKOUT mode to prevent a continuous cycling of the ignition process which would cause a premature soot up of the combustion chamber and smoke pipe To deactivate the LOCKOUT mode press and hold the reset button of the c...

Page 74: ...from the outlet B Close the door and the air intake s of the wood burning furnace C Light the burner for at least 10 to 15 minutes D Over the fire draft 0 01 to 0 02 in w c the draft over the fire must be measured by the scealed cap of the vision tube s pulsation trap E Smoke test between 0 and 1 on the shell bacharach scale traces F Draft in the chimney 0 02 in w c G Percentage of excess air 12 1...

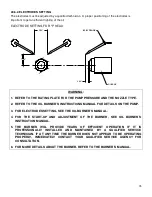
Page 75: ...E OIL BURNER S INSTRUCTIONS MANUAL FOR DETAILS ON THE PUMP 3 FOR ELECTRODES SETTING SEE THE OIL BURNER S MANUAL 4 FOR THE START UP AND ADJUSTMENT OF THE BURNER SEE OIL BURNER S INSTRUCTION MANUAL 5 THE BURNER WILL PROVIDE YEARS OF EFFICIENT OPERATION IF IT IS PROFESSIONALLY INSTALLED AND MAINTAINED BY A QUALIFIED SERVICE TECHNICIAN IF AT ANY TIME THE BURNER DOES NOT APPEAR TO BE OPERATING PROPERLY...

Page 76: ...o SETUP then WOOD SETUP 28 8 PROLONGED CLOSING Cut off the electric circuit Close the oil shut off valve NOTE THE SHUT OFF VALVE MUST BE CLOSED WHEN THE APPLIANCE IS OUT OF SERVICE FOR A PROLONGED PERIOD OF TIME 29 TECHNICAL DATA 29 1 UH CADDY MODEL BURNER TYPE BTU INPUT NOZZLE FLOW HEAD STATIC PLATE PRESSURE AT THE PUMP H P FAN MOTOR TUBULATOR ADJUSTMENT AIR ADJUSTMENT EFFICIENCY UH CADDY BECKETT...

Page 77: ...fied annually and replaced if needed 30 2 SERVICE Before calling for service first check the following Fuel supply Electric fuses or breakers Thermostat setting PC board settings The state of the green diagnostic LED on the burner control Burner no _______________ Model _____________ Date of installation _________________ Service telephone no Day ______________________ Night ______________________...

Page 78: ...78 31 ELECTRICAL DIAGRAM BECKETT OIL UNIT ...

Page 79: ...79 32 ELECTRICAL DIAGRAM RIELLO OIL UNIT ...

Page 80: ... lower electrical consumption than those shown in the table below In the event that the combined electrical consumption of the installed options is higher than 1A contact our technical support for further information WARNING INCORRECT WIRING CAN DAMAGE THE LINK BOARD Option Approximate consumption mA Additional 24V equipment 500 Air conditioning damper 500 Humidifier 500 Heat pump Current supply v...

Page 81: ...81 33 4 AIR CONDITIONNING DAMPER 33 5 HUMIDIFIER 33 6 HEAT PUMP ...

Page 82: ...82 34 EXPLODED VIEW AND PART LIST ...

Page 83: ...83 ...

Page 84: ...84 ...

Page 85: ...85 ...

Page 86: ...86 ...

Page 87: ...87 ...

Page 88: ...88 ...

Page 89: ...89 ...

Page 90: ...OVER GASKET 1 16 PL56480 REAR CABINET COVER 1 17 SE48221 LOWER RIGHT AIR JACKET PANEL WITH GASKET 1 18 PL48204 RIGHT AIR JACKET PANEL 1 19 PL48255 WIRE COVER SUPPORT 1 20 30090 BLACK SLEEVE 3 21 30153 METAL SCREW 8 X 1 2 PAN SQUARE TEK BLACK SELF DRILLING 2 22 PL48254 PLENUM WIRE COVER 1 23 SE44096 100 OHM RTD PROBE 38 WIRE WITH CONNECTOR 1 24 PL48258 RTD SUPPORT BRACKET 1 25 30416 WING NUT 3 8 16...

Page 91: ...ATION WIRE 4 CONDUCTOR 1 64 SE48246 CADDY TOUCH SCREEN BOARD LCD WITH HOUSING 1 65 PL48251 PC BOARD HOUSING COVER 1 66 30412 BLACK UNIVERSAL SNAP IN BUSHING 3 67 PL48250 PC BOARD HOUSING 1 68 30408 ELECTRONIC BOARD CLIP 9 69 SE48250 PC BOARD WITH HOUSING 1 70 PL48252 LIMIT MAIN CONTROL BOARD WITH PROGRAM 1 71 49068 ADAPTER 5 FOR FRESH AIR INTAKE KIT 2 72 PA08562 5 FRESH AIR INTAKE ADAPTER 1 73 PL4...

Page 92: ... 441 2 107 60204B TERMINAL BLOCK END SECTION 1 107 60204A TERMINAL 3 8 SECTION 2 108 60237 THERMODISC L170 MANUAL RESET FOR ELECTRICAL ELEMENT 1 109 60194 FUSE HOLDER 30A 600V PROTECTION 1 110 60365 60 COMMUNICATION WIRE 8 CONDUCTOR 1 111 SE48216 DUCT SUPPORT ASSEMBLY 1 112 21367 CARDBOARD AIR FILTER 25 X 14 X 1 1 113 SE48217 FILTER SUPPORT ASSEMBLY 1 114 28062 BLACK DRAWER HANDLE 3 25 32 1 115 30...

Page 93: ...AL KIT 1 133 AC05961 PSG GREY 424C SPRAY PAINT 1 133 AC05963 METALLIC BLACK STOVE PAINT 85 g 3oz AEROSOL 1 134 PL48171 ASH SHOVEL 1 134 PL48170 HEAT EXCHANGER SCRAPER 1 136 PL48173 POKER 1 137 PA03105 RIELLO OIL UNIT 1 137 PA03055 BECKETT OIL UNIT 1 138 PA08567 BLOWER ASSEMBLY 1 ...

Page 94: ...to standards Given the importance of the installation PSG recommends that it is carried out by a professional certified in the Building Code so that the furnace delivers its full potential This is why PSG offers an additional warranty that covers the cost of labor if your furnace has been purchased through an authorized PSG dealer If you want to enjoy the best service on the market and substantial...

Page 95: ...after inspection and investigation of the defect The manufacturer may at its discretion fully discharge all obligations with respect to this warranty by refunding the wholesale price of any warranted but defective parts The manufacturer shall in no event be responsible for any special indirect consequential damages of any nature which are in excess of the original purchase price of the product A o...

Page 96: ...t part All parts and labour costs covered by this warranty are limited according to the table below The manufacturer at its discretion may decide to repair or replace any part or unit after inspection and investigation of the defect The manufacturer may at its discretion fully discharge all obligations with respect to this warranty by refunding the wholesale price of any warranted but defective pa...

Reviews: