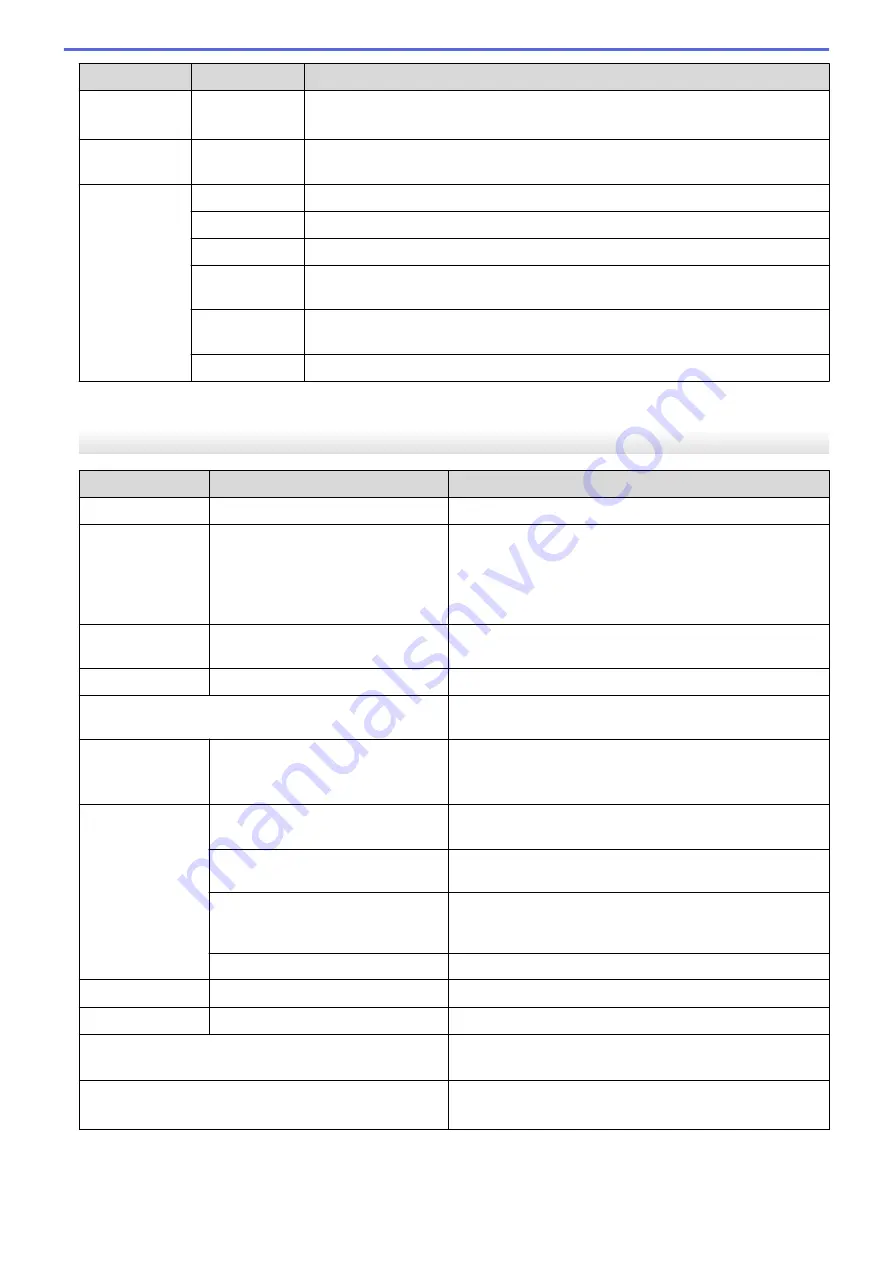
Level 1
Level 2
Descriptions
•
Auto-detected media
•
Media settings obtained using the
Auto Detect
function.
Auto Detect
-
Automatically adjust the sensor sensitivity and detect the length of the set paper.
Specify
Settings
in advance.
-
Configure the settings before performing
Auto Detect
.
Width
Select the paper width to be auto-detected.
Sensor Type
Select the sensor type:
Die-cut
,
Mark
, or
Continuous
.
Sensor
Calibr
Enable or disable sensor calibration during auto-detection.
Media
Timeout
Set the auto-detected paper to
Continuous
if
Auto Detect
does not find any
gap or black mark according to the
Media Timeout
length.
Energy Rank
Select the energy rank to adjust the print density.
1
Requires from the firmware version 1.09 or later.
[Settings]
Level 1
Level 2
Descriptions
Exit Position
Tear
/
Peeler
Select the media exit method.
Language
Dansk
/
Deutsch
/
English
/
Español
/
Français
/
Italiano
/
Nederlands
/
Norsk
/
Português
/
Suomi
/
Svenska
/
日
本語
/
繁體中文
Select the language.
LCD Contrast
+2
/
+1
/
0
/
-1
/
-2
Set the contrast of the LCD. The higher the number, the
stronger the contrast.
Beeper
On
/
Off
Enable or disable the beeper.
Configuration
Check the firmware version, font version, and available
memory.
Tear Bar
Upward
/
Downward
Adjust the tear position.
This setting appears when the
Linerless
is set to
Off
in
the
Advanced
tab of the Printer Setting Tool.
Cover Setting
Select Media
Shows the
Select Media
screen for ten seconds after
you close the Roll Compartment Cover.
Feed
Feeds the label automatically when you close the Roll
Compartment Cover.
Auto Detect
Performs
Auto Detect
automatically when you close the
Roll Compartment Cover. The printer displays the detected
paper size, and then displays the Ready screen.
None
No action and no change on the LCD.
Clock
On
/
Off
Show or hide the clock icon on the LCD.
AutoSync Time
On
/
Off
This setting appears when
Clock
is set to
On
.
Time Zone
Set the time zone. This setting appears when
Clock
is set
to
On
.
Date&Time
Display the date and time.
This setting appears when
Clock
is set to
On
.
1
Requires from the firmware version 1.09 or later.
158
Summary of Contents for RJ-3230B
Page 1: ...User s Guide RJ 3230B RJ 3250WB 2021 Brother Industries Ltd All rights reserved ...
Page 122: ...Home Security Use SNMPv3 Use SNMPv3 Manage Your Network Machine Securely Using SNMPv3 118 ...
Page 129: ...Home Update Update Update P touch Editor Update the Firmware 125 ...
Page 131: ...Related Information Update 127 ...
Page 163: ...Related Information Change Printer Settings Using the Printer 159 ...
Page 164: ...Home Routine Maintenance Routine Maintenance Maintenance 160 ...
Page 167: ...Related Information Routine Maintenance 163 ...
Page 195: ...Related Information Battery Charger Optional PA BC 003 191 ...
Page 213: ...Related Topics Active Docking Station Optional Problems 209 ...
Page 215: ...1 1 Eject Button Related Information 4 bay Active Docking Station Optional PA 4CR 003 211 ...
Page 217: ...Related Information 4 bay Active Docking Station Optional PA 4CR 003 213 ...
Page 220: ...Side view Battery Charger Front view Back view 216 ...
Page 221: ...Top view Bottom view Side view Cross section 217 ...
Page 222: ...Single Active Docking Station Front view Back view Top view Bottom view 218 ...
Page 223: ...Side view Cross section 219 ...
Page 224: ...4 bay Active Docking Station Top view Bottom view 220 ...
Page 225: ...Back view Side view 221 ...
Page 226: ...Cross section Related Information Appendix 222 ...
Page 228: ...Related Information Appendix 224 ...
Page 231: ...USA CAN Version A ...


