24
11
Automatic testing
11.1
Overview
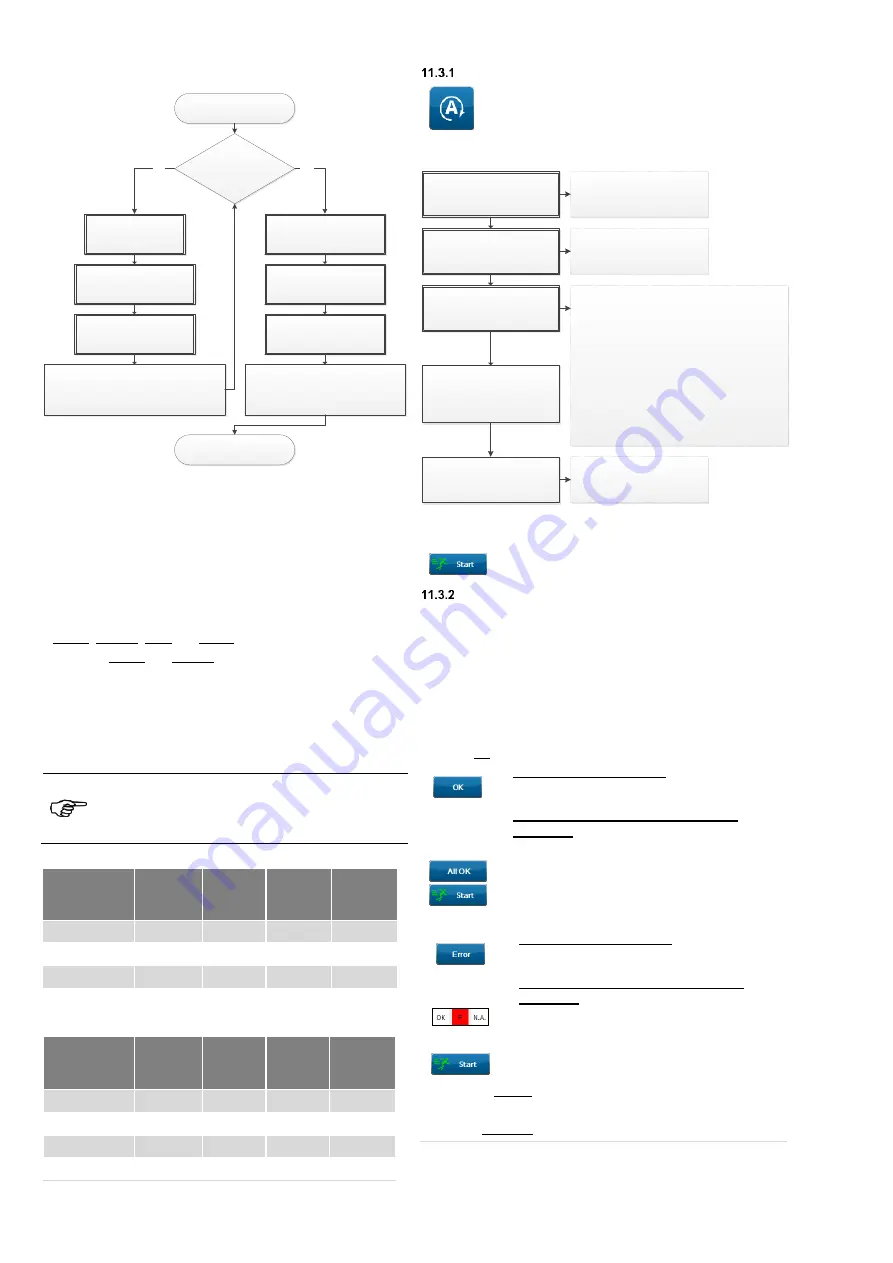
Database
Create new database
(
chapter 9.3.2)
Customer
Create new customer
(chapter 9.3.3)
Department
Create new department
(chapter 9.3.4)
Create test sample entry/ entries
Assign new ID no. or designation
(chapter 9.3.5)
Database
Select existing database
Customer
Select existing customer
Department
Select existing department
Select test sample entry
Select existing ID no. or designation
No
Yes
Database available?
Start of test
Automatic test
11.2
Explanation
The automatic testing is primarily used for periodic testing and
tests after modification or repair of test sample entries that have
already been created.
When creating a test sample entry, a test procedure is assigned to
the test sample. This test procedure will be used and run during
automatic testing.
Four different steps are used to manage
databases
,
customers
,
departments
and
test samples
:
Create, Change, Copy and Delete.
The steps Create and Change are provided on the "
Automatic
test
" screen and allow to create and change new test samples
without having to go to the actual
database administration
.
Please refer to the instructions in chapter 9.3 for a detailed
description of all steps.
The steps in chapter 9.3 are identical to those of the "
Automatic
test
" screen.
See chapter
for a detailed description of how to
manage:
databases, customers, departments and test
samples.
Table 1:
Functions of the “
Database administration
” screen
Database
administrati
on screen
Database
(ch. 9.3.2)
Customer
(ch. 9.3.2.2
)
Department
(ch. 9.3.4)
Test sample
(ch. 9.3.5)
Create
X
X
X
X
Change
-
X
X
X
Copy
-
X
-
X
Delete
-
X
X
X
Table 2:
Functions of the “
Automatic test
” screen
Automatic
test screen
Database
(ch. 9.3.2)
Customer
(ch. 9.3.2.2
)
Departmen
t
(ch. 9.3.4)
Test sample
(ch. 9.3.5)
Create
X
X
X
X
Change
-
X
X
X
Copy
-
-
-
-
Delete
-
-
-
-
11.3
General test procedure
Start
Use the icon on the left to navigate to the
“
Automatic test
” screen.
The following selections
must be made in the “
Automatic test
"
screen:
Database
Select existing database
Customer
Select existing customer
Department
Select existing department
Test sample entry
Select existing ID no. or
designation
After selection, test samples
of other databases will not
be displayed anymore
After selection, test samples
of other customers will not
be displayed anymore
If department is selected:
All test samples with the corresponding
department are displayed
If department (empty) is selected:
All test samples without a department being
assigned are displayed
If department (display all) is selected:
All test samples are displayed
Automatic test
Start of automatic test
Start of test acc. to the
standard assigned to the test
sample
After having selected the “
Database
”, “
Customer
”, “
Department
”
and “
Test sample
”, the “
Start
” button is displayed.
Touch the “
Start
” button and follow the
instructions on the display.
Visual inspection
The “
... visual inspection
” screen opens.
Depending on the test sample, the following type of visual
inspection is used:
o
standard visual inspection
o
advanced visual inspection
o
customer-specific visual inspection
Carry out the visual inspection.
11.3.2.1 No defects detected
Standard visual inspection
Tap the “
OK
” button.
Advanced and customer-specific visual
inspection
Tap the buttons
“
All OK
”
“
Start
”
11.3.2.2 Defects detected
Standard visual inspection
Tap the “
Error
” button.
Advanced and customer-specific visual
inspection
Tap the
“
F
” button
for each test question with a negative result or
“
N.A.
” for not available.
Tap the “
Start
” button.
If the test is passed, you will get to the next test step in the
preconfigured test procedure.
If the test has failed, the test procedure is stopped automatically.


