Avermedia NX 8000 series User Manual Download Page 72


64 

5.2 Camera 

Setting 

In the Camera Setting dialog box, click 

OK

 to accept the new settings, click 

Cancel

 to exit without 

saving, and click 

Default1/ Default2

 to revert back to original factory setting. 


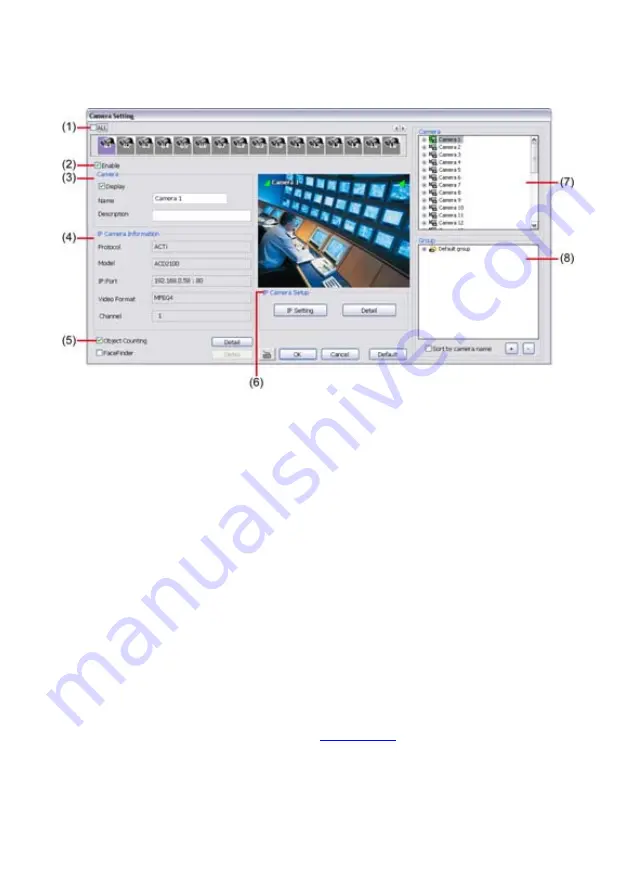
(1) Camera Icons 

Select the camera number you want to adjust the video setting. To select all the cameras, enable the 

ALL

 check box. To select more than one camera, 

Right click

 on the camera icon. To select one 

camera only, 

Left click

 on the camera icon. The camera icon turns red when it is selected. 

(2) Enable 

Set to enable/disable the selected camera. When there is no video source on the camera, we suggest 
disabling it so that the system won’t detect it as video loss error.   

(3) Camera 

Display 


Enable/disable to show the video. Even if the video of the selected camera is hidden you can 
still record the video and preview it in playback mode.   

Name 

Change the camera name.   

Description 

Add a short comment.   

(4) IP Camera Information 

Display the camera information, such as camera 

protocol

model

video type

IP address

, and 

channel number

. If the camera hasn’t been configured, those information are blank. 

(5) Object Counting 

Select the two regions on the screen and the system will count the objects that appear from one 
selected region to another selected region.(See also

 Chapter 5.2.1

). 

(6) IP Camera Setting 

Configure the camera for monitoring. Click 

IP setting

 to enter configuration interface. Click 

Save&Exit


to save the setting and exit the IP Camera Setting window. Click 

Connect

 to connecting with IP 

camera right away. To cancel the setting click 

Cancel

-


Protocol:

 select the brand of camera. Drag down the list and select the brand of camera. User 

also can click 

Search Device

 to find the selected protocol of camera on the LAN network. 

Summary of Contents for NX 8000 series

Page 1: ...AVerMedia NX8000 NXU8000 series User Manual April 2009...

Page 2: ...mber States relating to Electromagnetic Compatibility Directive 2004 108 EEC Warning This is a Class A product In a domestic environment this product may cause radio interference in which case the use...

Page 3: ...osed of correctly you will help prevent potential negative consequences for the environment and human health which could otherwise be caused by inappropriate waste handling of this product For more de...

Page 4: ...llocation on NX8000 series 9 2 6 1 Connecting the Sensor Relay device to I O card on NX8000 series 10 2 6 2 I O Card Sensor and Relay pinhole allocation 10 2 7 The Sensor input and Relay output Specif...

Page 5: ...hapter 5 Customizing the DVR System 44 5 1 System Setting 44 5 1 1 To Set the POS Setting 57 5 2 Camera Setting 64 5 2 1 Setup the Object Counting 69 5 2 2 Create a Camera Group 71 5 3 Recording Setti...

Page 6: ...sole Setting 131 8 4 Familiarizing the Buttons in PTZ Camera Controller 133 8 5 Using the Remote Playback 134 8 5 1 Familiarizing the Local Playback Buttons 136 8 5 2 Familiarizing the RealTime Playba...

Page 7: ...tion 171 11 4 1 Software Installation 172 11 4 2 Using the iMatrix 174 11 4 3 Customizing the iMatrix System 179 11 4 4 Using the Playback Function 186 Chapter 12 Using the Remote Control Server 188 A...

Page 8: ...mportant installation and operating instructions Fail to comply may damage the system i Information symbol is intended to provide additional information for the purpose of clarification NOTICE INFORMA...

Page 9: ...highly protected by our exclusive algorithm and chipset inside to prevent illegal pirating 1 1 Package Contents 1 1 1 NX8000 Series 4 8 16 Channels 1 AVerMedia NX8000 NXU8000 series Quick User Guide...

Page 10: ...2 1 2 NX8000 Series Card Parts I O connector Reset pin Watchdog pin TV OUT Audio OUT Relay Sensor Port...

Page 11: ...graphic card with DirectDraw YUV rendering capability 64MB video memory Audio Sound card and speakers i For AVerMedia Security Product Hardware Recommendation list update go to http www avermedia com...

Page 12: ...rror has been detected 1 Look for the labeled RESET SW switch lead and connect it to the NX8000 card reset pin 2 Connect the supplied Watchdog line to the NX8000 card watchdog pin and the other end to...

Page 13: ...end to the TV video input port If you are not sure please refer to the TV user manual 2 Connect the audio devices to the Audio input port 3 Connect the sensor and relay device to the sensor relay int...

Page 14: ...VGA chipsets Please follow the steps below to setup the dual monitors display 2 5 1 Graphic card with ATi chipset 1 Enter the ATI Catalyst Control Center user can click the short cut or right click on...

Page 15: ...user selected the Advanced mode click the View button 6 In Display Manager right click on the second Display on the right side and select Extend Main onto monitor 7 Adjust each monitor resolution to 1...

Page 16: ...t 1 Click the NVIDIA nView and select the Dualview mode 2 Adjust each monitor resolution to 1024x768 3 To review if the display mode is correct you can check the task bar The task bar will show on the...

Page 17: ...etc 20 19 18 17 16 15 14 13 12 11 10 9 8 7 6 5 4 3 2 1 Pin Definition Pin Definition 1 Sensor input signal 1 11 Relay Normal Close 1 2 Sensor output signal 1 GND 12 Relay Common 2 3 Sensor input signa...

Page 18: ...moke detectors proximity sensors door sensors etc is being transmitted to the I O card and this triggers the system to respond and send signal to relay device i e alarm telephone etc Pin Definition Pi...

Page 19: ...ransfer Characteristics Current Transfer Ratio CTR 50 600 IF 5mA VCE 5V RBE Collector Current IC 2 5 30 mA Collector Emitter Breakdown Voltage VCE sat 0 1 0 2 V IF 20mA IC 1mA Isolation Resistance RIS...

Page 20: ...tem thru RS232 connection enables you to view record and keep track of the items that were sold You may also select the camera on where to display all the data To connect locate the RS232 port of the...

Page 21: ...tings Control Panel and then double click Add Remove Programs In Add Remove Programs list select DVR and then click Remove We HIGHLY RECOMMEND having three 3 separate drives for the main system OS and...

Page 22: ...re about to install the divers This may take a while depending on the number of drivers needed to be installed Click Continue Anyway when the Microsoft digital signature appears When prompt to restart...

Page 23: ...NXU application is operating it may cause the application crash abnormally 3 2 2 For Added Installation To add more channels for existing DVR system please follow the below steps to install 1 Run the...

Page 24: ......

Page 25: ...e you to enter User ID and Password before it can be accessed When the Authorization dialog box appears key in your User ID and Password If this is the first time enter the one you have registered whe...

Page 26: ...Click Reboot to restart DVR system Click Login to sign in in different account Click Minimize to reduce the DVR to taskbar button Click Compact to switch to compact mode see Chapter 4 4 Click Guest t...

Page 27: ...Right click the video screen of the camera and Drag on where you want to relocate it To only display one of the video in the multiple screen mode Left click on the video screen you only want to displ...

Page 28: ...ter 5 2 2 Click of group to extend group and drag the camera to surveillance screen to view Click of camera to view the camera information 13 Camera ID Show the number of cameras that are being viewed...

Page 29: ...anced Setting in 3 1 1 and then user only can view one channel each time To switch to different channel click Select Camera drop down list to select the channel To tempore stop iPOS data coming click...

Page 30: ...gle to only display one of the video in the multiple screen mode or all 19 Alarm Button Click to trigger defined alarm The alarm buttons have been defined will show on the DVR application UI see also...

Page 31: ...rd in Find Text column and click Search button 3 To filter the records select and click the select button to display Event System Operation Network or All 4 The events list which display on the screen...

Page 32: ...actly box if wants to find exactly key word or word string of POS event log 5 Export POSDB It allows user to save the POS database to selected storage path in excel format Click to change the storage...

Page 33: ...ching 2 Select the search Event In Out or All 3 Select the Camera or All cameras to search 4 Click Search to start searching 5 The result will be list out in Result tablet 6 To save the search result...

Page 34: ...26 9 User can select the Date Camera and Cycle to view the report of object counts In Out...

Page 35: ...2 split screen mode When you are in single screen mode Right click and Drag a square on the area you want to enlarge When you are in multiple screen mode Right click the video screen of the camera and...

Page 36: ...9 16 and 13 split screen mode To zoom in an area on the screen Right click and Drag a square on the area you want to enlarge 2 Exit Close the Playback application 3 Progress bar Show the progress of...

Page 37: ...d the time from 00 to 23 to where to start playing the recorded video file OPEN FILE user can open the recorded file from HDD Channel 01 16 Channel 17 32 Switch to different channel group of playback...

Page 38: ...Event log Show the record of activities that take place in the system To filter the records select and click the option button to only display Event System Operation Network or POS 13 Bookmark Mark a...

Page 39: ...DVR program can only verify one channel at a time in playback mode To verify the playback video doesn t been modified Click to check the video Watermark verification windows will show up as following...

Page 40: ...age 5 Zoom Zoom in and out the image 6 Direction buttons Adjust and position the focal point of the PTZ camera 7 Camera ID pane Display the PTZ camera number that is being operated 8 Save Camera prese...

Page 41: ...ap screen click Edit You may now drag the camera sensor and relay icons to its place on the map Icons on the map can be relocated anywhere 5 To set the camera direction right click camera icon can sel...

Page 42: ...located on the map and to display the video at the upper right corner of the Emap screen At the lower right corner of the Emap screen it lists all the warning message 3 To control relay right click r...

Page 43: ...Segment button again 3 Click Export Output Video Clip button to save the wanted clip 4 In the Save As dialog box locate on where you want to save the file or choose to Burn the video segment to VCD D...

Page 44: ...kmark is protected the file won t be overwritten The protected bookmark file will be deleted when the Delete the recorded data is enable in the System setting also refer to 5 1 System setting 3 Select...

Page 45: ...nt to search If you select POS in the Find Text box type the word Then click OK to start searching The video search would stop at the frame that matches the condition To keep on searching click 4 You...

Page 46: ...the sensitivity bar and the motion detector frame size and location To set motion detector frame size and location left click and drag on the screen Then click OK to start searching The video search w...

Page 47: ...eset Name box and in the Preset Name text box type the word When done click Save to keep the settings 6 Repeat step 4 5 if you want to save another PTZ camera position 7 Restore AutoPan Time set a tim...

Page 48: ...will become a red cross and PTZ control bar will show up on the screen i User can move the on screen PTZ controller to any position of screen The on screen PTZ controller only display on a channel scr...

Page 49: ...o keep the settings 5 Use the IP PTZ control panel and adjust the position of the IP PTZ camera 6 In the Preset Setting section select the preset number to assign a number for the IP PTZ camera curren...

Page 50: ...brand of the PTZ camera 11 OSD To allow call out IP PTZ camera factory s OSD setup menu The OSD setup menu may vary that depends on the brand of IP PTZ camera 12 When is done click OK to save the sett...

Page 51: ...r will show up on the screen i User can move the on screen PTZ controller to any position of screen The on screen PTZ controller only display on a channel screen at a time 16 Using the red cross mouse...

Page 52: ...o save the data When there is not enough free space to record one hour data the system automatically replaces the oldest data In case you have more than one storage path the system automatically saves...

Page 53: ...ox and enter the numbers of days in Days text box If you want the system to automatically erase the event and alarm log after a certain days enable the Delete event and alarm log after check box and e...

Page 54: ...a you want to appear on TV and set the time gap from 3 to 10 sec before it switches to the next camera i TV Out function doesn t support on NXU8000 series Advance button Select the video card channel...

Page 55: ...is only one video card channel for selection 2 Select the display mode as FixedLayout 3 Preview screen the selected camera video will preview in here 4 Video Mode Select the split mode of TV out disp...

Page 56: ...ically enable DVR network connection when login into DVR program Login to compact mode Switch to compact mode directly when the DVR is executed Silent Launch Enable the DVR system minimizes on the sys...

Page 57: ...matically playback the video from the last hour 9 Instant Playback Automatically playback the video which has just recorded To set the instant playback time period fill in the time in second at Set In...

Page 58: ...50 i The UPS application must meet Windows XP or Windows Vista system requirements...

Page 59: ...ss Date Time Setting 1 Select the Time Zone of DVR server located 2 Select the Month and Date Click arrow button can switch to different month 3 Adjust the Time by click spin box arrow button 4 Click...

Page 60: ...by clicking Capacity column and enter the capacity If user doesn t want to divide hard disk into several partitions and then just leave the capacity without change 3 The partition can be named by clic...

Page 61: ...a real IP addresses give from ISP to DVR system i Do Not assign the DVR to 1 0 0 0 network segment It will cause the DVR cannot access to Internet due to the un recognize to 1 0 0 0 IP segment Mask I...

Page 62: ...54 Audio Setting To adjust audio volume of system Others Reboot To restart the DVR unit Shutdown To power off the DVR unit...

Page 63: ...and following the wizard to install a printer Regional Language Setting When DVR application is using different language of UI besides English user can select the corresponding region and language in...

Page 64: ...roller function Model Select model of the System Controller Port Select the com port that is connected with the System Controller Click Setup to configure com port value The com port value is shown in...

Page 65: ...etting Click OK to save and close POS Console Setting 3 In the POS Mapping dialog box click OK to accept the settings and Cancel to exit without saving the new setting 4 5 1 2 3 6 7 8 1 POS Name Enter...

Page 66: ...to where it is connected Local select the COM port number which is connected Remote Use the UDP protocol for remote connection if POS system can broadcast to Internet Enter the IP address of the remot...

Page 67: ...oup Each group has a limited number of times please refer to the Maximum and Remainder information in Rule Setting windows The Line End Page End and Bill End group only can be set once Line End set a...

Page 68: ...aracter that wants to be replaced 4 New Data select the Type Ascii or Hex and enter the word or character that will replace it in Old Data 5 Click OK 6 Click Save The configuration will be lost withou...

Page 69: ...er device name and select Type as XML The POS device can be added up to 50 include defaults Page Start Beginning of data for transaction Page End End of data for transaction Tag select a root tag and...

Page 70: ...e 20060317 Date Time 164216 Time RegisterID 3 RegisterID Sub tag Shift 4 Shift CashierID 000000009 CashierID JrnlTransNum 3 JrnlTransNum JrnlID 0 JrnlID Header TicketStart Item SaleTotals Item SaleTot...

Page 71: ...elect the POS data display position on surveillance screen Left Top Left Bottom Right Top or Right Bottom 5 To change the POS data font and color click Font 6 When it is done click Save to complete th...

Page 72: ...a is hidden you can still record the video and preview it in playback mode Name Change the camera name Description Add a short comment 4 IP Camera Information Display the camera information such as ca...

Page 73: ...necting port the DVR system can reach and monitor the camera URL Besides the IP address user can enter the URL of the camera too Authentication Mark check box and enter the ID and password for authori...

Page 74: ...s video again by using MPEG4 encoder Preview Setting 9 Decode key frame for Preview When selected the Save Original Format selection user can mark Only decode key frame for Preview this option When pr...

Page 75: ...to check the sensor status Red is high and Green is low 5 Click OK to exit and accept the setting and Cancel to exit without saving the setting 9 Relay Setting To setup relay device that is embedded o...

Page 76: ...a The video viewing interface will be varied by different brand of camera 7 Camera List all available cameras for grouping User can drag the camera to video screen in Camera Setting window to view cam...

Page 77: ...ove between the selected regions 4 Click Object size to define the detected object dimensions Press left button of mouse and drag on the screen To see the object size frame on screen enable Moving Obj...

Page 78: ...70 Region 1 Object size frame Region 2 Object counting information display...

Page 79: ...ow steps to create a camera group The maximum of group number is 64 The default group can be deleted and modified 1 Click to add a new group 2 Right click on group to rename the group name 3 Drag the...

Page 80: ...the camera to view all devices that is connected with camera 9 User can easy to view and manage the camera group in preview advanced mode by click camera tree icon see also Chapter 4 3 11 Camera Group...

Page 81: ...73...

Page 82: ...ng setting To select all the cameras enable the ALL check box To select more than one camera Right click on the camera icon To select one camera only Left click on the camera icon The camera icon turn...

Page 83: ...ystem won t do any recording 3 Motion Detection Adjust the sensitivity of the motion detector The higher the value the finer the sensitivity is detected When it detects a motion a green triangle mark...

Page 84: ...creen Display the video of the selected camera 6 Group Click to view the camera group that user has been setup in Camera setup see also Chapter 5 2 2 7 Camera Click to view the camera live video on 5...

Page 85: ...ll automatically detect your Server IP address You need this when accessing DVR server from the remote location via internet To change the IP address of DVR server click Detail button 4 Dynamic DNS Do...

Page 86: ...me on a daily basis Or user can click Synchronize Time Right Now to adjust time right away 10 3GPP Enable 3GPP that allows user to use browser on the mobile phone to view recorded video Just enter rts...

Page 87: ...PDA or a mobile phone to access DVR server and select the video size and quality See also Chapter 8 5 and Chapter 8 6 Network Bandwidth Limit By Channel Set the network bandwidth by each channel All...

Page 88: ...The left most column display the days in a week To Set the Schedule Setting 1 Select the date in the calendar Use and buttons to shift the calendar to the left or right 2 Select the condition you wan...

Page 89: ...password This way the system will be able to run DVR program Disable Alarm Deactivate the alarm at the set time temporarily Turn on Relay Active the Relay at the set time If there are no Relays are co...

Page 90: ...date to backup but it can t over 3 different date 3 Check the information beside the calendar Selected Files Show the number of files selected Require Space Show the total size of the selected file 4...

Page 91: ...e Backup Path list shows the archived item To burn the file in CD you need to have NERO 6 or above installed in your PC then select the item in the list and click Burn Click Exit to end this procedure...

Page 92: ...ect the channels that want to backup and click to select the save path 4 Backup Last Set the backup time period For example time before 60 minutes means backup the recorded file from now backward 60 m...

Page 93: ...ing 1 Click the drop down list and select the relay ID number 2 Enter relay name 3 The system automatically detects the card and input number In the Content section enter relay description 4 To set al...

Page 94: ...list 4 Select the connection type Ethernet or RS 232 5 For Ethernet connection enter IP Address of I O device or click Search IO Device button to search any I O device on LAN network 6 For RS 232 con...

Page 95: ...ows click Scan to scan the connected relays and sensors on the External I O box 11 All connected relays and sensors will be listed User can click radio button to control relays status And then click O...

Page 96: ...88 13 To view the all I O devices information click I O Map...

Page 97: ...u want to modify the alarm setting In 1 Alarm Setting number Name Description display the selected alarm setting number in the list below Enter alarm name and description In 2 Enable Time the number f...

Page 98: ...missing or doubtful the system will alarm see also Chapter 5 9 12 In Scene Change when the camera has been moved the system will alarm too In Audio Detect click the camera number to set the alarm cond...

Page 99: ...see Chapter 5 2 1 the system will send out the alarm Select the entry object moves from region 1 to 2 or from region 2 to 1 and click the Detail to select the camera and the times for system alarm 9...

Page 100: ...happen such as motion detected and video loss the alarm will reset at the alarm reset time In 6 Action you may now set the alarm action for the system to perform when the alarm condition is activated...

Page 101: ...n when an alarm is activated b Select the display mode 1 Channel or Full Screen c Retrieve time set the waiting duration before system switching back to original Preview mode If the retrieve time is u...

Page 102: ...amera to send video to CMS when the alarm is activated see also Chapter 5 9 10 Launch Program To call up the external program that is provided by 3rd party Click Detail and click to locate the program...

Page 103: ...dialog box click to select other wav file from other source or folder Play to listen Record to make a new copy of a sound 3 Select the Play Mode 9 Interrupt when receive the new alarm warming immediat...

Page 104: ...save the file click File Save As enter filename and click Save Make sure you have microphone connected to your PC The supported audio system is only 8KHz and 16Bit mono 5 Click OK to exit and accept...

Page 105: ...um number of picture can be transmitted are 16 4 In Upload image when sensor is triggered select the camera that the images will be capture and send when the sensor is triggered 5 Click OK to exit and...

Page 106: ...ode which your ISP provided 2 In Phone Num text box enter the contact number 3 You may now set to send thru SMS or MMS If you enable SMS setting just enter the message in the text box If you enable MM...

Page 107: ...pe the standard protocol when the alarm is activated When the alarm is activated the Standard Operation Procedure dialog box will appear Just click Next to see the next instruction Back to see the pre...

Page 108: ...text box Click Add to include the keyword in the list To remove select the word in the list and click Delete You may only add 8 keywords User can define the color for each keyword To set the color cl...

Page 109: ...OK to save and exit the setup windows To exam the setup condition click Start Test 1 Select the camera number 0 16 and press right button on the mouse to call up the setup windows And then click the S...

Page 110: ...nd Suspicious Object function 3 Mark the Enable check box to setup the condition 4 Sensitive Set the system detects sensitivity 5 Delay Time Set the lasting time for system to detect the movement 6 Ch...

Page 111: ...ng 1 2 3 6 7 4 5 8 9 1 Authorization level Select the status of the user Only Administrator level can access User Setting and reset the Alarm status when using the Remote Console 2 Control Right Enabl...

Page 112: ...s or view To select all the cameras enable the ALL check box 5 Time Span Set the user account a specific time period that user only can use given account to login DVR program in that specific period M...

Page 113: ...ction Exit Close the application 2 Split Screen Mode Select from 6 different split screen type to playback the recorded video file of all the camera or one camera over the other or alongside on a sing...

Page 114: ...will show the available video records during day light saving time period i The numbers from 00 to 23 represent the time in 24 hour clock The numbers from 01 to 16 represent the camera ID The blue col...

Page 115: ...ter the records select and click the option button to only display Event System Operation Network or POS 14 Visual Search Search from a specific camera by Date Hour Minute 10 Seconds and Second See al...

Page 116: ...tem information F2 Start recording F3 Enable network function F4 Access system settings F5 Switch to playback mode F6 Access E map setting F7 Access PTZ camera control panel F8 Snapshot F9 Switch to F...

Page 117: ...e install when DVR system is installed Please go to start program DVR DVR server Debug Tool To save a debug log click to change the save path and click Report button to export a debug log file in txt...

Page 118: ...for the first time you will be prompted by your browser to install WebCamX cab allow the installation and you should be able to connect and login afterwards For Windows 2000 click Yes when the Securit...

Page 119: ...1 i If you are not in a LAN network environment remote playback video may be un smooth due to network speed limitation Slow network transmission speed may possibly cause system performance drop as wel...

Page 120: ...and server to talk via internet using MIC Make sure your microphone and speakers work before using this function If the DVR server Talk to web client setting is disabled you won t be able to hear fro...

Page 121: ...mn click to enable disable viewing the camera In Video Quality column click to select between High Normal or Low Click Add Server and select the server type between DVR and IP Cam to add Click Delete...

Page 122: ...g here applies to Remote DVR only 1 2 3 4 5 6 1 Camera Name Select the camera you want to adjust the settings 2 Enable Set to enable disable the selected camera When there is no video source on the ca...

Page 123: ...ss picture and 2 if it captures lots of movement 5 Quality Adjust the video quality The higher the value the lower the compression level and uses more hard disk space 6 Frame Rate Set the number of im...

Page 124: ...stem to automatically erase the event and alarm log files after a certain days enable the Delete event and alarm log after check box and enter the numbers of days in Days text box 3 Video Standard Cha...

Page 125: ...h wants to display in Select date and time playback mode Auto Scan Period Set the time gap of the Auto Scan function from 3 to 10 seconds This automatically switches to the next video in cycle dependi...

Page 126: ...may use the Virtual Keyboard Just click to show the virtual keyboard For uppercase and lowercase click shift button Camera Setting Select the camera from remote DVR servers to modify settings In the C...

Page 127: ...Exit to exit without saving and click Default to revert back to original factory setting 1 2 1 Camera Icons Select the camera number you want to set the recording setting To select all the cameras en...

Page 128: ...when the system detects movement Once a motion is detected the system automatically saves the previous frames and stop based on the Start Record Prior and Stop Record After settings Smart Recording A...

Page 129: ...ation Set the Server IP and Remote Console Port number The system will automatically detect your Server IP address You need this when accessing DVR server from the remote location via internet 4 Dynam...

Page 130: ...e time on a daily basis 10 Other Configuration UPnP Enable UPnP function to automatically configure the port setting on the local network This function is available when there is UPNP device in the sa...

Page 131: ...use a PDA or a mobile phone to access DVR server and select the video size and quality See also Chapter 8 5 and 8 6 Network Bandwidth Limit By Channel Set the network bandwidth by each channel All Set...

Page 132: ...he archive Network Activate DVR remote system to access at the set time After the appointed time the Network function will be disabled If the Network function is already enabled the Network function w...

Page 133: ...te or deactivate the alarm function When it is deactivated the color of the block turns white 4 In 3 Conditions you can set Trigger if any to activate if it falls to one of the conditions or Trigger i...

Page 134: ...em alarm detection Enable disable the POS Keyword check box to scan the data from the POS if it matches the keyword see also Chapter 5 9 10 Enable disable the Alarm Message check box to active with ex...

Page 135: ...ble Authentication check box and enter User ID and Password 2 Mail To check if it is working click Test Account button From Enter the sender e mail address To and CC Enter the recipient email address...

Page 136: ...the available speed 4 In the Stop Recording after text box set the number in second for the program to continue recording after the alarm has ended 5 Click OK to accept the new settings and Cancel to...

Page 137: ...PTZ dialog box Select column click to enable disable viewing and controlling the PTZ camera Click OK to exit and save the setting and Cancel to exit without saving the setting 3 AutoPan Groups Operat...

Page 138: ...recording 6 Emap Display the map in each area the camera sensor relay location and the warning event see also Chapter 4 7 7 Network Enable disable remote system access This feature allows you to acces...

Page 139: ...sole Setting Click OK to exit and save the setting and Cancel to exit without saving the setting 1 2 3 4 1 Storage Path Set the directory on where to save the data When there is not enough free space...

Page 140: ...r display in Storage path list 2 Language Customize the system to display the tool tips and dialogs based on the selected language By default the language is in English 3 Remote Server Click Add to ad...

Page 141: ...mage 5 Zoom Zoom in and out the image 6 Direction buttons Adjust and position the focal point of the PTZ camera 7 Camera ID pane Display the PTZ camera number that is being operated 8 Save Camera pres...

Page 142: ...oose Remote Playback select RealTime Playback if your internet bandwidth is fast and big enough otherwise choose Download and Playback Click OK to proceed and Cancel to void this operation In the Vide...

Page 143: ...it is selected The block that appears in white doesn t have data You can only select one block when you choose Download and Playback 3 Click OK to proceed and Cancel to void this operation 4 If you s...

Page 144: ...rded video file on the specific time frame i The Hour buttons represent the time in 24 hour clock The blue bar on top of the hour button indicates that there is a recorded video file on that period of...

Page 145: ...me While the red colored column indicates on where to start playing the recorded video file 6 Preview Switch to Preview Advanced mode 7 Playback Switch to Playback mode This allows you to view the rec...

Page 146: ...of activities that take place in the system To filter the records select and click the option button to only display Event System Operation Network or POS 14 Visual Search Search from a specific camer...

Page 147: ...playback the recorded video file on the specific time frame i The Hour buttons represent the time in 24 hour clock The blue bar on top of the hour button indicates that there is a recorded video file...

Page 148: ...mode This allows you to view the recorded video file 8 Status bar Display the recorded date time and play speed 9 Camera ID Show the number of cameras that are being viewed When you are in single scre...

Page 149: ...ve at the beginning of the recorded video file Previous Go back to the previous frame Slower Play the recorded video file at the speed of 1 2x 1 4x or 1 8x Rewind Wind back the recorded video file Pau...

Page 150: ...mouse or ESC on the keyboard When you switch to full screen in multiple screen mode Left click to toggle to only display one of the video in the multiple screen mode or all 10 Event log Show the reco...

Page 151: ...R through Internet Make sure your PDA support IE browser and is connected to the internet To use this feature you need to install the PDAViewer software either thru ActiveSync connection or download i...

Page 152: ...PDAViewer from the Internet Make sure you are connected to the internet 1 Open the web browser and enter the server IP Then click the hyperlink Download PDA Viewer 2 When the Download dialog box appea...

Page 153: ...click Add to add DVR server Enter the server IP port user ID password and select the connection type Then click OK User can playback the recorded video from remote DVR server in PDAViewer see Chapter...

Page 154: ...disable audio and select to display different camera tap on the video screen longer the pop up menu will appear 8 7 4 To Playback in PDAViewer 1 Run the PDAViewer in the Programs 2 Hook up to the DVR...

Page 155: ...and can be connected to the internet To use this feature you need to install the JAVAViewer program that it can be downloading it from the DVR server through the internet 8 8 1 To install JAVAViewer...

Page 156: ...P address port number user ID and password Please refer to your DVR server setting for that information 3 And then select the Connect to connect to DVR server 4 Click Yes to accept the data from DVR s...

Page 157: ...different camera view select menu and select the channel 7 The JAVA Viewer support PTZ control function you can refer to Help file for detail function control key Select menu and go the way down to se...

Page 158: ...1 Click Start Programs DSS ImageVerification 2 In the ImageVerification screen click Load Source Image and locate the image source 3 Click Verify Image to begin the process 4 Check the result in the...

Page 159: ...file Play Play the video file Faster Play the video file at faster speed Next Go to the next frame End Go to the end of the video file 4 Save Video Save the edited or segmented video in avi format 5...

Page 160: ...t any location of the track 20 iStable To reduce the jolt in the recorded video also see Chapter 10 1 21 Add Setting Include the new setting to the temporary setting block 22 Rename Change the name of...

Page 161: ...rag the bar on the playback progress bar and pause on where you want to end the cut Then click Segment to set the end mark To cancel segmentation or set the segment marks from the start click Segment...

Page 162: ...rams DSS Tool Dispatch 3 In the DVR Server section enter the DVR server IP port user ID and password You can also select to display the language you prefer 4 Auto connect when start Enable to automati...

Page 163: ...t number is same the Webviewer port on the remote DVR server The default is 80 User ID fill in the remote DVR server s login account Password fill in the remote DVR server s login password Description...

Page 164: ...If you want the system to automatically erase the event and alarm log files after a certain days enable the Delete event and alarm log after check box and enter the numbers of days in Days text box 3...

Page 165: ...e the conditions in Login section you want the system to automatically carry out Auto record when login Automatically start video recording when the DVR is executed Auto start Network when login Autom...

Page 166: ...n To select one camera only Left click on the camera icon The camera icon turns red when it is selected 2 Enable Set to enable disable the selected camera When there is no video source on the camera w...

Page 167: ...he cameras enable the ALL check box To select more than one camera Right click on the camera icon To select one camera only Left click on the camera icon The camera icon turns red when it is selected...

Page 168: ...when the system detects movement Once a motion is detected the system automatically saves the previous frames and stop based on the Start Record Prior and Stop Record After settings Smart Recording A...

Page 169: ...m will automatically detect your Server IP address You need this when accessing DVR server from the remote location via internet 4 Dynamic DNS Domain Name System Enter the Domain Name and Password To...

Page 170: ...the same network It will write the DVR port information into the router or other network device Enable Original Security Protocol Enable DVR system to accept the connection from former version of rem...

Page 171: ...want to schedule in the drop down list Record Activate all the cameras to start video recording at the set time based on the Recording setting see also Chapter 5 3 Backup Save another copy of all the...

Page 172: ...alarm setting click Delete to remove the selected alarm setting click OK to exit and save the setting Cancel to exit without saving and Default to revert back to original factory setting 1 2 3 4 5 6...

Page 173: ...sage Network is switched off when the network connection of DVR system is lost the system will send out the alarm message Hard Disk failed when the hard disk can t work normally the system will send o...

Page 174: ...otocol To setup click Detail see also To Setup FTP Start Recording Record the video from the selected camera To setup click Detail see also To Setup Alarm Recording Alarm SOP Standard Operation Proced...

Page 175: ...ge title Message Type the message 3 Email Notice Setting Notice Interval Set the period of time before it sends another e mail notice Embedded image Select the image size and set the number of frames...

Page 176: ...after the alarm has ended 10 Click OK to accept the new settings and Cancel to exit without saving To Setup Alarm SOP Beside the Alarm SOP check box click Detail In the step text boxes type the stand...

Page 177: ...ta you must have at least 2G hard disk space To back up the recoded data from the DVR server 1 Make sure you are connected to the internet 2 Click Start Program DSS Tool Remote Backup 3 To add the DVR...

Page 178: ...ss the backup button Click File Select to choose the date time and camera you want to back up Click Browse to set the storage path 6 Click OK to complete the adding DVR server The added DVR server wil...

Page 179: ...stem that enables user to monitor DVR servers through an internet connection iMatrix can monitor and playback the video of remote DVR servers The iMatrix program supports Single Dual Triple and Four m...

Page 180: ...igher F Media CD ROM drive F VGA 32 bit high color SVGA graphics card with 128MB video memory and DirectDraw YUV Rendering Capability F Audio Sound card and speakers F Internet capacity 10 100 Base T...

Page 181: ...173 5 User may now run the iMatrix program To run the application click on your PC desktop or click Start Programs iMatrix iMatrix...

Page 182: ...in your User ID and Password If this is the first time enter the one you have registered when installing the software Using the iMatrix Application iMatrix can remote monitor and playback recorded vid...

Page 183: ...se the Logout dialog box 2 Setup Configure the iMatrix settings Only the administrator is authorized to access this command see also Chapter 11 4 3 3 Monitor Controller Call out monitor set selection...

Page 184: ...indicates the monitor set is selected and been monitored The monitor 1 4 are purple that indicate the monitor is monitoring Right click on monitor and select the Recover to reset the monitor 3 Drag th...

Page 185: ...Select the montior Step2 Click to expand the cameras Step3 Drag the camera to the blank block Step5 Click to close the sub window Step4 Click to refresh monitor set i Right click on channel block and...

Page 186: ...m in and out the image 6 Direction buttons Adjust and position the focal point of the PTZ camera 7 Camera ID pane Display the PTZ camera number that is being operated 8 Save Camera preset position Sav...

Page 187: ...dialog box click OK to accept and start to reload the new setting and Cancel to exit without saving 1 2 3 4 5 1 Alarm Network Port Select a port for receiving alarm video from DVR server Any network...

Page 188: ...8 Click Setup 9 In the Authorization dialog box enter the administrator User ID and Password 10 Click DVR 11 In the DVR Setup section click Add to insert Delete to remove and Edit to modify DVR serve...

Page 189: ...181 15 And then the iMatrix system will try to connect with DVR server If the connecting time takes too long user can click Disconnect button to cancel the connect action...

Page 190: ...nsmitting Frame Rate for preview but the real transmitting frame rate depends on camera setting 5 After the Monitor set has been created select the DVR server And then the camera channels of the DVR s...

Page 191: ...event to display If the retrieve time doesn t enable the alarm event will display on screen until next alarm event come in i On the DVR site user need to enable and configure the matrix to send iMatri...

Page 192: ...to normal view Press F1 will display DVR information on upper right corner of channel screen Press F1 again to hide Click on channel to view in full screen Press Esc to back to multiple channel scree...

Page 193: ...ustomize the iMatrix system 3 Enter the Name Description Password and Confirm password of the account 4 Select the DVR servers that allow this account user to preview and playback The DVR server with...

Page 194: ...The icon indicates the channel is in playback status 2 User can use the playback control button to operate the playback i Click channel to switch to full screen mode for operating playback control bu...

Page 195: ...n Select recorded vide to playback from remote DVR server hard disk Select the date on the calendar and the time from 00 to 23 to where to start playing the recorded video file Display playback speed...

Page 196: ...need to manually run this program for CMS access the DVR server To run click Start Programs DSS DVR Remote Control Server The remote control server icon appears on the taskbar when the remote control...

Page 197: ...Login Browse the website ddns avers com tw with Microsoft IE or Netscape Navigator to access the following dialog First input CD Key number serial number and select the product name Then click OK to l...

Page 198: ...be configured to use UPnP UPnP must be enabled on your router Please contact your local router dealer or refer to the router user manual for the UPnP configuration on router Enabling UPnP in Window XP...

Page 199: ...191 4 Mark the UPnP Framework check box and click OK...

Page 200: ...ollowing table shows the ports that DVR server uses for certain network service Port Variable Remote Console CM 3000 5550 Y WebCam 80 Y 2 way audio 9999 Y Remote Control CM3000 RC1000 5555 Y DVR POS 5...

Page 201: ...th the product 4 AVerMedia INFORMATION Inc does not warrant that this product will meet your requirements it is your responsibility to determine the suitability of this product for your purpose WHAT W...

Reviews: