57
5.1.1
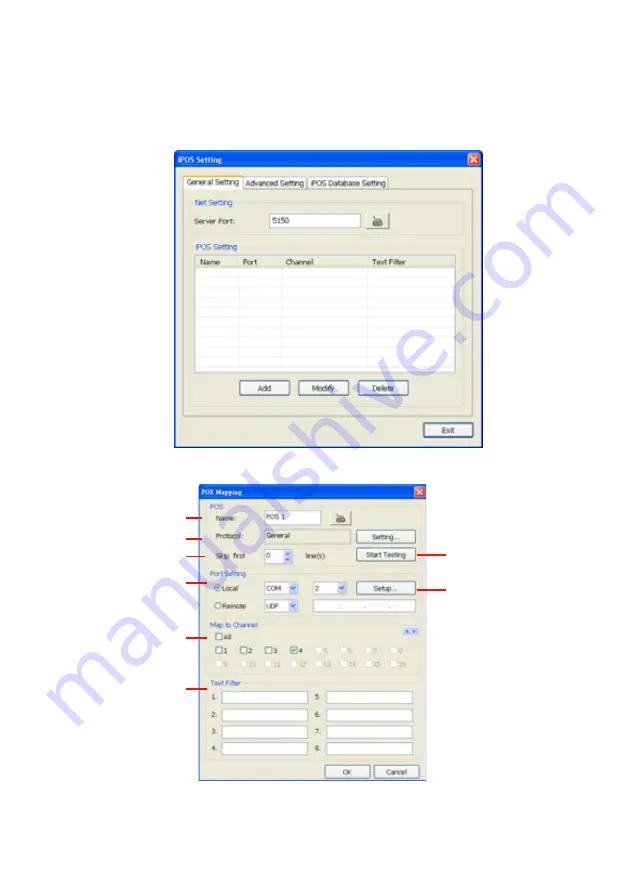
To Set the POS Setting:
General Setting
1. In the System Setting dialog box, POS section, click
Setting
.
2. In the POS Console Setting dialog box, click
Add
to set a new POS setting,
Modify
to change the
POS setting, and
Delete
to remove the selected POS setting. Click
OK
to save and close POS
Console Setting.
3. In the POS Mapping dialog box, click
OK
to accept the settings and
Cancel
to exit without saving
the new setting.
(4)
(5)
(1)
(2)
(3)
(6)
(7)
(8)
(1) POS Name
:
Enter a name to identify the POS.
(2) Protocol
:
To select the protocol, click
Setting
button (see Setup POS Protocol)
(3) Skip first
:
Set the number of lines you want to be removed
(4) Start Testing :
Click to test POS setting. You will see a test result on the right side of
Summary of Contents for NX 8000 series
Page 1: ...AVerMedia NX8000 NXU8000 series User Manual April 2009...
Page 24: ......
Page 34: ...26 9 User can select the Date Camera and Cycle to view the report of object counts In Out...
Page 58: ...50 i The UPS application must meet Windows XP or Windows Vista system requirements...
Page 78: ...70 Region 1 Object size frame Region 2 Object counting information display...
Page 81: ...73...
Page 96: ...88 13 To view the all I O devices information click I O Map...
Page 199: ...191 4 Mark the UPnP Framework check box and click OK...


