background image

Hardware Control Panel Familiarization - Ch.2

User Guide

67

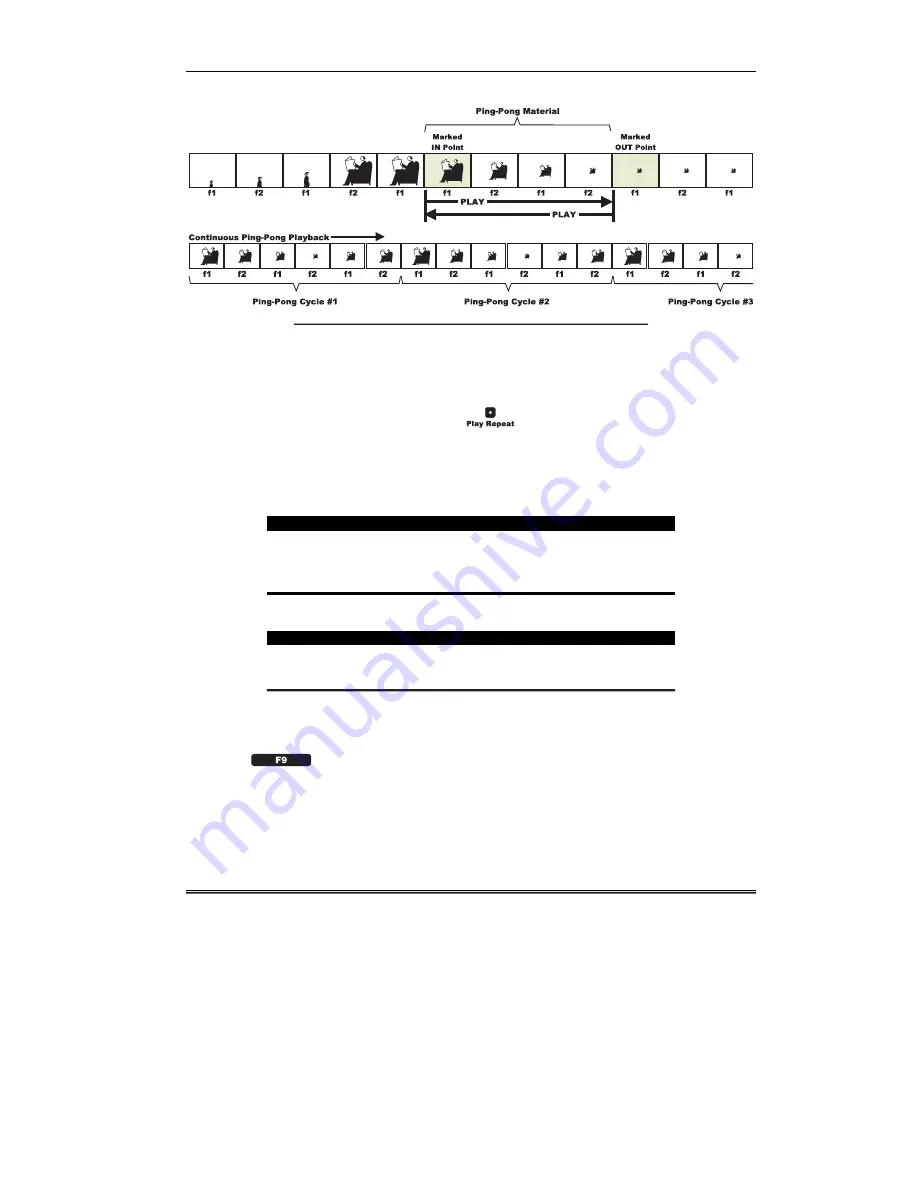
)LJXUH  3LQJ 3RQJ )XQFWLRQ

You may also enter a Ping Pong  count by typing a
numeric value into the numeric keypad and then

pressing the 

 button.  This sets a count value that

is used by the Ping Pong function to play the Ping Pong
a specified number of times before automatically
stopping.

127(

During Ping Pong play repeat, Jog Fwd and Jog Rev may appear to step
in the wrong direction, depending upon the play direction of the Ping Pong
cycle at the time the Jog command is issued.

127(

If you do not mark an IN point and OUT point, the entire disk length is
used as the Loop or Ping Pong area (from zero to the end of disk).

  F9 Cine Timeline (

525 only

)

Press 

  (

Cine Timeline

) to toggle between the 

Normal

 and 

Cine

timecode reporting functions.

Â

Normal

Places the Cine Timeline into the 

Normal

 setting, the

timecode during Cine Play follows the fields as they are
actually played out from the Attaché disk, with the 3:2

Summary of Contents for APR Attache

Page 1: ...APRy WWDFKp D I G I T A L D I S K R E C O R D E R 8VHU XLGH 6RIWZDUH 9HUVLRQ...

Page 2: ...This Page Blank...

Page 3: ...i APRy WWDFKp D I G I T A L D I S K R E C O R D E R 8VHU XLGH 6RIWZDUH 9HUVLRQ Part Number 750221 07...

Page 4: ...ii User Guide Printing History APRy WWDFKp User Guide Jan 1998 Feb 1998 Mar 1998 Apr 1998 Printed in U S A Copyright Accom Inc 1998...

Page 5: ...ser Guide is subject to change without notice or obligation Acknowledgments f APR is a trademark of Accom Inc f APRy WWDFKp is a trademark of Accom Inc f Indy Indigo2 and O2 are trademarks of Silicon...

Page 6: ...ved when system power is turned off Charged capacitors can retain dangerous voltages long after power is turned off f Do not take chances with electrical components As a priority all equipment should...

Page 7: ...TER 23 2 2 ATTACH CONTROL PANEL 24 2 2 1 Softkey Function Section 24 2 2 2 Attach Mode Select 26 2 2 3 Numeric Keypad 30 2 2 4 Transport Control 31 2 2 5 Auto Edit Functions 43 2 3 ATTACH STATUS MENU...

Page 8: ...ONS 164 4 2 1 Timecode 164 4 2 2 Frames 164 4 2 3 Timecode Entry Mode 165 4 2 4 Frame Entry Mode 167 4 2 5 Var Play Entries 170 4 2 6 Invalid Entries 170 4 2 7 Marking Edit Points 171 4 2 8 Setting Ed...

Page 9: ...STEM STATUS 225 4 11 1 Disk Array Status 225 4 11 2 Disk Errors which Prevent Attach from Booting 228 4 11 3 Resetting the Disk Error Log 228 4 11 4 Formatting the Disk Array 229 4 11 5 Checking the S...

Page 10: ...ON 8 1 ABOUT THIS CHAPTER 311 8 2 GENERAL INFORMATION ON THE ATTACH AUDIO 312 8 2 1 Audio Specifications 312 8 2 2 Analog Audio I O with Digital Recording 312 8 2 3 Audio File Transfer 312 8 2 4 Audio...

Page 11: ...NNECTOR PIN OUTS 342 A 6 INSTALLING THE ATTACH 349 A 6 1 Power Control Panel Data Reference 349 A 6 2 Video Connections 350 A 6 3 KeyTrack Key Connections 352 A 6 4 Audio Connections 354 A 6 5 Connect...

Page 12: ...Accom APR WWDFKp Digital Disk Recorder f User Guide...

Page 13: ...KDSWHU APRy WWDFKp 6 VWHP DPLOLDUL DWLRQ...

Page 14: ...Accom APR WWDFKp Digital Disk Recorder User Guide...

Page 15: ...ttach General Operations Discusses all phases of system operation including timecode recording playback segment play mode and Macros Chapter 5 APRy yAttach Ethernet Operations Explains all phases of E...

Page 16: ...labels on the Menu are shown exactly as they appear on screen using the font Courier For example Press Display To simplify the text the reference word button will not always be used in a description...

Page 17: ...isible on the system s analog composite video output status Image and Picture refer to video images that can be recorded and played back using the Attach system Keyboard Mini Keyboard both refer to a...

Page 18: ...render to tape based or other network related devices greatly enhancing speed quality and productivity The optional KeyTrack feature for Attach provides the ability to record and play a key signal th...

Page 19: ...as a menu status overlay which may be switched on or off Lastly there is also an S Video output which also has the switchable menu status overlay ITU R BT601 Serial Digital Video I O SDI The Attach of...

Page 20: ...unction then allows repeated playback of this timecode range on the disk In the forward play direction the disk plays from the In point to the Out point and then immediately seeks back to the In point...

Page 21: ...ides the following standard video inputs 1 Component analog RGB YUV Betacam video input 1 ITU R BT 601 CCIR 601 serial digital video input SDI The Attach provides the following optional key inputs 1 A...

Page 22: ...ollowing optional audio outputs 2 Analog Audio Output 1 stereo pair Refer to Appendix A Hardware Installation for details on all chassis connectors 1 3 3 External Control The Attach provides standard...

Page 23: ...cro 1 through macro 4 The four GPI outputs are used to trigger external devices and may be activated either manually by using the Attach Control Panel or may be programmed as a step in a user macro Et...

Page 24: ...ideo This option provides for the precise record and playback of the key signal along with the video signal However the video and key signal may each be recorded independently of each other Thus when...

Page 25: ...5 9 7 9 7 The green DRIVE ACTIVITY LED is ON whenever the drive is in use The LED will turn off when the disk drive is idle or the machine is turned off 233 6 5 9 The Attach boots off an internal har...

Page 26: ...luminates when power to the chassis is ON The power switch for the chassis is located on the rear panel next to the AC power plug 38 5 6 7 6 7 The CPU RESET SWITCH is used to perform a warm boot up Th...

Page 27: ...U T Q W E R T Y K E Y B O A R D V G A D I S P L A Y V G A V I D E O S V I D E O O U T A U D I O A N A L O G I O H E A D P H O N E S R E F E R E N C E R E F E R E N C E Y U V R G B I N Y U V R G B O U...

Page 28: ...your computer workstation the images are transferred to the Attach for real time playback The optional KeyTrack feature for Attach provides the ability to record and play a key signal that is associa...

Page 29: ...the material back in real time The Attach may also capture video and audio from an external VTR and then supply the material to a computer graphics workstation that in turn is used to rotoscope or mod...

Page 30: ...e vast array of computer generated images used in commercial television The limitations discussed here are to make you aware of them and to help you create the best possible images for use in the tele...

Page 31: ...ar correct when stored and viewed on the Attach An alternative is to use a 0 9 Aspect Ratio setting if such a setting is provided in the computer graphics software application Color Space See also Fil...

Page 32: ...Television uses interlaced scanning for image reproduction while most computer monitors use non interlaced scanning When you transfer images from your computer to the Attach there can be a correspond...

Page 33: ...System Familiarization Ch 1 User Guide 19...

Page 34: ...Accom APRy y WWDFKp Digital Disk Recorder 20 User Guide...

Page 35: ...KDSWHU APRy WWDFKp DUGZDUH RQWURO 3DQHO DPLOLDUL DWLRQ...

Page 36: ...Accom APR WWDFKp Digital Disk Recorder User Guide...

Page 37: ...this Chapter This chapter provides you with information to familiarize you with the APR Attach controls This chapter includes detailed descriptions of the following Attach Control Panel Attach Status...

Page 38: ...l a y S T O P F I E L D H O U R S M I N S S E C S F R A M E S D I G I T A L D I S K R E C O R D E R A t t a c h F 1 F 6 F 5 F 1 0 F 4 F 9 F 3 F 8 F 2 F 7 E N T E R 0 1 2 3 5 6 8 9 4 7 M A R K I N M A...

Page 39: ...ple to perform a destructive disk formatting process one must press and hold the button in order to execute the operation The button is used to determine the state of the status menu overlay on the co...

Page 40: ...n selects the Segment Play mode This is the secondary mode of operation for Attach in which the material stored on the disk is played in a random access fashion according to a user defined play list S...

Page 41: ...e value When you first press the button a small g appears in the numeric keypad entry register to let you know that you have pressed You may also press and hold down the button followed by a press of...

Page 42: ...yback is attained during standard record operation 127 Pressing the Record Mode button by itself will not change the recording mode as a safety precaution You must first press and hold down the Shift...

Page 43: ...this interval the audio output from Attach is muted The video key audio outputs are then updated with off disk playback as soon as the delay value has elapsed When this occurs the Attach begins playi...

Page 44: ...menu overlay on the composite video output Clears the last number entered into the numeric keypad Pressing and holding down the button will clear all numbers entered into the numeric keypad if multip...

Page 45: ...e Auto Edit function The button is active only if the button is turned ON For more information please refer to the description for the button While the button is active it determines which device is c...

Page 46: ...R Therefore had the button been set to VTR prior to toggling the button OFF the button reverts to the DDR setting when the button is turned OFF The button is used to enable or disable the Slave RS422...

Page 47: ...k option is fitted in the Attach and the record format in the Record Setup menu is set for RGB two wire recording then the button has no function The LED within the button will illuminate any time the...

Page 48: ...the off disk material is seen at the output of Attach This button tracks the parameter in the ATTRIBUTES menu Freeze On Off This button is used to play the disk backward from the current position If t...

Page 49: ...an be canceled only by pressing the button The button is used for two functions in conjunction with the numeric keypad it s used to set a new recording duration without actually performing a record op...

Page 50: ...new record duration Alternatively you may type the new record duration into the numeric keypad and then press and hold down the button to set the new record duration that is shown on the menu overlay...

Page 51: ...ton is illuminated to indicate that disk fast forward playback is underway All other LEDs in all other transport buttons are OFF during fast forward operation When the disk reaches the end of disk dur...

Page 52: ...nd then pressing the button at the same time The disk immediately seeks to the 00 00 timecode All other transport buttons except for and are canceled and thus turned OFF by pressing the button The REC...

Page 53: ...utton The button is used immediately stop any type of disk playback play forward play reverse fast forward rewind etc to halt a any recording operation and to halt any Auto Edit function When the butt...

Page 54: ...also selected and the play speed is set to zero As the rotary knob is turned clockwise the play speed increments to 0 250 speed after the knob has gone through four mechanical clicks Continuing throu...

Page 55: ...enting a single field or frame of video key audio material Clockwise rotations of the rotary knob will jog the disk forward while counter clockwise rotations jog the disk backward While the disk is in...

Page 56: ...e rotary knob You may also enter a numeric value for the variable play speed by typing a value into the numeric keypad and then pressing the button This places the disk directly into the specified pla...

Page 57: ...pter 4 This button is used in conjunction with the Auto Edit function The button is active only if the button is turned ON and when the minimum criteria for an Auto Edit event have been set Refer to t...

Page 58: ...and postroll intervals without stopping Never does the recorder switch to Bypass ON At the end of the post roll interval the recorder stops playback The LED within button turns OFF when the Review is...

Page 59: ...TR is set as the recording device with the Attach DDR as the player When the button is toggled to illuminate the associated DDR symbol the Attach DDR is the recording device with the external VTR as t...

Page 60: ...u desire you may temporarily turn OFF the Auto Edit function while preserving the data entered thus far To do so the button is toggled to turn OFF the LED within the button This action disables the Au...

Page 61: ...0 0 0 1 0 0 2 0 0 I n R 3 0 0 0 0 0 V K A 1 2 3 4 5 6 O u t N o r m 6 5 0 f 1 V i A t t a c h e H O M E M E N U S E L E C T I O N S F 1 A T T R I B U T E S F 2 S E T U P E D I T O R C O M M S F 3 S E...

Page 62: ...LRQ 6HFWLRQ Displays the system menus and lists all softkey assignments The menus and function softkeys labels shown in this area change depending upon the selected menu The menu overlay may be set to...

Page 63: ...G M E N T S F 6 S E T U P S Y S T E M I O F 7 S E T U P R E C O R D F 8 S E T U P A U D I O F 9 S E T U P E T H E R N E T F 1 0 D I S K A R R A Y R e c o r d E l e m e n t s P l a y R e p e a t P l a...

Page 64: ...e is selected instead of input disk VKT Video Key and Tone record setting shown when tone is selected instead of input disk VkS Video and Silence recording setting shown when silence is selected inste...

Page 65: ...ides several examples of different play speed values 3OD 6SHHG LVSOD 3OD 6SHHG LVSOD Speed Reverse 0 250 Stop 0 000 Speed Reverse 0 500 Normal Play 1 000 Speed Forward 0 250 1 Normal Play 1 500 Speed...

Page 66: ...s 6RIWNH 6HOHFWLRQV This area of the menu display will change according to the currently selected menu The numbers from F1 through F10 and the text to the right of these labels indicate the function a...

Page 67: ...lay forms mainly a two level menu tree which is logically arranged to allow you to quickly locate and activate system functions and features The following diagram illustrates the navigation of the men...

Page 68: ...p Video Timing Menu Macros Menu Segments Menu Setup System I O Menu Setup Record Menu Setup Audio Menu Setup Ethernet Menu System Status Menu Functions described are valid while the Status Menu Overla...

Page 69: ...L E C T I O N S F 1 A T T R I B U T E S F 2 S E T U P E D I T O R C O M M S F 3 S E T U P V I D E O T I M I N G F 4 M A C R O S F 5 S E G M E N T S F 6 S E T U P S Y S T E M I O F 7 S E T U P R E C O...

Page 70: ...to access the Attributes Menu as illustrated in Figure 2 13 below S T O P P E D 0 0 0 0 0 1 0 6 2 0 0 0 I n R 3 0 0 0 0 0 V K A 0 1 1 6 2 3 0 0 O u t N o r m 0 0 0 2 1 5 1 0 f 1 2 A t t a c h e A T T...

Page 71: ...eo camera rather than from film or computer graphics equipment If the vertical interpolator which is disabled by toggling the Interpolator softkey is OFF while the output mode is set to Field a single...

Page 72: ...cent field pairs and you require field 2 1 pairing 127 The video Output Mode setting does not affect the video output while the Bypass function is active F2 Interpolator Press Interpolator to toggle t...

Page 73: ...output mode selected the indicator shows f1 2 or f2 1 depending on the video field relationship at the video output If the Cine output mode is selected the f1 display area instead reads Cine In both...

Page 74: ...you may select Cine to place the Attach in Cine Play mode The label in the Playback Mode area of the status menu overlay reads Cine You may use this mode to play back material transferred from film th...

Page 75: ...en If the disk is playing when Freeze is turned ON the output video will freeze but the disk movement continues When you record with Freeze ON the Attach automatically turns Freeze OFF at the end of t...

Page 76: ...two When triggered the selected number appears in the column adjacent to the GPI Out label The duration of the GPI output pulse can be from one field to 3 200 fields You set the duration by typing a d...

Page 77: ...ection with Frames display enabled S T O P P E D 0 0 0 0 0 0 0 0 1 8 2 I n R 5 4 0 0 0 V K A 0 0 0 1 5 9 3 O u t N o r m 0 0 2 9 1 2 0 f 1 2 LJXUH UDPHV LVSOD In both displays note that the speed indi...

Page 78: ...back section with the IN and OUT mark points While Loop is active pressing the button makes the disk play forward from the marked IN point to the OUT point At the OUT point the disk immediately seeks...

Page 79: ...play list are used for Segment Loop playback Alternatively you can also use timecode frames on the segment timeline to define the IN and OUT points In this case the loop acts the same as in the Normal...

Page 80: ...may use either Segment IDs or timecode values on the Segment Timeline If you choose to define the segments using the Segment IDs the entire segments as defined by the segment IDs are included in the...

Page 81: ...Fwd and Jog Rev may appear to step in the wrong direction depending upon the play direction of the Ping Pong cycle at the time the Jog command is issued 127 If you do not mark an IN point and OUT poi...

Page 82: ...g system via RS422 serial control the Cine Timeline parameter must be set to Cine for proper operation When the Cine play mode is active the area of the status menu overlay which displays the disk tim...

Page 83: ...system F10 Video Content Press Video Content to toggle between Field and Frame modes to select the output type for reverse playback while the output mode is set to Frame If the recorded material is f...

Page 84: ...t O F F F 5 R o l l D e l a y 0 F i e l d s F 6 M a c h i n e I D 3 B V W 7 5 F 7 T C D e l a y 0 F i e l d s F 8 E d i t D e l a y 8 F i e l d s F 9 B a u d R a t e 3 8 4 0 0 F 1 0 P a r i t y O d d...

Page 85: ...d and then pressing the softkey The numeral after the SMPTE indicator is changed to the new value Sony Selects the Sony protocol for purposes of communicating via RS422 on editor port 1 The default va...

Page 86: ...0 F6 Machine ID Press Machine ID to toggle between values or type a value into the numeric keypad and then press to identify the type of machine being controlled on the RS422 ports Possible values ar...

Page 87: ...Baud Rate to toggle the baud rate of the RS422 editor port on the Attach This parameter toggles between 9600 19200 and 38400 baud Ensure that the baud rate of the Attach matches the baud rate of the e...

Page 88: ...V e r t T i m i n g 0 0 L i n e s F 5 D y n a m i c R n d I n O F F F 6 D y n a m i c R n d O u t O F F F 7 R e c o r d R e f U s e P l a y R e f LJXUH WWDFKp 6 783 9 2 7 0 1 0HQX The Setup Video Tim...

Page 89: ...outputs This adjustment moves the entire picture sync packet of the video outputs with respect to the chosen system reference The adjustment range is from 192 pixels 14 2uS advanced down to 64 pixels...

Page 90: ...ed this parameter applies dynamic rounding to the analog and digital video inputs while the Attach is set to 10 bit disk record mode Disabled Turns OFF the Dynamic Rounding on the video inputs Default...

Page 91: ...capability on its input then be sure to disable this function on Attach 127 Dynamic Rounding is a licensed technology from Quantel Ltd providing superior 10 bit to 8 bit digital video conversion Dyna...

Page 92: ...input is synchronous with the Play Reference input Sync on Input Uses the Input Video for the recording reference Select the Use Play Ref setting if the video input is NOT synchronous with the Play Re...

Page 93: ...c r o 1 F 3 P l a y M a c r o 1 F 4 P r e v i o u s F 5 N e x t F 6 I n s e r t F 7 D e l e t e S t e p F 8 H o l d T i m e 0 0 0 0 S t e p 0 3 o f 0 9 I D L E G o t o 0 1 0 5 0 0 0 0 LJXUH WWDFKp 0...

Page 94: ...o sequence The selected number is displayed in the right hand column During the macro record process the Record Macro label blanks and the system memorizes most keystrokes made on the Attach control p...

Page 95: ...es confirmation by pressing softkey A prompt will appear on the status menu overlay for this confirmation Pressing any other button will abort the Delete List Confirmation The label for this softkey i...

Page 96: ...status of the current macro sequence for example REC Record during the record process PLAY during macro sequence playback or running and IDLE when a macro is halted XQFWLRQ The Function line displays...

Page 97: ...e S e g F 8 M o d i f y F 9 S e g 2 o f 5 0 0 0 0 1 5 1 3 F 1 0 I n O u t G o t o U s e T i m e c o d e LJXUH WWDFKp 6 0 176 0HQX In the Segments Menu you may define a series of timecode IN and OUT po...

Page 98: ...Values are entered as either frames or HMSF timecode depending upon the setting of the timecode display function The right hand column displays the OUT point If the current segment is already in use...

Page 99: ...segment list during segment editing As you move through the list the values shown for segment IN point OUT point and play speed update accordingly The softkey label for Next is shown only when you ha...

Page 100: ...the entire contents of the segment play list Pressing any other button will cancel the operation F8 Modify Press Modify after entering a new IN point OUT point or play speed on the current segment to...

Page 101: ...ates that the current Segment is past the end of the Segment List so that if inserted this segment will append the list The time in the right column is the total time of the Segment List F10 In Out Go...

Page 102: ...egment play will result in a marked timecode value rather than a marked segment ID This timecode value is marked with respect to the Segment Play Timeline rather than from the Normal Play timeline The...

Page 103: ...F 1 V i d e o I n A n a l o g R G B F 2 V i d e o O u t D 1 R G B F 3 P l a y R e f R e f I n F 4 T e s t P a t t e r n C o l o r B a r s 0 F 5 T e s t M o d e 0 F 6 T V S t d F o r m a t 5 2 5 1 0 B...

Page 104: ...video input source 127 The F1 softkey in the Video Setup Menu F3 from the HOME menu allows you to toggle ON and OFF the 54mV Beta setup on the CAV input source whether it s set to Analog Beta or Anal...

Page 105: ...Attach to an external reference signal such as Color Black or Black Burst which is connected to the REFERENCE BNC connector on the 9 2 card and card if so equipped at the rear of the Attach main chas...

Page 106: ...component analog video input signal CAV which is attached to the YUVyRGB IN 15 pin connector on the 9 9 2 card at the rear of the Attach main chassis If the CAV input signal is set to RGB format then...

Page 107: ...rlay display F4 Test Pattern Press Test Pattern to recall a full screen test pattern to all of the video outputs The right hand column displays the current test pattern Toggle the softkey to select be...

Page 108: ...line standard and video resolution parameter Once a change is made to this parameter the video key and audio material already recorded on the Attach disk will be rendered useless This original materia...

Page 109: ...ss to the Attach is bound to the limits of the physical disk timeline or to an imaginary black area before and after the physical disk timeline This black area is 5 minutes before and 5 minutes after...

Page 110: ...roll before the beginning of the disk with Edit controllers that support pre roll prior to midnight 127 The TC Offset parameter is only applicable when entering and displaying the numbers in the HMSF...

Page 111: ...F 4 P r o g r a m D e l a y 0 0 0 0 0 0 0 0 F 5 V i d e o F o r m a t Y U V K 4 2 2 4 F 6 F 7 R e c o r d L e n g t h 3 0 0 0 0 0 F 8 R e c o r d L o c k o u t O F F F 9 I m a g e E n a b l e V i d e...

Page 112: ...tem will first play video material off disk and then immediately record the incoming video onto the same disk location This feature is most useful when you re using an external keying device with the...

Page 113: ...ue has elapsed When this occurs the Attach begins playing the off disk video key audio from the point where the recording was started This function normally defaults to no program delay There is a par...

Page 114: ...5 00 on the disk the playback material will be obtained from that found at 5 00 on the disk while the new recording will take place at 1 05 00 on the disk In order to record the playback material back...

Page 115: ...ideo key and audio just recorded By typing a timecode value into the numeric keypad and then pressing the softkey you change the Program Delay value This value defines an amount of time that must expi...

Page 116: ...nd record operation in a single disk channel without the need for a second disk system F5 Video Format The Video Format button is displayed only when the KeyTrack Key Channel option is installed If th...

Page 117: ...ince the video material on disk is no longer compatible with the format of the video output If you change this parameter in error then simply change it back to the previous setting but do so before yo...

Page 118: ...re Video Only Only the video track is enabled for recording Key Only Only the key track is enabled for recording This setting is not available if the KeyTrack options is not installed Video Key Both t...

Page 119: ...he OUT value The possible indications are for the recording enables are shown in the Table 2 3 below HVFULSWLRQ LVSOD HVFULSWLRQ LVSOD Video Only Vka Key Audio vKA Key Only VKa Video Key Audio VKA Aud...

Page 120: ...tem S T O P P E D 0 0 0 0 0 1 0 6 2 0 0 0 I n R 3 0 0 0 0 0 V K A 0 1 1 6 2 3 0 0 O u t N o r m 0 0 0 2 1 5 1 0 f 1 2 A t t a c h e S E T U P A U D I O F 1 A u d i o S o u r c e I n p u t D i s k F 2...

Page 121: ...rovides a convenient means of recording a steady 1kHz tone to the disk even when there is or is not an audio signal present at the input to Attach The tone generator provides a 0dB setup tone relative...

Page 122: ...udio and headphone audio outputs OFF Auto This setting is available only if you have installed the audio option after taking delivery of the Attach system from the factory In other words if you have i...

Page 123: ...umeric keypad and then press to set the volume level to a specific value F4 turn Knob While pressing and holding down you may then turn the rotary knob on the Attach control panel to change the volume...

Page 124: ...T O R C O M M S F 1 E d i t o r P o r t 1 O N F 2 P r o t o c o l S o n y F 3 E d i t F i e l d F 1 F 4 T C F l d R e p o r t O F F F 5 R o l l D e l a y 0 F i e l d s F 6 M a c h i n e I D 3 B V W 7...

Page 125: ...rning OFF the Ethernet port on Attach The two possible settings for the Ethernet Port are ON Ethernet port is enabled for image transfer and transport control OFF Ethernet port is disabled for image t...

Page 126: ...th no numerals entered into the numeric keypad In doing so the existing Gateway Address appears in the Attach control panel numeric keypad register Use on the numeric keypad to delete individual numer...

Page 127: ...F 3 D i s k S t a t u s 1 1 1 5 F 4 R e s e t D i s k E r r o r L o g F 6 F o r m a t D i s k A r r a y F 8 S o f t w a r e V e r s i o n V 1 5 0 1 LJXUH WWDFKp 6 67 0 67 786 0HQX The System Status M...

Page 128: ...he video and audio material F3 Status 11 15 Pressing Status 11 15 displays the configuration and status of the third set of five disks within the Attach disk array This sub menu shows the type of driv...

Page 129: ...r complete information 7R RUPDW D LVNV Directly press to format all drives without first making a numeric entry in the numeric keypad A warning message will appear on the status menu overlay You are t...

Page 130: ...Accom APRy y WWDFKp Digital Disk Recorder 116 User Guide...

Page 131: ...KDSWHU APRy WWDFKp HWWLQJ 6WDUWHG...

Page 132: ...Accom APR WWDFKp Digital Disk Recorder User Guide...

Page 133: ...el For details on setup and use of the Attach via Ethernet refer to Chapter 5 Ethernet Operations This section assumes the Attach is already installed correctly Power has already been connected refere...

Page 134: ...g this time a display showing the Attach configuration appears as shown in Figure 3 1 below A c c o m A P R S y s t e m I n i t i a l i z a t i o n I n i t D i s k A r r a y A P R A t t a c h e V 4 c...

Page 135: ...eps to power down the Attach system 1 It is recommended but not mandatory that all material on the Attach is backed up to a digital VTR for safekeeping prior to removing power from the Attach 2 Turn t...

Page 136: ...displays 01 05 Use the following procedure to switch the display mode between timecode and absolute frames 1 If the HOME Menu is not displayed press 2 Access the Attributes Menu From the HOME Menu pre...

Page 137: ...Getting Started Ch 3 User Guide 123 3 Toggle the display between Timecode and Frames notation Press Time Display...

Page 138: ...OME Menu is not displayed press 2 Access the Setup Editor Comms Menu From the HOME Menu press SETUP EDITOR COMMS S T O P P E D 0 0 0 0 0 1 0 6 2 0 0 0 I n R 3 0 0 0 0 0 V K A 0 1 1 6 2 3 0 0 O u t N o...

Page 139: ...F Disables the RS422 communications on Editor Port 1 The default value is ON F2 Protocol This parameter toggles the protocol setting of the RS422 serial communications Port 1 this port typically conne...

Page 140: ...e recording device F2 Causes the Attach to edit on field 2 boundaries when the Attach is the recording device None The Attach follows the field dominance of the external edit controller The default va...

Page 141: ...alue is 0 Fields F6 Machine ID The Machine ID parameter provides a device ID response from the Attach to the external editing system Some editing systems but not all then use the ID to automatically s...

Page 142: ...o effect on the reported timecode The available range is 20 fields 1 To change the TC Delay parameter Type into the numeric keypad the desired value then Press TC Delay The default value is 0 Fields F...

Page 143: ...d 19200 Sets baud rate of the RS422 Port 1 to 19200 baud 38400 Sets baud rate of the RS422 Port 1 to 38400 baud The default value is 38400 F10 Parity This parameter toggles the Parity setting of the R...

Page 144: ...System I O Menu do the following 1 If the HOME Menu is not displayed press 2 Access the Setup System I O Menu From the HOME Menu press SETUP SYSTEM I O S T O P P E D 0 0 0 0 0 1 0 6 2 0 0 0 I n R 3 0...

Page 145: ...nd formats it as an RGB signal Analog Beta Selects the Component Analog Video CAV video input and formats it as a YUV Betacam signal When using an Analog Beta input the 7 5IRE Setup softkey in the Vid...

Page 146: ...ke proper recordings on Attach 1 To select the system reference Press Play Ref 2 Toggle between the five following video reference choices Ref In Locks the Attach system to the incoming reference sign...

Page 147: ...es the use of the Reference Input in the Attach If you are recording on the Attach where the reference sync is aligned with the Attach video input select Use Play Ref with the Record Ref softkey in th...

Page 148: ...toggling the softkey by itself to select test patterns To select the Random pattern type 4 on the numeric keypad and then press the softkey The right hand column displays the current pattern Test pat...

Page 149: ...e 625 PAL Line Standard with 8 bit recording and playback resolution on disk 625 10 Bit Selects the 625 PAL Line Standard with 10 bit recording and playback resolution on disk 3 To confirm your line s...

Page 150: ...t to the physical end of disk Pre Post Turns ON the virtual pre and post roll areas of the system The starting timecode on the disk is 23 55 00 00 while the end of disk is 5 minutes 5 00 00 beyond the...

Page 151: ...uide 137 Type the desired timecode offset value into the numeric keypad and then Press TC Offset 127 When displaying the disk position as a Frame value the Timecode Offset operates from frame 0 at the...

Page 152: ...the Setup Video Timing Menu From the HOME Menu press SETUP VIDEO TIMING S T O P P E D 0 0 0 0 0 1 0 6 2 0 0 0 I n R 3 0 0 0 0 0 V K A 0 1 1 6 2 3 0 0 O u t N o r m 0 0 0 2 1 5 1 0 f 1 2 A t t a c h e...

Page 153: ...gles through the four 54mV Setup selections OFF Turns OFF the 54mV Setup from all video inputs and video outputs Input Only Turns ON the 54mV Setup but applies the setting only to the video inputs Out...

Page 154: ...desired value into the numeric keypad and then Press Horiz Timing OR To allow dynamic adjustment Press and hold down the softkey and then Turn the rotary knob on the Attach control panel This adjustm...

Page 155: ...the HOME Menu press SETUP AUDIO 127 The Setup Audio Menu is available only if you have the Audio Option fitted in your Attach system S T O P P E D 0 0 0 0 0 1 0 6 2 0 0 0 I n R 3 0 0 0 0 0 V K A 0 1 1...

Page 156: ...a convenient means of recording silence to the disk even when there is an audio signal present at the input to Attach Tone With this setting the Attach will record and internal test tone regardless of...

Page 157: ...s 20dB 8dB Selects the audio input output operating level of 8dB The headroom for this setting is 16dB F3 Program Mute This parameter toggles the audio output mute ON or OFF The Program Mute function...

Page 158: ...r available ON Mutes the audio on both the main audio and headphone audio outputs F4 Headphone Vol Volume This parameter is used to adjust the volume of the headphone output This setting does not affe...

Page 159: ...the headphone output This function does not affect the main audio output rather it only affects the headphone audio output 1 To change the audio Program Mute parameter Press Headphone Mute Toggle betw...

Page 160: ...A 0 1 1 6 2 3 0 0 O u t N o r m 0 0 0 2 1 5 1 0 f 1 2 A t t a c h e S E T U P R E C O R D F 1 R e c o r d M o d e N o r m a l F 2 P r e R e a d O f f s e t 0 0 0 0 0 0 0 0 F 3 P r e R e a d D e l a y...

Page 161: ...ion either from the Attach control panel or from an external editing system will first play back the video material off disk prior to recording immediately back to the same place on disk By default th...

Page 162: ...tions This value is used only if the PreRead record mode is selected with softkey When the PreRead Offset value is set to 00 00 the PreRead recordings will immediately overwrite the original source vi...

Page 163: ...audio signal processing delay that exists in the signal path from the Attach output to the Attach input This signal delay may be introduced by an external switcher mixer or other processing devices li...

Page 164: ...timecode value for Program Delay will cause the video output from Attach to show black with audio muted for the duration of the Program Delay Once the program delay has expired the Attach will then b...

Reviews: