background image

C

C//ZZ FFoollddeerr TTrroouubblleesshhoooottiinngg

C/Z Folder Paper Jams

• The press stops running and a fault message displays on the press touch screen.

• The message includes a graphical illustration showing the location of the fault along with a brief

explanation of corrective actions for clearing the fault.

• Paper jams may occur in multiple areas of the press and any optional devices connected to the

press. When this happens, the graphical illustration changes to show the multiple locations and
the required corrective actions.

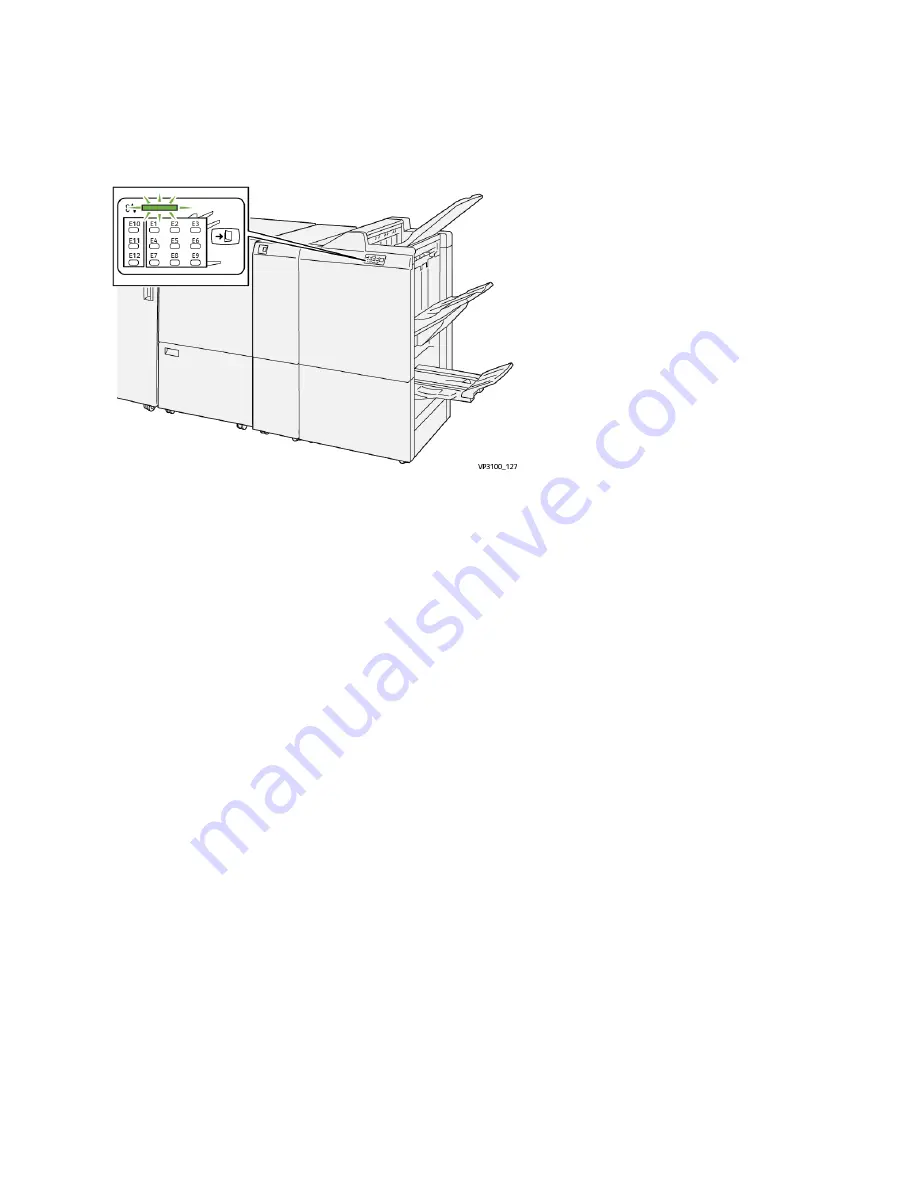
• Additionally, if a fault occurs with the C/Z Folder, an indicator lights on the PR Finisher control

panel and shows the corresponding area on the C/Z Folder where the fault occurred.

Always refer to the following information when clearing paper jams:

• Do not power off the press when removing paper jams.

• Paper jams can be removed with the press still powered on. When the power is turned off, all

information stored to the system memory is erased.

• Clear all paper jams before resuming print jobs.

• Do not touch components inside the press. This can cause print defects.

• Ensure that all paper jams, including any small ripped pieces of paper, are cleared before

proceeding with print jobs.

• Gently remove the paper taking care not to tear it. If paper is torn, be sure to remove all torn

pieces.

• After removing paper jams, close all doors and covers. The press cannot print when doors or covers

are open.

• After clearing a paper jam, printing automatically resumes from the state before the paper jam

occurred.

• If all paper jams are not cleared, an error message continues to display on the press touch screen.

To clear any remaining jams, refer to the press touch screen for instructions and information.

408

Содержание Versant 4100

Страница 1: ...Xerox Versant 4100 Press User Documentation...

Страница 2: ...symbols and their definitions Symbol Name and Definition if required Caution This symbol indicates a mandatory action to take in order to avoid damage to these areas Warning This symbol alerts users...

Страница 3: ...ur region or marketplace for correct disposal information and procedures Do Not Incinerate the Drum Cartridge Always refer to the recycling instructions for your region or marketplace for correct disp...

Страница 4: ...this location Keep Area Clear Do not store any objects in this location Do Not Use Transparencies with a White Strip or Overhead Projector Sheets with a White Strip Do Not Use Open Envelopes Do Not U...

Страница 5: ...ycling please contact your local municipality your waste disposal service or the point of sale where you purchased the items N No ot tiic ce es s a an nd d S Sa af fe et ty y Carefully read the follow...

Страница 6: ...ntative Power Cable and Electrical Supply Use the power cords that are supplied with your press Do not remove or modify the power cord The electrical outlet must be near the printer and must be easily...

Страница 7: ...the protective housing and external covers the laser beam cannot escape from the Production Press during any phase of the user operation This product contains laser warning labels These labels are int...

Страница 8: ...ce the Press on a level solid surface not on a thick pile carpet that has adequate strength to support the weight of the Press Do not attempt to move the Press A leveling device that was lowered when...

Страница 9: ...t tiio on n WARNING Use of non Xerox supplies is not recommended The Xerox Warranty Service Agreement and Total Satisfaction Guarantee do not cover damage malfunction or degradation of performance cau...

Страница 10: ...e ew w The Xerox Versant 4100 Press is a full color or black and white auto duplex press that operates at a speed of 100 prints per minute when printing on 8 5 x 11 inch or A4 paper The system configu...

Страница 11: ...dvanced Oversized High Capacity Feeder Trays 6 and 7 with Tray 5 Bypass 2 Dry Ink Toner Cover 3 Control Panel and Touch Screen 4 Power Button 5 Offset Catch Tray OCT 6 Right Front Door 7 Center Front...

Страница 12: ...Internal Components 1 Dry Ink Toner Cartridges 2 Main Power Switch 3 Circuit Breaker Switch on rear of press 4 Paper Cooling Module 5 Dry Ink Toner Waste Bottle 6 Fuser Module 7 Transfer Module 12...

Страница 13: ...per Tray 1 b At the left of the feeder tray on the press frame locate the plate with the serial number SER Advanced Oversized High Capacity Feeder Trays 6 and 7 Tip The Advanced Oversized High Capacit...

Страница 14: ...Trays 6 and 7 with Tray 5 Trays 6 and 7 Components 1 Paper Jam and Error Indicator Panel 2 Paper Level Indicators 3 Feeder Front Cover 4 Tray 6 5 Tray 7 6 Circuit Breaker Switch 14...

Страница 15: ...ch as Full Width Array color uniformity adjustments 3 Job Status button Use to check the progress of active jobs and detailed information about completed jobs or pending jobs This area also allows you...

Страница 16: ...ric keypad 11 Clear All button Use this button to return all selections to the same state as when the press was powered on Press once to clear a current entry Press twice to return to default settings...

Страница 17: ...l is required to customize the system and network defaults for your press and to customize particular print jobs by setting or changing parameters for certain features Press the Guest button or the Lo...

Страница 18: ...4 10 indicate optional devices P Pr re ed diic ct tP Pr riin nt t M Me ed diia a M Ma an na ag ge er r O Ov ve er rv viie ew w PredictPrint Media Manager is a hardware and software solution for Xerox...

Страница 19: ...of the following print servers can be used with your press Xerox EX 4100 Print Server Powered by Fiery Xerox EX P 4100 Print Server Powered by Fiery The print server accepts processes and manages doc...

Страница 20: ...ormation refer to Paper Size Ranges Paper Tray Information For information refer to Paper Tray Information Productivity Information For information refer to Press Productivity Information P Pe er rf f...

Страница 21: ...rmance cannot be guaranteed G Ge et tt tiin ng g H He ellp p H He ellp p o on n t th he e X Xe er ro ox x W We eb bs siit te e For technical support Xerox supplies customer documentation and answers t...

Страница 22: ...Go to www xerox com register It is recommended that you print all customer documentation and keep it close to the machine Note For the latest documentation updates for your Xerox Digital Press go to...

Страница 23: ...ry Canada s license exempt RSSs Operation is the subject to the following two conditions 1 This device may not cause interference and 2 This device must accept any interference including interference...

Страница 24: ...efault Power Saver Settings User Documentation or Systems Administrators Guide www xerox com VERSANT_4100docs Benefits of purchasing ENERGY STAR qualified products www energystar gov Environmental Ben...

Страница 25: ...y the device is used This device is designed and configured to enable you to reduce your electricity usage Power Saver modes are enabled on your device to reduce energy consumption After the last prin...

Страница 26: ...er consumption Eurasian Economic Union Compliance The EAC mark applied to this product indicates certification for use on the markets of the Member States of the Customs Union Turkey RoHS Regulation I...

Страница 27: ...f money drawn by or upon authorized officers of the United States Stamps and other representatives of value of whatever denomination which have been or can be issued under any Act of Congress Adjusted...

Страница 28: ...court of law Proclamations orders regulations or appointments or notices thereof with intent to falsely cause same to purport to have been printed by the Queen s Printer for Canada or the equivalent...

Страница 29: ...l A Allll C Co ou un nt tr riie es s If you dispose your Xerox product note that the printer may contain lead mercury perchlorate and other materials whose disposal may be regulated due to environment...

Страница 30: ...iler may be required to take back your old equipment free of charge For more information contact your retailer Business Users in the European Union in accordance with European legislation end of life...

Страница 31: ...is shipped Main Power Switch The Main Power Switch located inside the Center Front Door Note Switching off the Main Power also shuts off the Main Power Status LED Tip Before switching off the press e...

Страница 32: ...the power again P Po ow we er r S Sa av ve er r M Mo od de e The Power Saver feature allows the press to enter a reduced power consumption mode when all print jobs have completed and there are no jobs...

Страница 33: ...ure is canceled Exiting Power Saver Mode The press exits Power Saver mode by pressing the Power Saver button on the Control Panel or when receiving print data from an incoming job J Jo ob b a an nd d...

Страница 34: ...elect the Completed Jobs tab A list of the completed or deleted jobs appear Use the scroll bar to navigate the list 3 To verify the details of a job select the job from the displayed list 4 From this...

Страница 35: ...n the press is displayed under the Current System Software title IP Address and Host Name This is the unique Internet Protocol IP address and host name that identifies the press to the specific networ...

Страница 36: ...the hardware configuration devices and software installed and the network settings on the system such as port and proxy settings Print and place this report near the press for easy access to informat...

Страница 37: ...n on the Control Panel select the Tools icon and select Setup Billing Impression Mode Billing Impressions Information The Billing Information screen allows you to view the total number of impressions...

Страница 38: ...at is larger than 8 5 x 14 inches as their A4 equivalent To view the current Billing Impression Mode in effect on the press Press the Tools button on the Control Panel select the Tools icon and select...

Страница 39: ...nistrator Note The PredictPrint Media Manager is an application that is loaded onto the print server and is used to manage the stocks and paper trays for your press By default the Stock Library featur...

Страница 40: ...fer paper Envelopes with windows metal clasps side seams or adhesives with release strips Padded envelopes Envelopes Note For envelopes use Trays 5 6 or 7 Note In addition to the above list there may...

Страница 41: ...ap pe er r Paper Size Ranges Tray Minimum Size Maximum Size Trays 1 2 and 3 140 x 182 mm 5 51 x 7 17 in 330 2 x 488 mm 13 x 19 2 in Tray 5 Bypass 98 x 146 mm 3 86 x 5 75 in 330 2 x 488 mm 13 x 19 2 in...

Страница 42: ...punched paper coated and uncoated Recycled paper coated and uncoated All Trays 64 105 Embossed coated and uncoated All Trays Trays 1 2 and 3 106 256 Trays 5 6 and 7 106 400 Transparency 8 5 x 11 in A...

Страница 43: ...ons for each tray are Maximum of 550 sheets of 24 lb 90 g m2 uncoated paper 28 80 lb cover 105 120 g m2 coated stock Paper weight range of 18 lb Bond to 95 lb Cover 64 g m2 to 256 g m2 Paper sizes sta...

Страница 44: ...elopes to offset the extra thickness of the flaps This keeps the stack level for feeding and enables more envelopes to be fed from the tray Note For more information refer to Envelopes Paper Tray Info...

Страница 45: ...SEF Uncoated Coated and Matte Coated 52 300 g m2 301 400 g m2 100 ppm 80 ppm 50 ppm 40 ppm 8 5 x 11 in A4 LEF Uncoated Coated and Matte Coated 52 300 g m2 301 400 g m2 100 ppm 80 ppm 50 ppm 40 ppm 8...

Страница 46: ...0 g m2 70 ppm 70 ppm 35 ppm 35 ppm 8 5 x 11 in A4 LEF Uncoated Coated and Matte Coated 52 300 g m2 301 400 g m2 59 ppm 57 ppm 35 ppm 35 ppm 8 5 x 11 in SEF Uncoated Coated and Matte Coated 52 300 g m2...

Страница 47: ...s Cast Coated Embossed Textured Film 52 300 g m2 20 ppm 330 2 x 488 mm 13 x 19 2 in SEF Labels Cast Coated Embossed Textured Film 52 300 g m2 19 ppm L Lo oa ad diin ng g P Pa ap pe er r Loading Paper...

Страница 48: ...the tray Note Do not load materials above the MAX line located on the guides 8 Gently push in the tray until it comes to a stop The Stock Wizard opens on the print server 9 Scan the barcode on the sto...

Страница 49: ...djust the paper guides by pressing in the guide releases and carefully moving the guides until they lightly touch the edges of the material in the tray Note Do not load materials above the MAX line lo...

Страница 50: ...he Stock Wizard Note For details on setting up the stock in the Stock Wizard refer to Scanning a Media Barcode M Ma at tc ch hiin ng g t th he e T Tr ra ay y a an nd d S St to oc ck k I In nf fo or rm...

Страница 51: ...then continue to the next step If a message does not exist continue to the next step 3 Load the stock in the tray If the User Interface on the press displays a mismatch message to correct the mismatch...

Страница 52: ...t the desired paper is loaded into the tray 3 Go to the PredictPrint Media Manager application on the print server On the Tray Properties window verify the correct paper information such as size type...

Страница 53: ...ing The paper is fed accurately without skew and the printed output is satisfactory Close the tray and your task is completed The paper is skewed and the printed output is unsatisfactory proceed to th...

Страница 54: ...following 1 Open the tray 2 Return the right side paper feed adjustment lever to its default position by sliding it toward the front of the tray 3 To complete the task close the tray If the paper is...

Страница 55: ...nt server d Run your print job 12 After the print job finishes open the tray and return both levers to their default positions a Return the rear paper feed adjustment lever to its default position by...

Страница 56: ...mance and image projection use Xerox removable stripe transparency materials These premium transparencies are specifically designed to provide optimum print quality Use of other transparencies may cau...

Страница 57: ...of the transparencies against the right edge of the tray with the side to be printed on facing up Loading Transparencies in Tray 5 Bypass Load the transparencies in the LEF portrait direction and ali...

Страница 58: ...pe direction Position the holes along the feed edge as shown on the image on the front of the tray Load hole punched paper with the side to be printed on facing up To prevent jams or damage ensure tha...

Страница 59: ...on Load and align the paper against the right side of the tray for SEF direction Loading Hole punched Paper in Tray 5 Bypass Load and align the edge of the hole punched paper with the holes against th...

Страница 60: ...documentation for more detailed information on how to set up a tab job at your print server If a jam occurs while running tabbed sets cancel the job and start again Loading Tab Stock in Trays 1 2 and...

Страница 61: ...dge of the tab stock against the right edge of the tray and the tabs to the left Loading Straight Collated Tabs Load straight collated tabs with the first blank tab cutout toward the front of the tray...

Страница 62: ...ge of the tab stock against the right edge of the tray and the tabs to the left Loading Straight Collated Tabs Load straight collated tabs with the first blank tab cutout toward the front of the tray...

Страница 63: ...s Only print on one side of the sheet of labels Do not use any sheet where labels are missing as it may damage the press Store unused labels flat in their original packaging Leave the label sheets ins...

Страница 64: ...nting on Postcards Always refer to the following guidelines before using postcard stock Tip When printing postcards in Trays 6 or 7 the Postcard Bracket is required Always install the postcard bracket...

Страница 65: ...ing postcards 1 Slowly open one of the paper trays until it stops and remove the paper 2 Move the paper guides out to their largest position 3 To remove the postcard bracket loosen the screw on the le...

Страница 66: ...the postcard bracket in place 5 Load the postcard stock SEF and against the right side of the tray 6 Adjust the paper guides against the stock 7 Close the paper tray and confirm the new settings at t...

Страница 67: ...for Printing on Envelopes For envelope guidelines and limitation information refer to the Customer Expectation and Installation Guide Supported Envelope Sizes For supported envelope sizes refer to the...

Страница 68: ...cket loosen the screw on the left side of the tray 1 and remove the bracket 2 4 Install the postcard bracket a Sit the bracket on the locating pins on the upper frame and in the grooves on the bottom...

Страница 69: ...ront of the tray When loading envelopes LEF ensure the flaps are closed and face down and position the flaps along the right of the tray 6 Adjust the paper guides against the stock 7 Close the paper t...

Страница 70: ...onal Envelope Support Kit Note If available use the optional Envelope Support Kit to feed and print envelopes from Trays 6 or 7 The Envelope Support Kit enables a greater quantity of envelopes to be l...

Страница 71: ...of the tray b Tighten the thumb screw so it locks the L shape envelope bracket in place 5 Locate the larger of the plastic pieces and place it in the bottom of the tray so that it fits around the end...

Страница 72: ...lastic inserts with the flaps closed and facing down Note The flaps should always be down and positioned along the front of the tray 8 Adjust the paper guides against the stock 9 Close the paper tray...

Страница 73: ...iic ce es s Loading Media in the Optional Dual Advanced High Capacity Feeder Trays 8 and 9 For information refer to Dual Advanced Oversized High Capacity Feeder Trays 8 and 9 Loading Post Process Medi...

Страница 74: ...e Stock Library feature is not displayed on the PredictPrint Media Manager main screen the administrator has restricted access to the feature to administrators only In this case contact your administr...

Страница 75: ...options for different types of stock lists 3 Select an option To download the entire stock and media list SML click Download Full Stock Media List To download the Recommended Media List RML click Dow...

Страница 76: ...ofiles folder which is the shortcut icon on the desktop 3 Browse to the stock directory The stock extension distinguishes the stocks that were created copied and stored in the library 4 Select all the...

Страница 77: ...Overview The Stock Wizard is a feature that automates media management for the digital presses You can scan the media barcode using the barcode scanner then load the paper in the tray or you can load...

Страница 78: ...low the Stock Wizard If you load the trays first Load all stocks in the appropriate trays To verify the barcodes for the loaded stocks follow the Stock Wizard screens Setup On the Setup screen you can...

Страница 79: ...To launch the Stock Wizard you can scan the media barcode using the barcode scanner or on the PredictPrint Media Manager screen click Stock Wizard When you log in for the first time a Welcome screen...

Страница 80: ...f no Letter or A4 size paper is loaded in the press you cannot print the barcode during the setup process in the wizard You can also print your custom barcodes from the PredictPrint Stock Library at a...

Страница 81: ...e any manual adjustments For more information refer to Calibration and Profiling Note It is important to remember that these setup routines and all of the other print engine adjustments are performed...

Страница 82: ...they are not needed the PredictPrint Stock Wizard skips them 7 At any time during the process to change the information on the previous screen click Go Back 8 At any time during the process to cancel...

Страница 83: ...ock Wizard On the Advanced screen the PredictPrint Stock Wizard guides you through a series of advanced settings that include semi automatic and automatic setup routines For any semi automatic setup r...

Страница 84: ...ling is done through the PredictPrint Stock Wizard the process uses Full Width Array and requires 60 pages If needed you can perform additional calibration or profiling outside of the Stock Wizard usi...

Страница 85: ...een appears A yellow triangle icon appears on the tray that is loaded with the stock you are setting up 2 Hover the cursor over the yellow triangle icon The list of required manual setup routines appe...

Страница 86: ...lick Log Out Stock Wizard Tab As an Administrator the Stock Wizard tab allows you to make changes to the following features Stock Wizard Guided Stock Setup Paper Calibration and Profiling Alignment Pr...

Страница 87: ...ting is managed on the PredictPrint Cloud Server Advanced multiple profile To enable the advanced Alignment Profile setup routine select Advanced multiple profile Advanced Alignment runs every time yo...

Страница 88: ...r open a tray if you do not scan a stock after a set time period the Stock Wizard closes The default time period is 1 minute The Administrator can change the amount of time that the Stock Wizard appea...

Страница 89: ...out of Administrator mode the PredictPrint Media Manager returns to Operator mode Tray Stock Properties Window Timeout Use this setting to specify whether the tray properties window closes automatical...

Страница 90: ...4 To enable or disable Tray Stock Properties Window Timeout click the On Off toggle button The toggle button changes color and a label indicates whether the Tray Stock Properties Window Timeout is On...

Страница 91: ...ollowing a For Old Password type the old password b For New Password type a new password Choose a password of 4 12 numbers Use only numbers for your new password Alpha characters letters and symbols a...

Страница 92: ...ect an option MM DD YYYY Month Day Year DD MM YYYY Day Month Year YYYY MM DD Year Month Day 6 From the System tab select Time Format 7 For Time Format select an option 12 Hour Display 24 Hour Display...

Страница 93: ...ure is not displayed on the PredictPrint Media Manager main window the administrator has restricted access to the feature to administrators only In this case for more information contact your administ...

Страница 94: ...and rearranged to the preference of the user For example to move the Weight column to the left or right of the Type column highlight it and drag it with the mouse Columns include the following stock...

Страница 95: ...copying from the Stock Library list or from the All Media list The Stock Library list displays stocks that are specific to your press Columns can be resized and rearranged to the preference of the use...

Страница 96: ...ew stock Delete icon Select this option to delete a stock from the Stock Library list Select the stock then click the Delete icon Print Barcode icon This option allows the user to print the barcode of...

Страница 97: ...date and time when a stock was edited or changed Comment This section allows the user to enter information about the paper such as a brand name or job specific information A maximum of 256 characters...

Страница 98: ...dow 5 From Tray Stock Properties select either OK or Cancel The Tray Stock Properties window closes and the PredictPrint Media Manager main window appears Using the Stock Library Feature Use the Stock...

Страница 99: ...y is needed only when you have disabled the Stock Wizard 1 From the PredictPrint Media Manager main window click Stock Library The Stock Library window appears 2 Click Create New The New Stock Setup w...

Страница 100: ...that the tray is loaded with the same stock as programmed for that tray in the Stock Library Editing an Existing Stock in the Stock Library 1 From the PredictPrint Media Manager main window click Sto...

Страница 101: ...Properties window includes the following settings Enable Tray Permits the selected tray to be used Disable Tray Prohibits the selected tray from being used Long Edge Feed Indicates that the paper in t...

Страница 102: ...ager main window appears Alignment Profile Library The Alignment Profile Library is populated with all the saved alignment profiles for the system A user can select a desired profile to use at point o...

Страница 103: ...exists follow the information provided on the print server to correct the stock mismatch issue then continue to the next step If a message does not exist continue to the next step 3 Load the stock in...

Страница 104: ...procedures continually and test prints for any attribute or option until you achieve acceptable output prints If the printed output still is not acceptable after repeating procedures and test prints...

Страница 105: ...odify or edit an existing stock entry Refer to Editing an Existing Stock in the Stock Library 2 From the Stock Properties window select and modify the stock attributes as required including entering a...

Страница 106: ...s with a high volume output The Advanced Stock Setup feature allows you set specific custom parameters for different types of media and jobs such as outlined in the above paragraph These custom stocks...

Страница 107: ...efer to Primary Transfer Current Adjustment Secondary Transfer Voltage Adjustment Refer to Secondary Transfer Voltage Adjustment Transfer output adjustment for trail edge Refer to Transfer Output Adju...

Страница 108: ...g system settings that are optimized for Xerox papers Multifeed Support Table Select this option when you have a multifeed condition This changes the air assist function to lower the air volume so it...

Страница 109: ...the prints Note Changing the default setting should be considered a temporary solution because environmental conditions vary from day to day It is recommended that upon completion of the print job yo...

Страница 110: ...genta M and Yellow Y may also be adjusted to correct these problems Secondary Transfer Voltage Adjustment The purpose of this adjustment is to correct for mottle uneven toner coverage and color shift...

Страница 111: ...for specific stock weights or a specific job flow For Example The printed output shows signs of offset or flaking dry ink toner This can be caused by specific media or stock such as coated or silk me...

Страница 112: ...tment Profile field which is above the button All fold adjustment profiles are created and maintained from the Profiles feature on the PredictPrint Media Manager on the print server For detailed infor...

Страница 113: ...n test prints to ensure that the selected options provide the desired output For information refer to Using the Test Print Option from Advanced Stock Setup If the test prints are acceptable continue t...

Страница 114: ...ct the desired options such as paper tray sides imaged and color mode For step by step instructions on using the Auto and Manual adjustment options refer to the following procedures Auto Using the Aut...

Страница 115: ...indow select OK 10 To save and close the Stock Properties window select OK Using the Manual Adjustment Option for Secondary Transfer Voltage Adjustment 1 Perform one of the following Copy an existing...

Страница 116: ...Advanced Stock Setup window select OK 12 To save and close the Stock Properties window select OK 13 Run a few prints from a job that uses the Stock Properties with the new Secondary Transfer Voltage M...

Страница 117: ...curl The module decurler sets the amount of curl correction automatically If the automated curl correction Interface Decurler Module does not fix the paper curl you can select the curl correction man...

Страница 118: ...ustom settings and use lookup tables for curl control that are based on the percentage of toner area coverage of the job and the humidity values in the room where the press sits If you select the Edit...

Страница 119: ...mized settings including the default No Curl These settings are saved to the press memory and can be recalled and used at point of need The nine settings include the following Severe Large Upward Medi...

Страница 120: ...oner coverage area on the output you may want to enter a higher print density amount The system default value is 10 Recommended Order for Using Paper Curl Correction Test Print Options Important Paper...

Страница 121: ...Curl Correction Test Print window opens for the selected 1 sided or 2 sided option 5 Select the desired curl correction setting Default Type A Type B Type C Custom Curl Correction Severe Large Upward...

Страница 122: ...sfactory contact your Customer Support Center for further assistance If the output is acceptable perform the following 1 To save the selections or settings and close the Paper Curl Correction Test Pri...

Страница 123: ...Single Fold an optional finisher with a C Z Folder device Use this option to adjust the fold position for various paper types as well as set adjustment values to various default types For more informa...

Страница 124: ...e The factory default setting for all the Alignment options is zero 0 Before you create a new or using an existing Alignment profile review the following important information Side 1 or Side 2 images...

Страница 125: ...ption to adjust the lead edge of the image for side 1 and side 2 registration Side Registration Use this option to adjust the side edge of the image for side 1 and side 2 registration Perpendicularity...

Страница 126: ...age density on the target prints Density amounts range from 0 10 If your output is a high dry ink toner coverage area on the output enter a higher print density amount The system default value is 4 Au...

Страница 127: ...ent should be the first tab displayed after selecting Profiles from the PredictPrint Media Manager main window 3 Select New or Edit to create an alignment profile or to edit an existing alignment prof...

Страница 128: ...ither the New Profile Properties or the Edit Profile Properties window opens 4 If desired enter a new name or modify the existing name 5 Test Print The Test Print window opens 6 Select the appropriate...

Страница 129: ...is recommended that you select a quantity of 10 test prints in order to best evaluate the printed output c Choose the desired test print options include Grid 90 Front Back Grid 90 204 and PH REGI d Lo...

Страница 130: ...ncy tends to be greater with these first images 7 Evaluate the test prints by holding the output at eye level near a light source This allows you to see the registration marks for side 1 and side 2 if...

Страница 131: ...uate the test prints by holding the output at eye level near a light source This allows you to see the registration marks for side 1 and side 2 if 2 sided output was selected a If you determine that t...

Страница 132: ...re is available when the press is connected to an optional Production Ready Booklet Maker Finisher The C Fold and Z fold features are available when the press is connected to an optional finisher and...

Страница 133: ...pes are available For information refer to Crease Types Optional Trimming with Fold and Crease Adjustment Profiles The Trim and Crease selections are available only when the press is connected to the...

Страница 134: ...ure Note The Bi Fold Multiple Sheets Adjustment feature is available with an optional Production Ready Booklet Maker Finisher 1 From the PredictPrint Media Manager main window select Profiles The Prof...

Страница 135: ...Up and Down Arrow buttons and enter the measurement value that you obtain during the previous step in the A Length window Left and Right Sides are Equal When you use the Up and Down Arrow buttons to...

Страница 136: ...g Profile Properties window opens 4 Type a new name or if desired edit the existing name It is recommend that you use a name such as Single Fold Plain or something that indicates the fold type 5 From...

Страница 137: ...ore test prints to ensure that the fold position is now correct a Select the Test Print button b Select the desired tray c If you use the Trim settings ensure that On is selected for the Test Print Tr...

Страница 138: ...epending on the selected Fold Type 10 Obtain the printed samples from the output area of the press 11 Measure the sample output and record the bi fold position on a sheet of paper 12 Select the correc...

Страница 139: ...Adjustments are available with a C Z Folder device 1 From the PredictPrint Media Manager main window select Profiles The Profiles window appears 2 Select the Fold Adjustment tab The Fold Adjustment o...

Страница 140: ...achieved select OK to save and close the profile For further assistance contact the Customer Support Center Z Fold Adjustment Procedure Note The C and Z Fold Adjustments are available with a C Z Folde...

Страница 141: ...h values g Repeat the previous steps until the desired output is achieved 13 When desired output is achieved select OK to save and close the Fold Adjustment Profile Note After multiple attempts if acc...

Страница 142: ...a of the press e Measure the sample output and record both fold positions on a sheet of paper f Enter the measurement A Length and B Length values g Repeat the previous steps until the desired output...

Страница 143: ...the corresponding crease position length adjustments that you can make Crease Bi Fold Single Sheet A Bi Fold has one crease which creates two panels to the output Crease C Fold A C Fold has two crease...

Страница 144: ...tween a regular Z Fold and a Z Fold Half Sheet is that the half sheet is not creased in two equal lengths The two creases are unequal which allows one edge of the Z Fold Half Sheet to have a longer ed...

Страница 145: ...dle One half of the sheet of paper is nested inside the other half Accordion 3 Fold An Accordion 3 Fold is similar to a Z Fold however the paper is creased in thirds accordion style Crease Accordion 4...

Страница 146: ...le from the list and then select the Edit button The New or Existing Profile Properties window opens 4 Type in a new name or if needed edit the existing name It is recommend that you use a name that i...

Страница 147: ...o K Kn no ow w B Be ef fo or re e P Pr riin nt tiin ng g a a J Jo ob b Basic Job Workflow The basic workflow for setting up a job and submitting it from the print server is 1 Within the PredictPrint...

Страница 148: ...r the Xerox web site for more information on how to download or install print drivers At any remote workstation using a Hot Folders application to submit the document file to the print server At the p...

Страница 149: ...another tray for the preprinted tab stock and another tray for cover or back pages While you can print tab stock from any of the paper trays on the system Trays 1 2 3 5 6 7 8 or 9 the recommendation...

Страница 150: ...fined Any extra tabs not used in the job are sent to the output tray F Fe ee ed diin ng g D De ev viic ce es s D Du ua all A Ad dv va an nc ce ed d O Ov ve er rs siiz ze ed d H Hiig gh h C Ca ap pa ac...

Страница 151: ...8 and 9 Components 1 Paper Jam and Error Indicator Panel 2 Paper Level Indicators 3 Optional Tray 5 Bypass 4 Circuit Breaker Switch 5 Tray 8 6 Tray 9 7 Feeder Front Cover 8 Top Drawer on Trays 6 and...

Страница 152: ...ns Stapled paper Damp paper Thermal or heat transfer paper Envelopes with windows metal clasps side seams or adhesives with release strips Padded envelopes Envelopes Note For envelopes use Trays 5 6 o...

Страница 153: ...latest RML or TSL version from www xerox com and https www xerox com predictprintmedia Paper Size Ranges for Trays 8 and 9 Minimum Size Maximum Size 98 x 146 mm 3 86 x 5 75 in 330 2 x 488 mm 13 x 19 2...

Страница 154: ...o not load materials above the MAX line located on the guides 8 Gently push in the tray until it comes to a stop The Stock Wizard opens on the print server 9 Scan the barcode on the stock then to set...

Страница 155: ...vers are found in Trays 8 and 9 These levers are used to improve paper feed accuracy and to reduce paper skew problems 1 Rear Paper feed Adjustment Lever 2 Right side Paper feed Adjustment Lever Impro...

Страница 156: ...stment lever to its default position by sliding it to the left Leave the tray open and continue to the next step 8 Retrieve and evaluate the printed output choose one of the following The paper is fed...

Страница 157: ...the printed output choose one of the following The paper is fed accurately without skew and the printed output is satisfactory perform the following 1 Open the tray 2 Return the right side paper feed...

Страница 158: ...in the rear position c Close the tray and verify the tray settings from the PredictPrint Media Manager on the print server d Run your print job 12 After the print job finishes open the tray and retur...

Страница 159: ...esolve the problem If the problem continues contact the Customer Support Center Important If using an Advanced Stock Setup feature always return the feature to its default setting before using the pre...

Страница 160: ...printed on facing up Hole punched Paper Guidelines for Printing on Hole punched Paper Hole punched paper is defined as having two or more holes along one edge for use in ring binders and notebooks Alw...

Страница 161: ...s loaded so the straight edge of the stock is in the feed direction You can load single straight collated or single reverse collated tab stock Refer to the print server documentation for more detailed...

Страница 162: ...bels Guidelines for Printing on Labels Always refer to the following guidelines before using labels Labels can be printed from all trays Trays 8 and 9 can hold a maximum of 400 g m2 When submitting yo...

Страница 163: ...o load them into the press Store glossy paper flat in the original packaging Remove all other paper from the tray before loading glossy paper Load only the amount of glossy paper you plan to use Remov...

Страница 164: ...rint driver select the following options Select Custom Paper as the Paper Type then enter the Size dimensions of the postcard Enter the Paper Weight for the postcard stock Select Tray 8 or 9 as the Pa...

Страница 165: ...racket on the locating pins on the upper frame and in the grooves on the bottom of the tray b Tighten the thumb screw so it locks the postcard bracket in place 5 Load the postcard stock SEF and agains...

Страница 166: ...cket by inserting it into the storage area on the left side of the tray 1 and tightening the screw 2 Trays 8 and 9 Specifications Item Specification Sheet size Refer to Paper Specifications for All Tr...

Страница 167: ...igh Capacity XLS Vacuum Feeder 8 Right Side Cover The following information applies to the High Capacity XLS Vacuum Feeder When a paper jam occurs the error indicator illuminates For the paper level i...

Страница 168: ...Trays 8 and 9 4 Tray 5 Bypass Tray 5 Extra Long Sheet XLS Feeder 6 Circuit Breaker Switch 7 Tray 8 of High Capacity XLS Vacuum Feeder 8 Tray 9 of High Capacity XLS Vacuum Feeder 9 Right Side Cover fo...

Страница 169: ...uit breaker is disconnected automatically Do not touch the breakers under normal operating conditions High Capacity XLS Vacuum Feeder Specifications Supported Paper Types and Weights Trays Paper Sizes...

Страница 170: ...acuum Feeder Important Loading paper above the maximum fill line can cause paper jams or device malfunctions Position the guides correctly to match the paper size Incorrectly positioned guides can cau...

Страница 171: ...bility of paper jams 4 Load 100 500 sheets of paper For preprinted media load the paper with the printed side facing up a Align the edges of the paper against the right edge of the tray 1 Paper can be...

Страница 172: ...it stops Special Media Hole Punched Paper For hole punched paper place the paper with the holes to the right when you face the front side of the High Capacity Vacuum Feeder HCVF Precut Tabs For precu...

Страница 173: ...nnot use the Postcard Kit with Extra Long Sheet XLS Trays The following procedure defines how to load paper using postcard guides 1 Pull out the tray toward you until it stops 2 Remove any paper that...

Страница 174: ...to secure the guide 3 Caution If the screw is not tightened fully it can come off and hit the transport device which can result in breakage of the transport device 6 Insert the guide A into the slit o...

Страница 175: ...e of the postcard is the leading edge 1 8 Load the remaining sheets in the tray a Align the paper edges in the direction shown 1 b Move the end guide to touch the short edges of the paper lightly 2 Ad...

Страница 176: ...n the paper tray read and adhere to the following envelope guidelines Curled or waving edges If there are envelopes with curled or waving edges replace the envelopes or straighten the edges Adhered or...

Страница 177: ...sed Place the envelope with the flap facing to the right when you are at the front of the device When loading self seal envelopes fold the flaps If the weight of each envelope is different a multifeed...

Страница 178: ...ve burrs before you load the envelopes in the tray flex the envelopes back and forth and fan them Optional Large Envelope Kit Components When you load the envelope size C4 324 x 229 mm C5 229 x 162 mm...

Страница 179: ...E F2 DLX A B E F2 Any other sizes 181 9 mm 7 16 in or less on the long edge in the portrait orientation A B Any other sizes 182 0 mm 7 16 in or more on the long edge in the portrait orientation C D W...

Страница 180: ...hit the transport device which can result in breakage of the transport device 3 Attach part E to the end guide at the short edge of the paper Place part F1 or F2 along the wall on the leading edge of...

Страница 181: ...ill the tray easily load the stack of envelopes in small bundles Bend the envelope stacks to provide additional clearance while loading 6 Load each stack of envelopes and align the envelopes edges in...

Страница 182: ...If the envelopes do not align misalignment on prints or a paper feeding error can occur 5 Move the end guide to touch the edges of the envelopes lightly To adjust the paper guides press in the guide r...

Страница 183: ...Hold the paper guide and pull it up 2 Pull the paper guide toward you until it clicks in place c Pinch the lever 3 and close the shutter Caution Do not hold the paper guide clip to pull up the paper...

Страница 184: ...y pressing in the guide release lever and carefully moving the guides until they touch the edges of the paper lightly 6 Close the two covers Loading 488 1 864 mm 19 21 34 0 in Paper 1 Remove the paper...

Страница 185: ...d media load the paper with the printed side facing up Hold the side guide by its grip then move it to touch the edges of the paper lightly 2 5 Hold the XLS rear side guide by its grip then move it to...

Страница 186: ...nd guide is removable Install the rear end guide in the direction that ensures that the metal surface touches the paper 8 Close the two covers Loading 864 1 mm 34 02 in or Larger Paper You can load a...

Страница 187: ...the two covers 3 Attach the XLS extension tray and the extension plate a Insert the XLS extension tray then tighten the screws to secure it as shown b Insert the XLS extension plate c When not in use...

Страница 188: ...he shutter 1 b Hold the release lever and lay down the paper guide 2 c Pinch the lever 3 and close the shutter 6 Load 100 or less sheets of paper with the paper edges aligned in the direction shown 1...

Страница 189: ...covers 1 then wait until the bottom plate rises Place the XLS end guide to fit the loaded paper 2 The XLS end guide is removable Install the end guide in the direction that ensures that the metal surf...

Страница 190: ...s and the attached finishing device An aligned paper path between the press and the attached finishing device Cooling and decurling of the paper as it exits the press Interface Decurler Module IDM Com...

Страница 191: ...rl Up Button 4 Manual Curl Down Button 5 Auto Curl Button and Indicator Interface Decurler Module Curl Correction Tip The purpose of this curl correction is to fix paper curl as it leaves the press bu...

Страница 192: ...want to adjust the paper curl on the printed output quickly and at the point of need use the manual curl up or down buttons If the printed output contains too much curl after using these buttons refer...

Страница 193: ...1 sided or 2 sided printing When Auto is selected the indicator to the right of the button is illuminated This mode has seven automated settings for controlling paper curl three upcurl settings three...

Страница 194: ...rled upwards select the curl up button There are three upward curl correction values The top three indicators show which level of upward curl correction is selected The top indicator is the highest am...

Страница 195: ...tion values The bottom three indicators show which level of downward curl correction is selected The bottom indicator is the lowest amount of downward curl correction that can be applied to a printed...

Страница 196: ...nto the finished output This stock serves as separators and covers for the finished output Paper fed from the Inserter device is not printed on however the paper is placed into the printed output at s...

Страница 197: ...ion this is the middle indicator Important Use one of the following buttons only if paper curl continues after setting the curl correction level to the highest or lowest setting on the Interface Decur...

Страница 198: ...Paper in Inserter Tray T1 Before you use tray T1 review the following guidelines Remove the remaining paper from the tray Load all the paper required for the job into the tray To use saddle stitch and...

Страница 199: ...tPrint Media Manager on the print server 3 From the Tray Properties window enter or verify the correct paper information 4 Select OK to save the information and close the Tray Properties window Printi...

Страница 200: ...requires the inclusion of paper into the finished set the press checks that paper Is loaded in tray T1 before it starts printing This setting increases the wait time between sets which causes decreas...

Страница 201: ...screen displays 11 Exit the administrator mode G GB BC C A Ad dv va an nc ce ed dP Pu un nc ch h P Pr ro o The GBC AdvancedPunch Pro is an automatic hole punch module that integrates with the press t...

Страница 202: ...d information and instructions to use the AdvancedPunch Pro refer to the press User Documentation or go to www xerox com gbc advancedpunch pro H Hiig gh h C Ca ap pa ac ciit ty y S St ta ac ck ke er r...

Страница 203: ...Sample sheets also are delivered here Holds a maximum of 500 sheets 330 x 488 mm 13 x 19 2 in 5 Circuit breaker switch The circuit breaker switch is located on the rear of the HCS This switch automat...

Страница 204: ...al interruption is detected the circuit breaker automatically switches off to discontinue the electrical flow to the HCS For electrical information refer to Safety Output Trays The High Capacity Stack...

Страница 205: ...Unload Indicator lights open the HCS front door 3 Position the securing bar on top of the stacked paper 4 Pull the Stacker Cart straight out of the HCS 5 Remove the securing bar 6 Remove the paper fro...

Страница 206: ...with the possibility of degraded stack quality and increased jam rate for stocks that are heavier than 300 g m2 Transparencies may be run to the top tray or to the stacker tray cart Stack height shoul...

Страница 207: ...9 2 in If the trimmed output is for booklet making the minimum paper size is 194 x 257 mm 7 6 x 10 1 in Handles uncoated and coated paper 52 350 g m2 Crease and Two Sided Trimmer Components Number Com...

Страница 208: ...Z Z F Fo olld de er r The C Z Folder is available only with one of the optional Production Ready PR Finishers For more information refer to Production Ready PR Finishers Note This optional finishing...

Страница 209: ...ypes C Fold A C Fold has two folds which create a three panel output Z Fold A Z Fold has two folds that are folded in opposite directions resulting in a type of fan fold Z Fold Half Sheet shown here w...

Страница 210: ...etailed information about the folding feature refer to Fold Adjustments Number Component Description 1 C Z fold output tray Receives output sheets 2 C Z fold output tray button Press this button to op...

Страница 211: ...a steady light on no blinking pull out the output tray 2 C Z fold output tray C Fold or Z Fold jobs are delivered to this tray only Note C Z Fold jobs cannot be delivered to any other tray C Z Folder...

Страница 212: ...red to simply as the Finisher Any differences between the finishers are distinguished by using the specific finisher name The Production Ready PR Finishers provide the following capabilities Handling...

Страница 213: ...ically creates saddle stitched booklets of up to 30 sheets and bi folding also called single folding The Production Ready PR Booklet Maker Finisher consists of Three output trays Top Tray Stacker Tray...

Страница 214: ...attached to the press Finisher Components 1 Paper Jam and Error Indicator 2 Top Tray 3 Stacker Tray 4 Booklet Tray 5 Booklet Output Button 6 Front Cover 7 Staple Waste Container 8 Basic Staple Cartri...

Страница 215: ...ort 6 Finishing Transport Paper Jam and Error Indicators 7 Finishing Transport Front Cover 8 Finisher Module Front Cover 9 Finisher Staple Waste Container 10 Finisher Basic Stapler for Side Stitching...

Страница 216: ...ng the top tray angle For normal usage keep the tray in its lower default position Important Continual usage of the tray in the upper position may cause paper jams or output sheets to fall from the tr...

Страница 217: ...e downward curl may cause the output stack to fall out of the tray If this happens set the curl correction level on the Interface Decurler Module to its lowest level and set curl correction on the Ins...

Страница 218: ...Top Tray Aligner Accessory aligns any small size stock that goes on the top tray such as small sheets postcards and envelopes To install the Top Tray Aligner Accessory on a Production Ready Finisher...

Страница 219: ...ction to downward Printing on paper weighing 157 g m2 or heavier with up curl may cause paper jams If this occurs set the curl correction level on the Interface Decurler Module to its highest setting...

Страница 220: ...ment feature refer to Fold Adjustments Booklet Output Button on the Production Ready Booklet Maker Finisher Press this button to remove finished booklets from the finisher Note If the SquareFold Trimm...

Страница 221: ...ray 52 400 g m2 Stacker tray 52 400 g m2 Booklet tray 60 350 g m2 Tray capacity Top tray 500 sheets Stacker tray without staples 8 5 x 11 in A4 PR Finisher 3000 sheets PR Booklet Maker Finisher 2000 s...

Страница 222: ...ndard size Maximum A3 Tabloid 11 x 17 in Minimum 2 hole or 3 hole JIS B5 4 hole A4 16K Custom size Height 203 297 mm Width 182 431 8 mm Paper weight Uncoated 52 220 g m2 Coated 72 200 g m2 Number of H...

Страница 223: ...ob whose number of pages is within the limit staple faults can occur depending on the following conditions Type of paper such as Gloss Coated Paper Environment where the press is installed such as roo...

Страница 224: ...immer device Receives the booklet from the booklet maker area of the finisher Flattens the booklet spine thereby reducing the booklet thickness and giving it the appearance of a perfect bound book Tri...

Страница 225: ...er Collects waste from the trimmer area of the device The covers cannot be opened during normal operation or when the press is idle The covers can be opened only when an indicator is lit and a jam or...

Страница 226: ...ular area of the SquareFold Trimmer device The lower indicator with the lock icon lights when the trimmer waste container is pulled out or when it is full Note If El E2 or E3 is lit the left and right...

Страница 227: ...nd the spine squared it is moved to the trimmer area Based on the finished booklet size the booklet is moved until the trail edge reaches the trimmer cutter The trail edge is trimmed cut this is based...

Страница 228: ...ptions depending on your requirements for the finished booklet job Note Run one or more test prints before running large jobs Number Description 1 Select this setting 2 Lower Low 2 when your finished...

Страница 229: ...t bound book appearance Trim Feature Access the trim feature from your computer print driver or from the print server Trim Options When using the trim options always consider the following Booklets ex...

Страница 230: ...able are provided as examples and are not meant to represent every possible job scenario again use this table as a guideline only Scenar io num ber Paper Size Finished booklet size Paper weight lbs g...

Страница 231: ...120 g m2 215 5 15 305 x 458 mm 12 x 18 in 152 x 229 mm 6 x 9 in 80 lbs 120 g m2 210 4 16 305 x 458 mm 12 x 18 in 152 x 229 mm 6 x 9 in 28 lbs 105 g m2 220 16 17 305 x 458 mm 12 x 18 in 152 x 229 mm 6...

Страница 232: ...Speed Up to 9 ppm Simplex Mode only Paper Weights Uncoated 52 220 g m2 Coated 52 220 g m2 Maximum Paper Size 330 x 660 mm Maximum Printable Area 323 x 654 mm To use this feature you must feed sheets f...

Страница 233: ...at you want to make c On the Quick Access tab for Paper size click Custom d Set the Width and Height of the paper as you did at the press Control Panel Note that the terms for the paper dimensions are...

Страница 234: ...is useful to print the file first with no trim to see how much trim is needed to achieve the full bleed of page images To produce booklets with three sided trimming for a full bleed perform the follow...

Страница 235: ...eet around the body pages to form front and back covers a Load the pre printed cover stock into the Inserter Tray T 1 b From the print server go to PredictPrint Media Manager Stock Wizard c Scan the b...

Страница 236: ...uses the required adjustments for booklets that vary in size between Set 1 and Set 2 The paper weight for the booklet media is important when creating the profile The number of sheets used in the sets...

Страница 237: ...s too far up and onto the top sheet select Left of Fold If the staple is rotated too far down and onto the bottom sheet select Right of Fold 22 Set the distance of the offset using the Up Arrow As you...

Страница 238: ...oduce simple folded sheets or insert folded sheets into a document With the optional C Z Folder you can produce C and Z folds on 8 5 x 11 in or A4 sheets You also can create engineering Z Fold on 11 x...

Страница 239: ...heets into documents as long as they are not booklets created by imposing and folding large sheets For example document sets can receive folded sheets if they are stapled and or hole punched but not b...

Страница 240: ...into the Printed Output with the EX and EX P Print Servers 1 If needed load the main stock for the document into a feeder tray with a LEF Long Edge Feed orientation If it is a new stock for the tray...

Страница 241: ...which you want to insert pre printed or blank sheets or tabs Use a comma to separate the numbers 13 For Paper Size select the size of your tabs 8 5 x 11 in Tab LEF or A4 Tab LEF 14 For Media Type sele...

Страница 242: ...may result in fire or electrical shock Use the materials and supplies specifically designed for your equipment The use of unsuitable materials may result in poor performance of the equipment and possi...

Страница 243: ...ntact your Xerox Service Representative Dry ink toner debris may be coming from the transfer roll area instead of the fuser 1 Select the Tools button on the press control panel 2 Select Clean Fuser As...

Страница 244: ...wand and cloth pad provided when performing this procedure Do not use any other cleaning device liquid solutions or cloths 1 Open the left and center front doors of the press 2 Locate and remove the...

Страница 245: ...p Continue until you complete the procedure for all four ROS windows 6 Replace the cleaning wand tool into the storage area on the inside panel of the left front door 7 Close the left and center front...

Страница 246: ...s about calibrating the press only For information about calibrating the print server refer the System Administrator Guide for the press Also refer to the print server documentation Full Width Array A...

Страница 247: ...procedure and use the calibration features at the print server to ensure that your press maintains the best image quality with less or no down time Note Refer to your print server user documentation w...

Страница 248: ...that each line of color shows even density across the page as shown in the following illustration Check for uniform consistent density across all color bars as indicated by the arrows in the above il...

Страница 249: ...Dry Ink Toner Cartridge 1 per box 51 000 Yellow Dry Ink Toner Cartridge 1 per box 51 000 Waste Dry Ink Toner Bottle 1 45 000 Dry Ink Toner yield projections are based on 7 5 percent area coverage per...

Страница 250: ...nsumable item With some customer replaceable units CRUs the screen indicates that the press may continue to run print jobs without immediately replacing the item Otherwise when it is time to replace i...

Страница 251: ...consumables such as the drum cartridges the dry ink toner waste container trays 6 9 feeder rolls and consumables for any additional optional devices that are configured with the press Note The status...

Страница 252: ...pass when experiencing frequent multifeeds single feeds or blank prints in the stack of the output prints 1 Feed Roll 2 Nudger Roll 3 Separator Roll 1 Locate Tray 5 Bypass on top of Trays 6 and 7 2 Li...

Страница 253: ...it up and out of the tray b Install a new feed roll by squeezing the metal shaft at both ends and sliding it into place 4 Remove the nudger roll and install a new one a Remove the nudger roll by sque...

Страница 254: ...ends and sliding it into place 6 Close the bypass tray cover 7 Verify that the tray is operating correctly by feeding paper from the bypass tray 8 Log in as the administrator or ask the administrator...

Страница 255: ...inistrator mode by pressing the Log In Out button on the control panel When prompted select Logout Replacing the Feed Rolls for Tray 6 and 7 To perform this procedure the feed roll kit is required The...

Страница 256: ...h raises the roll upward and then squeezing the metal shaft on both ends with your other hand b Lift out the nudger roll c Install a new nudger roll by squeezing both ends of the metal shaft and while...

Страница 257: ...until completely removed from the tray and set aside the assembly 4 With the separator roll assembly out replace the feed roll a To remove the feed roll squeeze both ends of the metal shaft and lift o...

Страница 258: ...l assembly into the tray a Align the cutout holes of the assembly with the frame of the tray so the pin holes match up b Insert the assembly into the frame c Slide the assembly all the way to the righ...

Страница 259: ...in as TKO or do not have the TKO password call your Customer Service Engineer g Select the item that corresponds with the newly replaced components h Select Reset Current Value The system resets the H...

Страница 260: ...ge from its packaging 6 Prepare the cartridge for installation Note The dry ink toner material inside the new cartridge is compact Loosen and redistribute the dry ink toner material before placing int...

Страница 261: ...Toner Waste Bottle The dry ink toner waste bottle collects dry ink toner that accumulates during the printing process Note When the waste bottle is full a message displays on the press touch screen i...

Страница 262: ...detergent 5 Place the full waste bottle into the plastic bag provided with the bottle 6 Remove a new empty waste bottle from the packaging 7 Hold the center part on the top of a new bottle and insert...

Страница 263: ...Torx driver to remove the screw on the right side of the cover by turning the screw counterclockwise 3 Pull out and remove the suction filter cover 4 Grasp the handle of the filter box and pull strai...

Страница 264: ...h Select Reset Current Value The system resets the HFSI to 0 10 Exit administrator mode a To return to Tools tab select Close twice The main Tools screen displays b Select the Log In or Out button on...

Страница 265: ...2 Open the press Left and Center Front doors 3 Turn the R1 R4 Drum Drawer Handle clockwise to the unlock position 4 Grasp the Release Handle and pull out the Drum Drawer until it stops 265...

Страница 266: ...Cartridge Drawer open look for dry ink toner waste on the bottom of the catch pan under the drum cartridges b Use a clean cloth to wipe down the catch pan 7 Open the bag containing the new drum cartr...

Страница 267: ...ear marks you may require the use of two fusers one when running 8 5x 11 in A4 stock and the other when running 12 x 18 in 304 8 x 457 2 mm or larger stock This is especially true for the graphic arts...

Страница 268: ...eset NVM settings for other widths not shown in this table Changing the Fuser Width ID The press is installed with a default standard fuser type that is suitable for all media sizes paper widths Howev...

Страница 269: ...Center WARNING Before you perform this procedure power off the press and allow fifty minutes for the fuser to cool down Always observe the warning labels inside the press 1 If required have the system...

Страница 270: ...r 2 range value and the blue jumper right represents the number 3 range value For the range numbers refer to the bypass connector table in Fuser Paper Width Information 7 Attach the appropriate jumper...

Страница 271: ...ntative CRUs Supply Item Reorder Quantity Approximate Print Yield Full Color 8 5x11 A4 Prints Tray 8 9 Feed Roll Kit 1 kit 500 000 Each tray requires its own feed roll kit one kit for Tray 8 and one k...

Страница 272: ...and provides information about the percentage of remaining life for each consumable 4 Use the up down arrows to see additional consumables such as the trays 6 7 8 and 9 feeder rolls and other consuma...

Страница 273: ...pass when experiencing frequent multifeeds single feeds or blank prints in the stack of the output prints 1 Feed Roll 2 Nudger Roll 3 Separator Roll 1 Locate Tray 5 Bypass on top of Trays 8 and 9 2 Li...

Страница 274: ...it up and out of the tray b Install a new feed roll by squeezing the metal shaft at both ends and sliding it into place 4 Remove the nudger roll and install a new one a Remove the nudger roll by sque...

Страница 275: ...s and sliding it into place 6 Close the bypass tray cover 7 Verify that the tray is operating correctly by feeding paper from the bypass tray 8 Log in as the administrator or ask the administrator to...

Страница 276: ...ed Rolls Use this procedure to replace the Tray 8 and 9 feed rolls To perform this procedure the feed roll kit is required The kit contains all the required items for replacing the feed rolls Importan...

Страница 277: ...h raises the roll upward and then squeezing the metal shaft on both ends with your other hand b Lift out the nudger roll c Install a new nudger roll by squeezing both ends of the metal shaft and while...

Страница 278: ...to the left so it is out of the slots c Pull the assembly out towards you until completely removed from the tray and set aside the assembly 4 With the separator roll assembly out replace the feed roll...

Страница 279: ...the assembly squeeze the orange shafts of the separator roll and lift out of the assembly b Install a new separator roll into the black notches of the assembly using the same technique 6 Reinstall the...

Страница 280: ...h component a At the control panel press the Tools button b From the screen that displays select the Tools icon c Select System Settings Common Service Settings Maintenance d Use the up down arrow but...

Страница 281: ...e Crease and Two Sided Trimmer Note The waste container can be emptied before it is full and also while the printer is running When the waste container reaches the full condition the following changes...

Страница 282: ...may malfunction 4 To ensure that you remove all waste and debris especially beneath the frame that is located behind the container use the cleaning rod to remove any remaining waste from inside the tr...

Страница 283: ...der Quantity Staple Cartridge and Staple Waste Container for the PR Finisher the PR Booklet Maker Finisher and the PR Finisher Plus 4 staple cartridges 5 000 staples per cartridge and 1 staple waste c...

Страница 284: ...ears and provides information about the percentage of remaining life for each consumable 4 Use the up and down arrows to see additional consumables such as the finisher staples the staple waste contai...

Страница 285: ...1 Open the finisher front cover 2 Pull out R1 3 Holding the staple cartridge at the position indicated by the arrow remove it from the unit 285...

Страница 286: ...sition 6 Close the finisher front cover Replacing the Booklet Staple Cartridge for Saddle Stitching Note Ensure that the press is not running before performing this procedure Note This procedure is ap...

Страница 287: ...ple cartridge pull out the cartridge to remove it Note There are two booklet staple cartridges provided Check the message to see which cartridge needs replacing 4 While holding the tabs on the new sta...

Страница 288: ...ce the container with a new one Important Before you perform this procedure ensure that the press is not running When you replace the staple waste container keep the press powered on If the press is p...

Страница 289: ...e left to the opened lock mark 3 Pull out R5 4 Place the used staple waste container into the supplied plastic bag Note Do not disassemble the used waste containers Return the used staple waste contai...

Страница 290: ...e Container The press displays a message when hole punch waste container is full When the message appears empty the container of all paper scraps Important Before you perform this procedure ensure tha...

Страница 291: ...ainer If any waste or scraps remain the container becomes full before a full message displays causing a fault to occur 4 Return R4 to its original position 5 Close the finisher front cover PR Finisher...

Страница 292: ...container reaches the full condition an indicator lights on the top of the SquareFold Trimmer device A message also appears on the press indicating that it is full When the message appears dispose of...

Страница 293: ...s 3 Discard all waste and scraps Note Ensure that the container is completely emptied If any waste or scraps remain the container will become full before a message appears causing the press to malfunc...

Страница 294: ...Firmly plug in the power cord c Press the power switch on 2 Ensure the power switch inside the center front door is set to the On position then at the control panel press firmly on the Off button 3 E...

Страница 295: ...int job To restart the press power Off the press and then power it On Your press may not be configured on the network To connect the press to the network contact your system administrator T Tiim me e...

Страница 296: ...per settings for the tray Check the print server settings Check that the paper is loaded correctly as short edge feed SEF or long edge feed LEF and ensure it matches the paper settings programmed at t...

Страница 297: ...the selected paper tray Replace the paper in the selected paper tray with paper from a new package Remove any partially fed paper from the trays Remove any torn pieces of paper still remaining inside...

Страница 298: ...re selected The mass amount of dry ink toner coverage on the print output the greater amount of the dry ink toner mass the more the paper curls The paper weight and whether or not it is coated or unco...

Страница 299: ...tative Important NVM values must be set or changed only by the customer support representative User Requirement Solution 1 Image Quality IQ Priority These are the press default settings which provide...

Страница 300: ...sage persists scan another barcode I Im ma ag ge e Q Qu ua alliit ty y I IQ Q T Tr ro ou ub blle es sh ho oo ot tiin ng g To improve image quality perform these actions Manage the Stock Library for th...

Страница 301: ...n can be media related Look for paper damage paper dust or environmental conditions that may contribute Ensure media is fresh and properly loaded in the trays If the defect is the specific streak on t...

Страница 302: ...eplacing a Drum Cartridge If the defect is at the interval of 154 mm replace the pressure roll assembly To replace the pressure roll assembly contact your Xerox Technical Customer Support If the defec...

Страница 303: ...ng the Clean Toner Procedure Perform Adjusting Automatic Density Uniformity Refer to Uneven Density or Mottle R Ra an nd do om m W Wh hiit te e o or r D Da ar rk k S Sp po ot ts s o on n P Pr riin nt...

Страница 304: ...ntervals Acquire the measuring tool either from www xerox com VERSANT_4100docs or from the Nationalization Kit If spots occur every 147 mm on the output print the Halftone Test Pattern to determine wh...

Страница 305: ...ing Contact the Customer Support Center If spots or bands occur every 147 mm on the prints a drum cartridge is damaged or light shocked Replace or swap the appropriate drum cartridge refer to Replacin...

Страница 306: ...run in the inboard to outboard IB OB direction refer to Banding on Prints Solution Perform Cleaning the Raster Output Scanner ROS Window Areas If streaks or lines continue after cleaning the ROS wind...

Страница 307: ...G Gllo os ss s D Diif ff fe er re en nt tiia all o on n P Pr riin nt ts s Problem The inboard and outboard edges of the output prints shows dry ink toner deletions density inconsistency or is lacking...

Страница 308: ...ution Refer to Uneven Density or Mottle I Im ma ag ge e D De en ns siit ty y Problem Print output is too light faint or washed out solid areas not black or inconsistent shading part of image missing 3...

Страница 309: ...ight shocked by running a set of halftone test patterns to identify which color is affected Go to www xerox com VERSANT_4100docs and download the Halftone Test Pattern PDF Print several sets of the Ha...

Страница 310: ...correct positions Ensure the paper tray guides are touching the edges of the loaded paper Push the tray in completely Refer to Image Registration Perpendicularity Skew and Magnification U Un nf fu us...

Страница 311: ...d Media After reviewing Paper and Media Storage Guidelines load a new ream of paper into the selected paper tray Perform the Cleaning the Fuser Assembly with Paper procedure Refer to Unfused Dry Ink o...

Страница 312: ...an na ag ge er r T Tr ro ou ub blle es sh ho oo ot tiin ng g This section helps you locate and resolve specific problems through the use of the PredictPrint Media Manager Important Many of the follow...

Страница 313: ...paper tray M Mu ullt tiif fe ee ed ds s M Miis sf fe ee ed ds s a an nd d P Pa ap pe er r J Ja am ms s iin n T Tr ra ay ys s 6 6 9 9 Problem Multifeed or misfeed paper jams are occurring in Tray 6 7 8...

Страница 314: ...move the check mark from Disable check box Note Disabling the tray heater may result in an increase of multifeeds This feature can be found in PredictPrint Media Manager Stock Library Stock Properties...

Страница 315: ...nterface Decurler Module IDM 2 Change the Paper Curl Correction setting from the PredictPrint Media Manager application Tip Changing the default setting is considered a temporary solution because envi...

Страница 316: ...changes are necessary If paper curl continues to persist after trying several or all of these settings try decreasing the image density on the print job or use a different type of paper If paper curl...

Страница 317: ...ltage ratio on the secondary bias transfer roll 2nd BTR this is where the image is transferred from the belt to the paper This feature is accessed from PredictPrint Media Manager Stock Library Stock P...

Страница 318: ...o multiple items use the following guidelines Adjust the image in the following order Registration Perpendicularity Skew and Magnification Choose only one option at a time then run a set of test print...

Страница 319: ...nts and evaluate the output prints to determine if additional adjustments are required 4 Change the Regi Loop setting Note Use Regi Loop only if Alignment Profile or Aligner Roll Pressure did not corr...

Страница 320: ...weight 221 g m or greater where the leading edge of the paper is torn select this option to release the paper from the pregate roll Note Selecting Off disables the Alignment Roll Pressure setting Afte...

Страница 321: ...the Fuser Temperature Adjustment in increments of 1 or 2 After each incremental adjustment run test prints and evaluate the output to determine if additional adjustments are required 2 If feeding pap...

Страница 322: ...ate Roll Adjustment Important To select a setting for the Aligner Roll Pressure option the Pre Gate option must be On Access the option from PredictPrint Media Manager Stock Library Stock Properties A...

Страница 323: ...you edit an existing fold adjustment select the desired profile from the list and then select Edit 4 Type in a new name or if desired edit the existing name 5 To complete the procedure refer to Fold...

Страница 324: ...For information refer to the Advanced Stock Setup Problem The printed output contains trail edge deletions Solutions Change the Transfer Output Adjustment for Trail Edge setting This feature is used t...

Страница 325: ...0 0 1 2 0 to 2 0 mm Determined by test print output Table 3 Perpendicularity Option or Setting Default Value Adjust ment Step Incre ments Available Range Recommended Incremental Adjustment Side 1 0 0...

Страница 326: ...heet Option or Setting Default Value Adjust ment Step Incre ments Available Range Recommended Incremental Adjustment Left and Right Sides Equal N A N A N A N A Left Side of Fold is Longer 0 0 0 1 0 0...

Страница 327: ...0 0 1 0 0 20 0 mm Determined by test print output Sheets in Set 2 Left and Right Sides Equal N A N A N A N A Left Side of Fold is Longer 0 0 0 1 0 0 20 0 mm Determined by test print output Right Side...

Страница 328: ...ined by test print output B Length 0 0 0 1 0 0 20 0 mm Determined by test print output Advanced Stock Setup for Stock Properties Table 12 Stock By Name and Multifeed Detection Option or Setting Defaul...

Страница 329: ...0 1 10 to 300 Perform Auto Adjustment Side 2 150 1 10 to 300 Perform Auto Adjustment Table 15 More Advanced Stock Setup Features Option or Setting Default Value Adjust ment Step Incre ments Available...

Страница 330: ...Regi Loop 0 0 0 3 3 0 to 3 0 mm 0 3 mm Alignment Profile Default Distinct Selections Available Available selections will be based on the Profiles created by the user Determined by test print output Fo...

Страница 331: ...stom Curl Correction Moderate Small Upward or Moderate Small Downward Custom Curl Correction Medium Upward or Medium Downward Custom Curl Correction Severe Large Upward or Severe Large Downward 1 Side...

Страница 332: ...ial order Default Type A Type B Type C Custom Curl Correction Slight Very Small Upward or Slight Very Small Downward Custom Curl Correction Moderate Small Upward or Moderate Small Downward Custom Curl...

Страница 333: ...ly and Decurler area behind the Center Front Door Inverter and Entrance Exit areas of the Output Cooling Module behind the Right Front Door Tip Always check the Output Module first for a paper jam at...

Страница 334: ...out the transfer drawer until it stops Note If paper is jammed in the drawer while pulling it out stop pulling when the jammed paper is visible Hold down the paper with one hand and continue pulling o...

Страница 335: ...5 Open lever 2b upward and remove any jammed paper 6 Return lever 2b to its original position 7 Locate area 2c and pull any jammed paper out towards the left 335...

Страница 336: ...8 Open lever 2d upward 1 and lever 2e to the right 2 and remove any jammed paper 3 9 Return levers 2d and 2e to their original positions 10 Open lever 2f lever downward and remove any jammed paper 336...

Страница 337: ...urn the green handle to the left to lock the drawer in place 2 13 Close the left and center front doors completely The press does not operate when doors or covers are open C Clle ea ar riin ng g J Ja...

Страница 338: ...jammed paper 2 3 If there is difficulty in removing the jammed paper rotate knob 3b clockwise right 1 and remove the jammed paper 2 Note There may be extra sheets remaining in the press To ensure all...

Страница 339: ...lever 3a to its original position 5 Open lever 5a downward and remove any jammed paper 6 If there is difficulty in removing the jammed paper rotate knob 5b clockwise right 1 and remove the jammed pap...

Страница 340: ...ever 5a to its original position 8 Open lever 5c downward 1 and remove any jammed paper 2 9 If there is difficulty in removing the jammed paper rotate knob 5d clockwise right 1 and remove the jammed p...

Страница 341: ...eturn lever 5c to its original position 11 To open the exit module drawer grasp handle 4 and rotate handle to the right to the horizontal position 12 Slowly pull out the exit module drawer until stops...

Страница 342: ...top of the module area 4a by pulling it straight out 14 If there is difficulty in removing the jammed paper rotate knob 4a clockwise right 1 and remove the jammed paper 2 15 Open lever 4b to the right...

Страница 343: ...fficulty in removing the jammed paper open lever 4d to the right 1 and remove the jammed paper 2 17 Return levers 4b and 4d to their original positions 18 Open lever 4c to the right 1 and remove any j...

Страница 344: ...e in place 22 Close the right front door completely The press does not operate if a door is open even slightly P Pa ap pe er r J Ja am ms s iin n T Tr ra ay ys s 1 1 3 3 Note Paper is sometimes torn a...

Страница 345: ...1 Open the tray where the paper jam occurred 2 Remove the jammed paper 3 Push the tray in gently until it comes to a stop 345...

Страница 346: ...e that all paper jams including any small ripped pieces of paper are cleared before proceeding with any print jobs 1 Remove the paper currently loaded in the Bypass Tray 5 2 Lift and open the Top Cove...

Страница 347: ...the chance of jamming as paper enters the print engine Note Follow the jam clearance instructions displayed on the touch screen Always ensure that all paper jams including any small ripped pieces of...

Страница 348: ...knob 1c to the right Remove the jammed paper Note If paper is torn check for any torn pieces of paper inside the machine 3 Return the lever 1a to the original position 4 Close the front cover of the f...

Страница 349: ...orn check for any torn pieces of paper inside the machine 3 Return the lever 1b to the original position 4 Close the front cover of the feeder module Note If the front cover of the feeder module is no...

Страница 350: ...1 Open the front cover of the feeder module 2 Move the lever 1d upward and remove the jammed paper 3 If the paper cannot be removed turn the knob 1c clockwise then remove the jammed paper 350...

Страница 351: ...rrective actions Additionally if a fault occurs with an optional device an indicator lights on that device control panel and shows the corresponding area on the device where the fault occurred Always...

Страница 352: ...re ee en n When a fault occurs such as paper jams open doors or covers or a press malfunction the press stops printing and a message appears on the press touch screen Use the following procedure to o...

Страница 353: ...a fault cannot be cleared contact the system administrator F Fa au ullt t M Me es ss sa ag ge es s When a fault occurs such as paper jams open doors or covers or a press malfunction the press stops p...

Страница 354: ...ra ay ys s 8 8 a an nd d 9 9 T Tr ro ou ub blle es sh ho oo ot tiin ng g T Tr ra ay ys s 8 8 a an nd d 9 9 T Tr ro ou ub blle es sh ho oo ot tiin ng g Paper Jams in Trays 8 and 9 Paper Jams When the...

Страница 355: ...2 Lift and open the Top Cover of the Bypass Tray 5 3 Remove any jammed paper Note If paper is torn check inside the press and remove it 4 Close the Top Cover of the Bypass Tray 5 355...

Страница 356: ...open the Top Drawer located at the top of Trays 6 and 7 6 Lift levers 2a and 2b then remove any paper jams 7 Close levers 2a and 2b 8 Close the Top Drawer 9 Reload paper into the tray and resume print...

Страница 357: ...the paper jam occurred 2 Remove the jammed paper Note If paper is torn check inside the machine and remove it 3 Gently push in the tray until it comes to a stop Trays 8 and 9 Paper Jams at Lever 1a an...

Страница 358: ...chine and remove it 3 Return the lever 1a to the original position 4 Close the front cover of the feeder module Note If the front cover of the feeder module is not completely closed a message will app...

Страница 359: ...chine and remove it 3 Return the lever 1b to the original position 4 Close the front cover of the feeder module Note If the front cover of the feeder module is not completely closed a message will app...

Страница 360: ...cation of the fault with a brief explanation of corrective actions for clearing the fault If a fault occurs in more than one location the illustration changes to indicate the multiple locations and th...

Страница 361: ...ig gh h C Ca ap pa ac ciit ty y X XL LS S V Va ac cu uu um m F Fe ee ed de er r H HC CV VF F When using the optional High Capacity XLS Vacuum Feeder HCVF and a misfeed or multifeed condition occurs ch...

Страница 362: ...reater than 2 The fastest speed is setting 13 Increase the blower speed only if the current setting is less than 13 If the preset value is 1 the blower is not operating Do not change the setting Note...

Страница 363: ...isfeed follow the steps in the appropriate section Note Before you make any adjustments note the current settings for the Air Knife Blower the Rear Lead Blower and the Front Blower If you are instruct...

Страница 364: ...s than 177 g m and printing more than five sheets When using paper of weights less than 177 g m and printing more than five sheets misfeeds can occur 1 Make the following blower adjustments Air Knife...

Страница 365: ...F To resolve a multifeed follow the steps in the appropriate section Note Before you make any adjustments note the current settings for the Air Knife Blower the Rear Lead Blower and the Front Blower I...

Страница 366: ...e following a Make the following blower adjustments Air Knife Blower No change Rear Lead Blower Change the setting to the preset value then decrease the speed by one setting Front Blower Change the se...

Страница 367: ...ake the following blower adjustments Air Knife Blower Decrease the blower speed by one setting Note For the Air Knife Blower decrease the speed only if the current setting is High or Mid Rear Lead Blo...

Страница 368: ...speed is set at 7 to decrease the speed by three settings change the setting to 4 Front Blower Decrease the blower speed by three settings 2 Run a test print If no misfeed or multifeed occurs the pro...

Страница 369: ...ecrease the blower speed by two settings 4 Run a test print If no misfeed or multifeed occurs the problem is resolved 5 If a multifeed occurs again do the following a Make the following adjustments Ai...

Страница 370: ...occurs the problem is resolved 8 If a misfeed occurs for the Air Knife Blower decrease the blower speed by one setting Note For the Air Knife Blower decrease the speed only if the current setting is H...

Страница 371: ...by one setting 4 Run a test print If no misfeed or multifeed occurs the problem is resolved 5 If a multifeed occurs again do the following Air Knife Blower Decrease the blower speed by one setting Not...

Страница 372: ...resolved c If a multifeed occurs again for the Rear Lead Blower and Front Blower decrease the blower speed by one setting d Run a test print If no misfeed or multifeed occurs the problem is resolved e...

Страница 373: ...ive actions Additionally if a fault occurs with an optional device an indicator lights on that device control panel and shows the corresponding area on the device where the fault occurred Always refer...

Страница 374: ...earing Paper Jams on the Interface Decurler Module 1 Open the front cover on the Interface Decurler Module IDM 2 Remove jammed paper a Open lever 1a downward b Turn knob 1b counterclockwise Important...

Страница 375: ...fficulty when removing jammed paper open lever 1c upward and carefully remove jammed paper 5 Return lever 1c to its original position 6 Close the IDM front cover 7 If required follow the instructions...

Страница 376: ...about the fault and detailed instructions for correcting the fault Fault Code Information on the Interface Decurler Module When a fault occurs such as paper jams open doors or covers or a press malfun...

Страница 377: ...the system memory will be erased Clear all paper jams before resuming print jobs Do not touch components inside the press This can cause print defects Ensure that all paper jams including any small ri...

Страница 378: ...ray 3 Close the T1 cover Clearing Paper Jams from Inserter E2 Area 1 Open the Inserter front cover 2 Open lever 1a upward 1 and turn knob 1b counterclockwise 2 Remove jammed paper 3 3 Return lever 1a...

Страница 379: ...paper open lever 1c to the right 1 and turn knob 1b counterclockwise 2 Remove jammed paper 3 5 Return lever 1c to its original position 6 Close the Inserter front cover Clearing Paper Jams from Insert...

Страница 380: ...he jammed paper 3 Note The jammed paper may be hidden behind the upper left cover area 3 Return lever 1d to its original position 4 If you have difficulty when removing jammed paper open lever 1a upwa...

Страница 381: ...tions The touch screen also displays a Faults button which provides information about the fault and detailed instructions for correcting the fault The E code on the upper left part of the Fault messag...

Страница 382: ...where the fault occurred Always refer to the following information when clearing paper jams Do not power off the press when removing paper jams Paper jams can be removed with the press still powered o...

Страница 383: ...cover 2 Open lever 1b upward 1 and remove jammed papers 2 3 Return lever 1b to its original position 4 Close the HCS top cover 5 If the press indicates there are additional paper jams follow the inst...

Страница 384: ...1b upward 1 and rotate knob 1a counterclockwise 2 and remove jammed papers 3 3 Return lever 1b to its original position 4 Close the HCS top cover 5 If the press indicates there are additional paper j...

Страница 385: ...the HCS top cover 2 Open lever 1b upward 1 and rotate knob 1a counterclockwise 2 and remove jammed papers 3 3 Return lever 1b to its original position 4 Open lever 2b upward 1 and turn knob 2c counte...

Страница 386: ...tes there are additional paper jams follow the instructions to clear the paper and to resume printing Clearing Paper Jams from HCS Area E4 1 Open the HCS top cover 2 Open lever 2a downward 1 and remov...

Страница 387: ...per Jams from HCS Area E5 1 Open the HCS top cover 2 Open lever 2b upward 1 and turn knob 2c counterclockwise 2 and remove jammed papers 3 3 Return lever 2b to its original position 4 Close the HCS to...

Страница 388: ...nlocked and then open it 3 Pull out the stacker cart slowly and remove any jammed paper 4 Push the stacker cart back into its original position 5 Close the HCS front door 6 If the press indicates ther...

Страница 389: ...aring Paper Jams from HCS Area E7 1 Remove any output delivered to the top tray 2 Open the HCS top cover 3 Open lever 1b upward 1 and remove jammed papers 2 4 Return lever 1b to its original position...

Страница 390: ...cation the illustration changes to indicate the multiple locations and the required corrective actions The touch screen also displays a Faults button which provides information about the fault and det...

Страница 391: ...utput is acceptable and meets customer satisfaction you are finished b If no curl is present and if the output is not acceptable call for service c If curl is present continue to the next step 2 To co...

Страница 392: ...an optional device an indicator lights on that device control panel and shows the corresponding area on the device where the fault occurred Always refer to the following information when clearing pap...

Страница 393: ...y remaining jams refer to the press touch screen for instructions and information Clearing Paper Jams from Trimmer Area E1 1 Open the trimmer upper cover 2 Open lever 1a downward 1 lever 1b downward 2...

Страница 394: ...d paper 2 4 Return levers 1a 1b and 1d to their original positions 5 Close the trimmer upper cover 6 If the press indicates there are additional paper jams follow the instructions to clear the paper a...

Страница 395: ...counterclockwise to align the mark on the knob with the unlock position a mark resembling an open padlock 3 Open lever 1a downward 1 and lever 1b downward 2 4 Turn knob 1c clockwise 1 and remove jamm...

Страница 396: ...evers 1a and 1b to their original positions 6 If you have difficulty removing any paper jams open lever 1d upward 1 and lever 2a to the left 2 7 Rotate knob 2b counterclockwise 1 and remove jammed pap...

Страница 397: ...dicates there are additional paper jams follow the instructions to clear the paper and to resume printing Clearing Paper Jams from Trimmer Area E3 1 Open the trimmer upper cover 2 Rotate knob 2 counte...

Страница 398: ...hidden jammed paper 4 Return lever 2c to its original position 5 Close the trimmer upper cover 6 If the press indicates there are additional paper jams follow the instructions to clear the paper and...

Страница 399: ...b 2f clockwise 1 and remove jammed paper 2 Note Grasp the lead edge of the jammed sheet and gently pull out the sheet to remove it 4 If you have difficulty removing the jammed sheet grasp the top edge...

Страница 400: ...trimmer upper cover 7 If the press indicates there are additional paper jams follow the instructions to clear the paper and to resume printing Clearing Paper Jams from Trimmer Area E5 1 Open the trim...

Страница 401: ...nob 2f counterclockwise 1 and remove jammed paper 2 5 Return levers 3a and 3b to their original positions 6 Close the trimmer upper cover 7 If the press indicates there are additional paper jams follo...

Страница 402: ...from Trimmer Area E6 1 Open the trimmer upper cover 2 Open lever 3a to the right 1 lever 4b downward 2 and lever 4c to the right 3 Remove jammed paper 4 3 Rotate knob 4d counterclockwise 1 and remove...

Страница 403: ...ever 4a while rotating knob 2f 5 Rotate knob 3c clockwise 1 and remove jammed paper 2 6 Return levers 3a 4b and 4c to their original positions 7 Close the trimmer upper cover 8 If the press indicates...

Страница 404: ...a E7 1 Open the trimmer upper cover 2 Open lever 3a to the right 1 and rotate knob 2f counterclockwise 2 Note Rotate the knob five times or more 3 Pull out and push in the trimmer waste container cont...

Страница 405: ...Return lever 3a to its original position 5 If indicator E7 remains lit perform the following steps a Open the lower cover b Remove the supplied cleaning rod from its location inside the lower cover 40...

Страница 406: ...the trimmer waste container use the cleaning rod to gather waste then remove the waste by hand f Return levers 3a and 3d to their original positions 6 To ensure that all waste and debris is removed e...

Страница 407: ...required corrective actions The touch screen also displays a Faults button which provides information about the fault and detailed instructions for correcting the fault The E code on the upper left pa...

Страница 408: ...ation when clearing paper jams Do not power off the press when removing paper jams Paper jams can be removed with the press still powered on When the power is turned off all information stored to the...

Страница 409: ...lever 2a upward 1 and lever 2b to the left 2 Remove jammed paper 3 3 Return levers 2a and 2b to their original positions 4 Close the folder front cover 5 If the press indicates there are additional pa...

Страница 410: ...er 2g to the right 1 and rotate knob 2c counterclockwise 2 Remove jammed paper 3 3 Return lever 2g to its original position 4 Close the folder front cover 5 If the press indicates there are additional...

Страница 411: ...aring Paper Jams from Folder Area E12 1 Open the folder front cover 2 Pull open the C Z fold output tray 2d 3 Open lever 2e to the right 1 and rotate knob 2c counterclockwise 2 Remove jammed paper 3 4...

Страница 412: ...2e to its original position 5 If you have difficulty removing any paper jams open lever 2f to the right 1 and rotate knob 2c counterclockwise 2 Remove jammed paper 3 6 Return lever 2f to its original...

Страница 413: ...hanges to indicate the multiple locations and the required corrective actions The touch screen also displays a Faults button which provides information about the fault and detailed instructions for co...

Страница 414: ...ws the corresponding area on the device where the fault occurred Always refer to the following information when clearing paper jams Do not power off the press when removing paper jams Paper jams can b...

Страница 415: ...ont cover 2 Open lever 1a to the left 1 and remove the jammed paper 2 Note Grasp the leading edge of the jammed sheet and pull out the sheet to remove it 3 If you have difficulty removing any paper ja...

Страница 416: ...the finisher front cover Clearing Paper Jams from Finisher Area E2 1 Open the finisher front cover 2 Open lever 1c to the right 1 and rotate knob 1e clockwise 2 Remove the jammed paper 3 Note The jam...

Страница 417: ...lever 1c to its original position 4 Close the finisher front cover Clearing Paper Jams from Finisher Area E3 1 Pull out the jammed paper from the finisher top tray 2 Open and close the finisher front...

Страница 418: ...rom Finisher Area E4 1 Open the finisher front cover 2 Open lever 1d to the right 1 and rotate knob 1e clockwise 2 Remove the jammed paper 3 3 Return lever 1d to its original position 4 Close the fini...

Страница 419: ...Finisher Area E5 1 Open the finisher front cover 2 Open lever 1d to the right 1 and rotate knob 1f counterclockwise 2 Remove the jammed paper 3 3 Return lever 1d to its original position 4 Close the...

Страница 420: ...Jams from Finisher Area E6 1 Pull out the jammed paper from the finisher stacker tray 2 Open and close the finisher front cover Clearing Paper Jams from Finisher Booklet Area E7 1 Open the finisher f...

Страница 421: ...2 Open lever 3a to the left 1 and remove the jammed paper 2 3 If you have difficulty to remove the paper jam pull out the Saddle Stitch Unit 3 1 and remove the jammed paper 2 421...

Страница 422: ...lever 3a to its original position 5 Gently push in the Saddle Stitch Unit 3 until it stops 6 Close the finisher front cover Clearing Paper Jams from Finisher Booklet Area E8 1 Open the finisher front...

Страница 423: ...you until it stops Note Check lever 3a for paper jam before pulling out the unit 3 Rotate knob 3b counterclockwise 1 and remove the jammed paper 2 4 Gently push in the Saddle Stitch Unit 3 until it s...

Страница 424: ...tate knob 3b clockwise 1 and remove the jammed paper from the booklet tray area 2 3 Close the finisher front cover Clearing Paper Jams in the PR Finisher Plus Area E7 1 Open the finisher front cover 2...

Страница 425: ...isher front cover Clearing Paper Jams in the PR Finisher Plus Finishing Transport Refer to the following procedures for clearing paper jams the PR Finisher Plus Finisher Module areas 1 4 Clearing Pape...

Страница 426: ...ms in Finishing Transport Area 1 1 Open the Finishing Transport front cover 2 Open lever 1 downward and remove the jammed paper 3 Return lever 1 to its original position 4 Close the Finishing Transpor...

Страница 427: ...port Area 2 1 Open the Finishing Transport front cover 2 Open lever 2 to the right 1 and rotate the knob counterclockwise 2 Remove the jammed paper 3 Return lever 2 to its original position 4 Close th...

Страница 428: ...ransport Area 3 1 Open the Finishing Transport front cover 2 Open lever 3 to the left 1 and rotate the knob clockwise 2 Remove the jammed paper 3 Return lever 3 to its original position 4 Close the Fi...

Страница 429: ...g Transport Area 4 1 Open the Finishing Transport front cover 2 Open lever 4 downward 1 and rotate the knob clockwise 2 Remove jammed papers 3 Return lever 4 to its original position 4 Close the Finis...

Страница 430: ...lattened staple Entire staple raised up Staple raised up with center pressed inward Important Depending on the type of paper being stapled the staple nails may be bent If the bent nails are stuck insi...

Страница 431: ...ll out R1 Note After removing the staple cartridge check the inside of the finisher for any remaining staples 3 Open the unit cover and remove the jammed staples WARNING To avoid personal injury use c...

Страница 432: ...cover Reinserting the Basic Staple Cartridge If a staple cartridge has been inserted incorrectly or accidentally removed perform the following procedure to correctly reinsert the staple cartridge int...

Страница 433: ...personal injury use care when removing jammed staples 4 Locate the lever on the back of the unit WARNING When moving the lever be careful not to hurt your fingers and nails 5 Turn the unit up while ho...

Страница 434: ...careful not to hurt your fingers 7 Insert the staple cartridge into the unit 8 Reinsert the unit to its original position 9 Close the finisher front cover Clearing Staple Jams in the Booklet Stapler N...

Страница 435: ...t the Saddle Stitch Unit 3 toward you until it stops 3 While holding the tabs on the staple cartridge pull out the cartridge to remove it 4 Remove any jammed staples WARNING To avoid personal injury u...

Страница 436: ...ss stops printing and a message appears on the press touch screen A graphical illustration shows the location of the fault with a brief explanation of corrective actions for clearing the fault If a fa...

Страница 437: ...124 PR Finisher Plus Fault Code Information When a fault occurs such as paper jams open doors or covers or a press malfunction the press stops printing and a message appears on the press touch screen...

Страница 438: ...ice where the fault occurred Always refer to the following information when clearing paper jams Do not power off the press when removing paper jams Paper jams can be removed with the press still power...

Страница 439: ...Ensure that the press is not running before performing this procedure 1 Open the left cover of trimmer device by pressing the button on the cover 2 Remove the jammed paper 3 If you have difficulty re...

Страница 440: ...trimmer device 7 If the press indicates there are additional paper jams follow the instructions to clear the paper and to resume printing Clearing Paper Jams from SquareFold Trimmer Area E3 Note Ensur...

Страница 441: ...cate the multiple locations and the required corrective actions The touch screen also displays a Faults button which provides information about the fault and detailed instructions for correcting the f...

Страница 442: ...nsiderations Before you print any booklet consider the following Image location on the original as it will no longer be centered Do you need to shift images in order to ensure they fit on the finished...

Страница 443: ...of the press near paper Tray 1 a At the press fully open paper Tray 1 b At the left of the feeder tray on the press frame locate the plate with the serial number SER C Ca alllliin ng g f fo or r S Se...

Страница 444: ...nd or other countries Macintosh macOS Power Mac TrueType and Mac are registered trademarks of Apple Computer Inc in the United States and or other countries Microsoft Windows and Windows Server are tr...

Страница 445: ...gh Frequency Service Item HFSI counter Use the Fuser NVM Read Write Setting Select and edit other System Settings Connect to Xerox CentreWare Internet Services Setup and use the Accounting features an...

Отзывы: