


__________________________________________ Installation 2-33
a.
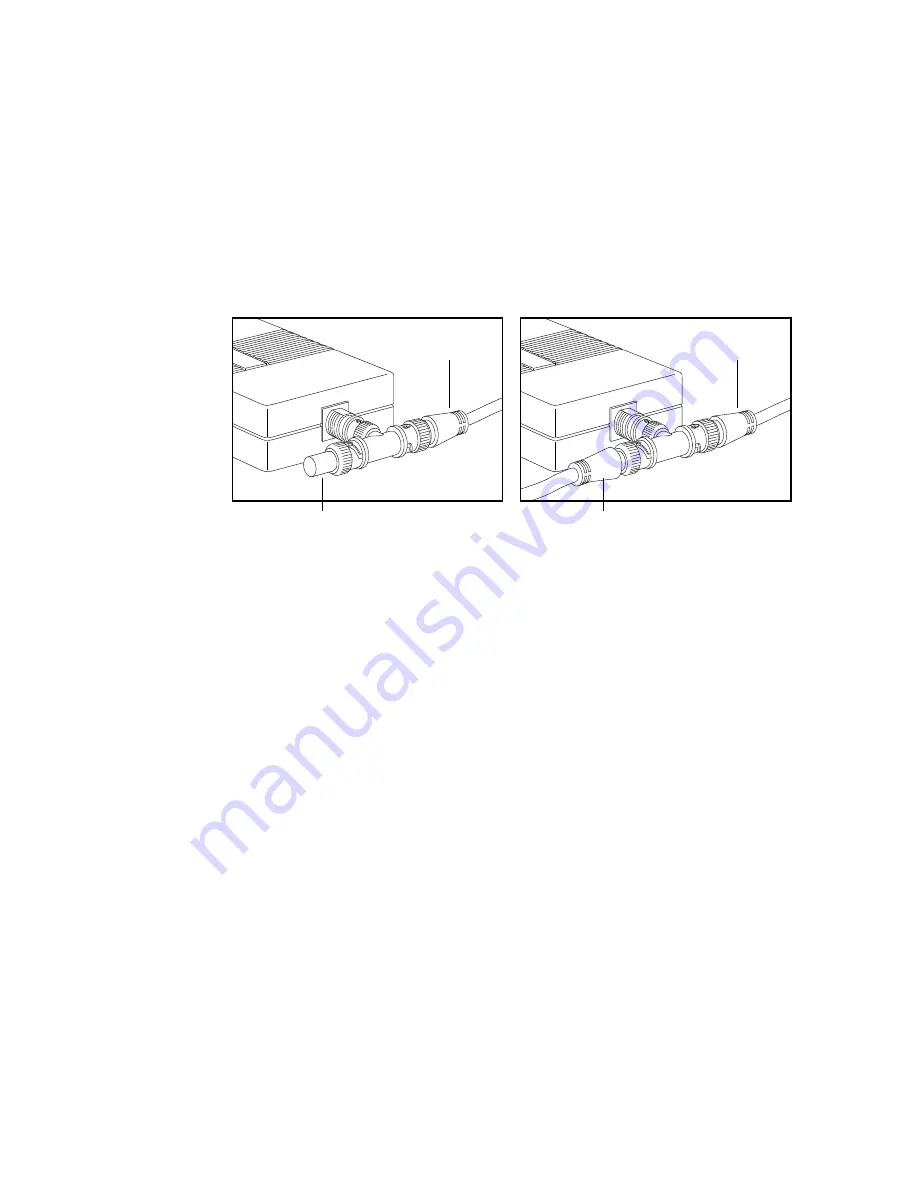
If the transceiver box has a single male BNC connector,
either plug it into an existing Ethernet drop or use a “T”
connector (fig. 2.23). Follow the directions included
with the transceiver.
Note:
Make sure to place a terminator in the open
connector if this is an end node on the network
(fig. 2.23).
10Base2 Terminated T Connection
Coaxial Cable
Termination Resistor
10Base2 Inline T Connection
Coaxial Cable
Coaxial Cable
Fig. 2.23 Connecting to a single BNC Connector
b.
If the transceiver box has dual male BNC connectors,
first check the documentation to see if the unit is
self-terminating. Then, follow the instructions included
with the transceiver to attach one end of the coaxial
cable to the box.
Note:
You can plug the coaxial cable into either one of
the male connectors; however, make sure that if
this is an end-node on the network and the unit
is not self-terminating, that you place a
terminator in the open socket on the box.
4.
Plug the free end of the coaxial cable into the network.
5.
Turn on the printer.
Now that your Macintosh and printer are connected, you may need to
set the zone name. For details, see the next section.
Содержание Accel a Writer 812
Страница 1: ..._____________________________________________________ i Innovations In Output PM AW812D 5 7 96...
Страница 7: ..._____________________________________________________ vii...
Страница 15: ...xivbb ____________________________________________________...
Страница 17: ...1 2 Introductionbb ________________________________________ Notes...
Страница 26: ..._________________________________________ Introduction 1 11...
Страница 28: ...2 2 Installationbb_________________________________________ Notes...
Страница 68: ...3 2 Macintosh Setupbb ____________________________________ Notes...
Страница 82: ...4 2 PC Setupbb __________________________________________ Notes...
Страница 98: ...4 18 PC Setupbb __________________________________________...
Страница 100: ...5 2 Configurationbb ______________________________________ Notes...
Страница 125: ..._______________________________________ Configuration 5 27...
Страница 127: ...6 2 Routine Operationsbb __________________________________ Notes...
Страница 163: ...7 2 Advanced Imagingbb ___________________________________ Notes...
Страница 185: ...7 24 Advanced Imagingbb ___________________________________...
Страница 187: ...8 2 Maintenancebb _______________________________________ Notes...
Страница 197: ...8 12 Maintenancebb _______________________________________...
Страница 199: ...9 2 Optionsbb ___________________________________________ Notes...
Страница 221: ...10 2 Troubleshootingbb____________________________________ Notes...
Страница 249: ...10 30 Troubleshootingbb____________________________________...
Страница 250: ...________ Supported HP PCL 5 and HP GL 7475A Commands A 1 Appendix A Supported HP PCL 5 and HP GL 7475A Commands...
Страница 251: ...A 2 Supported HP PCL 5 and HP GL 7475A Commandsbb _______ Notes...
Страница 263: ...A 14 Supported HP PCL 5 and HP GL 7475A Commandsbb _______...
Страница 264: ...____________________________________ Application Notes B 1 Appendix B Application Notes...
Страница 265: ...B 2 Application Notesbb ___________________________________ Notes...
Страница 277: ...B 14 Application Notesbb ___________________________________...
Страница 278: ..._________________________________ Warranty Information C 1 Appendix C Warranty Information...
Страница 279: ...C 2 Warranty Infromationbb ________________________________ Notes...
Страница 282: ...___________________________________________ Glossary G 1 Glossary...
Страница 283: ...G 2 Glossarybb __________________________________________ Notes...
Страница 293: ...G 12 Glossarybb __________________________________________...
Страница 312: ..._______________________________________________ Index I 19...


