background image

_________________________________________

 Introduction  1-3

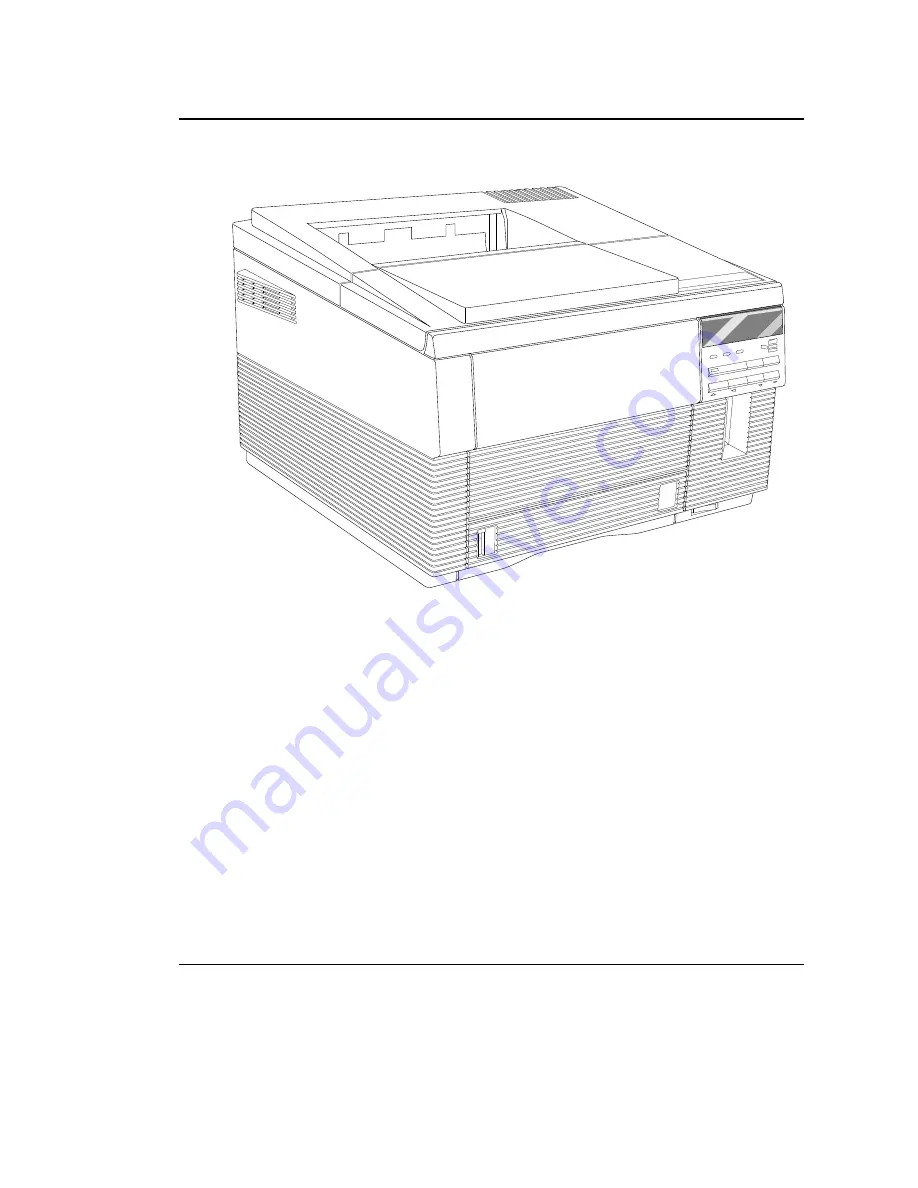
The XANTÉ Accel-a-Writer 812

ONLINE

FORM FEED

TRAY SELECT

ENTER

MENU

RESET

TEST

DATA

MANUAL

READY

Fig. 1.1  XANTÉ Accel-a-Writer 812

Your new Accel-a-Writer 812 provides high-quality laser prints,
excellent for everyday office needs as well as for the demanding
field of desktop publishing. This chapter provides an overview of
this manual and highlights major features of your new
Accel-a-Writer 812.

About this Manual

This User’s Guide provides complete documentation on the
installation, setup, and operation of the Accel-a-Writer 812. The
chapters are outlined in the following manner:

Содержание Accel a Writer 812

Страница 1: ..._____________________________________________________ i Innovations In Output PM AW812D 5 7 96...

Страница 2: ...onics Data Computer Corporation registered in the United States Patent and Trademark Office Hewlett Packard HP LaserJet HP PCL and HP GL are registered trademarks of Hewlett Packard Co registered in t...

Страница 3: ...and fitness for a particular purpose with regard to this manual XANT Corporation assumes no responsibility for or liability for errors contained in this manual or for incidental special or consequenti...

Страница 4: ...found to comply with the limits for a Class A digital device pursuant to Part 15 of the FCC Rules These limits are designed to provide reasonable protection against harmful interference when the equip...

Страница 5: ...me exige par le pays ou il sera utilis e Das Netzkabel ist das haupfsachliche Diskonnektionsmittel es sollte in eine leicht erreichbare steckdos gesteckt werden Das Netzkabel kann mit einer 230 Volts...

Страница 6: ...quipment I the undersigned hereby declare that the equipment specified above conforms to the above Directives and Standards Place Mobile Alabama Date December 7 1995 Robert C Ross President Colophon T...

Страница 7: ..._____________________________________________________ vii...

Страница 8: ...3 Package Contents 2 4 Printer Setup 2 5 Unpacking the Printer 2 6 Installing Options 2 12 Installing the Toner Cartridge 2 12 Loading the Paper Cassette 2 14 Loading the Fold Down Tray 2 16 Connecti...

Страница 9: ...ps 3 7 Sysparm ps 3 7 Drivers Folder 3 8 Aldus APD Folder 3 8 Aldus PPD Folder 3 8 QuarkXPress PDF Folder 3 8 Printer Description Folder 3 8 Installing XANT Command Center 3 9 Loading Printer Fonts 3...

Страница 10: ...RTPG ON 4 16 Chapter 5 Configuration 5 1 Introduction 5 3 Printer Control 5 3 The Front Panel 5 4 The Display Window 5 4 Front Panel Lights LEDs 5 5 Front Panel Keys 5 6 The Configuration Menu Structu...

Страница 11: ...ostScript and Emulations 5 25 Selecting PostScript or Emulation Modes 5 26 Chapter 6 Routine Operations 6 1 Introduction 6 3 Media Handling 6 3 Selecting Media 6 3 Storing Media 6 7 Feeding Media to t...

Страница 12: ...5 TIFF PICT EPS Formats 7 6 Gamma Corrections 7 6 Enhanced Screening 7 9 Accurate Calibration Technology 7 10 Page Design 7 16 Typefaces and Fonts 7 16 Serif Sans Serif and Miscellaneous Typefaces 7...

Страница 13: ...shooting 10 1 Introduction 10 3 Jams 10 3 Preventing Jams 10 3 Clearing Jams 10 4 Paper Pick up Areas 10 5 Access Door Area 10 7 Fuser Assembly Area 10 12 Paper Exit Area 10 14 Status Messages 10 16 P...

Страница 14: ...________________________________________________ xiii Appendix A Supported HP PCL 5 and HP GL 7475A Commands A 1 Appendix B Application Notes B 1 Appendix C Warranty Information C 1 Glossary G 1 Index...

Страница 15: ...xivbb ____________________________________________________...

Страница 16: ...roduction 1 1 Chapter 1 Introduction Chapter Overview About this Manual Manual Conventions Other Helpful Documentation About Your Printer Printer Features PostScript Typefaces PCL Typefaces About XANT...

Страница 17: ...1 2 Introductionbb ________________________________________ Notes...

Страница 18: ...vides high quality laser prints excellent for everyday office needs as well as for the demanding field of desktop publishing This chapter provides an overview of this manual and highlights major featu...

Страница 19: ...indows driver with the Accel a Writer 812 PPD and printer fonts setting margins and controlling the start up page printing Chapter 5 Configuration explains the ways you can control the printer It illu...

Страница 20: ...ironments Appendix C Warranty Information covers both the warranty and the effects consumables can have on your warranty Glossary The glossary defines terms used in conjunction with your Accel a Write...

Страница 21: ...who want to learn about working directly in the PostScript language Most bookstores and many computer businesses either keep these books in stock or can order them for you About Your Printer The Accel...

Страница 22: ...legal 8 50 x 14 216 mm x 356 mm size paper This tray also has the ability to feed up to 10 envelopes automatically If you require an even higher input capacity you can add an optional 500 sheet input...

Страница 23: ...alibration Technology XANT Enhanced Screening Technology XANT Accurate Calibration Technology 16 MB RAM upgradable to 64 MB RAM Fold down tray multi purpose input paper transparencies envelopes labels...

Страница 24: ...ier Times Bold Courier Bold Times BoldItalic Courier BoldOblique Times Italic Courier Oblique Times Roman Helvetica Symbol Helvetica Bold ITC ZapfChancery MediumItalic Helvetica BoldOblique ITC ZapfDi...

Страница 25: ...o have a namer feature in Command Center to prevent confusion on networks where several printers are the same mode for example you can leave one printer with the model name Accel a Writer 812 and rena...

Страница 26: ..._________________________________________ Introduction 1 11...

Страница 27: ...etup Unpacking the Printer Installing Options Installing the Toner Cartridge Loading the Paper Cassette Loading the Fold Down Tray Connecting the Power Cord Starting the Printer Printing the Start up...

Страница 28: ...2 2 Installationbb_________________________________________ Notes...

Страница 29: ...lower cassette Have an area of approximately 24 x 50 624 mm x 1292 mm so there is sufficient clearance for operation and maintenance Maintain a temperature of 50 to 90 5 Fahrenheit 10 to 32 5 Celsius...

Страница 30: ...rinter 250 sheet letter or A4 paper cassette Power cord Accel a Writer 812 User s Guide this manual XANT Utilities PSPrinter driver and other software The smaller box contains Toner cartridge for the...

Страница 31: ...ing the power cord Starting the printer Before you begin this setup take a few minutes to familiarize yourself with the printer The following illustrations figures 2 1 and 2 2 provide an overview of t...

Страница 32: ...king the Printer Various packing materials protect your printer during shipping These materials include plastic tape polystyrene cardboard and shipping spacers all of which must be removed You may wan...

Страница 33: ...r cassettes and media installed Have someone help you lift it 2 Lift the printer out of the box 3 Remove the plastic wrap from around the printer 4 Remove the tape securing the rear cover the fold dow...

Страница 34: ..._____________ 6 Remove the packing tape and cardboard 7 Push down on the plate in the bottom of the cassette and remove the plastic packing spacers fig 2 4 Then place the cassette back into the printe...

Страница 35: ...of the top cover fig 2 5 and lift up and back approximately 180 to open it ONLINE FORM FEED TRAYSELECT ENTER MENU RESET TEST DATA MANUAL READY Fig 2 5 Open the Top Cover 9 Remove the packing tape and...

Страница 36: ...2 10 Installationbb_________________________________________ 10 Open the rear cover by pressing the release lever and tilting the cover out and down fig 2 7 Fig 2 7 Open the Rear Cover...

Страница 37: ...own the two levers one on each side fig 2 8 12 Remove the shipping cardboard fig 2 8 from the fuser area Fig 2 8 Open the Fuser Area 13 Close the rear cover Unpacking the printer is completed If you d...

Страница 38: ...talling the Toner Cartridge Caution The toner cartridge is sensitive to bright lights and direct sunlight Leave it in its protective bag until you are ready to load it into the printer The cartridge c...

Страница 39: ...bute the toner evenly throughout the cartridge fig 2 9 Fig 2 9 Distribute the Toner 3 Place the cartridge on a flat surface and gently flex the black tab on the end of the sealing tape back and forth...

Страница 40: ...the printer s top cover gently until it snaps into place Note Never move or ship the printer with a toner cartridge installed Loading the Paper Cassette Your Accel a Writer 812 ships with a standard l...

Страница 41: ...mately 1 25 mm or less of laser quality or 20 lb photocopier paper To do this a Make sure the paper meets all the requirements in Selecting Media in chapter 6 b Determine the printing side of the pape...

Страница 42: ...assette Caution Make sure the paper stack does not exceed the upper paper limit marked on the cassette fig 2 12 Overloading a cassette will cause paper to jam Fig 2 12 Load the Paper Cassette 4 Slide...

Страница 43: ...gth The tray also handles COM 10 monarch DL C5 and B5 envelopes This section includes instructions for loading letter or A4 size laser quality or 20 lb photocopier paper Refilling the tray printing on...

Страница 44: ...sheets approximately 3 8 10 mm or less of laser quality or 20 lb photocopier paper To do this a Make sure the paper meets all the requirements listed in Media Handling in chapter 6 b Determine the pri...

Страница 45: ...aper to jam ONLINE FORM FEED TRAYSELECT ENTER MENU RESET TEST DATA MANUAL READY Paper Limit Mark Fig 2 15 Load the Fold Down Tray 5 Adjust the paper guides on each side so they rest lightly against th...

Страница 46: ...lower right side 1 Locate the power switch 2 Press the on the power switch to turn on the printer The green Ready light will begin flashing and ACCEL A WRITER appears in the display window After the...

Страница 47: ...rinter unless you disable it Use the front panel or XANT Command Center to disable this feature Note You can disable this page for an individual power cycle by removing the paper cassette before turni...

Страница 48: ...l There is a SCSI port where you can attach multiple external hard disks and an optional Ethernet port LOCALTALK PARALLEL ETHERNET SCSI SERIAL Fig 2 16 Accel a Writer 812 Ports The serial parallel Loc...

Страница 49: ...e a PC setup skip to Connecting in a PC Environment later in this chapter If you have a Macintosh setup without Ethernet go to the next section Connecting in a Macintosh Environment Connecting in a Ma...

Страница 50: ...es Fig 2 18 Place a Terminating Resistor in the Open Socket Note Be sure to terminate the open sockets on the ends of your LocalTalk network with the terminators supplied with your LocalTalk connecto...

Страница 51: ...r Serial communication allows two way communication between the host and printer Use the parallel port if your host has a Centronics parallel port available and it is within 10 ft 3 m of the printer U...

Страница 52: ...ort skip to the section on connecting to the desired port later in this chapter If not and you are connecting an optional hard disk skip to Connecting a Hard Disk later in this chapter Otherwise skip...

Страница 53: ...3 5 6 7 20 8 Printer 1 2 3 4 5 6 8 7 Data Carrier Detect In Transmit Data Out Receive Data In Data Set Ready In Ground Data Terminal Ready Out Clear to Send In Request for Send Out Open Data Carrier D...

Страница 54: ...u print make sure the host printer and application are using the same communication settings The three settings which must match are Baud Rate Flow Control Parity The factory default printer settings...

Страница 55: ...e high that it will affect the size of a group providing a warning of transmission errors Your Accel a Writer 812 supports five parity settings None Even Odd Mark and Space The printer s factory defau...

Страница 56: ...omputer stores or mail order warehouses The transceiver should have an Apple AUI Attachment Unit Interface connector on one end and either an Unshielded Twisted Pair UTP or 10BaseT cable or a thin coa...

Страница 57: ...ke ordinary telephone wire Each end has an RJ 45 plug which looks like a slightly larger version of the standard telephone plug fig 2 21 The UTP cable should be a maximum of 328 ft 100 m in length No...

Страница 58: ...twist on BNC connector on each end A T connector is used to tie the external transceiver into the network fig 2 22 T Connection Coaxial Cable Fig 2 22 A T Connector Some external transceiver boxes are...

Страница 59: ...ting to a single BNC Connector b If the transceiver box has dual male BNC connectors first check the documentation to see if the unit is self terminating Then follow the instructions included with the...

Страница 60: ...For example to name your zone Marketing First Floor using the procedure later in this section you would type the following in step 3 EtherTalk_NV EtherTalkZone Marketing First Floor setdevparams Note...

Страница 61: ...ting a Hard Disk Otherwise skip to the next chapter Macintosh Setup Connecting a Hard Disk You can connect multiple hard disks to your printer via the SCSI port Adding a hard disk increases the availa...

Страница 62: ...The printer has a 9 pin serial port that is labeled clearly 1 Make sure the printer and the hard disk are turned off 2 Connect the SCSI cable following the instructions included with the hard disk 3 T...

Страница 63: ...en downloading this file to the printer s external hard disk using the Adobe Downloader in the XANT Utilities Caution Make sure the printer is selected in the Chooser before initializing a hard disk U...

Страница 64: ...es disk included with your printer 7 Open the Utilities folder 8 Double click the Downloader icon to open that utility 9 Choose Download PostScript File from the File menu 10 Locate the Initialize Dis...

Страница 65: ...d to your printer open the file in a DOS editor and make sure the desired disk is specified This sample file initializes disk 1 To initialize another disk substitute the 1 in disk1 with the SCSI ID of...

Страница 66: ...the parallel interface or by typing COPY INITDSK PS COM1 to download to the printer over the serial interface Note Turn on the hard disk before turning the printer on whenever you start your system Th...

Страница 67: ...Before You Begin Installing XANT Utilities Macintosh Readme 1st File Utilities Folder Downloads Folder Drivers Folder Installing XANT Command Center Loading Printer Fonts Downloading to the Printer Me...

Страница 68: ...3 2 Macintosh Setupbb ____________________________________ Notes...

Страница 69: ...any of these procedures see your Macintosh documentation Once your Accel a Writer 812 is installed you need to do three things before using the printer First check the Readme 1st file on the XANT Util...

Страница 70: ...nd the Accel a Writer 812 listing If the listing does not appear check all LocalTalk or Ethernet cable connections see Connecting in a Macintosh Environment in chapter 2 for details Chooser Accel a Wr...

Страница 71: ...tensions folder in your System folder 7 Select the Accel a Writer 812 PPD file for your printer and click Select You return to the dialog box in figure 3 2 If you have not added a second tray to your...

Страница 72: ...drive and title it XANT Utilities Many of your utilities should be loaded into this folder The following list gives a brief description of each file so that you can decide which ones you may not want...

Страница 73: ...Script files to set up your printer for your working environment Initialize Disk ps This file is used to initialize an external hard disk attached to the SCSI interface on your Accel a Writer 812 prin...

Страница 74: ...eadme 1st file to determine which file s you need and instructions for installing the file s Aldus APD Folder This folder contains APDs Aldus Printer Description files which provide printer specific i...

Страница 75: ...nloading PostScript Files allows you to download PostScript files to the printer Test Directory allows you to display a list of test files located on the printer You have options of printing adding or...

Страница 76: ...he printer s external hard disk survive a power cycle Once you download fonts you can use them as resident fonts within your applications Caution Downloaded PostScript fonts use the printer s virtual...

Страница 77: ...vailable Ameri AmeriBol Desktop Add Add All Remove Cancel Download Outline Fonts Selected Macinto Memory Device Fig 3 3 Download Fonts to Memory or a Hard Disk 3 Select Memory or Disk in the Device po...

Страница 78: ...e it from the list of fonts to download 6 Click Download and wait until the downloading finishes 7 Choose Quit from the File menu To remove downloaded fonts from the hard disk see Removing Downloaded...

Страница 79: ...inor adjustments using the XANT Command Center s Align Paper feature in the Printer menu Printer margins refer to the imageable area of the page not to the margin settings in an application You must a...

Страница 80: ...ess the On Line key to put the printer back on line You can disable or enable start up page printing by using the front panel or by using the Startup Page option under the General menu in XANT Command...

Страница 81: ...d Center Setup Windows 3 1 or 3 11 Command Center Setup Windows 95 Windows Setup Printing the Windows Driver Guide Installing the Windows Driver for 3 1 or 3 11 Installing the Windows 95 Driver Settin...

Страница 82: ...4 2 PC Setupbb __________________________________________ Notes...

Страница 83: ...ile in the root directory of the XANT Utilities disk for the PC Any updates on the printer the utilities software or this manual will be covered in this file It also may have information on new option...

Страница 84: ...locate the files easily Main Directory The main directory of the PC XANT Utilities disk contains files and subdirectories This section covers the files The subdirectories are covered in the following...

Страница 85: ...PostScript end of file marker Read the descriptions of all the files in this directory to determine which files to load to your system To load some or all of these files use the following procedure to...

Страница 86: ...name for the printer The printer must be restarted repowered before the changes take place STARTPG OFF disables your Accel a Writer 812 start up page so that it does not print automatically when the p...

Страница 87: ...manual for instructions on setting up Novell Command Center Setup Windows 3 1 or 3 11 1 Open Windows 3 1 or 3 11 2 Place your XANT Command Center disk in drive A or B 3 Go to PROGRAM MANAGER and highl...

Страница 88: ...t Printer Driver User s Guide How to print this guide is explained later in this section it also covers installing the windows driver for versions 3 1 or 3 11 and for Windows 95 and then setting up th...

Страница 89: ...floppy disk drive 4 Choose File Run from the Windows Program Manager 5 Locate the Command Line box and type a setup Note If you use a disk drive other than a substitute the letter of the disk drive yo...

Страница 90: ...the Windows Write format and contains any updates to the driver s documentation Use the following procedure to install the Adobe Windows driver for Windows 95 1 Open Windows 2 Make sure all programs i...

Страница 91: ...n the printers list Note If your printer does not show up in the printers list restart Windows 95 The printer icon should then show up in the PRINTERS group 20 Set the desired properties for the print...

Страница 92: ...ds box and change DEVICE NOT SELECTED to 300 TRANSMISSION RETRY to 900 8 Make sure the FAST PRINTING DIRECT TO PORT is not enabled 9 Click OK 10 Select 812 2014 108 on LPT the is replaced by the numbe...

Страница 93: ...scription file for your printer Use the following procedure to do this 1 Insert the disk containing the PPD for your printer into a floppy disk drive on your host 2 Open the Windows Program Manager 3...

Страница 94: ...f after removing and reinstalling your printers you still experience problems delete all previous versions of the driver and reinstall your printers using the Adobe PostScript Printers dialog box Use...

Страница 95: ...AdobePS delete that line also Loading Printer Fonts Included on the Adobe Windows driver is a font downloader located under Printer Setup The fonts can be downloaded to the printer s memory or to an e...

Страница 96: ...s to print the start up page whenever the printer is turned on You can save printer start up time paper and toner by not printing this page However you may want to print it to check printer settings I...

Страница 97: ...ing the following procedure to disable or enable the start up page Note Substitute either STARTPG OFF or STARTPG ON for filename in the command line Also if you use a port other than LPT1 or COM1 subs...

Страница 98: ...4 18 PC Setupbb __________________________________________...

Страница 99: ...llaneous Menu The Language Menu The Startup Page Menu The Jam Recovery Menu The Initial Job Menu The DPI Menu The Timeout Menu The Manual Feed Menu The Gamma Menu The Screen Menu The Density Menu The...

Страница 100: ...5 2 Configurationbb ______________________________________ Notes...

Страница 101: ...T Utilities Through the printer s front panel This chapter deals with using the front panel For information on using applications see the specific application documentation and appendix B Application...

Страница 102: ...tests The following messages appear during this initialization period of approximately a minute ACCEL A WRITER INITIALIZING and FIRST JOB if the Initial Job feature is enabled the factory default If...

Страница 103: ...n the printer icon also will be on when the Manual LED is on The Ready LED is the third light from the left side of the front panel It is on when the printer is ready to receive data and stays on unle...

Страница 104: ...e Form Feed key A page prints clearing any remaining job data from the printer s memory Press the On Line key to put the printer back on line Pressing the Form Feed key while the printer is on line wi...

Страница 105: ...e current menu or to lower a numeric value such as the number of copies to print The down arrow Enter key is used when working within the menu structure Press the Enter key to select a menu or to sele...

Страница 106: ...has a complete listing of the printer s menus Selecting Menu Options Use the front panel s configuration menu structure to set up your printer to communicate with your host computer Note Four printer...

Страница 107: ...selection If you want to make further selections go to step 7 If not go to step 8 6 Press the Enter key to select the desired option if the option is not a numeric value If the option is a numeric va...

Страница 108: ...e Enter key to select dpi 600 600 The selection changes to all capital letters DPI 600 600 in the display window 8 Press the On Line key READY IDLE appears in the display window The printer now has 60...

Страница 109: ...in Configuration Menus The Miscellaneous Menu The Miscellaneous menu SETUP MISC includes nine submenus with more options The nine submenus are LANG the language of the printer display STRTUP PAGE star...

Страница 110: ...ENGLISH lang francais lang deutsch lang japanese MANFEED LETTER manfeed legal manfeed a4 manfeed b5 manfeed com 10 manfeed monarch manfeed dl manfeed c5 MISC GAMMA GAMMA 0 gamma 1 gamma 2 gamma 3 gamm...

Страница 111: ...e jam is cleared and the remaining part of the job prints If Jam Recover is enabled it works as long as you do not turn off the power to the printer while removing the jam The factory default is YES T...

Страница 112: ...nd and the timeout is set to never subsequent jobs cannot print until you send a form feed command or press the Form Feed key The Manual Feed Menu The Manual Feed menu MISC MANFEED allows you to selec...

Страница 113: ...t is MISC SCREEN Normal See Levels of Gray in chapter 7 for more details The Density Menu The Density menu MISC DENSITY allows you to select density settings from 0 to 15 to darken or lighten your ima...

Страница 114: ...MODE I F LTALK LTALK ENABLE LTALK MODE I F ETALK ETALK ENABLE ETALK MODE I F LPR LPR ENABLE LPR MODE Fig 5 4 The Interface Menu The RS232 menu has seven submenus which will be covered separately in t...

Страница 115: ...TE PARITY FLOW CNTL flow control DATA BITS STOP BITS I F RS232 RS232 ENABLE ENABLE YES enable no ENTER TEST MENU TEST MENU RS232 MODE MODE PS STD mode ps bin mode ps tbcp mode hpgl mode pcl5 mode ais...

Страница 116: ...ication protocol PostScript HPGL for HP GL 7475A emulation PCL5 for HP PCL 5 emulation AIS RAW for automatic interface switching AIS BIN for binary automatic interface switching AIS TBCP for tagged bi...

Страница 117: ...ows you to select either 1 or 2 stop bits The factory default is 1 To change this numeric value once you are in this menu use the Test key to lower the value or use the Menu key to raise the value to...

Страница 118: ...to disable NO the parallel LocalTalk or Ethernet interfaces on your printer The XXXX will be replaced by the specific interface menu chosen either PARALLEL LTALK ETALK or LPR The factory default is Y...

Страница 119: ...ace switching See the PostScript and Emulations section at the end of this chapter for more details on selecting emulations The PCL5 Menu The PCL5 menu SETUP PCL5 includes six other menus some with mo...

Страница 120: ...ONT NUMBER FONT SYM SET ENTER TEST MENU PCL5 FONT PAGE Fig 5 7 The PCL5 Menu The Copies Menu The Copies menu PCL5 COPIES allows you to select from 1 to 99 copies to print The factory default is 1 copy...

Страница 121: ...ntation The two options are Portrait and Landscape Portrait tall printing goes across the narrower dimension of the page landscape wide printing goes across the wider dimension of the page The factory...

Страница 122: ...et iso 85 sym set german sym set spanish sym set vn math sym set vn intl sym set vn us sym set ps math sym set ps text sym set math 8 sym set pi font sym set ms publ sym set windows sym set desktop PC...

Страница 123: ...ISO 14 german The Font Page Menu The Font Page menu PCL5 FONT PAGE causes pages to print listing the printer s fonts for PCL emulation printing These pages list the font number font ID symbol set whet...

Страница 124: ...he parallel port for PostScript and the serial port for HP GL 7475A If you plan to send a combination of PostScript and HP PCL 5 files you may want to set at least one of the printer interfaces to an...

Страница 125: ..._______________________________________ Configuration 5 27...

Страница 126: ...g Printing Transparencies Printing Envelopes Printing Labels Adjusting Print Density Redistributing Toner Adjusting Density through the Front Panel Handling and Replacing the Toner Cartridge Removing...

Страница 127: ...6 2 Routine Operationsbb __________________________________ Notes...

Страница 128: ...ner using Windows using a SCSI disk and removing downloaded fonts Media Handling The quality of your printed output depends on many factors such as the printer s capabilities and application features...

Страница 129: ...0 Envelopes Approx 10 shts B5 182 mm x 257 mm Envelopes US 10 Monarch ISO DL C5 500 sheet tray Letter 8 50 x 11 00 Plain or laser Approx 500 shts optional A4 210 mm x 297 mm Legal 8 50 x 14 00 Executi...

Страница 130: ...et or damp Is curled torn creased or otherwise damaged Has metal clasps strings or staples Has any cutouts or perforations Is coated or synthetically reinforced stock Has exposed adhesives such as par...

Страница 131: ...x 14 00 8 43 x 13 84 216 mm x 356 mm 214 mm x 352 mm A4 8 26 x 11 69 8 00 x 11 49 A4small 210 mm x 297 mm 203 mm x 292 mm B5 7 17 x 10 13 6 88 x 9 89 182 12 mm x 257 30 mm 174 75 mm x 251 21 mm Execut...

Страница 132: ...o avoid problems always store media On a flat surface With the media flat not on its side or end In stacks only if necessary and if the stacks are not too heavy or high In a dark dry cool area In its...

Страница 133: ...igure 6 1 This cover prevents dust and debris from getting into the paper tray and building up in the printer where it can reduce print quality Fig 6 1 Install the Universal Cassette Cover The univers...

Страница 134: ...nter 2 Prepare up to 250 sheets approximately 1 27 mm or less of laser quality or 20 lb photocopier paper To do this a Make sure the paper meets all requirements listed in Selecting Media earlier in t...

Страница 135: ...n the cassette Overloading a cassette will cause paper to jam Fig 6 2 Load the Paper Cassette 4 Slide the cassette into the printer until it snaps into place 5 Select the paper cassette as the media s...

Страница 136: ...it can reduce print quality Media loading for both the standard letter or A4 cassette and the optional 500 sheet cassette is the same See the previous section Using a Paper Cassette for details Instal...

Страница 137: ...llowing procedure to load the fold down tray 1 Press and release the center top edge of the tray and ease the tray down fig 6 3 making sure to support the tray as it opens ONLINE FORM FEED TRAYSELECT...

Страница 138: ...the media meets all requirements listed in Selecting Media earlier in this chapter b Determine the printing side of the media Most packages of paper have an arrow pointing in the direction of the pri...

Страница 139: ...AL READY Paper Limit Mark Fig 6 5 Load the Fold Down Tray 5 Adjust the paper guides on each side so they rest lightly against the media without causing it to buckle 6 Select the manual feed fold down...

Страница 140: ...tray chaining through the printer s front panel see the next section Selecting Tray Chaining for details or through some applications if they offer that feature Make sure both trays are inserted prop...

Страница 141: ...printing fewer transparencies at a time if jams occur and remove each as it exits the printer The more transparencies loaded the heavier the stack which could cause the media to stick together Removin...

Страница 142: ...d and then open them as soon as they emerge from the printer This prevents the heat during printing from sealing the envelopes Do not use envelopes with exposed adhesives Do not use envelopes which ar...

Страница 143: ...ake sure the inks used in preprinting can withstand fuser temperatures of 392 F 200 C Load 50 sheets or fewer making sure the stack does not exceed the upper paper limit mark on the side of the fold d...

Страница 144: ...ront panel Since toner has the tendency to settle when not used for several days we suggest you try redistributing the toner first Then if you still feel you want to make an adjustment use the Density...

Страница 145: ...d back approximately 180 fig 6 6 ONLINE FORM FEED TRAYSELECT ENTER MENU RESET TEST DATA MANUAL READY Fig 6 6 Open the Top Cover 2 Grasp the toner cartridge by the grip area raise that end slightly and...

Страница 146: ...cartridge back and forth to distribute the toner evenly throughout the cartridge fig 6 8 Fig 6 8 Distribute the Toner Note If the toner is running low you may want to install a new cartridge If so see...

Страница 147: ...printer s top cover gently until it snaps into place 6 Print a test file to check the density If redistributing the toner has not corrected the situation install a new toner cartridge See Handling an...

Страница 148: ...ntil density 9 appears if necessary If DENSITY is capitalized then 9 is already the default density setting skip to step 8 7 Press the Enter key to select density 9 The selection changes to all capita...

Страница 149: ...lity and reliability and toner leaks could affect your printer warranty New or stored cartridges may require a breaking in run of approximately 50 copies This is because toner settles during prolonged...

Страница 150: ...ridge by the grip area raise that end slightly and then pull the cartridge out of the printer fig 6 10 ONLINE FORM FEED TRAYSELECT ENTER MENU RESET TEST DATA MANUAL READY Fig 6 10 Remove the Toner Car...

Страница 151: ...rocedure a Locate and remove the green cleaning brush inside the right side of the printer fig 6 11 b Locate the anti static teeth and slide the cleaning brush back and forth across them several times...

Страница 152: ...Installing the New Cartridge Use the following procedure to install a new EP E toner cartridge 1 Remove the new toner cartridge from its package and gently rock it to distribute the toner evenly thro...

Страница 153: ...Place the cartridge on a flat surface and gently flex the black end tab on the sealing tape back and forth until it becomes loose Then pull the tab and 21 tape straight out from the toner cartridge a...

Страница 154: ...e the top cover will not close ONLINE FORM FEED TRAYSELECT ENTER MENU RESET TEST DATA MANUAL READY Fig 6 14 Load the Toner Cartridge 4 Close the printer s top cover until it snaps into place Caution N...

Страница 155: ...e desired setting through both the application and the front panel Some but not all Macintosh applications have resolution options for the printer Since many factors affect resolution selection this t...

Страница 156: ...oes not include a resolution option If you use PageMaker you must set the resolution through the printer s front panel If you use LaserWriter 8 x software you can select the resolution using the follo...

Страница 157: ...orking in a Windows application see chapter 10 Troubleshooting in this manual the Adobe PostScript Printer Driver User s Guide or your Windows documentation Note You should be familiar with all standa...

Страница 158: ...Use Print Manager Connect Setup Remove Add Help Apple LaserWriter II NT on LPT1 Fig 6 15 The Printers Window 6 Click Accel a Writer 812 on LPT1 to select it 7 Click Connect fig 6 15 A window displays...

Страница 159: ...ck on Fonts stored in printer memory only last for the current power cycle You can remove individual downloaded fonts from memory with the Downloader in a Macintosh environment but not in a PC environ...

Страница 160: ...iBol Desktop Add Add All Remove Cancel Download Outline Fonts Selected Macinto Disk Device Fig 6 16 Remove Fonts from Disk 4 Make sure Disk not Memory is selected in the upper right corner of the wind...

Страница 161: ...ee Loading Printer Fonts in chapter 4 for more details To remove fonts from a SCSI drive you have two options First you can use PSDown exe which comes with your fonts See the PSDown exe documentation...

Страница 162: ...of Gray Line Screens Scanner Resolutions Line Art Scanning Halftone Scanning TIFF PICT EPS Formats Gamma Corrections Enhanced Screening Accurate Calibration Technology Page Design Typefaces and Fonts...

Страница 163: ...7 2 Advanced Imagingbb ___________________________________ Notes...

Страница 164: ...page design with tips for adding finishing touches for a truly professional image Levels of Gray The resolution of a laser printer is measured in dots per inch dpi The resolutions on your Accel a Writ...

Страница 165: ...eens Knowing how many levels of gray you would like to achieve is one factor in determining the appropriate line screen to use Depending on the individual image quality some degree of experimentation...

Страница 166: ...olution of 2 times that of the line screen used if printing at 100 size For example if a line screen of 95 is used the scanner resolution should be set to 190 dpi 95 x 2 If that resolution cannot be s...

Страница 167: ...the formulas in the previous section Halftone Scanning Note Different versions of PageMaker may work differently See the application manual for details QuarkXPress only allows you to change the line s...

Страница 168: ...812 offers seven gamma settings 0 through 6 with 0 as the default Settings 0 through 5 progressively lighten the midrange values If you need a negative reverse image which is required by some printin...

Страница 169: ...Black White Input Levels Gamma 5 Black White 1 1 0 Output Levels Black White Input Levels Gamma 4 Black White 1 1 0 Output Levels Black White Input Levels Gamma 3 Black White 1 1 0 Output Levels Blac...

Страница 170: ...ault enhanced screen is setup under the MISC SCREEN menus If you use the software printer setup you can select the levels of gray and gamma settings simultaneously Gray level and line screen combinati...

Страница 171: ...he desired screen 6 Click OK 7 Click OK 8 Close the Control Panel window Accurate Calibration Technology XANT s Accurate Calibration Technology X ACT allows you easily to calibrate the printer s engin...

Страница 172: ...ustments can be done using XANT s Command Center In a Macintosh environment use the following procedure to calibrate line lengths and adjust the printer margins 1 Start Command Center by double clicki...

Страница 173: ...ter or longer than the measurement above the vertical scroll bar in figure 7 3 adjust the scroll bar until the measurement reads the exact length of your line 7 Click Update Print When the new page pr...

Страница 174: ...f the x axis is low move the x scroll bar right until you reach the desired number of units 13 Click Set Print An alignment page with new settings prints 14 Measure where the x and y axes cross If pos...

Страница 175: ...tal line If it is shorter or longer than the measurement to the right of the horizontal scroll bar fig 7 5 adjust that bar until the measurement reads the exact line length 8 Measure the vertical line...

Страница 176: ...m and 1 over from the left side of the page If the lines cross at the correct place skip to step 16 13 Use the x scroll bar to make x axis changes and the y scroll bar to make y axis changes fig 7 6 F...

Страница 177: ...pter deals with some of the language and elements used in desktop publishing page design Typefaces and Fonts Two very important terms to understand are typefaces and fonts These terms often are used i...

Страница 178: ...ch typeface category lends itself to particular areas of page design For example the small detailed lines on a serif typeface helps draw a reader s eye across a line of text This makes it well suited...

Страница 179: ...ue Palatino Bold Palatino BoldItalic Miscellaneous Palatino Italic Symbol Palatino Roman ZapfDingbats Times Bold Times BoldItalic Times Italic Times Roman ITC ZapfChancery MediumItalic Typeface Forms...

Страница 180: ...a cluttered appearance Other Elements of Design Other elements of design besides typeface forms include orientation pitch point size and spacing Orientation The terms portrait and landscape orientatio...

Страница 181: ...e number of characters which can fit horizontally within one inch For example your printer has the PCL typeface Courier 10 pitch 12 points Ten characters fit within an inch and the size is 12 points i...

Страница 182: ...ender the downward stoke within a character set fig 7 10 6Point 8 Point 10 Point 12 Point 14 Point 18 Point 24 Point 54 Point Ready 72 Point PostScript Ascender x Height Descender Fig 7 10 Point Sizes...

Страница 183: ...cters For example the letter l needs less space than a w Except for Courier the rest of your printer s resident PostScript typefaces are proportionally spaced Proportional spacing is more legible bett...

Страница 184: ...ext All capitalized text is much harder to read than mixed case text Vary paragraph lengths to help readers keep track of where they are on the page Keep most paragraphs to five lines or less to help...

Страница 185: ...7 24 Advanced Imagingbb ___________________________________...

Страница 186: ...__________ Maintenance 8 1 Chapter 8 Maintenance Chapter Overview Handling the Printer Moving the Printer Cleaning the Printer Cleaning the Exterior Cleaning the Anti Static Teeth Cleaning the Transfe...

Страница 187: ...8 2 Maintenancebb _______________________________________ Notes...

Страница 188: ...gs in mind Do not place anything on top of the printer Always have someone help you lift the printer It weighs approximately 43 lbs 19 4 kg with toner and a cassette or 56 lbs 25 4 kg with an optional...

Страница 189: ...close the fold down tray Then after the printer cools cover it with protective plastic or a cloth If the printer is stored make sure it is in an area with a temperature of 32 to 95 F 0 to 35 C and a r...

Страница 190: ...Toner in chapter 6 Make sure all printer covers and the fold down tray are securely closed Remove all interface cables and the power cord Also if a SCSI disk is attached remove it too Always have help...

Страница 191: ...or pour solutions directly on the printer Always put the solution on the cloth and wipe the printer with the cloth Make sure the solution does not get inside the printer ports air vents or power cord...

Страница 192: ...cover by pressing the raised finger grips and lifting up and back approximately 180 fig 8 1 ONLINE FORM FEED TRAYSELECT ENTER MENU RESET TEST DATA MANUAL READY Fig 8 1 Open the Top Cover 3 Remove the...

Страница 193: ...ide of the printer fig 8 2 b Locate the anti static teeth and slide the cleaning brush back and forth across them several times to remove residue fig 8 2 Fig 8 2 Clean the Anti Static Teeth c Replace...

Страница 194: ...p and back approximately 180 3 Remove the toner cartridge See Removing the Old Cartridge in chapter 6 for details 4 Wipe off any dust toner or paper residue in the silver colored metal strip in the tr...

Страница 195: ...a trained service technician replace these parts Consumable Parts Part Name Part No Expected Life Cassette feed roller RB1 2126 000 200 000 pages Multi feed roller RB1 2127 000 200 000 pages Separatio...

Страница 196: ...er you will be charged for the return shipping parts and labor If you purchase a maintenance contract and send the printer back to XANT for work you only pay for the shipping to XANT If according to y...

Страница 197: ...8 12 Maintenancebb _______________________________________...

Страница 198: ..._________ Options 9 1 Chapter 9 Options Chapter Overview Paper Handling Options Optional Replacement Cassettes Optional 500 Sheet Cassette and Feeder RAM Upgrades Installing RAM Upgrades Ethernet Upgr...

Страница 199: ...9 2 Optionsbb ___________________________________________ Notes...

Страница 200: ...The standard printer comes with a 250 sheet cassette letter or A4 size as well as the built in fold down tray that will handle up to 100 sheets of standard or custom size media This not only gives yo...

Страница 201: ...dust and debris from getting into the cassette and building up in the printer where it can reduce print quality See Feeding Media to the Printer in chapter 6 for installation details The next section...

Страница 202: ...going to use skip to step 3 If not use the following procedure to reposition the guides a If the length guide is not positioned for the desired size slide it to the right lift it up and out If the wi...

Страница 203: ...placing it in the slots for the desired width and sliding it back until it locks in place fig 9 2 Note If you are using legal size media store the paper length guide in the slot at the front of the ca...

Страница 204: ...Then make sure the paper size indicator on the end of the cassette matches the setting LGL LTR A4 EXEC LTR LGL A4 EXEC LGL LTR A4 EXEC Paper Capacity Indicator Paper Size Indicator Fig 9 3 Set the Pa...

Страница 205: ...nd 500 sheets of executive paper in the second one used with the feeder Plus you still have the fold down tray where you can load a third size of paper For more details on the feeder see Using the Opt...

Страница 206: ...lbs 19 4 kg with the toner and a cassette loaded Have someone help you lift it 3 With the help of someone else align the printer over the feeder and gently lower it onto the feeder fig 9 4 ONLINE FOR...

Страница 207: ...firmly into place 5 Check the paper width guide fig 9 5 If it is not positioned for the desired media width squeeze the green latch on outside of the guide slide the guide in or out to the desired wid...

Страница 208: ...The blue gauge to the left should be aligned in the center for proper tension on the media LGL LTR A4 EXEC EC A4 LTR LGL Fig 9 6 Set the Paper Size and Paper Capacity Dials 9 Slide the loaded cassett...

Страница 209: ...ingle In line Memory Module The 4 MB upgrades are 72 pin SIMMs arranged as a 1 MBit by 32 bit width The 16 MB upgrades are arranged as a 4 MBit by 32 bit width The 32 MB upgrades are arranged as an 8...

Страница 210: ...and following the directions on the package 2 Turn off your printer and disconnect the power cord and all interface cables 3 Open the top cover by pressing in on the raised finger grips on each side a...

Страница 211: ...ate and remove the side cover securing screw located on the back of the printer just below and to the left of the interface plate fig 9 8 5 Slide the side cover toward the back of the printer fig 9 8...

Страница 212: ...cover by lowering it and gently lifting the bottom edge up and out of the slots on the printer Then set the cover aside for now fig 9 9 Fig 9 9 Remove the Side Cover 7 Remove the 9 screws securing th...

Страница 213: ...bb ___________________________________________ 8 Tilt the EMI shield down and lift the tabs at the bottom out of the slots on the printer fig 9 11 Then set the shield aside for now Fig 9 11 Remove the...

Страница 214: ...e RAM upgrade using the following procedure Note RAM banks must be filled in order Bank 1 and then Bank 2 If you mix SIMM RAM sizes the larger size SIMM goes into Bank 1 and the smaller in Bank 2 a If...

Страница 215: ...bag e Align the new SIMM with the notched corner down and the SIMM tilted to the right at a 45 angle to the controller board over the appropriate bank fig 9 14 Then insert the SIMM into the bank s con...

Страница 216: ...e in front You may have to hold the two latches out while pushing the SIMM into place and then release them If you do not have another SIMM to install skip to step 10 g If you have another SIMM to ins...

Страница 217: ...9 20 Optionsbb ___________________________________________ 12 Replace the 9 screws securing the EMI shield fig 9 16 Fig 9 16 Replace the EMI Shield Screws...

Страница 218: ...________________________________ Options 9 21 13 Replace the side cover by slipping the tabs on the bottom edge into the slots on the printer and raising the cover back up fig 9 17 Fig 9 17 Replace th...

Страница 219: ...ver 17 Reattach the interface cables and power cord 18 Turn on your printer Note If you want to confirm the memory upgrade check the start up page To print a test start up page take the printer off li...

Страница 220: ...eventing Jams Clearing Jams Status Messages Printer Status Messages Printer Error Messages Preliminary Troubleshooting The General Checkup Macintosh Environment Checkup PC Environment Checkup Miscella...

Страница 221: ...10 2 Troubleshootingbb____________________________________ Notes...

Страница 222: ...d how to place a service call Jams This section covers preventing and clearing media jams Preventing Jams Many jams are the result of using the wrong consumables either toner or media and handling the...

Страница 223: ...print side down and the fold down paper tray media print side up Empty the output tray when it gets full to prevent the media already in the tray from blocking media as it exits the printer Use XANT...

Страница 224: ...is means if the feature is enabled and a multiple page job jams as long as you do not turn off the printer to remove the jam the printer reprints the jammed page and the rest of the job See The Jam Re...

Страница 225: ...ure 10 2 ONLINE FORM FEED TRAYSELECT ENTER MENU RESET TEST DATA MANUAL READY Fig 10 2 Remove the Jam from the Cassette Slot 3 Check the fold down tray slot for a media jam If it is there gently pull t...

Страница 226: ...tinue checking the paper path for jams in the access door area Access Door Area Use the following procedure to clear access door area jams 1 Open the top cover fig 10 4 ONLINE FORM FEED TRAYSELECT ENT...

Страница 227: ...g 10 5 Remove the Toner Cartridge Caution The toner cartridge is sensitive to bright lights and direct sunlight Do not keep it out of the printer for any extended periods without putting it in the bag...

Страница 228: ..._____________________________________ Troubleshooting 10 9 3 Open the paper access door by pulling the green lever on the left fig 10 6 Fig 10 6 Open the Paper Access Door...

Страница 229: ...und remove the jam in one of the following ways a Remove the jam by gently pulling it out from the standard cassette slot if you can see the media in the slot and it will easily pull out fig 10 7 ONLI...

Страница 230: ...ter and then pulling it toward you fig 10 8 Fig 10 8 Remove the Jam via the Access Door Area c If the media has already entered the fuser area and does not come out easily skip to the next section Fus...

Страница 231: ...clear fuser assembly area jams Warning The fuser unit can become extremely hot during printing and can cause severe burns Do not touch this area 1 Check the fuser area for a jam If found gently pull t...

Страница 232: ...r until it rests securely in place fig 10 10 If the cartridge is not seated correctly the top cover will not close completely ONLINE FORM FEED TRAYSELECT ENTER MENU RESET TEST DATA MANUAL READY Fig 10...

Страница 233: ...____________________________________ Paper Exit Area Use the following procedure to clear paper exit area jams 1 Open the rear cover by pressing in and pulling the latch back and down fig 10 11 Fig 10...

Страница 234: ...of the following methods a If the media is not completely past the fuser area first gently pull the media s trailing edge loose from the fuser unit and then pull the lead edge to remove the media via...

Страница 235: ...n figure 10 13 and then release the green lever Fig 10 13 Remove a Jam from the Paper Exit Area 3 Close the rear cover making sure it latches firmly Status Messages Often you can solve questions by ch...

Страница 236: ...ITIALIZING The printer is warming up performing setup routines and getting ready to go on line NO EP CART The toner cartridge is either not in the printer or not seated firmly in the printer Install a...

Страница 237: ...ter is resetting after the Reset key has been pressed and an active job has been cancelled TEST PRINT The printer is printing a test page when the printer is off line and not working within the menu s...

Страница 238: ...bleshooting covers both a general once over of the printer and then specific checks depending on the environment Macintosh PC or Ethernet Also Ethernet troubleshooting is covered in the Ethernet upgra...

Страница 239: ...ke sure you install screen fonts to match the printer fonts you use See Loading Screen Fonts in chapter 3 for details If you have an Ethernet setup make sure all Ethernet cabling is connected correctl...

Страница 240: ...ndow and press the Enter key If STARTUP PAGE YES is capitalized this feature is already enabled if so press the On Line key and skip to the next bullet item in this list If not press the Enter key to...

Страница 241: ...paper cassette turn the printer off and start the printer again When I print a legal size document the text is chopped off for a letter size page Possible Solutions If you try to print legal size docu...

Страница 242: ...ent the printer needs to be in PostScript or AIS mode If you are printing a PCL 5 document the printer needs to be in PCL5 or AIS mode If you are printing an HP GL 7475A document the printer needs to...

Страница 243: ...in Select the Chooser from the Apple menu make sure LocalTalk is active and select the Accel a Writer 812 printer If you have an Ethernet setup select Control Panels from the Apple menu then select Ne...

Страница 244: ...for details Use laser quality media and make sure it meets all the requirements in the Media Handling section of chapter 6 Install a new toner cartridge See Handling and Replacing the Toner Cartridge...

Страница 245: ...ils Replace the media with new media making sure it meets all the requirements in the Media Handling section of chapter 6 Adjust the screen frequency for the images within the applications The printer...

Страница 246: ...ort break in run of several copies since toner can settle during storage See Handling and Replacing the Toner Cartridge in chapter 6 for details The start up page has banding along the vertical axis o...

Страница 247: ...chapter before calling for technical support If these solutions do not work gather the following troubleshooting information and then call XANT s Technical Support Troubleshooting Information A start...

Страница 248: ...en a call number and your call will be placed next in line for the first available technician XANT Fax Support You have an option of 24 hour fax support XANT s Technical Support fax number is 334 342...

Страница 249: ...10 30 Troubleshootingbb____________________________________...

Страница 250: ...________ Supported HP PCL 5 and HP GL 7475A Commands A 1 Appendix A Supported HP PCL 5 and HP GL 7475A Commands...

Страница 251: ...A 2 Supported HP PCL 5 and HP GL 7475A Commandsbb _______ Notes...

Страница 252: ...yntax Before listing supported HP PCL 5 commands the syntax of the commands or escape sequences should be explained The following is the syntax of an HP PCL 5 escape sequence esc cc gc p1 c1 pn cn dat...

Страница 253: ...terminating characters data This refers to data that is sometimes required by the escape sequence Note The and are not part of the escape sequence They are used to separate the parts of the command L...

Страница 254: ...f columns esc a L Set Right Margin of columns esc a M Clear Side Margins esc 9 Vertical Line Spacing Set VMI of 1 48 inch increments esc l C Set Lines Per Inch of lines esc l D 1 2 3 4 6 8 12 16 or 24...

Страница 255: ...data End Graphics esc rB Advanced Graphics Horizontal Rule Pattern of dots esc c A Size of decipoints esc c H Vertical Rule Pattern of dots esc c B Size of decipoints esc c V Print Rule esc c0P Rule P...

Страница 256: ...6X Delete all temporary macros esc f7X Delete macro ID esc f8X Make temporary esc f9X Make permanent esc f10X Font Selection Symbol Set Roman 8 esc 8U US ASCII esc 0U Linedraw esc 0B Math8 esc 8M Spac...

Страница 257: ...ecified esc c2F Delete last font ID esc c3F character code Make temporary font esc c4F Make permanent font esc c5F Copy assign esc c6F Create Font of bytes esc s W data Download of bytes esc s W data...

Страница 258: ...767 sd for scaled decimal format 32 768 0000 to 32 767 9999 Supported HP GL 7475A Commands The following commands instructions are supported by the HP GL emulation AA Arc absolute X i sd Y i sd arc a...

Страница 259: ...d Y i sd ER Edge rectangle relative X i sd Y i sd EW Edge wedge radius i sd start angle i sweep angle i chord angle i FT Fill type type i spacing sd angle i IM Input e s and p masks e i s i p i IN Ini...

Страница 260: ...i return OE Output error i return OF Output factors i return OH Output hard clip limits i return OI Output identification c return OO Output options i return OP Output P1 and P2 i return OS Output st...

Страница 261: ...RR Shade rectangle relative X i sd Y i sd SA Select alternate character set SC Scale Xmin i Xmax i Ymin i Ymax i SI Absolute character set width d height d SL Absolute character slant from vertical t...

Страница 262: ...________ Supported HP PCL 5 and HP GL 7475A Commands A 13 VS Select velocity v v d WG Shade wedge radius i sd start angle i sweep angle i chord angle i XT X axis tick YT Y axis tick...

Страница 263: ...A 14 Supported HP PCL 5 and HP GL 7475A Commandsbb _______...

Страница 264: ...____________________________________ Application Notes B 1 Appendix B Application Notes...

Страница 265: ...B 2 Application Notesbb ___________________________________ Notes...

Страница 266: ...cription file see the Windows Setup section in chapter 4 for details on installing this file In a Macintosh Environment If you work in a Macintosh environment FreeHand uses files known as PPD files Po...

Страница 267: ...selected size appears in the Paper Size field 8 Select the Optimized Screen box and hold the mouse button down A pop up menu appears with available combinations of lpi lines per inch screen rulings an...

Страница 268: ...selected size appears in the Paper box 8 Click the Halftone Screen box and hold the mouse button down A pop up menu appears with available combinations of lpi lines per inch screen rulings and printer...

Страница 269: ...g this driver In a Macintosh Environment If you work in a Macintosh environment QuarkXPress uses a file known as a PDF file PostScript description file See the Drivers Folder section of chapter 3 for...

Страница 270: ...ties disk includes special files to use with PageMaker You need to install the file required by your version of PageMaker and the environment in which you work In a PC Environment If you work in a PC...

Страница 271: ...PD The pop up menu disappears and the selected file appears in the Printer box 5 Make any other selections you want in the Print dialog box 6 Click Print to send the job to the printer PageMaker 5 0 A...

Страница 272: ...the program to print to the Accel a Writer 812 using the following procedure 1 Select Configure from the File menu A Configure menu appears 2 Select Configure plotter The Plotter Configuration menu a...

Страница 273: ...over the list for all the selections If you want to make changes type YES and press the Enter key then make the desired changes If not type NO press the Enter key The message Enter a description for t...

Страница 274: ...its Rotation and Origin 10 5 9 Plot Preview Partial Full Fig B 1 The Plot Configuration Window 3 Click Device and Default Selection A pop up menu appears with a list of available printers Choose the p...

Страница 275: ...812 will be the default printer Use this same process with any other documents that were created and saved with a different printer selected as the output device Adobe Separator 5 0 Macintosh Adobe I...

Страница 276: ...____________________________________ Application Notes B 13 MultiAd Creator The Accel a Writer 812 PPD should be placed in the PPD folder in the MultiAd Creator folder...

Страница 277: ...B 14 Application Notesbb ___________________________________...

Страница 278: ..._________________________________ Warranty Information C 1 Appendix C Warranty Information...

Страница 279: ...C 2 Warranty Infromationbb ________________________________ Notes...

Страница 280: ...n of XANT Corporation XANT CORPORATION IS NOT RESPONSIBLE FOR SPECIAL INCIDENTAL OR CONSEQUENTIAL DAMAGES RESULTING FROM ANY BREACH OF WARRANTY OR UNDER ANY OTHER LEGAL THEORY INCLUDING LOST PROFITS D...

Страница 281: ...er parts and consumables from XANT call Customer Support at 800 926 8393 in the US and Canada at 95 800 926 8393 in Mexico or 334 342 4846 elsewhere Your warranty and maintenance contracts are not aff...

Страница 282: ...___________________________________________ Glossary G 1 Glossary...

Страница 283: ...G 2 Glossarybb __________________________________________ Notes...

Страница 284: ...ween computer devices using a serial interface Bitmapped Image An image made up of small dots placed on a grid to form the outline and then filled within the outline Bitmapped images are often rough a...

Страница 285: ...ciated with the number of dots per inch either on a printed page or on a monitor screen It is also the measurement used to describe printer resolution See also Resolution DTR DSR Data Terminal Ready D...

Страница 286: ...ee also Typeface Flow Control Conflict A conflict which occurs when your computer software and printer settings are not both set for the same communication protocol For example in serial communication...

Страница 287: ...Accel a Writer 812 contains an HP GL 7475A plotter emulation of this language HP PCL A page control language developed by Hewlett Packard Company It is the laser printer language used by HP LaserJet...

Страница 288: ...communicate with each other using one of many network operating standards such as AppleTalk or Ethernet Null Modem Cable One type of cable used for serial communication This type of cable arranges th...

Страница 289: ...e Systems The Accel a Writer 812 printer contains the Adobe Postscript language not an emulation PPD File PostScript Printer Description file A special file providing printer specific information whic...

Страница 290: ...rinter Port See Interface Protocol A mechanism that controls how data is sent between devices Queue The list of print jobs waiting to be printed RAM Random Access Memory RAM is volatile memory availab...

Страница 291: ...ks two SCSI peripheral devices on a SCSI chain See also SCSI SCSI Cable Termination A device which reduces interference on the SCSI chain See also SCSI SCSI Disk A disk that uses the SCSI communicatio...

Страница 292: ...face all have three things in common family style and character set See also Font Family and Character Set Volatile Parameters Printer parameters which only last during the current power cycle of the...

Страница 293: ...G 12 Glossarybb __________________________________________...

Страница 294: ...plication notes B 3 AutoCAD B 9 FreeHand Macintosh B 3 FreeHand PC B 3 PageMaker Macintosh B 7 PageMaker PC B 7 QuarkXPress Macintosh B 6 QuarkXPress PC B 6 Applications See Individual applica tions N...

Страница 295: ...stalling 9 8 Cassette lower Using 6 11 Cassettes Replacements 9 4 Cautions Adhesives 6 5 Cleaning the printer 8 6 Downloading fonts 3 10 4 15 Fuser unit 6 5 Hard disk 2 37 Hard disks 2 36 2 37 Inks 6...

Страница 296: ...ities 5 3 Copies menu PCL5 5 21 5 22 Copies number of PCL5 5 22 Credits manual vi Custom size Fold down tray 6 11 Customer support 10 28 Bulletin board number 10 29 Fax number 10 29 Phone number 10 29...

Страница 297: ...rnet port Apple AUI connector 2 30 Cables illustration of 2 30 Connecting to 2 30 Thin coaxial 10Base2 2 30 Transceivers 2 30 Transceivers illustration of 2 30 UTP 10BaseT 2 30 Ethernet troubleshootin...

Страница 298: ...as source 6 14 Transparencies 6 7 6 11 6 15 Tray Select key 6 14 Using 6 11 Font downloading Macintosh 3 10 Memory 4 15 9 12 PostScript error 3 10 Font menu PCL5 5 21 5 23 Illustration of 5 24 Number...

Страница 299: ...plications See Indi vidual applications INITDSK PS initializing file 4 6 Initial Job menu 5 11 5 13 Initialize Disk ps 3 7 Initializing hard disk 2 36 Macintosh 2 37 PC 2 39 PC file 2 39 Initializing...

Страница 300: ...5 12 Options 5 12 Languages printer 5 11 Factory default 5 11 Laser beam warning iv LaserWriter driver 10 20 10 24 LaserWriter icon 3 4 Leading edge of media 6 7 LEDs 5 4 Data LED 5 5 Manual LED 5 5...

Страница 301: ...5 10 5 21 Maintenance Cleaners 2 4 8 6 Cleaning the printer 8 5 Contract 8 11 Parts consumable 8 10 Manfeed menu 5 11 5 14 Factory default 5 14 Options 5 14 Manual feed Fold down tray 6 14 Media sizes...

Страница 302: ...r 8 5 Toner cartridge 2 14 6 22 MultiAd Creator B 13 N Negative image 7 7 Network Ethernet 9 22 EtherTalk 9 22 No EP Cart status message 10 17 No EP Cart 10 17 Number menu PCL5 5 23 5 24 Numeric value...

Страница 303: ...geMaker 1 10 B 7 Application notes B 7 Line screen 7 6 Macintosh B 7 PC B 7 Scanned images 7 6 Windows B 7 Paper Coated 6 5 Curl 6 5 Fanning 2 15 2 18 Feeder source 6 7 6 11 Fold down tray 6 11 Laser...

Страница 304: ...5 23 PCL5 menu 5 10 5 21 Copies menu 5 21 5 22 Font menu 5 21 5 23 Font Page menu 5 21 5 25 Illustration of 5 22 Line Wrap menu 5 21 5 23 Lines Inch menu 5 21 5 22 Orient menu 5 21 5 23 Phone numbers...

Страница 305: ...er 1 10 B 7 PC 4 3 QuarkXPress 1 10 B 6 Separator B 12 Printer fonts Downloading to disk 3 10 Downloading to memory 3 10 Printer fonts Macintosh Downloader 5 0 4 3 10 Downloading 3 10 Printer fonts PC...

Страница 306: ...efault 5 13 Levels of gray 7 4 Memory 1 6 QuarkXPress B 7 Scanner 7 5 Standard 1 7 6 30 Upgrades 6 30 RISC processor 1 7 RJ 45 2 31 RJ ll 2 23 RS232 menu 5 15 5 17 Baud Rate menu 5 17 5 18 Data Bits m...

Страница 307: ...2 Banks 9 17 Caution 9 18 Complex files 9 12 Order of installation 9 17 Sizes 9 12 Static electricity 9 12 Simultaneous interfacing 1 8 Software proprietary iii Source menu PCL5 5 23 5 24 Spacing char...

Страница 308: ...ons 5 7 Test print status message 10 18 ThinNet 2 30 TIFF PageMaker 7 6 QuarkXPress 7 6 Scanned images 7 6 Timeout End of file marker 5 14 Timeout menu 5 11 5 14 Factory default 5 14 Options 5 14 Tone...

Страница 309: ...nting 10 22 Light image 6 19 10 25 Macintosh 10 19 10 20 Media source 10 21 Miscellaneous 10 21 PC 4 3 10 19 10 20 PostScript error 3 10 Power cord 2 20 10 19 Power source 10 19 Power up 2 20 Prelimin...

Страница 310: ...ting status message 10 18 Warming up 2 20 Status message 10 18 Time period 2 20 Warnings Clearing jams 10 12 Fuser unit 10 12 Laser beam iv Lifting the printer 9 9 Printer weight 2 7 9 9 Warranty 1 10...

Страница 311: ...e 1st file 3 6 Sysparm ps 3 7 Utilities folder 3 6 XANT Utilities PC ADOBEPS DRV 4 4 INITDSK PS 4 6 Main directory 4 4 PARMDUMP PS 4 6 PS_Files directory 4 5 README 1ST 4 4 README WRI 4 4 SET_IP PS 4...

Страница 312: ..._______________________________________________ Index I 19...

Отзывы: