


Watlow EZ-ZONE
®
RMC Module
•
121
•
Chapter 5 Profiling Page
Chapter 5: Profiling Page
5
How to Setup and Start a Profile
First, consider some foundational profile setup fea-
tures that once configured, will then be available for
all profiles.
Note:
It should also be noted that to execute a profile for
any given loop of control, profiles must be enabled for
each loop; this can be found in the Loop Menu of the
Setup Page.
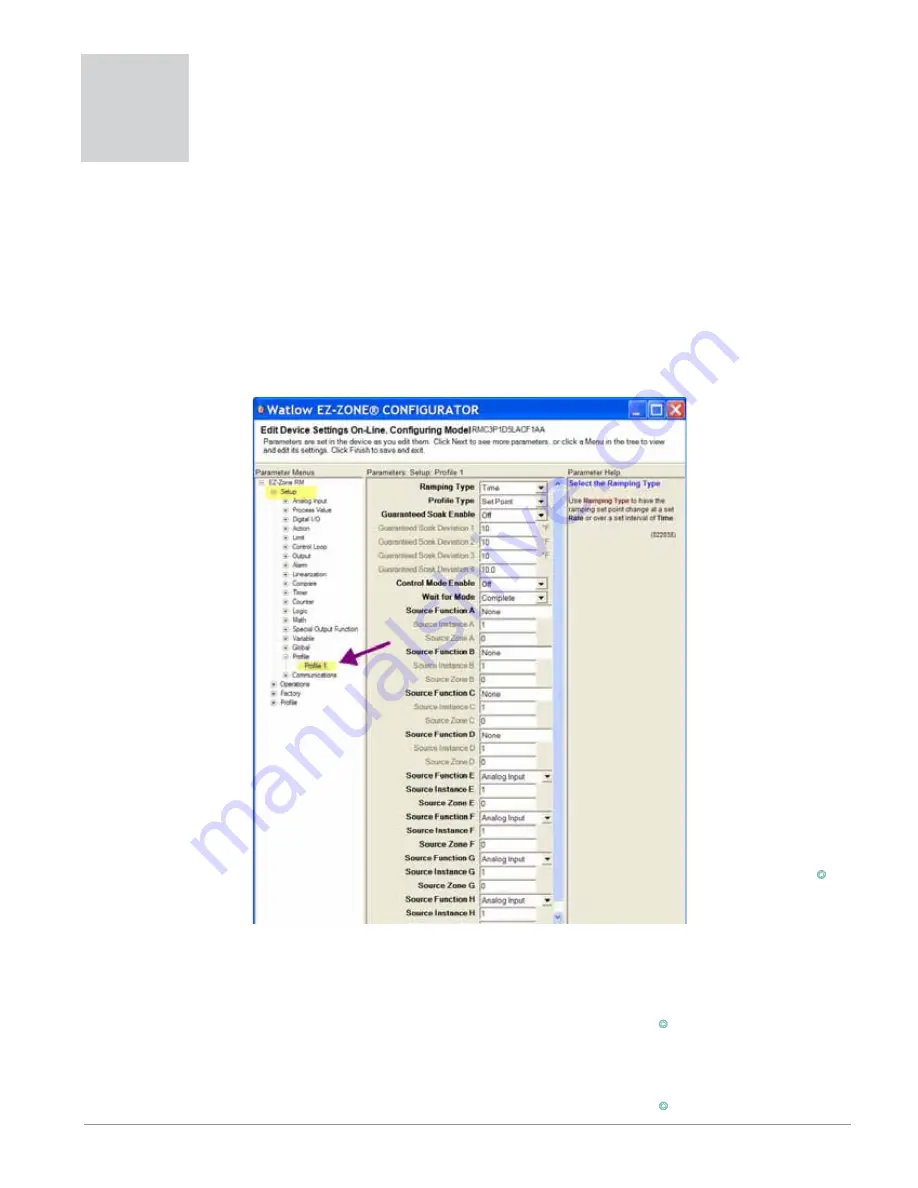
The screen shot below (EZ-ZONE Configurator soft-
ware) graphically
shows the settings
that will apply to all
profiles; e.g., if Guar-
anteed Soak is not en-
abled here this feature
will not be available in
any individual profile
configuration.
Some of those features
that apply to all pro-
files are listed below
with a brief description
of their function.
-
Ramping Type
(Time or Rate) which
changes the profile
set point based on a
set interval of time or
set rate.
-
Profile Type
(Set
Point or Process) de-
termines whether a
step (any step chang-
ing the set point) of
a profile will begin
by using the process
value (Process) or the
last closed-loop set
point (Set Point).
-
Guaranteed Soak
Enable
, when set to On makes this feature avail-
able in all profiles. If Guaranteed Soak Enable is
on, use Guaranteed Soak Deviation 1 to 4 to set the
value for the corresponding loop. Set the deviation
or band above or below the working set point where
this condition must be met before the profile can
proceed.
-
Control Mode Enable
if changed to on, will allow
the loops control mode to be changed through the
profile.
-
Wait for Mode
determines how the wait-for condi-
tions must be satisfied:
•
Complete
requires that all of the conditions must
be true at the same time.
•
Once
requires that all of the conditions were true
at some time during the wait period.
Note:
Changes made to profile parameters in the Profiling
Pages will be saved and will also have an immediate
impact on the running profile. Some parameters in the
Profile Status Menu can be changed for the currently
running profile, but
should only be changed
by knowledgeable
personnel and with
caution. Changing pa-
rameters via the Pro-
file Status Menu will
not change the stored
profile but will have an
immediate impact on
the profile that is run-
ning.
Once these global
profile features are
configured, the next
step will require navi-
gation to the Profiling
Page. Here, each de-
sired ramp and soak
profile will be config-
ured.
To navigate to the
Profile Page using the
RUI, follow the steps
below:
1. From the Home
Page, press and hold
the Advance Key
‰
for four seconds. The
profile prompt
[ProF]
will appear in the
lower display and the profile number (e.g.
[``p1]
)
appears in the upper display.
2. Press the Up
¿
or Down
¯
key to change to an-
other profile.
3. Press the Advance Key
‰
to move to the selected
profiles first step.
4. Press the Up
¿
or Down
¯
keys to move through
the steps.
5. Press the Advance Key
‰
to move through the se-


