


P
ROGRAMMING
T
OLL
R
ESTRICTIONS
> A
CCOUNT
C
ODE
L
ENGTH
AND
P
ASSWORD
DX-80 Programming Manual
- 220 -
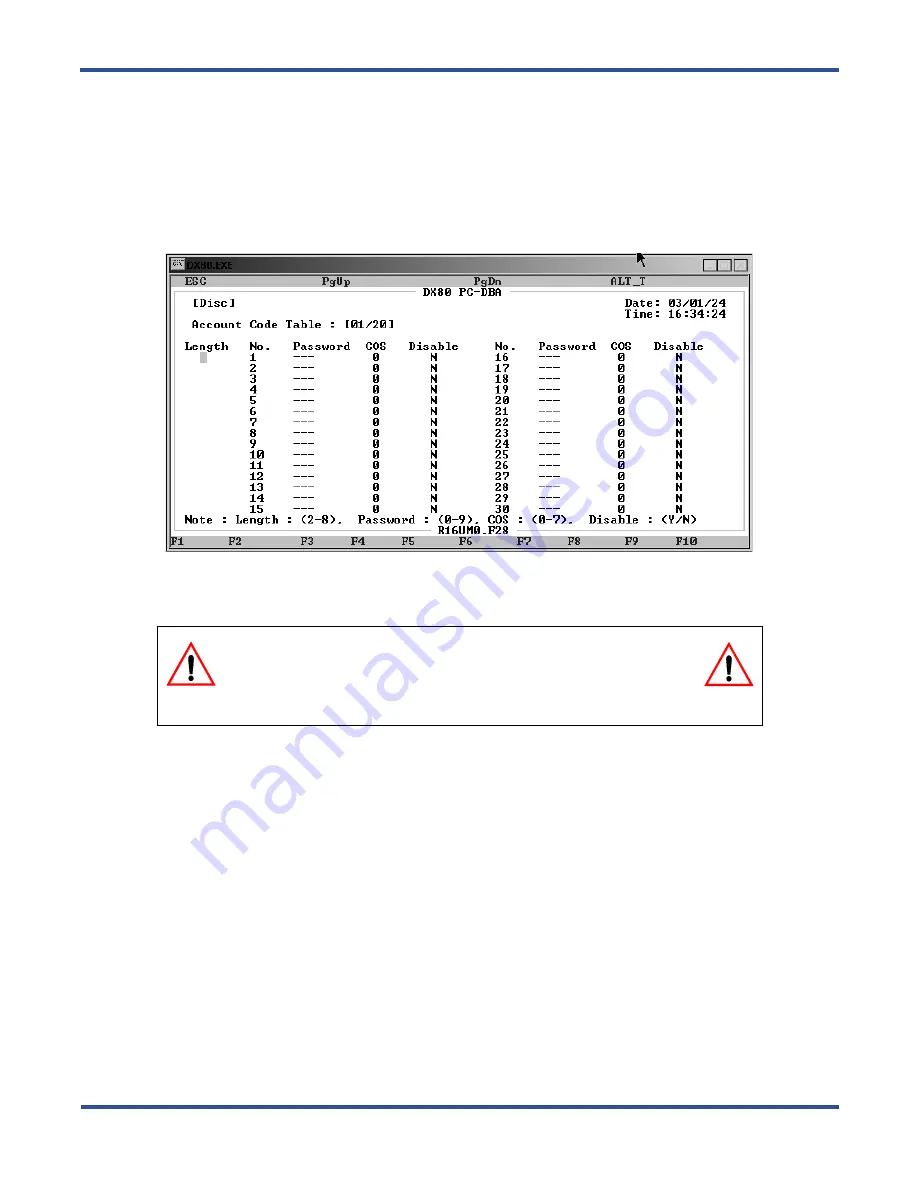
7.2.2 PROGRAMMING USING PC-DBA
1. Select
Programming
from the PC-DBA menu and press
Enter
. The system displays the Database Program-
ming menu.
2. Use the arrow keys to highlight
Restriction
and press
Enter
. The system displays the Restriction menu.
3. Highlight
Account Code Table
and press
Enter
. The system displays the Account Code Table screen.
4. Highlight
Length
and press
Enter
. Key in the number of digits you want to use for account codes, then press
Enter.
Valid options are 2 - 8 digits. The default is 2.
When you specify the length of the password, the system changes the number of digits in the Password field
accordingly.
5. Next, highlight the first
Password
field and press
Enter
. Key in the password and press
Enter
. Valid pass-
words are numbers from 0 to 9, containing as many digits as you specified in the Length field. The default
is no password.
6. Highlight
COS
for password 1 and press
Enter
to assign this password a class of service, from 0 through 7.
The default is 0. When an extension user enters this password, the system automatically assigns the class of
service you specify here to that call. The system follows all of the restrictions associated with that class of
service.
7. Next highlight
Disable
. Press
Enter
and assign either
Y
or
N
to disable/enable this password. The default is
N. You must set
Disable
to
N
if you want to use the password.
8. In the same manner, assign additional passwords and their classes of service as needed. You can assign up
to 600 passwords.
9. When you are done, press
Esc
to return to the Database Programming screen. The system prompts: “Exit
This Feature?”; press
Y
for yes.
10. The system prompts “Save Current Setting?” Press
Y
to save your changes.
CAUTION
Changing the account code length will delete all previously
programmed account codes.
Содержание Comdial DX-80
Страница 1: ...Programming Manual Technical Manual Volume II GCA60 001 RB1105 ...
Страница 4: ... iv This Page Intentionally Left Blank ...
Страница 18: ...This page intentionally left blank ...
Страница 28: ...OVERVIEW PROGRAMMING A NEW SYSTEM DX 80 Programming Manual 28 This Page Intentionally Left Blank ...
Страница 58: ...GETTING STARTED SHORTCUTS TO HELP YOU WORK FASTER DX 80 Programming Manual 58 ...
Страница 284: ...PROGRAMMING EXTENSIONS CONFIGURING SINGLE LINE TELEPHONES ANALOG DEVICE SUPPORT DX 80 Program 284 ...
Страница 290: ...PROGRAMMING FEATURE BUTTONS FEATURE KEY RESET DX 80 Programming Manual 290 This Page Intentionally Left Blank ...
Страница 291: ... 291 A WORKSHEETS Worksheets DX 80 Programming Manual ...
Страница 292: ...APPENDIX A DX 80 Programming Manual 292 ...
Страница 293: ... 293 DX 80 Programming Manual APPENDIX A ...
Страница 294: ...APPENDIX A DX 80 Programming Manual 294 ...
Страница 295: ... 295 DX 80 Programming Manual APPENDIX A ...
Страница 296: ...APPENDIX A DX 80 Programming Manual 296 ...
Страница 297: ... 297 DX 80 Programming Manual APPENDIX A ...
Страница 298: ...APPENDIX A DX 80 Programming Manual 298 ...
Страница 299: ... 299 DX 80 Programming Manual APPENDIX A ...
Страница 300: ...APPENDIX A DX 80 Programming Manual 300 ...
Страница 301: ... 301 DX 80 Programming Manual APPENDIX A ...
Страница 302: ...APPENDIX A DX 80 Programming Manual 302 ...
Страница 303: ... 303 DX 80 Programming Manual APPENDIX A ...
Страница 304: ...APPENDIX A DX 80 Programming Manual 304 ...
Страница 305: ... 305 B BUTTON LABELING Cut along all dotted lines C O M D I A L D X 8 0 DX 80 Programming Manual ...
Страница 308: ...APPENDIX B DX 80 Programming Manual 308 This Page Intentionally Left Blank ...
Страница 321: ... 321 DX 80 Programming Manual INDEX This page intentionally left blank ...


