16
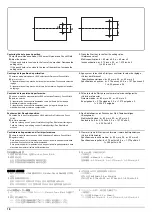
a
b
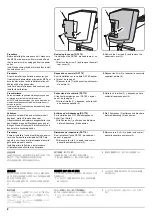
[Adjusting the hole punch position]
1.
Connect the MFP power plug to the wall out-
let and turn the MFP main power switch on.
2.
Make a test copy in punch mode.
3.
If any off-centering is observed, follow the
procedure below to adjust the hole position.
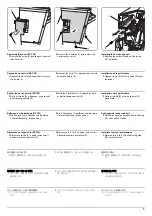
Adjusting the hole punch entry registration
1.
Enter the maintenance mode U246, select Finisher and Punch Regist.
2.
Adjust the values.
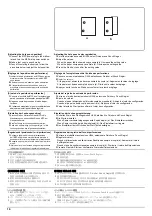
When the paper fed in skewed copy example (a): Increase the setting value.
When the paper crimped copy example (b): Decrease the setting value.
3.
Press the Start key to confirm the setting value.
[Réglage de la position des perforations]
1.
Insérer la fiche d’alimentation du MFP dans la prise
murale et mettre l’interrupteur principal du MFP
sous tension.
2.
Effectuer une copie d'essai en mode perforation.
3.
Si les perforations sont décentrées, suivre la
procédure ci-dessous pour ajuster la position de
perforation.
Réglage de l'enregistrement de l'entrée des perforations
1.
Passer en mode maintenance U246, sélectionner Finisher et Punch Regist.
2.
Régler les valeurs.
Si le papier est alimenté de travers exemple de copie (a): Augmentez la valeur de réglage.
Si le papier est froissé exemple de copie (b): Diminuez la valeur de réglage.
3.
Appuyer sur la touche de Start pour confirmer la valeur de réglage.
[Ajuste de la posición de perforación]
1.
Conecte el enchufe del MFP en el receptáculo de
pared y encienda el interruptor principal del MFP.
2.
Haga una copia de prueba en el modo de per-
foración.
3.
Si observa descentrado, siga el procedimiento de
abajo para ajustar la posición del agujero.
Ajuste del registro de entrada de perforación
1.
Entre en el modo de mantenimiento U246, seleccione Finisher y Punch Regist.
2.
Ajuste los valores.
Cuando el papel alimentado está torcido copia de muestra (a): Aumente el valor de configuración.
Cuando el papel se dobló copia de muestra (b): Reduzca el valor de configuración.
3.
Pulse la tecla de Start para confirmar el valor de configuración.
[Einstellen der Lochungsposition]
1.
Stecken Sie den Netzstecker des MFP in die
Wandsteckdose und schalten Sie den MFP am
Hauptschalter ein.
2.
Eine Testkopie im Lochungsmodus erstellen.
3.
Falls eine außermittige Lochung erfolgte, ist die
Lochungsposition wie folgend nachzustellen.
Einstellen der Lochungsregistrierung
1.
Schalten Sie in den Wartungsmodus U246, wählen Sie Finisher und Punch Regist.
2.
Die Werte einstellen.
Wenn Papier verkantet eingezogen wird Kopiebeispiel (a): Den Einstellwert erhöhen.
Wenn Papier verknittert wird Kopiebeispiel (b): Den Einstellwert verringern.
3.
Den Einstellwert durch Drücken der Start-Taste bestätigen.
[Regolazione di posizione dei fori di perforazione]
1.
Collegare la spina del cavo di alimentazione
dell’MFP alla presa a muro della rete elettrica e
accendere l’interruttore principale di alimentazione.
2.
Eseguire una copia di prova in modalità di perfora-
zione.
3.
Nel caso in cui non lo siano, eseguire la procedura
indicata qui di seguito per regolarne la posizione.
Regolazione del registro del foro di perforazione
1.
Entrare in modalità manutenzione U246, selezionare Finisher e Punch Regist.
2.
Regolare i valori.
Quando l'alimentazione della carta risulta obliqua esempio di copia (a): Aumentare il valore
dell'impostazione.
Quando la carta risulta increspata esempio di copia (b): Diminuire il valore dell'impostazione.
3.
Premere il tasto di Start per confermare il valore dell'impostazione.
[パンチ位置の調整]
1.
MFP 本体の電源プラグをコンセントに差し
込み、
主電源スイッチを ON にする。
2.
パンチモードでテストコピーを行う。
3.
パンチ位置がずれていた場合、次の手順で調
整を行う。
パンチ搬入レジスト調整
1.
メンテナンスモード U246 をセットし、Finisher、
Punch Regist を選択する。
2.
設定値を調整する。
用紙が斜めに搬送される場合コピーサンプル (a):設定値を上げる。
用紙が Z 折れする場合コピーサンプル (b):設定値を下げる。
3.
スタートキーを押し、設定値を確定する。
[打孔位置的调节]
1.
将 MFP 主机上的电源插头插入电源插座中,
打开主电源开关。
2.
在打孔模式下进行测试复印。
3.
打孔位置有偏差时,按以下步骤进行调节。
打孔装入定位调节
1.
设置维护模式 U246,选择 Finisher、Punch Regist。
2.
调整设定值。
纸张斜向搬运时的复印样本 (a):调高设定值。
纸张作 Z 字折时的复印样本 (b):调低设定值。
3.
按 Start 键,以确定设定值。
[펀치위치의 조정]
1.
MFP 본체 전원플러그를 콘센트에 꽂고 주
전원 스위치를 ON 으로 합니다 .
2.
펀치모드에서 시험복사를 합니다 .
3.
펀치위치가 벗어난 경우에는 다음 순서로 조
정합니다 .
펀치반입 레지스트 조정
1.
메인터넌스 모드 U246 를 세트하고 Finisher, Punch Regist 를 선택합니다 .
2.
설정치를 조정합니다 .
용지가 경사로 반송되는 경우의 복사샘플 (a):설정치를 높입니다 .
용지가 Z 꺾임이 있는 경의 복사샘플 (b):설정치를 내립니다 .
3.
시작키를 누르고 설정치를 확인합니다 .
Содержание UTAX AK 730
Страница 5: ...This page is intentionally left blank ...
Страница 11: ...This page is intentionally left blank ...
Страница 15: ...3NB 3ND 3N0 3NK This page is intentionally left blank ...
Страница 25: ...3NB 3ND 3N0 3NK 1 1 10 This page is intentionally left blank ...
Страница 43: ...3NB 3ND 3N0 3NK 1 2 18 3 Remove tape and pad Figure 1 2 23 Tape Pad ...
Страница 45: ...3NB 3ND 3N0 3NK 1 2 20 This page is intentionally left blank ...
Страница 81: ...3NB 3ND 3N0 3NK 1 3 36 This page is intentionally left blank ...
Страница 157: ...3NB 3ND 3N0 3NK 1 4 76 This page is intentionally left blank ...
Страница 169: ...3NB 3ND 3N0 3NK 1 5 12 This page is intentionally left blank ...
Страница 206: ...3NB 3ND 3N0 3NK 2 2 11 This page is intentionally left blank ...
Страница 246: ...1 1 INSTALLATION GUIDE INSTALLATION GUIDE FOR 4000 SHEETS FINISHER ...
Страница 269: ...INSTALLATION GUIDE FOR FINISHER ATTACHMENT KIT MFP A ...
Страница 283: ...INSTALLATION GUIDE FOR FINISHER ATTACHMENT KIT MFP B ...
Страница 284: ...E F A H G I J B D C ...
Страница 291: ...INSTALLATION GUIDE FOR FINISHER ATTACHMENT KIT PRINTER ...
Страница 295: ...INSTALLATION GUIDE FOR CENTER FOLDING UNIT ...
Страница 312: ...INSTALLATION GUIDE FOR MULTI TRAY ...
Страница 326: ...INSTALLATION GUIDE FOR MULTI TRAY ATTACHMENT KIT PRINTER ...
Страница 330: ...INSTALLATION GUIDE FOR PUNCH UNIT ...

