10
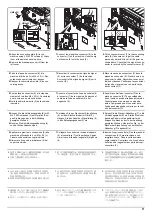
2.
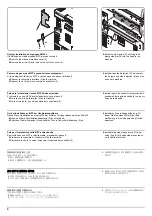
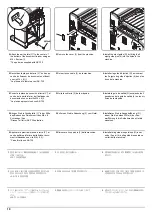
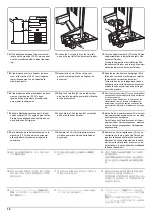
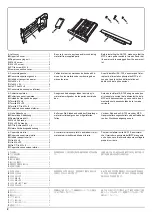
Attach the earth plate (Y)* to the center of
the bottom of the document finisher using an
M4 × 8 screw (I).
*The part was supplied with AK-735
3.
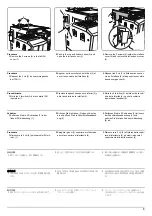
Remove the cover (3) from the machine.
4.
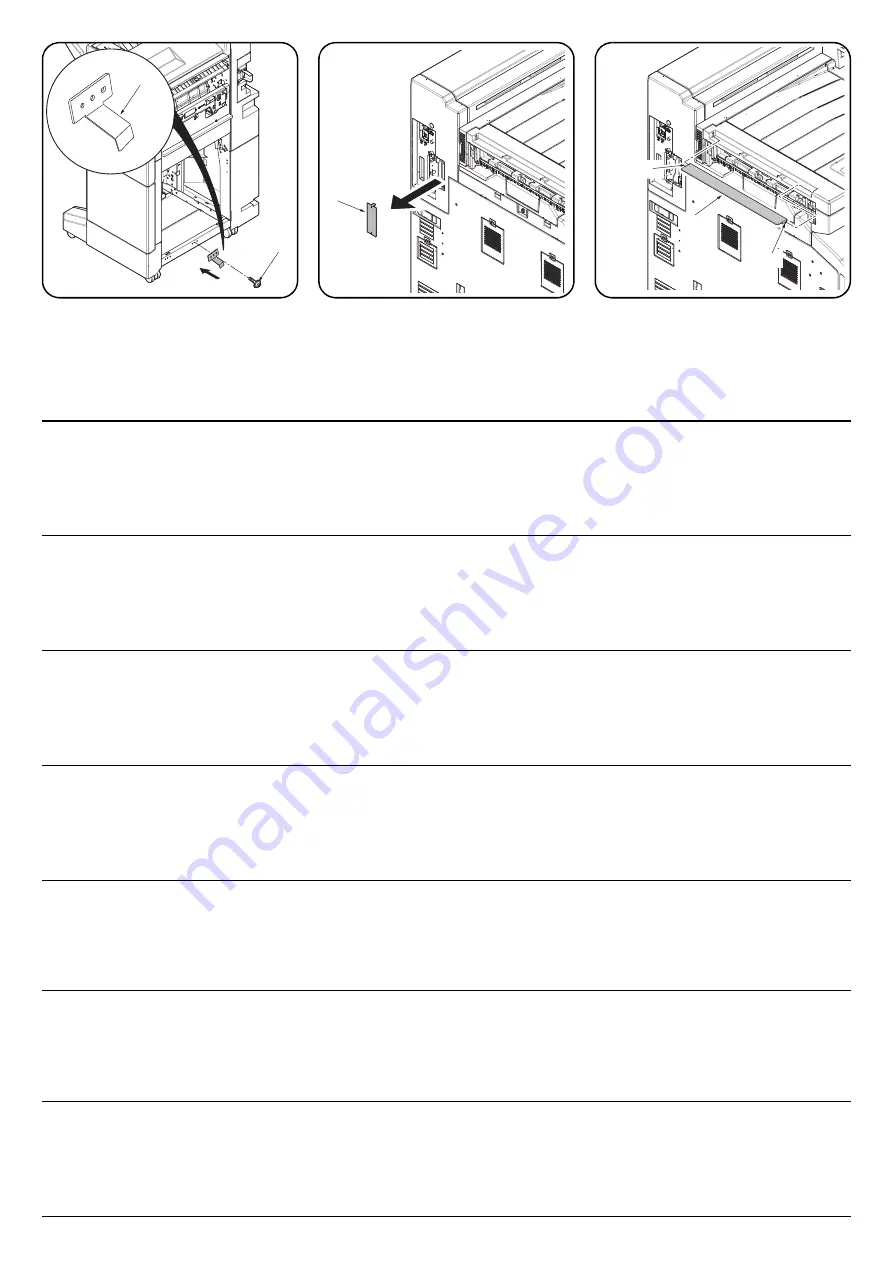
Install the eject guide (G) by fitting the 2
eject guide pins (4) into the holes in the
machine.
2.
Raccordez la plaque de terre (Y)* en bas au
centre du finisseur de document en utilisant
une vis M4 × 8 (I).
*La pièce a été fournie avec l'AK-735
3.
Retirer le couvercle (3) de la machine.
4.
Installer le guide d'éjection (G) en insérant
les 2 ergots du guide d'éjection (4) dans les
trous de la machine.
2.
Conecte la placa de conexión a tierra (Y)* al
centro de la parte inferior del finalizador de
documentos con un tornillo M4 × 8 (I).
*La pieza se proporcionó con AK-735
3.
Quite la cubierta (3) de la máquina.
4.
Instale la guía de salida (G) encajando los 2
pasadores de la guía de salida (4) en los ori-
ficios de la máquina.
2.
Bringen Sie die Grundplatte (Y)* in der Mitte
des Bodens des Finishers mit den M4 x 8
Schrauben (I) an.
*Dieses Teil ist im AK-735 enthalten.
3.
Entfernen Sie die Abdeckung (3) vom Gerät.
4.
Installieren Sie die Ausgabeführung (G),
indem Sie die beiden Stifte (4) der Aus-
werfführung in die Aufnahmen des Geräts
einsetzen.
2.
Applicare la piastra di messa a terra (Y)* al
centro dell'area inferiore della finisher docu-
menti utilizzando una vite M4 × 8 (I).
*Parte fornita con AK-735
3.
Rimuovere il coperchio (3) dalla macchina.
4.
Installare la guida di espulsione (G) inser-
endo i 2 perni (4) della guida di espulsione
nei fori della macchina.
2.
ビス M4×8(I) でアース板 (Y)* をドキュメ
ントフィニッシャー下部センターに取り付
ける。
*AK-735 の同梱品
3.
機械本体からカバー(3) を取り外す。
4.
排出ガイド (G) のピン (4)2 本を機械本体の
穴に差し込み取り付ける。
2.
使用 M4×8(I) 螺丝将接地板 (Y)* 安装到装
订器下部中央。
*AK-735 的附属品
3.
从机器上拆下盖板(3)。
4.
将排纸导向板 (G) 的 2 根销钉 (4) 插入机器
的孔中。
2.
나사 M4 × 8(I) 를 사용하여 접지판 (Y)* 을
문서 피니셔의 하단 중앙에 부착합니다 .
*AK-735 동봉 부품
3.
본체에서 커버 (3) 를 분리합니다 .
4.
배출 가이드 (G) 의 핀 (4) 2 개를 본체의 구
멍에 맞추어 끼워서 부착합니다 .
Y
I(M4x8)
3
G
4
4
Содержание UTAX AK 730
Страница 5: ...This page is intentionally left blank ...
Страница 11: ...This page is intentionally left blank ...
Страница 15: ...3NB 3ND 3N0 3NK This page is intentionally left blank ...
Страница 25: ...3NB 3ND 3N0 3NK 1 1 10 This page is intentionally left blank ...
Страница 43: ...3NB 3ND 3N0 3NK 1 2 18 3 Remove tape and pad Figure 1 2 23 Tape Pad ...
Страница 45: ...3NB 3ND 3N0 3NK 1 2 20 This page is intentionally left blank ...
Страница 81: ...3NB 3ND 3N0 3NK 1 3 36 This page is intentionally left blank ...
Страница 157: ...3NB 3ND 3N0 3NK 1 4 76 This page is intentionally left blank ...
Страница 169: ...3NB 3ND 3N0 3NK 1 5 12 This page is intentionally left blank ...
Страница 206: ...3NB 3ND 3N0 3NK 2 2 11 This page is intentionally left blank ...
Страница 246: ...1 1 INSTALLATION GUIDE INSTALLATION GUIDE FOR 4000 SHEETS FINISHER ...
Страница 269: ...INSTALLATION GUIDE FOR FINISHER ATTACHMENT KIT MFP A ...
Страница 283: ...INSTALLATION GUIDE FOR FINISHER ATTACHMENT KIT MFP B ...
Страница 284: ...E F A H G I J B D C ...
Страница 291: ...INSTALLATION GUIDE FOR FINISHER ATTACHMENT KIT PRINTER ...
Страница 295: ...INSTALLATION GUIDE FOR CENTER FOLDING UNIT ...
Страница 312: ...INSTALLATION GUIDE FOR MULTI TRAY ...
Страница 326: ...INSTALLATION GUIDE FOR MULTI TRAY ATTACHMENT KIT PRINTER ...
Страница 330: ...INSTALLATION GUIDE FOR PUNCH UNIT ...

