2
A
1
2
D
1
Procedure
Before starting installation, be sure to turn the
main power switch of the machine off, and
unplug the power plug from the wall outlet.
1.
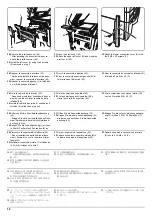
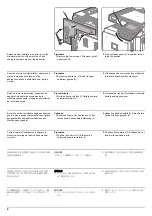
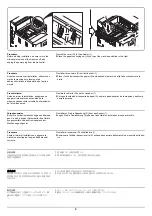
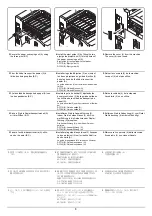
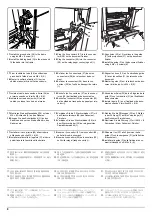
Install the cover (D) to the actuator (1).
2.
Place the paper conveying unit (A) on top of the machine and slide to the right.
Procédure
Avant de commencer l'installation, s'assurer de
mettre la machine hors tension et de
débrancher la fiche d'alimentation de la prise
murale.
1.
Installer le couvercle (D) sur l'actionneur (1).
2.
Placer l'unité de transport du papier (A) au-dessus de la machine et la faire coulisser vers la
droite.
Procedimiento
Antes de iniciar la instalación, asegúrese de
apagar el interruptor de encendido de la
máquina y desenchufar el cable de alimentación
de la toma de pared.
1.
Instale la cubierta (D) en el accionador (1).
2.
Coloque la unidad de transporte de papel (A) sobre la parte superior de la máquina y deslícela
hacia la derecha.
Vorgehensweise
Bevor Sie mit der Installation beginnen überzeu-
gen Sie sich, dass der Netzschalter des Geräts
ausgeschaltet und das Stromkabel aus der
Steckdose gezogen ist.
1.
Installieren Sie die Abdeckung (D) über den Sensor (1).
2.
Legen Sie die Papierführung (A) oben auf das Gerät und schieben diese nach rechts.
Procedura
Prima di iniziare l'installazione, spegnere la
macchina e scollegare la spina dalla presa di
corrente.
1.
Installare il coperchio (D) sull'attuatore (1).
2.
Posizionare l'unità di trasporto carta (A) sulla parte superiore della macchina e inserirla sulla des-
tra.
取付手順
必ず機械本体の主電源スイッチを OFF にし、
機
械本体の電源プラグを抜いてから作業するこ
と。
1.
カバー (D) をアクチュエーター (1) に取り付ける。
2.
搬送ユニット (A) を機械本体に載せ、
機械右側へスライドさせる。
安装步骤
安装前务必关闭机器的主电源开关,并从墙壁插
座拔下电源插头。
1.
把盖板 (D)安装至挡臂 (1)。
2.
将纸张传输单元 (A) 放在机器上部并向右滑动。
설치순서
설치를 시작하기 전에 반드시 본체의 주 전원 스
위치를 끄고 벽 콘센트에서 전원 플러그를 분리
하십시오 .
1.
커버 (D) 를 액추에이터 (1) 에 장착합니다 .
2.
반송 유니트 (A) 를 본체의 상단에 올리고 오른쪽으로 밉니다 .
Содержание UTAX AK 730
Страница 5: ...This page is intentionally left blank ...
Страница 11: ...This page is intentionally left blank ...
Страница 15: ...3NB 3ND 3N0 3NK This page is intentionally left blank ...
Страница 25: ...3NB 3ND 3N0 3NK 1 1 10 This page is intentionally left blank ...
Страница 43: ...3NB 3ND 3N0 3NK 1 2 18 3 Remove tape and pad Figure 1 2 23 Tape Pad ...
Страница 45: ...3NB 3ND 3N0 3NK 1 2 20 This page is intentionally left blank ...
Страница 81: ...3NB 3ND 3N0 3NK 1 3 36 This page is intentionally left blank ...
Страница 157: ...3NB 3ND 3N0 3NK 1 4 76 This page is intentionally left blank ...
Страница 169: ...3NB 3ND 3N0 3NK 1 5 12 This page is intentionally left blank ...
Страница 206: ...3NB 3ND 3N0 3NK 2 2 11 This page is intentionally left blank ...
Страница 246: ...1 1 INSTALLATION GUIDE INSTALLATION GUIDE FOR 4000 SHEETS FINISHER ...
Страница 269: ...INSTALLATION GUIDE FOR FINISHER ATTACHMENT KIT MFP A ...
Страница 283: ...INSTALLATION GUIDE FOR FINISHER ATTACHMENT KIT MFP B ...
Страница 284: ...E F A H G I J B D C ...
Страница 291: ...INSTALLATION GUIDE FOR FINISHER ATTACHMENT KIT PRINTER ...
Страница 295: ...INSTALLATION GUIDE FOR CENTER FOLDING UNIT ...
Страница 312: ...INSTALLATION GUIDE FOR MULTI TRAY ...
Страница 326: ...INSTALLATION GUIDE FOR MULTI TRAY ATTACHMENT KIT PRINTER ...
Страница 330: ...INSTALLATION GUIDE FOR PUNCH UNIT ...

