Installing the System
MicronNav System
0656-SOM-00001-07
37
© Tritech International Ltd.
Step 3: Click on
Save Exit
to immediately update the Job and apply changes. The Integral
Attitude Sensor Heading/Pitch/Roll will no longer be applied and External MRU data input(s)
will now be applied instead.
External Heading with Integral Sensor Pitch/Roll
The information given in Section 3.2.7, “Connecting optional third party High Accuracy
Heading/Pitch/Roll MRU Sensors” describes the configuration of an External Heading/Pitch/
Roll input to be applied in place of the Integral Attitude Sensor Heading/Pitch/Roll data (e.g.
Node 75 MINIATTSEN).
It is also possible to re-enable the Integral Sensor (Node 75 MINIATTSEN) and apply only
its Pitch/Roll data to calculations, whilst using only Heading data from an External (Ship)
Compass input. This effectively replaces the Heading from the Integral Sensor with External
Ship Compass data.
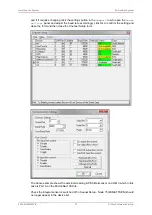
To configure the system to accept Heading from an External Compass device, switch on
the power supply to the MicronNav100 Interface Hub and click the
Seanet Setup
icon on
the desktop to display the device list, select Utilities from the top menu bar followed by Com
Setup from the sub-menu to open the
Channel Setup
page and leave the Integral sensor
Enabled (i.e. the check box for SeaHubE should be ticked). The Integral sensor needs to
remain enabled for application of its Pitch/Roll data.
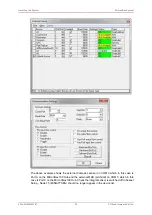
Configure the Compass entry for the correct COM port used for the external device input
and click the check box to enable, check the baud rate matches that of the external device
and if it requires changing click the settings button in the
Compass
row to open the
Comms
Settings
panel and adjust the baud rate accordingly, click Ok to confirm the setting and
close the form and then close the Channel Setup form.


