Installing the System
MicronNav System
0656-SOM-00001-07
29
© Tritech International Ltd.
Note
In transponder mode a wired communications connection is not required.
If it is required to operate in Transponder mode and power the Modem from a Micron Sonar
Aux
port using the standard Micron cable the communications type of the Sonar
Aux
port
should be set to match the communications type of the Modem head.
3.2.6. Connecting optional third party GPS Receiver
The MicronNav system can be configured to accept a NMEA GPS input string from an
external third party GPS receiver enabling synchronisation of the Seanet display and ROV
tracked position to true world position.
Note
If a GPS Receiver is to be used it is important to be aware that a low cost and
low accuracy GPS device will limit the accuracy of the MicronNav system - the
MicronNav tracked position will only be as good as the reference GPS signal it
is using.
The GPS receiver can be connected to any of the free USB or Serial interface connectors
available on the MicronNav100 Interface Hub (see Section 3.1.6, “Electrical Connection to
the Surface MicronNav100 Interface Hub” for serial port pin out details), or any available
serial ports on the computer.
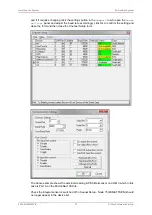
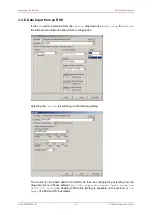
To configure the system to accept the GPS receiver switch on the power supply to the
MicronNav100 Interface Hub and click the
Seanet Setup
icon on the desktop to display the
device list, select Utilities from the top menu bar followed by Com setup from the sub-menu
to open the
Channel Setup
page and configure the GPS entry for the correct COM port
used for the GPS input and click the check box to enable. Check the baud rate matches that
of the GPS receiver (normally 4800 baud) and if it requires changing click the settings button
in the
GPS
row to open the
Comms Settings
panel and adjust the baud rate accordingly,
click Ok to confirm the setting and close the form and then close the Channel Setup form.

