MicronNav System
0656-SOM-00001-07
12
© Tritech International Ltd.
3. Installing the System
3.1. Preparation
This section is intended to provide the user with sufficient information to allow for the
consideration and preparation of mounting brackets and wiring arrangements prior to receipt
of the system, final wiring however can only be completed once in receipt of the system as
interconnect leads are supplied with the system.
3.1.1. Using the system with the Micron INS
The Tritech Micron INS has been designed to be fully compatible with the MicronNav System
and can be integrated in a variety of ways.
For full details of how to install a Tritech Micron INS with the MicronNav please refer to
the Micron INS Product Manual (document reference: 0722-SOM-00001) alongside this
document.
3.1.2. Mounting the Subsea Modem Head
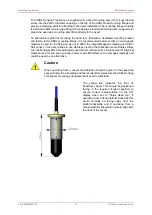
The Subsea Modem Head should be mounted at the top of the ROV ensuring the transducer
is proud of the ROV fairing with a clear view from the transducer to the surface, also
remembering to ensure enough room is left to enable the cable connection to be made to the
Micron connectors. To assist with the mounting there are 4 off M3 x 0.5 tapped 5.0 deep full
thread fixing holes in the base of the unit (note: these are protected with plastic grub screws
when shipped from the factory and should be removed prior to using). An alternative method
of mounting the head is to gently grip with a 50mm diameter clamping mechanism around
the bottom part of the housing (in this case the plastic grub screws fitted to the fixing holes
should be left in place).
Caution
It is recommended that any fixing screws used should be of non-metallic material
to reduce the risk of corrosion around the fixing positions.


