☞
If the drive is a system/voice drive, subtract five hours from the number
of storage hours above.
4.
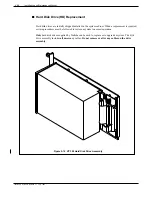
Hold disk drive with right hand grasping the front flange and left hand
supporting the weight of the drive. The drive should be to the right of the
metal slider plate.
5.
Guide the sheetmetal plate into the cardguides marked with the appropriate
slot ID.
6.
Gently but firmly slide the drive assembly into the slot until the connector
on the back of the assembly is mated with the connector on the backplane.
This is accomplished when flange on front of drive assembly sheetmetal
reaches or very nearly reaches the cabinet sheetmetal.
◆
WARNING
◆
Do not slam the drive assembly into cabinet. This can damage the
disk drive.
7.
Using a flat-blade screw driver, screw in the two captive screws attached to
the front flange of the drive assembly.
8.
Follow the Hard Disk Restore/Add/Replace procedures to restore the system
to proper configuration.
9.
Test the system for proper operation.
Toshiba VP Systems Release 7.1
July, 1994
5-98
Installation and Maintenance Manual
Table 5-4 Storage Disk Drives
Toshiba Part Number
Maximum Number of
Storage Hours
300 HD-25/30
300 HD-55/60
300 HD-90/95
30
60
95
Содержание VP 300
Страница 2: ......
Страница 10: ......
Страница 14: ......
Страница 19: ...Quick Reference Guide Hardware Toshiba VP 300 System Specifications Toshiba VP Systems Release 7 1 July 1994 ...
Страница 20: ...Toshiba VP Systems Release 7 1 July 1994 ...
Страница 52: ...Toshiba VP Systems Release 6 1 February 1993 2 14 Installation and Maintenance Manual ...
Страница 56: ...Toshiba VP Systems Release 7 1 July 1994 ...
Страница 146: ......
Страница 312: ...Toshiba VP Systems Release 7 1 July 1994 ...
Страница 314: ......
Страница 444: ......
Страница 496: ......
Страница 542: ......
Страница 598: ...Toshiba VP Systems Release 6 1 February 1993 ...
Страница 600: ...Toshiba VP Systems Release 6 1 February 1993 ...


