41
7. Load a piece of marked material on the table.
Note: Ensure the material is placed somewhere between the red infrared length scanner dot and the black range marker at
the end of the TigerStop.
8. Press the [Start] button or the cycle start button to begin the cycle.
Note: TigerStop is in automatic mode from this point. Keep work area clear.
9. TigerStop will now move backwards and will scan the stock. Once finished, TigerStop will lower the
pusher foot and will start to process the material.
10. TigerStop will now cut the defects and finished parts from your list.
Note: Once the pusher foot has cleared the loading zone, you can place another marked material on the table and press
[Start] to queue the board. Once TigerStop is finished cutting, it will automatically start scanning the queued board.
11. Continue in this fashion until the parts list is complete
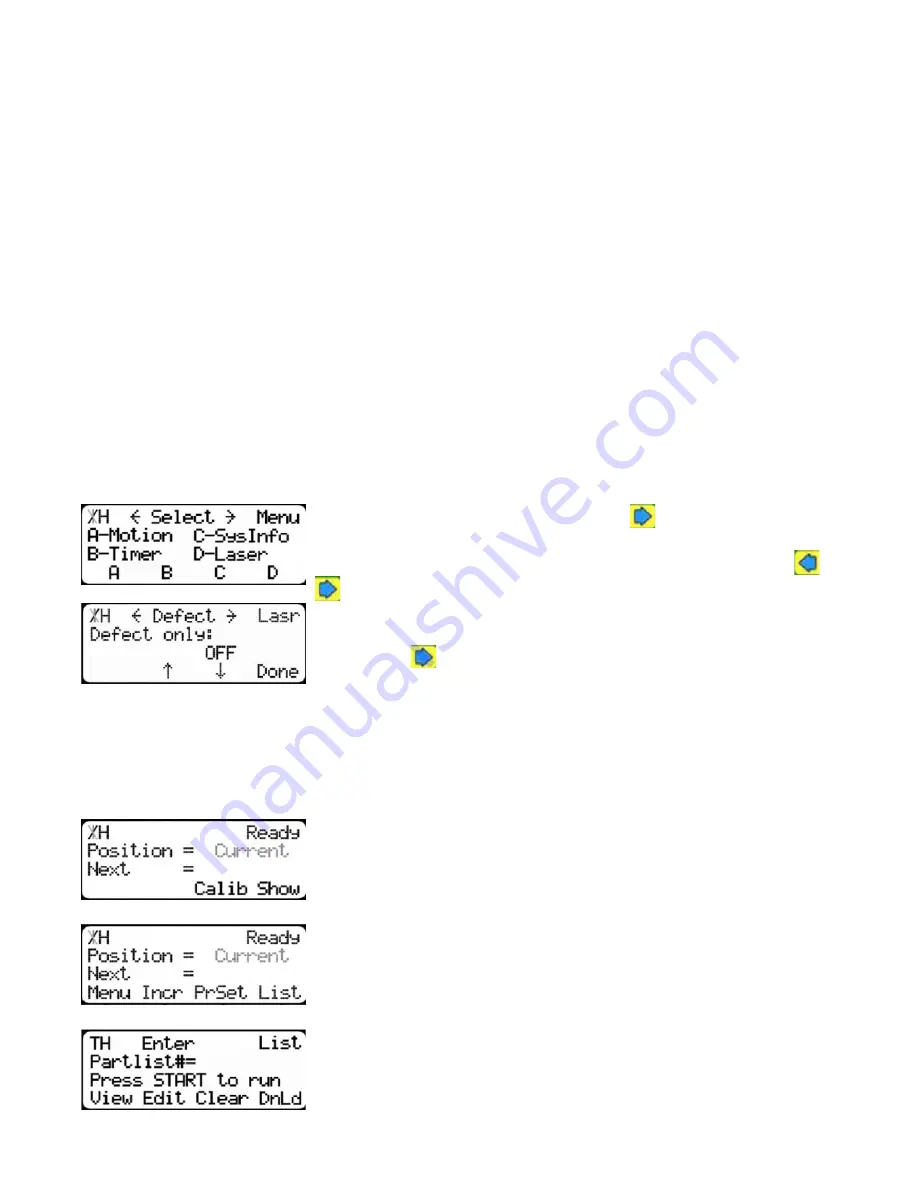
Using Defect Only Mode
Defect only mode allows you to defect material, without cutting parts from a parts list. Defect only
mode is active when running optimized push feed lists only.
Turning On Defect Only Setting
The Defect Only setting turns on defect only mode for parts lists.
1.At the Menu Select screen, press the
button to access the sec-
ond menu screen.
Note: TigerStop has 3 menu screens. You can access them by pressing
or
.
2.Press the [Laser] soft key to access the Laser menu.
3.Press the
button 1 time.
To change Defect Only...
1. Press [B] or [C] to toggle the setting.
2. Press the [Done] soft key to save the parameter.
Making a Defect Only Pusher List
1.Start at the Ready Screen
2.Press the [Show] soft key.
3.Press the [List] soft key.
4.You are now at the list interface.
Содержание TigerSaw 1000
Страница 1: ......
Страница 2: ......
Страница 8: ...5 TigerSaw Cap Guard TigerSaw Guard Back ...
Страница 9: ...6 TigerSaw Guard Sides ...
Страница 10: ...7 TigerSaw Blade Access Door In Feed and Out Feed Table ...
Страница 11: ...8 Pusher Foot ...
Страница 15: ...12 1 Assemble table legs ...
Страница 17: ...14 5 Attach the back fence to the out feed table 6 Attach the material staging tubes to the in feed table ...
Страница 24: ...21 7 Attach the Printer Stand M8 X 35 ...
Страница 66: ......
Страница 67: ......


