background image

57

TD-000472-00-B

User Buttons

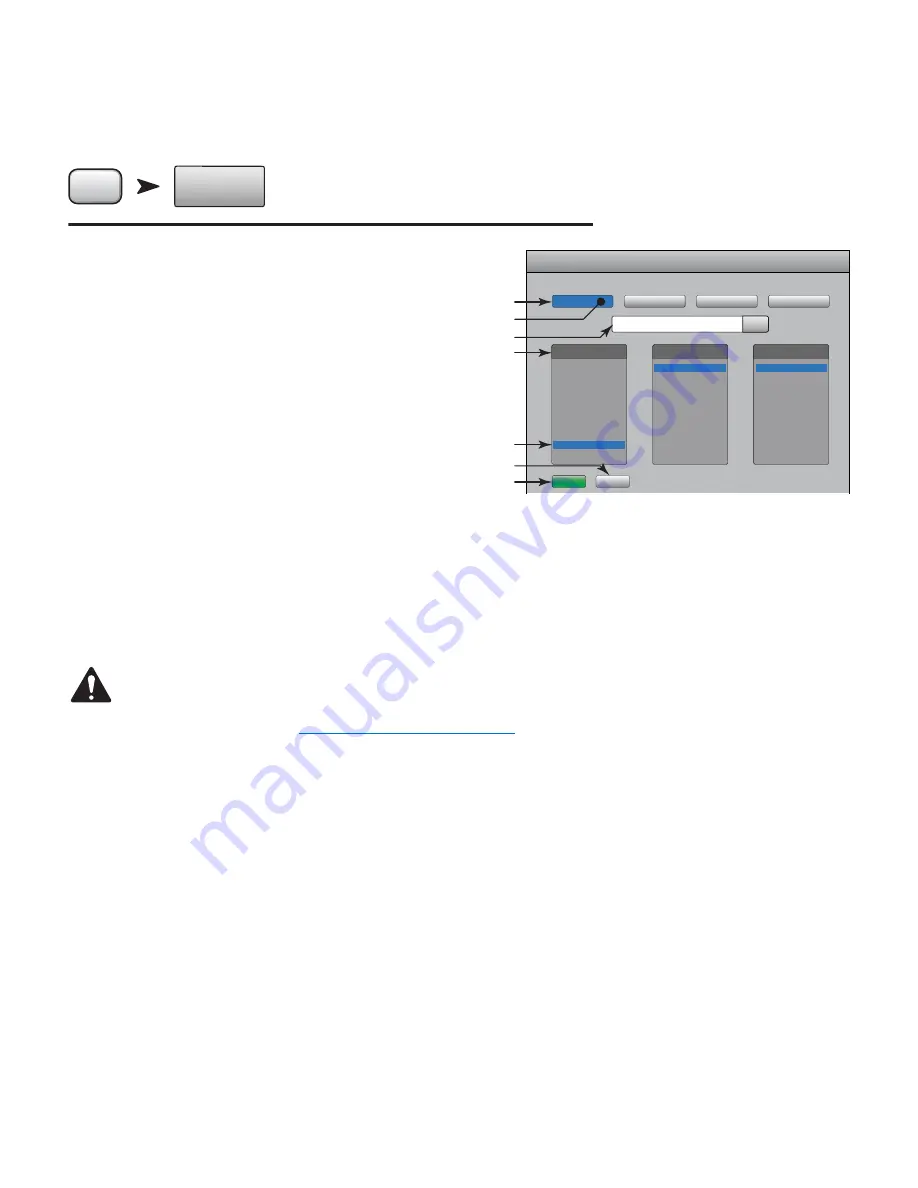
Provides a means to assign the four User Buttons to various functions giving one-touch access to the assigned function.


Press 

Menu

Menu

User

Buttons

Touch 

User Buttons

Refer to 

— Figure 56

By default the User buttons are assigned to: 

• 

Navigate Left

 (U1)

• 

Clear Clip

 (U2)

• 

Clear Cue

 (U3)

• 

Navigate Right

 (U4). 

1.  Current User Button functions 1 – 4.

2.  Blue indicates the User Button is selected and can be changed or renamed. 

The current function is displayed in the Action, Selection, and Detail list 
boxes.

3.  Name of the User Button. Click to rename. When you change the 

function assigned to the button, the name changes to the default for what 
you selected.

4.  Select an item from each of the lists in the order shown – Action, Selection, Detail.

5.  Blue indicates the current selection for the list.

6.  Assign – press this button to complete the assignment.

NOTE!:


PITCH CORRECT!:

 This function disables or enables the Pitch Correct feature, it does not affect the assignment of the feature to 

a channel. The only way you can tell if this feature is enabled or disabled at the User Button level is to see if you can hear a difference 
when Pitch Correct is assigned to a channel. If you select Utility > Pitch Correct >, you need two user buttons, one to enable the feature, 
the other to disable it. Refer to 

Input Channel – Pitch Correct on page 35

 for information about assigning or enabling Pitch Correct for 

a channel.

Alternate Method

 of setting a User button to navigate to a specific screen. Does not apply to remote devices.

1.  Navigate to the desired page.

2.  Press and hold a user button for 2 - 3 seconds.

3.  Upon release, a message appears. Touch “Yes” to accept the change or “Cancel” to reject it.

4.  You can give the user button a friendly name from the User Button Setup screen.

To return the user button to the factory default, press it one time to access the assigned page. Then push and hold the user button for 2-3 seconds. 

— Figure 57 —

Nav Left

Clear Clip

Clear Cue

Nav Right

Reset

Assign

Recall Input Preset
Recall Output Preset
Recall Scene
Mute
Go to Screen
Recording
Select

Utility

Action

Clear
Pitch Correct

Selection

Nav Right
Fader to 0 dB

Detail

Selected Parameter

User Button Setup

User Button 1

User Button 2

User Button 3

User Button 4

Nav Left

Nav Left

3

2

4

1

7

5

6

Содержание TouchMix-8

Страница 1: ...TouchMix User Guide Firmware Version 2 0 TouchMix 8 TouchMix 16 TD 000472 00 B TD 000472 00 ...

Страница 2: ...h as radiators heat registers stoves or other apparatus including amplifiers that produce heat Do not defeat the safety purpose of the polarized or grounding type plug A polarized plug has two blades with one wider than the other A grounding type plug has two blades and a third grounding prong The wide blade or the third prong are provided for your safety If the provided plug does not fit into you...

Страница 3: ...tween the equipment and receiver Connect the equipment into an outlet on a circuit different from that to which the receiver is connected Consult the dealer or an experienced radio TV technician for help RoHS STATEMENT The QSC TouchMix 8 and QSC TouchMix 16 audio mixers are in compliance with European Directive 2011 65 EU Restriction of Hazardous Substances RoHS The QSC TouchMix 8 and QSC TouchMix...

Страница 4: ...fects 3 Effects Assignment Example 3 Name the Effects Channels or Mixes 4 Using the FX Wizard 5 Using the Input Channel FX Tab 6 Using the FX Channel Effect Tab 7 Using the FX Overview 8 Mute Groups 8 DCA Groups 9 Save Your Work in a Scene 9 Connecting Remote Devices 10 Create a TouchMix Network 10 Connect to an Existing Network 10 Wired Connection to an Existing Network Using Static IP Addresses ...

Страница 5: ... Output Processing 14 EQ Tab 15 Limiter Tab 15 Filters Tab 15 Presets Tab 15 Setup Tab 16 Recording 17 Recording Directory Structure 18 Playback 18 Mix Down 18 Security 19 To Access Security Setup 19 To Lock the Mixer Manually 19 To Lock the Mixer with the Auto Lock Timer 19 Using the Security Features 19 Tips Tricks 20 Low Cut Filters AKA High Pass Filters 20 Compressor Latch 20 About Effects Rou...

Страница 6: ...Are on the Home Screen Channels 29 Input Channel 30 Input Channel Trim 30 Input Channel EQ 31 Input Channel Compressor 32 Input Channel Gate 33 Input Channel FX Sends 34 FX Signal Flow 34 Input Channel Pitch Correct 35 Input Channel Aux Sends 36 Auxiliary Channels Flow Diagram 36 Input Channel Presets 37 Input Channel Setup 38 Output Channel 39 Output Channel EQ 39 Output Channel Limiter 40 Output...

Страница 7: ...s Mono and Stereo Delay 51 FX Processors Pitch Shift 51 Menu 52 Scenes 53 Security 54 DCA Groups 55 About DCA Groups 55 Aux Overview 55 Remote Control Settings 56 FX Overview 56 User Buttons 57 Mixer Setup 58 Talkback Noise 59 Phantom Power 59 Network Setup 60 Wireless Network Setup 60 Wired Network Setup 61 Network Troubleshooting 61 Mute Groups 62 About Mute Groups 62 Mute Groups Mute Screen 62 ...

Страница 8: ...creen 64 Recording Setup 65 2 Channel Playback and Record 66 2 Track Recording Setup 66 2 Track Playback EQ 66 Wizard 67 FX Wizard 67 Gain Wizard 68 Aux Mix on Faders 68 Dimensions 69 TouchMix 8 69 TouchMix 16 70 Specifications 71 Block Diagram 72 ...

Страница 9: ... taking it to a show for the first time Turn off Demo Mode Demo mode is a looping slide show that plays on the TouchMix as a factory default to give prospective buyers an overview of the mixer Once you have purchased your TouchMix you ll probably want to turn Demo Mode off even though our graphics guys are really proud of how it looks To Disable Demo Mode Recall a Factory Scene What is a Scene A S...

Страница 10: ...eport great results using the presets with little or no modification To Select Channel Presets 1 Make sure that the Factory User switch is in the Factory position 2 In the left window you ll see a list of instrument categories Touch an instrument category name and a list of specific instruments appears in the middle window 3 Select a type of instrument and the right window will display a list of o...

Страница 11: ...hoose any combination of four in your mix You can have a different Processor assigned to each effects mix use four instances of the same processor or mix and match as you like Each of these processors have multiple presets The reverb processors for example have presets simulating various sizes of rooms and halls as well as reverb plates In addition there are brighter and darker sounding variations...

Страница 12: ...L 14 Lead Vocals 1 2 Mono Delay Lush Reverb Mono 250 Delay L Med Hall 15 Backing Vocal 2 Lush Reverb L Med Hall 16 Backing Vocal 2 Lush Reverb L Med Hall Once you ve thought about what effects you want to use you can go to your TouchMix and start setting up your effects Following are several ways to set up and control your TouchMix effects Name the Effects Channels or Mixes Before we start using t...

Страница 13: ...t the amount of effect heard in the main mix Send the Effect to Monitors 5 Is the performer going to want to hear the effect in the stage monitors or in ear monitors If so it s easy to send it there Just use the Select Aux Outputs monitors to receive FX1 buttons to tell your mixer where the effect should go 6 You ve still got three more effects available so touch one of the tabs at the top of the ...

Страница 14: ...h the Enable button to assign it to the currently selected channel Use the Blend control to vary the mix between corrected wet and uncorrected dry signal 100 wet is used to correct pitch A blend between wet and dry is used to provide a doubling effect Use the Key control to select a musical key This helps Pitch Correct be more accurate in determining what the intended note is Use the Correct Rate ...

Страница 15: ...R Output Use the FX Master fader to the right of the FX panel to adjust the amount of effect heard in the main speaker system To Adjust the Level of the Effect Sent to the Auxiliary Outputs TouchMix 8 Auxes 1 4 TouchMix 16 Auxes 1 6 and 7 8 9 10 Use the FX Returns to Monitors knobs to control the amount of effect heard in the monitor speakers The FX panel also includes EQ Preset and Setup tabs The...

Страница 16: ...d know that they sound superb and will enhance your performances You can dive in deep or just use the wizards factory defaults and presets Either way you now have the tools for a great sounding show Mute Groups There are many times when it is useful to mute some of the inputs and outputs For example you might want to mute everything but a stereo input for break music Or you may wish to mute all th...

Страница 17: ...t to which it s going to the same DCA changes you make using the DCA are doubled for the input Raise the DCA 3 dB the input is effectively raised 6 dB To Name the DCA group To Mute a DCA Group When you mute a DCA all channels assigned to that DCA are muted If a channel is muted by the channel Mute button or a Mute Group the DCA does not un mute the channel when the DCA is un muted Save Your Work i...

Страница 18: ...ixer s name Network SSID and Network Password Wireless Connection to Existing Network When this method is used TouchMix uses a wireless connection to an external router Wi Fi devices connect to TouchMix via the external router Make sure the provided USB Wi Fi adapter is installed in one of the mixer s USB ports To Connect to an existing wireless network Edit Settings for Network Mode If desired en...

Страница 19: ...twork Using Automatic IP Addresses Install a USB to Ethernet adapter into one of the mixer s USB ports visit qsc com for a list of validated adaptors Using an RJ45 cable connect the adapter to a port of the router To Connect to an existing wired network Edit Settings for If desired enter a new Mixer Name IP Address Assignment Assigned Address 192 168 1 1 The actual address you get will probably be...

Страница 20: ...ton associated with your loudspeaker and then adjust your loudspeakers as instructed You re probably wondering why we recommend using input B Input A has a switch that adds gain for use with a direct microphone input If this switch is set incorrectly the speaker s input will be far too hot Using input B eliminates the possibility of such a mistake These settings will give you the optimum signal to...

Страница 21: ...d and allow a little extra headroom With the performer performing un mute the channel and bring the fader up until the desired performance level is reached If you are using one of the internal channel presets this channel should already be sounding good If it s not what you re looking for try some of the other preset choices For most instruments and musical styles there will be a preset that works...

Страница 22: ...des a view of all the aux mixes for a bank of channels at once in matrix format To Set Up Monitor Mixes Each horizontal row of sliders represents one of your monitor mixes If you have named your Aux outputs the name displays above the Master slider on the right of the screen Auxes 7 8 and 9 10 are stereo auxes so each has a Pan control If any mono auxes are linked they also have Pan controls Touch...

Страница 23: ...ne handling noise or if outdoors wind noise Fill speakers may not need any additional low frequency energy as there is ample bottom end coming from subwoofers There is a technique known as subs on auxes in which the subwoofer is fed from one of the auxes while the main speakers are fed from the mixer s main outputs Only those instruments that contain low frequencies are sent to the subwoofer This ...

Страница 24: ...d from the actual kick drum and the reinforced kick drum arrive at the listeners ears at the same time You can also drive your drummer nuts by delaying his monitor just a bit but that wouldn t be very nice would it The delay provides a read out in msecs up to 100 meters up to 34 3 and feet up to 113 Speaker Settings Refer to Level Match Your QSC Speakers on page 12 for details GXD Amp Settings Ref...

Страница 25: ... wave files and potential loss of audio data and synchronization across tracks At approximately 3 hours of non stop recording the maximum file size supported by FAT32 is exceeded To avoid problems stop and then resume recording It is not necessary to create a new session TouchMix displays a pop up that warns you when this limit is approaching If you do exceed the FAT32 limit track synchronization ...

Страница 26: ...ouchMix for more recording or for playback Playback Tracks that you have recorded on the TouchMix may be played back and mixed down on your TouchMix The first step is to load the Session you wish to play back To load a recorded Session The next step is to select Track as the source for the mixer s input channels To select Track as the input source Mix Down There are three ways to mix down your mul...

Страница 27: ...es To use the mixer without security simply leave all the passwords blank If lots of people have access to the mixer it might be a good idea to enter an Administrator password just to prevent someone else from taking over as Administrator even if you aren t going to set up other security levels To set up a security level simply enter a password for the security level and set the preset and scenes ...

Страница 28: ...high and low cut filters If you ever mike a Leslie speaker one neat trick is to take the Low Cut filter for the top rotor channel up to 800 Hz That s the cross over frequency for a Leslie so anything below 800 Hz is going to be wind noise from the rotor or bleed from other instruments For the bottom rotor microphone you guessed it use the High Cut filter set to 800 Hz Compressor Latch When the ban...

Страница 29: ...gure 8 40 20 10 5 5 10 U FX Processor FX Processor FX Processor FX Processor To FX1 Mix To FX2 Mix To FX3 Mix To FX4 Mix In 2 In 1 Stereo In 19 20 Four FX Mixes or Channels Input Channel FX Sends Main L R Output FX Master Faders or Returns 1 2 3 4 5 6 7 To Master Faders Input Channels FX1 Mix FX2 Mix FX3 Mix FX4 Mix Any of eight Aux Outputs FX1 Send FX2 Send FX3 Send FX4 Send FX1 Send FX2 Send FX3...

Страница 30: ...rocessor is controlled by the FX Master or Return fader You can easily see this if you look at the FX Overview screen 9 The final step is mixing the audio from the input channel with the audio from the effects channel and sending it to the Main L R fader 9 then to the Main L R outputs 10 Remember this example is just one channel You ll probably have more than one channel so all the Input channels ...

Страница 31: ...at 0 0 when changing assignments About the TouchMix Compressor Display Dynamics processing compressors limiters is not well understood by many users This is probably due to the fact that the actions of compressors and limiters are subtle unless they are completely mis adjusted Most displays of dynamics processors use a graph that shows input level versus output level But these displays don t captu...

Страница 32: ...ptions Left Side of the TouchMix 8 Mixing Surface Refer to Figure 12 1 Rear Panel labels 2 Balanced female XLR and 1 4 TRS combo inputs 1 4 The TRS connectors supply a 10dB pad NOTE Inputs 1 2 may be switched to Hi Z for use with guitars and other instruments having passive pick up systems See Channel 1 or 2 Setup for more information 3 Balanced female XLR inputs 5 8 4 Trim Channels 1 8 adjusts in...

Страница 33: ...ol to the left 16 U2 User Button Factory default clears all clipping indications 17 Ø Returns the selected control to its default position 18 U3 User Button Factory default clears all Cues 19 U4 User Button Factory default selects the next control to the right NOTE Refer to User Buttons on page 57 to re assign the User Buttons 20 Master Control Adjusts the selected parameter press turn for fine ad...

Страница 34: ...s 11 FX Mute Mutes all four FX outputs 12 Mute Groups Displays Mute Group controls and setup options 13 U3 Factory default clears all Cues 14 U4 Factory default selects the next control to the right 15 Ø Returns the selected control to its default position 16 Link Displays the Link status and Network Name if connected 17 Scene Displays the name of the current Scene 18 Home Navigates up the menu st...

Страница 35: ...storage devices1 and Wi Fi adapter 2 K Lock Security Slot Compatible with the MicroSaver Security Cable 3 Power Supply Use the power supply delivered with the mixer do not substitute 4 Cue Monitor Stereo 1 4 TRS Line or headphone output is directed to this output when a channel Cue is activated 5 Aux 3 4 Stereo 1 4 TRS Line or in ear output This output is wired in parallel with Aux 3 and 4 XLRs 6 ...

Страница 36: ...pe and range of the channels Faders The faders represent the current position of all the mixer s faders You cannot change the fader levels on the Nav Strip Red Fader Slot This is a sticky clipping indicator letting you know the channel is or has been clipping Make necessary adjustments to the channel trim then go to Menu Mixer Setup Clear Clip or push the U2 button Inputs 1 8 and 9 16 Display the ...

Страница 37: ... by touch or Master Encoder Yellow indicates selected 11 Unity 0 dB Meter 12 Meter Input channel Indicates the pre fader signal level 13 Channel color Blue selected Gray not selected Touch to select 14 Channel Mute Silences the channel audio to the Main L R Auxiliaries and FX Does not mute send to multi track You can listen to a muted channel using the Cue button the channel level meter shows the ...

Страница 38: ...Pad or TouchMix on which you cleared it 3 Input Channel Fader Adjusts the output of the channel to the Main L R outputs 4 Level Meter Indicating that the signal level in the channel is below unity If input gain trim is properly adjusted this is what you will see when the source is playing somewhat below its average level 5 Level Meter Indicating that the signal level in the channel is at unity If ...

Страница 39: ...Low and High Cut Sets the frequency of the low and or high cut filter as measured from a point 3 dB below 0 or unity 7 EQ In Button Engages the equalizer 8 Gain Control Knob Adjusts the gain at the frequency setting of the associated EQ band Range of 15 dB to 15 dB 9 Freq Control Knob Frequency bands 1 4 Sets the center frequency of the associated EQ band If the Shelving filter is engaged the Freq...

Страница 40: ... the frequencies of sibilant consonants such as s z and sh 9 Comp In Button Engages and disengages the compressor 10 De Esser Button Engages or disengages the De Esser 11 Release Slider Adjusts how quickly the compressor stops compressing when signal falls below threshold 12 Knee In Button The knee determines whether the compressor comes on abruptly not engaged or gradually engaged as the threshol...

Страница 41: ...eds the threshold 8 Gate In Button Engages or disengages the Gate 9 Hold Knob Sets the minimum time the Gate stays open once it is opened and the length of time the Gate stays open after the input level drops below the Threshold 10 Release Slider Adjusts how quickly the Gate attenuates the audio when signal falls below threshold 11 Simple Button Turns Simple mode on and off Hides all controls exce...

Страница 42: ... Input Channel Pitch Correct on page 35 FX Signal Flow Audio input passes through the EQ Dynamics compressor and gate and the Channel Fader At this point the audio signal is split and goes in two directions 1 Through the Pan control to the Main L R Fader and Main outputs 2 To the 4 Channel FX sends Figure 6 shows just one of the four FX Sends The FX Send control determines how much of the channel ...

Страница 43: ...n page 57 Home Select Input Bank Select Input Channel FX In 2 Inputs 1 8 Select FX Refer to Figure 25 1 Pitch Correct Enable Button Assigns and enables disables Pitch Correct to the currently selected channel 2 Blend Knob Sets the ratio of uncorrected Dry to corrected Wet signal When fully clockwise only corrected signal will be heard When fully counter clockwise only the original signal will be h...

Страница 44: ... Figure 27 6 Aux Sends Pan Slider Aux mixes 7 8 9 10 for TouchMix 16 only always have a pan control When two auxes are linked the even aux s send control becomes a pan control Refer to the Aux Output topic for Aux Linking information 7 Aux Link Indicator Indicates the Aux channels are linked The TouchMix 16 auxes 7 8 and 9 10 cannot be unlinked You can link Aux channels from an Input channel Aux S...

Страница 45: ...utton Recalls the selected Preset Recalls all parameters for an Input Channel except Analog Multi track state Track Arm button Cue Mute Channel Link state 9 Omit Levels Switch When engaged Channel Faders FX Sends and Aux Sends are not recalled 10 Omit Name Switch When engaged preset Channel Names are not recalled 11 Omit Phantom Switch When engaged Phantom power On setting is not recalled 12 Save ...

Страница 46: ...d even pairings are supported even odd pairings are not 3 Channel The system channel number This does not change 4 Name Touch the Name to display a keyboard that may be used to enter a name for the channel 5 Input Selector TouchMix 8 Mic Inputs 1 2 only Line accepts line level inputs Hi Z is for use with guitars and other instruments having passive pick up systems 6 Source Selects the correspondin...

Страница 47: ...ngages disengages the filters These filters cut frequencies below or above the frequency set by the corresponding Freq control 10 Low and High Shelf Buttons Toggles EQ Bands 1 and 4 between parametric and shelving filters When a shelf filter is engaged the Bandwidth control is not available 11 Frequency Bands 1 2 3 and 4 Buttons Engages disengages the associated parametric EQ band Four overlapping...

Страница 48: ... to reduce signal level 7 Ratio Slider Sets the ratio of input level to output level when the signal exceeds the threshold 8 Attack Slider Adjusts how quickly the Limiter reacts to a signal that exceeds the threshold 9 Release Slider Adjusts how quickly the Limiter stops Limiting when signal falls below the Threshold 10 Limiter In Button Engages or disengages the limiter 11 Knee In Button Engages ...

Страница 49: ...ange is 20 Hz to 2 kHz The slope of this filter is 18 dB octave 4 Graph Graphic representation of engaged filters Vertical scale dB Horizontal scale frequency 5 Hi Cut Attenuates or cuts frequencies above this frequency setting Range is 200 Hz to 20 kHz The slope of this filter is 18 dB octave 6 Freq Knob Sets the center frequency of a filter 7 Cut Knob Sets amount of Cut or attenuation for a notc...

Страница 50: ...t of factory programmed presets Currently the only preset available is Reset Reset sets all output channel s parameters to their factory default state 6 External Presets List Up to 100 External Presets may be stored to and recalled from an External USB storage device 7 Recall Preset Button Recalls stored output channel EQ settings limiter settings filter settings mute assignments DCA assignments l...

Страница 51: ...elay Knob Sets the output delay Readouts are provided in milliseconds feet and meters 7 GXD Amp Settings Button Click this button to determine the best settings for your QSC GXD amplifier Refer to Output Channel QSC GXD Amplifier Settings on page 45 for details 8 Speaker Settings Button Click this button to determine the best settings for your QSC K Series KW Series and KLA Series Loudspeakers Ref...

Страница 52: ...d to get the desired relative high low balance When the speakers are adjusted as directed signal to noise ratio is optimized and the output meters on the TouchMix reflect how much speaker system headroom is available Note that the LIMIT LED on the speakers is not a Clip indicator It will be lit before the mixer s meters indicate any overdrive This is because the speakers DSP is preventing dynamic ...

Страница 53: ...for each Aux mix All aux sends pan controls and master fader levels may be adjusted by touching to select and using the Master Encoder Menu Press Aux Overview Select an Input Bank Menu Aux Overview Inputs 1 8 Refer to Figure 40 1 Only Input and FX Master banks are selectable on the Nav Strip while in the Aux Overview 2 Each column In 1 In 2 represents a channel and lists the channel s Aux Sends an...

Страница 54: ...evel of the FX mix to the Main L R Outputs Select Pre fader Listening PFL or After Fader Listening AFL on the Mixer Setup screen FX Masters EQ Controls and displays the settings for the FX Master channel equalization Home Select the FX Masters Bank Touch a Select Button Select EQ Tab EQ FX Masters FX 1 Refer to Figure 42 1 EQ Tab Selects the FX Master EQ screen 2 EQ Graph A graphic representation ...

Страница 55: ...f presets that have been saved on an External USB drive 5 Internal List Displays a list of presets that have been stored to Internal mixer memory 6 Factory List Displays a list of the factory programmed presets available for the currently loaded FX device Touch a preset name to select 7 Delete Button Deletes a selected preset from Internal or External user memory 8 Copy to USB Button Copies the se...

Страница 56: ...the FX Sends for all Input channels and the FX Master fader for each FX processor All FX sends and FX master levels may be adjusted by touching the control to select and using the Master Encoder or the Nudge buttons on the iPad Menu FX Overview Select Input Bank Menu FX Overview Inputs 1 8 Refer to Figure 45 1 Only Input banks are selectable on the Nav Strip 2 Each column In 1 In 2 represents a ch...

Страница 57: ...rmines the rate at which the pitch will be varied 3 LFO Depth Knob Controls the amount of modulation applied to the audio signal 4 Lo Cut Knob Attenuates or cuts frequencies below this frequency setting Range is 20 Hz to 2 kHz 5 Hi Cut Knob Attenuates or cuts frequencies above this frequency setting Range is 200 Hz to 20 kHz Home FX Masters Select FX Channel FX Chorus Effect FX Masters FX 1 Select...

Страница 58: ...nges the delay between reflections 8 Early Reflections Knob Changes the amplitude of the early reflections FX Processors Lush Reverb Lush Reverb presets with an L suffix is a model of a DSP reverb with a more lush character Home FX Masters Select FX Channel FX Lush Reverb Effect FX Masters FX 1 Select Lush Reverb Select Effect Refer to Figure 49 1 Lo Cut Knob Attenuates or cuts frequencies below t...

Страница 59: ... level 6 Channel Linking Knob Stereo Delay only Links all controls of both channels Channel two is set to the same level as Channel one FX Processors Pitch Shift The Pitch Shift raises or lowers the pitch of an audio signal by a fixed interval In addition the signal can be delayed from the original The two output channels can be adjusted independently Home FX Masters Select FX Channel FX Masters F...

Страница 60: ... indications are cleared only on the device on which the clear Clip button was pressed By default User Button 2 also performs this function 12 Clear Mute Unmutes all Mutes except Mute Groups and DCA Mutes 13 Clear Cue Clears the Cue By default User Button 3 also performs this function 14 Advanced displays and allows access to all controls on all screens having Advanced and Simple mode You can chan...

Страница 61: ...B memory and internal memory Factory memory is read only 8 Copy to Internal Button Allows scenes to be moved copied between USB memory and internal memory 9 Recall Preset Button Recalls the selected Scene Does not change Wi Fi network settings 10 Include Omit Levels Switch When engaged omit all Faders FX Sends and Aux Sends are not recalled NOTE The mixer saves the state of all controls every 30 s...

Страница 62: ... overwrite Scenes and Presets on the mixer or external hard drive The switch is available for all security levels except Administrator 3 Recall Scenes Enables or disables ability to recall Scenes on the mixer or external hard drive The switch is available for all security levels except Administrator 4 Recall Presets Enables or disables the ability to recall Presets on the mixer or external hard dr...

Страница 63: ...CA and Mute Group all must be unmuted for audio to pass 1 DCA Select Button Selects the associated DCA group to add or remove channels 2 DCA System Name Label This name does not change 3 User defined Name Field Touch the name field to display a keyboard that may be used to enter a name for the DCA Group 4 Clear Button Clears all assignments from the selected DCA Group 5 Assignment Buttons Touch on...

Страница 64: ...es Great for the on stage performers 4 Save Saves the settings for the selected device A message indicating what functions are available is sent to the device 5 Remove Device Removes the selected device from the list 6 Security Login Determines if the user of the selected device must login or not Must have the mixer Security functionality enabled See Security FX Overview For details refer to FX Ov...

Страница 65: ...s feature is enabled or disabled at the User Button level is to see if you can hear a difference when Pitch Correct is assigned to a channel If you select Utility Pitch Correct you need two user buttons one to enable the feature the other to disable it Refer to Input Channel Pitch Correct on page 35 for information about assigning or enabling Pitch Correct for a channel Alternate Method of setting...

Страница 66: ...hen QSC makes an update to the TouchMix firmware you can download it from the QSC website and onto a USB device After inserting the USB device into the TouchMix touch the Upgrade button to start the process Follow the instructions on screen 9 End User License Agreement Please read this agreement before using your TouchMix 10 Save System Log to USB Button1 The TouchMix saves various events that tak...

Страница 67: ...luminated On the iPad both Talk and Enable are latching 4 Noise Level Adjusts the level of the noise signal to the assigned outputs Inf Infinity is off 5 Noise Enable Touch to enable Noise touch again to disable Noise Phantom Power Supplies 48 VDC to XLR Inputs only when using an XLR connector Phantom power is not available on any 1 4 TRS connectors Press Menu Touch Mic Phantom Phantom 48V Menu Mi...

Страница 68: ...rk When creating your own network A the password must be numeric 0 9 only and must be 10 characters An existing network B may have restrictions as well 5 Scan When connecting to an existing network B touch the Scan button to display a list of networks from which you can select Touch the network you want then touch Select The Network SSID is automatically populated 6 Signal Strength Shows the signa...

Страница 69: ...ur iOS device to your TouchMix here are a few tips 1 Check the software version on the mixer Menu Mixer Setup Software Version and your iOS device Settings TouchMix Version If the TouchMix software version is 2 0 xxx the iOS TouchMix App must be 2 0 xxxx If the TouchMix software version is 1 xx xxxx the iOS TouchMix App must be 1 xx xxxx If you are in doubt download the latest ToucMix software fro...

Страница 70: ...Edit Screen Refer to Figure 65 1 Close Edit Button Returns to the Mute Group Mute screen 2 Mute Group Select Buttons Selects the Mute Group for editing 3 Mute Buttons Mutes unmutes the channels assigned to the Mute Group NOTE Channel Mute on Home screen When a channel is muted by a Mute Group only the channel Mute button is a lighter shade of red not gray 4 User Defined Name Touch the name to disp...

Страница 71: ...nitor Level control is available only on the TouchMix 16 Phones 1 and Monitor 2 Level Controls the level of the Cue signal on the Phones and Monitor outputs NOTE By default no audio signal is sent to the Phones Monitor Outputs To send audio channel signals including Main LR to the Phones Monitor Outputs Enable the Cue button for the channels you want to listen to Figure 66 1 2 ...

Страница 72: ...ayed 7 Transport Control Buttons Standard controls To record and playback at the same time arm the inputs you want to record select Track for the tracks you want to playback then touch the Play button 8 Time Code Display Displays position of the Play pointer in HH MM SS Maximum record time is determined by the capacity of the attached hard disc drive NOTE Due to a file size limitation the max cont...

Страница 73: ...The session you want to rename must be the current session 3 Rename Button Touch the Rename button to change the name of the current session 4 USB Sessions List Displays a list of recording sessions available on the USB device connected to the mixer Select a session to Recall or Rename 5 Record Pick off Point Switch Pre Recorded signal is taken before the channel EQ compressor and gate Post Record...

Страница 74: ...cord Button When engaged the source channels you selected are recorded when recording begins This button is also available on the Record Play screen 2 Track Playback EQ Refer to Figure 70 1 EQ In Button Engages the equalizer 2 Low Cut Button Engages disengages the filter This filter cuts frequencies below the frequency set by the Freq control 3 High and Low Shelf Filter 1 2 Buttons Engages disenga...

Страница 75: ...ugh for TouchMix to provide a list of recommended Effect presets 4 FX Preset List Use the FX Preset window to select the Effect and variation For example in the FX Preset window if you see the letter D it refers to the Dense Reverb Effect and the text following the letter indicates the Preset variation of the Dense Reverb 5 Recall Button Loads the effect that has been selected in the Source Type a...

Страница 76: ... Reset Button Clears the Tick Mark counters Aux Mix on Faders Presents a single Aux Mix with large Sends faders Touch Aux Select an Input Bank Inputs 1 8 Aux Refer to Figure 73 1 Input and FX Bank Selectors The Nav Strip functions as it does for the Main L R mix Touch a block of mini faders to navigate to a group of inputs or effects 2 Channel Select and Friendly Name touch a channel selector to g...

Страница 77: ...7 8 1 2 3 4 5 6 7 8 Main Left Aux 1 Aux 2 Aux 3 Aux 4 Main Right Phones Stereo In 9 10 Stereo In 11 12 Trim Trim Trim Trim Trim Trim Trim Trim TouchMix 8 Instrument 1 48V User User Press for fine Cue Monitor Aux 3 4 FX Mute Info Mute Groups Wizard U4 U1 U2 U3 0 Menu Record Play USB 13 1 in 333 mm 2 2 in 56 mm 9 6 in 245 mm ...

Страница 78: ...rim Trim 1 2 3 4 5 6 7 8 9 10 11 12 13 14 15 16 Main Left Aux 1 Aux 2 Aux 3 Aux 4 Aux 5 Aux 6 Main Right Talkback Talkback 9 10 11 12 13 14 15 16 1 2 3 4 5 6 7 8 TouchMix 16 Mute Groups Aux Wizard Info FX Mute Talk Phones Monitor 48V U1 U2 U3 U4 0 Aux 2 Aux 1 Talkback Main Right Aux 6 Aux 5 Main Left Aux 4 Aux 3 Power USB 14 2 in 360 mm 2 3 in 58 mm 11 5 in 291 mm Menu Record Play ...

Страница 79: ...er parameters may be stored internally or on FAT32 formatted USB Channel and FX Presets 130 user defined channel presets and 130 FX presets may be stored internally or on FAT32 formatted USB External Control 2 iOS TouchMix App for iPad iPad mini iPad Air iPhone and iPad Touch Control via Wi Fi provides access to all mixer functions When run on iPhone and iPod touch controls personal monitor mix re...

Страница 80: ...D A Cue Out Notch Filters Notch Filters A D 2 Band Shelv Processor FX 1 of 4 Low Cut Stereo Aux Mode Meter Digital Gain Aux Level odd Aux Level even Stereo Aux Mode Record Pick Off Post Line Amp Line Amp A D Stereo Line Input 1 of 2 Pre Talkback Noise Over Over Meter Channel Track Record In From USB Drive Record In From USB Drive Pre DCA From DCA Masters From DCA Masters DCA DCA D A D A Meter DCA ...

Страница 81: ...4 Customer Service FAX 714 754 6173 World Wide Web www qsc com E mail info qsc com service qsc com 2014 2015 QSC Audio Products LLC All rights reserved QSC the QSC logo and TouchMix are registered trademarks of QSC Audio Products LLC in the U S Patent and Trademark office and other countries iPad iPhone and iOS are trademarks of Apple Inc registered in the U S and other countries Leslie is a regis...

Отзывы: