8. Electronics assembly
130
Original Prusa i3 MK3S+ kit assembly
STEP 42
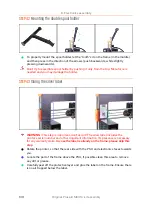
Mounting the double spool holder
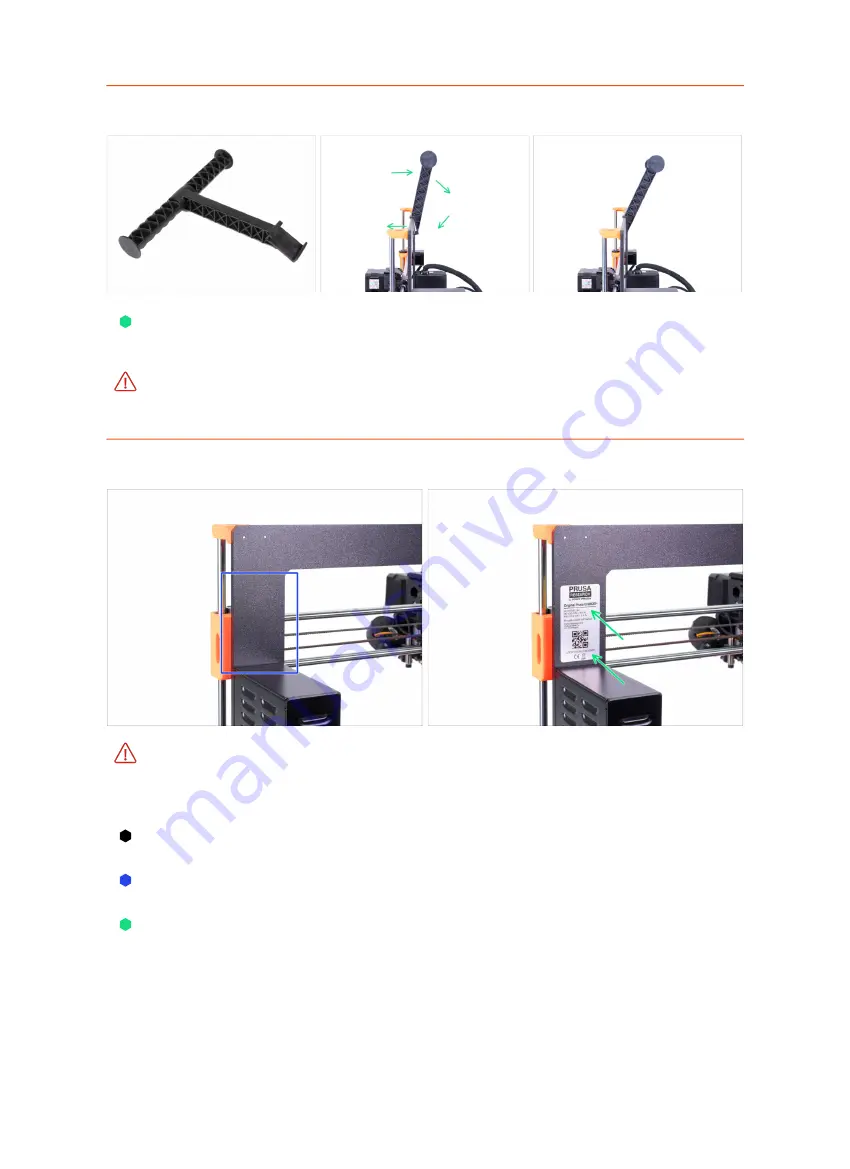
To properly mount the spool holder, let the "tooth" sit on the frame (in the middle)
and then press in the direction of the arrows (push backwards, while slightly
pressing downwards).
Don't try to assemble spool holder by pushing it only from the top. More force is
needed and you may damage the holder.
STEP 43
Gluing the silver label
WARNING:
This step is important, don't skip it! The silver label includes the
printer's serial number and other important information. Its presence is necessary
for any warranty claim.
In case the label is already on the frame, please skip this
step
.
Rotate the printer, so that the rear side with the PSU and electronics faces towards
you.
Locate the part of the frame above the PSU, if possible clean this area to remove
any dirt or grease.
Carefully peel off the protective layer and glue the label on the frame. Ensure there
is no air trapped below the label.
Содержание i3 MK3S+
Страница 6: ...6 ...
Страница 7: ...Original Prusa i3 MK3S kit assembly 7 1 Introduction ...
Страница 15: ...Original Prusa i3 MK3S kit assembly 15 2 Y axis assembly ...
Страница 36: ...36 Original Prusa i3 MK3S kit assembly 3 X axis assembly ...
Страница 44: ...44 Original Prusa i3 MK3S kit assembly 4 Z axis assembly ...
Страница 51: ...Original Prusa i3 MK3S kit assembly 51 5 E axis assembly ...
Страница 88: ...88 Original Prusa i3 MK3S kit assembly 6 LCD assembly ...
Страница 94: ...94 Original Prusa i3 MK3S kit assembly 7 Heatbed PSU assembly ...
Страница 108: ...108 Original Prusa i3 MK3S kit assembly 8 Electronics assembly ...
Страница 132: ...132 Original Prusa i3 MK3S kit assembly 9 Preflight check ...
Страница 137: ...137 Notes ...
Страница 138: ...138 ...
Страница 139: ...139 Notes ...
Страница 140: ...140 ...
Страница 141: ...141 Notes ...
Страница 142: ...142 ...
Страница 143: ...143 Notes ...
Страница 144: ...144 ...

