

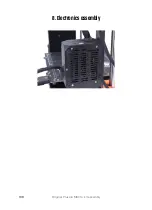


8. Electronics assembly
Original Prusa i3 MK3S+ kit assembly
117
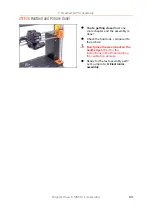
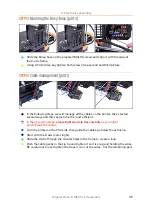
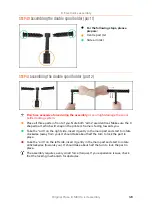
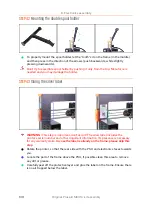
STEP 17
Cable management (part 4)
Take the LCD cables and gently push them in the aluminum extrusion. Leave some
slack, do not stretch the cables too much.
Use the whole length of the extrusion.
Bend the cable bundle down for now.
Carefully fold the LCD cables around the frame.
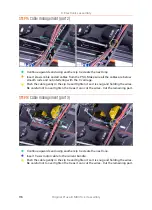
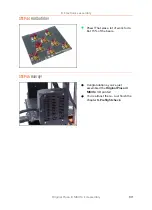
STEP 18
Cable management (part 5)
Continue upwards and using another zip tie create the next loop.
Take the bundle of cables and place it over the LCD cables.
Push the cables gently in the zip tie (excluding the LCD cables) and tighten it. Cut
the remaining part.
Содержание i3 MK3S+
Страница 6: ...6 ...
Страница 7: ...Original Prusa i3 MK3S kit assembly 7 1 Introduction ...
Страница 15: ...Original Prusa i3 MK3S kit assembly 15 2 Y axis assembly ...
Страница 36: ...36 Original Prusa i3 MK3S kit assembly 3 X axis assembly ...
Страница 44: ...44 Original Prusa i3 MK3S kit assembly 4 Z axis assembly ...
Страница 51: ...Original Prusa i3 MK3S kit assembly 51 5 E axis assembly ...
Страница 88: ...88 Original Prusa i3 MK3S kit assembly 6 LCD assembly ...
Страница 94: ...94 Original Prusa i3 MK3S kit assembly 7 Heatbed PSU assembly ...
Страница 108: ...108 Original Prusa i3 MK3S kit assembly 8 Electronics assembly ...
Страница 132: ...132 Original Prusa i3 MK3S kit assembly 9 Preflight check ...
Страница 137: ...137 Notes ...
Страница 138: ...138 ...
Страница 139: ...139 Notes ...
Страница 140: ...140 ...
Страница 141: ...141 Notes ...
Страница 142: ...142 ...
Страница 143: ...143 Notes ...
Страница 144: ...144 ...