< CRD4847-A >
16
Chapter
44
En
Activating iDatalink Maestro
Before using and/or connecting the iData-
link Maestro adapter, you will need to first
flash the Maestro module with the appropri-
ate vehicle and head unit firmware.
■
Updating the iDatalink Maestro
module
1 Find the last six numbers (device
number) on the label on the pack-
aging of this product or on this
product itself.
p
Device number input is required for
updating the iDatalink MAESTRO mod-
ule. Take a note of the device number as
necessary.
p
You can also check the device number on
the “
Firmware Information
” screen of
this product.
For details, refer to Displaying the firm-
ware version on page 60.
2 Access the Automotive Data
Solutions Inc. website (www.idata-
linkmaestro.com/) and follow the
on-screen directions to configure
the desired firmware.
p
When the serial number input is required,
please input the device number of this
product.
3 Install the vehicle/head unit spe-
cific firmware on your iDatalink
Maestro module.
For details, please refer to Automotive
Data Solutions Inc. website.
4 Connect this product to iDatalink
Maestro, and then install this prod-
uct to the vehicle.
The iDatalink function will be active.
Starting procedure
1 Display the AV source selection
screen.
For details of the operations, refer to
Displaying the AV operation screen on
page 12.
2 Touch [My Vehicle] on the AV
source selection screen.
3 Touch [USB/iPod], [SiriusXM] or
[Bluetooth Audio] when you want
to operate iDatalink.
4 Use the touch panel keys on the
screen to control the OEM feature.
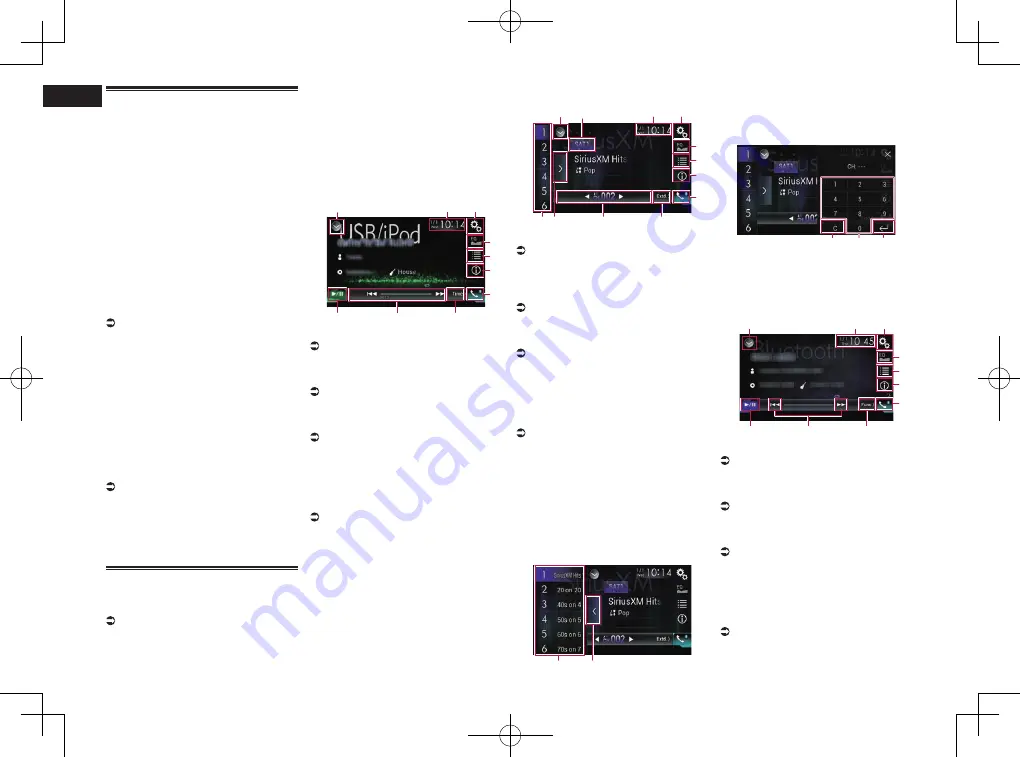
USB/iPod
(Media player)
1
3
2
8
4
5
7
a
9
6
1
Displays the source list.
For details, refer to Selecting a front
source on the source list on page 13.
2
Displays the Time and date setting
screen.
For details, refer to Setting the time and
date on page 70.
3
Displays the Setting menu screen.
4
Recalls equalizer curves.
For details, refer to Using the equalizer on
page 64.
5
Selects a track from the list.
6
Switches the text display between
tag information and file/folder
information.
7
Displays the Phone menu screen.
For details, refer to Displaying the phone
menu on page 16.
8
Switches to the next or previous
page of touch panel keys.
9
Functions and displays vary depend-
ing on the connected type of iDatalink
adapter and the vehicle model.
a
Switches between playback and
pause.
Satellite Radio
1
4
9
5
6
8
c
a
7
2
b
3
1
Displays the source list.
For details, refer to Selecting a front
source on the source list on page 13.
2
Selects a band.
3
Displays the Time and date setting
screen.
For details, refer to Setting the time and
date on page 70.
4
Displays the Setting menu screen.
5
Recalls equalizer curves.
For details, refer to Using the equalizer on
page 64.
6
Selects a channel from the list.
7
Switches the text display between the
current channel information and the
current content information.
8
Displays the Phone menu screen.
For details, refer to Displaying the phone
menu on page 16.
9
Switches to the next or previous
page of touch panel keys.
a
Functions and displays vary depend-
ing on the connected type of iDatalink
adapter and the vehicle model.
b
Displays the preset channels.
c
Selects a preset channel.
Selecting a preset channel from the
preset channel list
1
2
1
Preset tuning keys
2
Preset channel list display key
Selecting a SiriusXM channel directly
1
2
3
1
Clear key
2
Numeric keys
3
Enter key
Bluetooth Audio
4
5
7
6
8
a
9
1
2
3
1
Displays the source list.
For details, refer to Selecting a front
source on the source list on page 13.
2
Displays the Time and date setting
screen.
For details, refer to Setting the time and
date on page 70.
3
Displays the Setting menu screen.
4
Recalls equalizer curves.
For details, refer to Using the equalizer on
page 64.
5
Selects a track from the list.
6
Switches the text display between
tag information and file/folder
information.
7
Displays the Phone menu screen.
For details, refer to Displaying the phone
menu on page 16.
8
Switches to the next or previous
page of touch panel keys.


