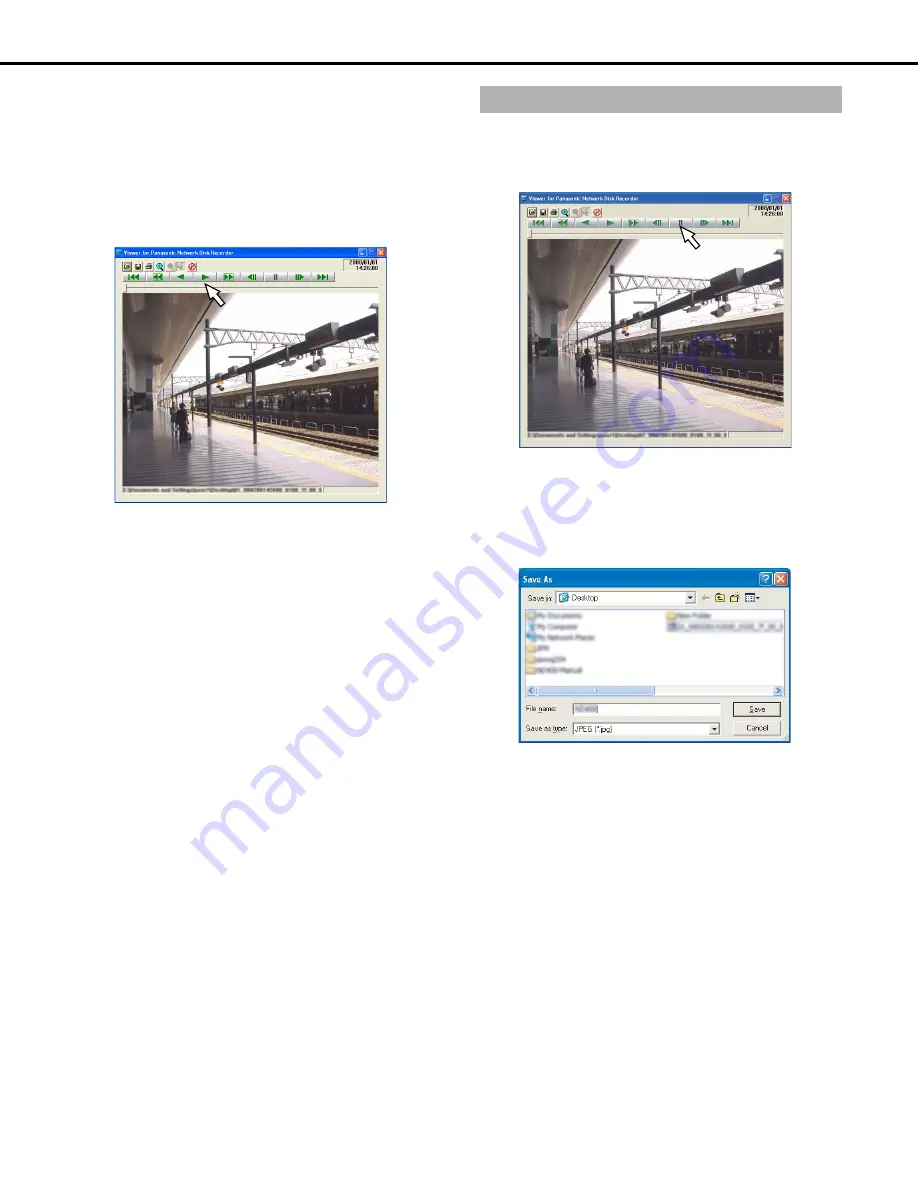
background image

Downloading images

45

3

Select the downloaded image data (file name.n3r).

You can select multiple files while pressing either the
[Ctrl] or [Shift] keys. A maximum of 32 files can be
selected.

When you play audio data, put both image data (file
name.n3r) and audio data (file name.n3a) in the same
folder.

4

Click the [Open] button.

This displays the image.

5

Click the [PLAY] button.

When playback is finished, a black window is displayed
and playback is paused.

When multiple files are selected, click the [NEXT 
RECORD] or [PREV RECORD] buttons to switch 
between images.

• Click the [Zoom] button to enlarge the image twice the

size.

Depending on the specifications of the PC, playback may
not be smooth.

You can turn audio on or off by clicking the [Speaker
(audio on)] or the [Speaker (audio off)] button.

If browser, viewer, or HDD viewer are running at the same
time, audio playback may not be correct.

To play back the audio correctly, run just the browser, the
viewer, or the HDD viewer only.

• Image and audio sometimes may not be synchronized.

Displayed images are saved to the PC as jpeg files.

1

Perform operations on playback with the viewer
software.

2

Click the [PAUSE] button.

3

Click the [SAVE] button.

The "Save As" window will be displayed.

4

Enter a file name and select JPEG (*.jpg) as the file type.

5

Designate the folder and click the [Save] button.

The image data is saved.

Saving images

Содержание WJND400 - NETWORK DISK RECORDER

Страница 1: ... this product please read these instructions carefully and save this manual for future use Network Disk Recorder Operating Instructions Model No WJ ND400 1 2 3 4 5 6 7 8 9 www voicesonic com Phone 877 289 2829 Panasonic I Pro Network Cameras ...

Страница 2: ...ng images and audio 18 Manual recording of images and audio 18 Recording mode and priority 18 Audio recording 18 Playback 19 Playback recorded images 19 Operations during playback 20 Playback from a designated time and date 22 Search for and playback images 22 Filter conditions 23 Rec event list display 23 Search for and playback recorded events 24 Search for and playback images with motion at a s...

Страница 3: ...43 Downloading the viewer software 43 Installing the viewer software 43 Uninstalling the viewer software 44 Playing back images 44 Saving images 45 Printing images 46 Alteration detection 46 Transmitting data 47 Transmitting to the FTP server 47 Periodically transmit camera images 47 Transmit camera images when an event occurs 47 Send mail 47 Checking system disk information 48 System information ...

Страница 4: ...Contents 4 Troubleshooting 60 Problems 60 Message display 64 Glossary 65 Words used in the manual 65 Index 68 ...

Страница 5: ...ader is not installed on the PC download the latest Adobe Reader from the Adobe web site and install it In this manual and on the screen the ND400 and the recorder are shown as WJ ND400 Refer to the readme txt file on the CD ROM bundled with the recorder for information about the versions and types of separately available software and cameras supported The following abbreviations are used in this ...

Страница 6: ...sta Business 32 bit Microsoft Windows XP Professional SP2 Microsoft Windows XP Home Edition SP2 OS Language English French Spanish German Italian Russian Chinese CPU Pentium 4 3 0 GHz or faster Memory 1 GB or more 512 MB or more is required when using Microsoft Windows XP Monitor Resolution 1 024 x 768 pixels or more Color 24 bit True color or better Network interface 10 100 1 000 Mbps Ethernet po...

Страница 7: ...EG 4 image by designating time and date playback may start from a point several seconds before or after the designated time and date or from the first frame of the next record 4 When recording images 1 Time and date displayed on the recording event list actual start time of recordings may not exactly indicate the actual time of recording trigger event occurrence time start time of the schedule rec...

Страница 8: ... registered with the recorder can connect to the recorder For more information contact your system administrator Do not enter 0 on the front of the IP address when inputting it Example OK 192 168 0 50 NG 192 168 0 050 Refer to page 64 if a message appears in the information bar Important Refer to your system administrator for the user name and password set for you Refer to the Setup Instructions P...

Страница 9: ...ions If WJ ND200 WJ ND300 ActiveX is already installed delete WebVideo ActiveX using Add or Remove Programs and then install WJ ND400 ActiveX When the install wizard is displayed again even after completing the installation of the ActiveX restart the PC 6 Close the web browser after operations and settings are finished Follow the on screen instructions for setting and ending functions Important Re...

Страница 10: ...s the recording and playback status 5 Current time display area Displays the current time 6 Image display Displays live and recorded images Displays the camera title in the upper left and the date time in the upper right current for live recorded for recorded images Click the camera title when viewing multiscreen to view the clicked image on a single screen 7 Playback point operation area page 15 ...

Страница 11: ...y is shown on the rec event list window Error log button Displays a log of the errors that occur Access log button Displays the log in log out time and date the user name or IP address Event log button Displays the event log when it occurred and a description Network log button Displays a log of the problems that occur on the network 7 Rec event list Number of events Displays the total number of e...

Страница 12: ...h clicking of the button following the preset camera combination refer to the Setup Instructions PDF file 2 Sequence box Switches the camera images automatically in a preset sequence The button indicator lights green during sequence refer to the Setup Instructions PDF file 3 El zoom box Displays the camera image at the magnification of the button clicked 4 Cam select box Displays the group titles ...

Страница 13: ... event site alarm terminal alarm command alarm 5 Schedule button Displays a menu for setting recording event action for specified days and times 6 Camera button Displays a menu for setting the network group and sequence of cameras 7 Server button Displays a menu for setting the server of recorder 8 Network button Displays a menu for setting the network of recorder 9 User mng button Displays a menu...

Страница 14: ...ownloaded Step 1 to Step 7 The playback speed is displayed 1x Approx 4x Approx 8x Approx 16x Approx 32x Approx 48x Approx 96x The sequence is being activated Normal recording area or event recording area of the HDD on the recorder is selected HDD copy area is selected SD memory data is currently being obtained RAID is being recovered Rec event list is filtered For details on filtering of recording...

Страница 15: ...icking during playback or pause plays back one frame at a time reversely and then pauses 8 PAUSE button Clicking during playback pauses playback Clicking during pause restarts playback 9 STOP button Stops playback and displays live images from the camera 10 NEXT IMAGE button Clicking during playback or pause plays back one frame at a time forward and then pauses 11 Download TO PC box Downloads the...

Страница 16: ...erforming the playback operations again during playback skips ahead a few seconds Single Frame Reverse Not all recorded images are displayed Single frame reverse is performed at the refresh rate set for the camera at the time of recording Fast Forward Fast Reverse Not all recorded images are displayed Fast forward and fast reverse are performed at the refresh rate set for the camera at the time of...

Страница 17: ...ttons Click the buttons on the control pad to move the camera to the direction of the button pan tilt Also click in the control pad to adjust the horizontal vertical position pan tilt of the image The pan tilt movement increases if a clicked point gets farther from the center point of the control pad 5 Brightness box Click Dark or Bright to adjust the lens iris brightness Click Reset to reset the ...

Страница 18: ...ng recording continues even if you press the Recording stop button It is impossible to record images when images are not being received from cameras The recorder has 5 recording modes The access priority of the recording modes is shown below Images are recorded in the highest priority mode when two or more recordings with different recording modes started simultaneously only recording with the hig...

Страница 19: ... information about settings contact your system administrator If multiple browsers and viewers are running at the same time audio playback may not be correct To play back the audio correctly run either the browser or the viewer only Playback may slow down or briefly stop if the load on the main unit is too large many cameras are connected many images are being played or shown etc When playing imag...

Страница 20: ...aying previous images If the skip destination does not exist playback continues In this case the play time may go back one minute Fast playback fast reverse playback Each time the FF button is clicked the speed changes Step 2 4x Step 3 8x Step 4 16x Step 5 32x Step 6 48x Step 7 96x Each time the REW button is clicked the reverse speed changes Step 2 4x Step 3 8x Step 4 16x Step 5 32x Step 6 48x St...

Страница 21: ...n while multiscreen are displayed may cause discrepancies in the image of that channel Electronic zoom Enlarge the size of the image Clicking the button in the El zoom box while one screen is being displayed enlarges the image x1 button Digitally zooms image by 1x x2 button Digitally zooms image by 2x x4 button Digitally zooms image by 4x The point where a zoomed image is clicked becomes the cente...

Страница 22: ...t operations during playback 6 On the HDD tab click the STOP button Playing Step 1 disappears from the status display area and playback is stopped The live image from the camera is displayed in the Image display Note When an MPEG 4 image is being played back playback may start from a point several seconds before or after the designated time and date To playback SD memory data saved on the recorder...

Страница 23: ...Setup Instructions PDF file Records according to site alarms refer to the Setup Instructions PDF file Records according to terminal alarms refer to the Setup Instructions PDF file Records according to command alarms refer to the Setup Instructions PDF file SD memory recording refer to the Setup Instructions PDF file Camera Searches selected camera channels Rec event list display Number of the list...

Страница 24: ...hannel by selecting the check box of the camera channel to search 5 Click the OK button FILTERING is displayed on the status display area and the filtered results are displayed This displays the search results on the rec event list window To clear the filter click the All list button All events are displayed and FILTERING disappears 6 Click the recorded event time to playback The image at the sele...

Страница 25: ...s This displays the search results on the rec event list window Searching may take a while 8 Click the recorded event time to playback The image at the selected recorded event time is played back Refer to page 20 for information about operations during playback Images are played back in 1 screen only Click the Multiscreen select button after playback has started to display images in multiscreen 9 ...

Страница 26: ...box for the area to be played back Normal area Event area Copy area 4 Click the OK button The selected disk is displayed in the status display area 5 Click the HDD tab 6 Click the PLAY button Playing Step 1 is displayed in the status display area and the recorded images on the selected disk are played back Refer to page 20 for information about operations during playback 7 Click the STOP button St...

Страница 27: ...lecting a Camera Click WJ ND400 to display the group titles of the cameras set on the recorder Clicking a group title displays the cameras that belong to that group Clicking a camera s title displays that camera s image About selecting a camera from the right click menu You can change the image by right clicking on the image and selecting a camera from the menu that appears 2 Click WJ ND400 and se...

Страница 28: ...oomed image is clicked becomes the center of the screen Zoom in Zoom in Enlarges live images To zoom in to the image right click on the image and select ZOOM IN from the menu that is displayed To return from the zoomed display to the regular display right click on the image being played and select BACK from the menu that is displayed Note When MPEG 4 image is enlarged it may take the first few sec...

Страница 29: ... zoom by using the mouse wheel button Camera control Pan tilt Adjust the cameras horizontal and vertical position Zoom Zoom in out the image Focus Adjust the focus point of the image Brightness Adjust the lens iris brightness Preset operations Registers the preset position of camera Moves the camera to the registered preset positions Auto Select the camera s automatic mode function Control button ...

Страница 30: ... to the preset position registered in advance Registering preset positions is required to perform the preset function 1 Click the CAM tab 2 Click the V button in the Preset box and select the preset number Home 1 to 256 to be moved 3 Click the Go button The camera moves to the position that was registered as the preset position for that number Auto mode function Auto pan etc Operates the auto func...

Страница 31: ...menu that is displayed When the Go to last button is clicked while displaying live images playback of the latest recorded images from the selected camera channel will start It is available to select a time to be skipped when the Go to last button is clicked Default 30 seconds The audio of the upper left camera channel will be heard when multiscreen are displayed When performing a VMD search page 2...

Страница 32: ...cted camera channel will start It is available to select a time to be skipped when the Go to last button is clicked Default 30 seconds About starting sequence operations from the right click menu You can start sequence operations by right clicking on the image and selecting SEQ from the menu that appears You can also stop sequence operation by selecting SEQ during sequence operation About zooming ...

Страница 33: ...Alarm mail notification of the time and date of an event is sent to registered e mail addresses when an event occurs A JPEG image can be attached to this e mail Up to 4 addresses can be registered to receive the alarm mail Refer to the Setup Instructions PDF file for information about settings Alarm signal output from the Alarm Control connector on the rear panel of the recorder Alarm output When ...

Страница 34: ... Note Emergency recording does not stop even if you click the Alarm ALM button while recording However recording stops if the recording time is set to Continue for emergency recording The recorder can be set so that alarms do not occur even if an event occurs Use this function to do settings or other work when you do not want the alarm to operate However recording and event logs are still recorded...

Страница 35: ...the following 1 When an error occurred the ERR button will be displayed in the status display area 2 Click the ERR button The unit will be released from the error status Note Depending on the error the ERROR indicator on the front of the unit does not go off even if the ERR button is clicked Cancel the Error Status ...

Страница 36: ...ock is set 1 Press the arrow buttons up or down on the front panel Continue to press it until Keylock Mode is displayed 2 Press the SET button Locked is displayed and the password entry screen appears 3 Enter your password default is 12345 Move the cursor using the arrow buttons left or right and enter values from 0 to 9 using up or down You can set the password on the setup menu Refer to the Setu...

Страница 37: ... and date of the latest log will be updated Live images will not be refreshed correctly while the displayed logs are being refreshed Displays the log in log out time and date the user name and IP address 1 Click the Control button 2 Click the Access log button in the Log box Access logs are shown in a list on the rec event list About the Access log The user name or IP address is shown in 3 Click t...

Страница 38: ... and a description in a list 1 Click the Control button 2 Click the Network log button in the Log box Network logs are shown in a list on the rec event list Refer to page 52 for more information about Network Logs 3 Click the List button The Network log list closes Note A maximum of 1000 logs are listed on the Network log list When there are over 1000 logs the oldest are overwritten If the current...

Страница 39: ... camera are set in the same time zone set to 6 Click the OK button COPY is appeared in the status display area and copying begins Note In the following cases copying during operation is canceled If a different user changes the settings during copying When a user who started manual copying from a PC web browser closes the Web browser copying stops about 90 seconds after the web browser is closed Co...

Страница 40: ...images are shown in a list in the rec event list 5 Click the HDD tab 6 Click the log to playback Playing Step 1 is displayed in the status display area and the recorded images on the selected disk are played back 7 Click the STOP button Stops playback Playing Step 1 disappears from the status display area and a live image from the camera is displayed in the Image display Playback will start from t...

Страница 41: ...ete for normal recording area Manual delete for event recording area and Manual delete for copy area and enter a time and date Images and audio recorded before the set time and date will be deleted 4 Click the Delete button This will display a confirmation window 5 Click the OK button The data is deleted Manual deletion Important Note that deleted images and audio cannot be recovered You can set p...

Страница 42: ... are displayed in the Start and End boxes Note When an MPEG 4 image is downloaded a few seconds before and after the specified start and end time may be downloaded 5 Select whether the data for download has audio or whether data for alteration detection is attached and click the OK button The File Download window is displayed The download time is longer if audio or alteration detection data is att...

Страница 43: ...te a new folder in the selected destination and click the Save button The viewer software is downloaded You must uninstall any previous versions of the viewer software before installing the latest version 1 Double click the downloaded n3vsetup exe file This will display the end user s license agreement 2 Select I accept the terms in the licence agreement and click the Next button This displays the...

Страница 44: ...f installed programs and then click the Remove button The uninstall program launches 3 Uninstall the program following the instructions on the window In Windows Vista 1 Select The uninstall program from the Control Panel 2 Select ND_Viewer from the list of installed programs and right click Select Uninstall and Change in the menu that is displayed The uninstall program launches 3 Uninstall the pro...

Страница 45: ... enlarge the image twice the size Depending on the specifications of the PC playback may not be smooth You can turn audio on or off by clicking the Speaker audio on or the Speaker audio off button If browser viewer or HDD viewer are running at the same time audio playback may not be correct To play back the audio correctly run just the browser the viewer or the HDD viewer only Image and audio some...

Страница 46: ...ion data attached Refer to page 42 for information on how to attach alteration detection data 1 When you launch the viewer software the following window appears 2 Click the Open File OPEN button The Open window opens 3 Select the downloaded image data file name n3r 4 Click the Open button Playback is paused on the first image of the data 5 Click the ALT CHECK button Alteration detection starts The...

Страница 47: ...ssion format of the camera channel set in Image transmission by periodic timer is MPEG 4 You must configure settings for sending camera images to the FTP server when an event occurs in advance on the setup menu Configure the settings for the destination server name and the transmit time of pre event and post event images under Image transmission by alarm on the setup menu Also configure image tran...

Страница 48: ...rder s HDDs and Extension units Ext 1 to 5 You can also check the date range of images recorded on the selected HDD Refer to the Setup Instructions PDF file for more information on the recorder s HDD You can also configure settings for operating time hour meter warnings for the HDD 1 Click the Setup button 2 Click the Maintenance button and then click Disk information This will display the Disk in...

Страница 49: ...e displayed HDD capacity warning 1 Anything other than FULL NORMAL HDD CAPACITY REMAINS EVENT HDD CAPACITY REMAINS COPY HDD CAPACITY REMAINS is remaining capacity FULL EVENT HDD FULL COPY HDD FULL Power outage detection POWER LOSS Recover from a power outage POWER RECOVERED NW camera error detection CAM COMMUNICATION ERROR is camera channel NW camera error recovery CAM COMMUNICATION RECOVERED is c...

Страница 50: ...6 2 DOWN Extension unit EXTx RAID6 2 DOWN x is unit number RAID6 3 DOWN Recorder MAIN RAID6 3 DOWN Extension unit EXTx RAID6 3 DOWN x is unit number Camera SD memory card error CAM xx SD ERR is camera channel Camera SD memory card starting write error CAM xx SD START ERR is camera channel Camera SD memory card ending write error CAM xx SD END ERR is camera channel Camera SD memory card list reques...

Страница 51: ...ach time 1 of the available disk space is reduced and a warning mail with the FULL content will be sent when there is no available disk space 2 The HDD smart warning mail is not sent in the RAID5 mode or the RAID6 mode RAID6 mode format failure Recorder MAIN RAID6 FORMAT ERROR Extension unit EXTx RAID6 FORMAT ERROR x is unit number HDD remove error Recorder MAIN y SWAP WARNING Extension unit EXTx ...

Страница 52: ...ocol PANASONIC_ALM_OTHE R_ERR Network error output Parameter initialization error Recorder MAIN ERR INITIAL ERR Extension unit EXTu ERR INITIAL ERR FAN warning Recorder MAIN FANf ERROR Recorder MAIN f ERR FAN ERROR Error output Extension unit EXTu FANf ERROR Extension unit EXTu f ERR FAN ERROR Thermal error warning Recorder MAIN THERMAL ERROR Recorder MAIN t ERR THERMAL ERROR Error output Extensio...

Страница 53: ... HDD error output Extension unit EXTu RAID5 2DOWN Extension unit EXTu ERR RAID5 2down RAID6 1DOWN Recorder MAIN RAID6 1DOWN Recorder MAIN ERR RAID6 1down HDD error output Extension unit EXTu RAID6 1DOWN Extension unit EXTu ERR RAID6 1down RAID6 2DOWN Recorder MAIN RAID6 2DOWN Recorder MAIN ERR RAID6 2down HDD error output Extension unit EXTu RAID6 2DOWN Extension unit EXTu ERR RAID6 2down RAID6 3D...

Страница 54: ...R Extension unit EXTu PARTITION ERROR Extension unit EXTu ERR PARTITION ERROR HDD RAID 5 recovery failure Recorder MAIN RAID5 RECOVERY FAILURE Recorder MAIN ERR RAID5 R FAILURE HDD error output Extension unit EXTu RAID5 RECOVERY FAILURE Extension unit EXTu ERR RAID5 R FAILURE HDD RAID 6 recovery failure Recorder MAIN RAID6 RECOVERY FAILURE Recorder MAIN ERR RAID6 R FAILURE HDD error output Extensi...

Страница 55: ...rror output Failed to resolve POP3 server address from DNS SMTP POP 3_ADD_ERR Network error output Failed to find POP3 server SMTP POP3_SVR_ER R Network error output POP3 authentication error SMTP POP3_ATTEST _ERR Network error output Failed to resolve SMTP server address from DNS SMTP SMTP_ADD_ER R Network error output Failed to find SMTP server SMTP SMTP_SVR_ER R Network error output MAIL FROM C...

Страница 56: ...k error output Time from the NTP server is invalid NTP TIME_INVALID Network error output Other errors for NTP NTP OTHER_ERR Network error output SNMP transmission complete SNMP SEND_OK Password error for SNMP user name SNMP USER_PASS_E RR Network error output SNMP object inquiry failure SNMP OBJ_ERR Network error output Other errors for SNMP SNMP OTHER_ERR Network error output Having IP address co...

Страница 57: ...ing of the WJ ND400 Refer to page 58 for information on symbols used on the table above Other errors for HTTP HTTP OTHER_ERR Network error output Move to Config CONFIG Camera SD memory card error CAM cc SD ERR NW ERR CAMERA cc SD ERROR Camera error output Request to start writing on the camera SD denied CAM cc SD START ERR NW ERR CAMERA cc SD ERROR Camera error output Request to finish writing on ...

Страница 58: ... ERR RAID6 2DOWN MAIN RAID6 3DOWN EXTu RAID6 3DOWN MAIN ERR RAID6 3DOWN EXTu ERR RAID6 3DOWN MAIN d SMART WARNING EXTu d SMART WARNING MAIN d ERR SMART WARNING EXTu d ERR SMART WARNING The HDD malfunctioned and may not be usable Contact your dealer to have the HDD replaced 1 MAIN d HOUR METER WARNING EXTu d HOUR METER WARNING MAIN d ERR HDD HOUR METER WARNING EXTu d ERR HDD HOUR METER WARNING The ...

Страница 59: ...d Check the camera settings and the SD memory card CAM cc SD START ERR NW ERR CAMERA cc SD ERROR Abnormality with the camera s SD memory card Communication with the network camera is unstable or the network camera is not connected Check the camera settings and the SD memory card Check the status of the connection with the network camera CAM cc SD END ERR CAM cc GET LIST ERR CAM cc GET IMG ERR CAM ...

Страница 60: ...P address is different from another device Setup Instructions PDF file Check if the IP address of the recorder matches the subnet of the network Setup Instructions PDF file When the recorder and the client PC are on the same subnet set the same subnet for the IP address Setup Instructions PDF file To access the recorder on the same subnet it is recommended to set the recorder s address to Don t Us...

Страница 61: ... PC s display adapter and driver When this happens first update the driver of the display adapter If this does not resolve the problem use the following procedure to adjust the hardware accelerator function This explanation uses Windows XP as an example 1 Close all the browsers and then right click the desktop and select Properties from the menu 2 Select Setting tab from Display Properties and the...

Страница 62: ... of live image are not recorded and instead a black screen appears If this happens wait about 10 minutes The camera image may not be displayed in MPEG 4 format images via the Internet Refer to your network administrator because it effects the router settings and other network devices Stops playback Playback restarts after a short time Time settings are changed through auto time adjustment When the...

Страница 63: ...twork performance such as the live transmission rate and the recording rate Setup Instructions PDF file The recorder and the HUB network speed may not match 100BASE TX Full and 100BASE TX Half for example A HUB may cause variations in network transmission speeds Set the HUB s transmission speed and the recorder s network transmission speed to the same speed Cannot operate camera Make sure that the...

Страница 64: ...tion bar and select Install ActiveX Control A security warning window appears click the Install button The following message appears in the information bar Internet Explorer has blocked the file being downloaded to your computer from this site as a security measure Click here to display options Click the information bar and select Download File If you cannot download the file even after doing the ...

Страница 65: ...vice used as a gateway for networks such as a local network to access PCs on an external network Data is sent using the default gateway if a gateway is not specified in the destination IP address Disk Configuration Configure the HDD after replacing removing or adding a HDD Disk Configuration is the menu for configuring the HDD Electronic Zoom Enlarges live images and playback images during playbac...

Страница 66: ...June 2003 as IEEE802 3af PoE Supplied Hub A switching hub that provides PoE functionality A maximum of 48 V 15 4 W of power can be supplied to cameras and other devices Port Number A sub address set below the IP address to connect multiple parties simultaneously for communication TCP UDP etc on the Internet Primary Server DNS servers usually have more than 2 system and the primary server is the ma...

Страница 67: ...e Function that automatically switches the camera image in a preset order Sequence is available on the recorder when live images are displayed Subnet A small network used as a unit of administration when a larger network is divided into smaller networks Large networks in corporations for example the network can be broken down into smaller networks called subnets to make the network more manageable...

Страница 68: ... MAC address 48 Manual deletion 41 Manual recording 18 Multiscreen 21 31 Multiscreen select 31 N Network log 38 52 Network log registration count 38 NTP 56 P Password 8 Playback position operations 15 POP3 55 Preset 30 Protocol 33 R RAID5 53 54 RAID6 53 54 Rec event list 12 23 Rec event search 22 24 Recording mode access priority 18 Recording rate 18 19 RECOVER 14 Refresh 7 S Schedule recording 18...

Страница 69: ...f old products and used batteries please take them to applicable collection points in accordance with your national legislation and the Directives 2002 96 EC and 2006 66 EC By disposing of these products and batteries correctly you will help to save valuable resources and prevent any potential negative effects on human health and the environment which could otherwise arise from inappropriate waste...

Страница 70: ...fore attempting to connect or operate this product please read these instructions carefully and save this manual for future use Network Disk Recorder Installation Guide Model No WJ ND400 1 2 3 4 5 6 7 8 9 ...

Страница 71: ...la ansvar för att den produkt till vilken denna deklaration hänvisar är i överensstämmelse med standarddokument eller andra normativa dokument som framställs i direktiv nr 2006 95 EC och 2004 108 EC Ilmoitamme yksinomaisella vastuullamme että tuote jota tämä ilmoitus koskee noudattaa seuraavia standardeja tai muita ohjeellisia asiakirjoja jotka noudattavat direktiivien 2006 95 EC ja 2004 108 EC sä...

Страница 72: ...nable protection against harmful interference when the equipment is operated in a commercial environment This equipment generates uses and can radiate radio frequency energy and if not installed and used in accordance with the instruction manual may cause harmful interference to radio communications Operation of this equipment in a residential area is likely to cause harmful interference in which ...

Страница 73: ...4 ...

Страница 74: ...17 Encrypting Data Recorded on the HDDs 17 Recording and Playing Images 18 Stable recording and playback of images 18 Setting Schedules 18 Event Functions 18 List of Functions 19 Setup Menu List 19 Network 20 Remote Operation 20 Network Security Function 20 SD Memory Recording 21 Maintenance Version Upgrade 21 Installation and Setup Getting Started 22 Setup Procedure 22 Setting up the Rack 23 Rack...

Страница 75: ... Supply 39 Turning On the Power 39 Turning Off the Power 39 During Recording 39 During Playback 39 Using the Front Panel for Operations 40 Basic Operations 40 Checking System Information 41 Checking the IP Address 42 Setting the IP Address 43 Configuring the Settings for Each Item 43 Setting and Canceling Key Lock 43 HDD Unit 44 Handling the HDD 45 Installing HDDs 46 Installing HDDs by unit 47 Rem...

Страница 76: ...ed on the PC download the latest Adobe Reader from the Adobe web site and install it In this manual and on the screen the ND400 and the recorder are shown as WJ ND400 Refer to the readme txt file on the CD ROM bundled with the recorder for information about the versions and types of separately available software and cameras supported The following abbreviations are used in this document Microsoft ...

Страница 77: ... or other malicious entities using a regularly updated anti virus program anti spyware program etc Protect your network against unauthorized access by restricting users to those who log in with an authorized user name and password Apply measures such as user authentication to protect your network against leakage or theft of information including image data authentication information user names and...

Страница 78: ... operation when they have been used at the recommended ambient temperature approx 25 ºC 77 ºF When hard disk drive trouble occurs replace it immediately Consult your dealer for servicing Hard disk drives are precise devices Do not leave them where the temperature is high and humid Do not touch the connector of the removable hard disk by hand directly to protect the hard disk drive from static elec...

Страница 79: ... functions We recommend that you make a note of your settings and save them This will help when you are required to change the system configuration or when unexpected trouble or failure occurs Distributing copying disassembling reverse compiling reverse engineering and also exporting in violation of export laws of the software provided with this product is expressly prohibited z MPEG 4 Visual pate...

Страница 80: ...mode the indicator lights or blinks red The indicators display the status of the drives from HDD1 to HDD9 but if a system errors occur each indicator has the same display Front View 8 16 15 9 10 11 12 13 14 6 5 3 2 7 1 4 Blinks red System errors Blinks orange Temperature is too high or low Cooling fan stopped etc Blinks Alarm has occurred Lights Alarm output stopped Off Alarm is resolved or no ala...

Страница 81: ... is for future extension off 16 Front cover Open to add or replace HDD units and to configure HDD operations Single RAID5 RAID6 Keep it closed and locked during normal operations Important When the HDD indicators light red in the RAID5 RAID6 mode quickly replace the HDD where the errors occurred Contact your dealer for information on replacing HDDs RAID5 mode Data cannot be recovered when two or m...

Страница 82: ...operations HDD operation mode Change The settings become effective after setting the RAID switch and turning on the Power switch while holding down the USE button to boot up Remember to hold down the USE button until the buzzer sounds Lights green HDD power On Formatted Blinks green HDD for playback only only for playback recording not possible Blinks orange Formatting HDD Lights red HDD format fa...

Страница 83: ...mode with the RAID switch and turning on the power while holding down the USE button to boot up 7 Removal knob Used when replacing the HDD units RAID5 mode The RAID5 mode can be used when more than three HDDs are installed RAID6 mode The RAID6 mode can be used when more than four HDDs are installed S SINGLE mode default R5 RAID5 mode R6 RAID6 mode Important The HDD operation mode cannot be changed...

Страница 84: ...ctor EXT STORAGE Use to connect the WJ HDE400 extension unit and the recorder with the connection cable provided with the extension unit 6 Client PC port PC Use to connect a PC 10BASE T 100BASE TX or 1000BASE T network 7 Camera port CAMERA Use to connect a camera 10BASE T 100BASE TX or 1000BASE T network 8 Signal GND terminal SIGNAL GND Use as a ground when the recorder s Signal GND terminal is co...

Страница 85: ...ns PDF file You can set only one area for each HDD 1 Normal Recording Area Area for recording except events Manual recording schedule recording SD memory data 2 Event Recording Area Area for recording when events occur Post event recording emergency recording 3 Pre event Recording Area Area for pre event recording 4 Copy area Area where copied data is saved Note The HDD provided in the recorder at...

Страница 86: ...r more HDDs Theoretical volume when RAID5 mode enabled Theoretical volume HDD with smallest capacity in the unit x number of HDDs in the unit 1 Theoretical volume when RAID6 mode enabled Theoretical volume HDD with smallest capacity in the unit x number of HDDs in the unit 2 The capacity of the HDDs that are installed may be a few percents smaller The image and audio data recorded on the HDDs is e...

Страница 87: ...arms site alarms and command alarms For example if a camera sends a site alarm the recorder receives the alarm and an event occurs About event operations Event operations are the operations done when an event occurs Event operations include depending on the settings recording images recording logs sending external notification mail notification LED buzzers FTP transmission and others Here operatio...

Страница 88: ...starts for a set period of time and are automatically transmitted to an FTP server A PC is notified of an alarm according to Panasonic alarm protocol settings When an event or error occurs a PC is automatically notified regarding event or error information according to the Panasonic alarm protocol settings Install the software option on the PC designated to receive and display event or error notif...

Страница 89: ...djust the cameras horizontal and vertical position Zoom Zoom in out the image Focus Adjust the focus point of the image Brightness Adjust the lens iris brightness Preset operations Registers the preset position of camera and moves the camera to the registered preset positions Auto Select the camera s automatic mode function Network Security Function Important Network security settings vary dependi...

Страница 90: ...era channel The time SD memory recording starts depends on the recording rate setting refer to the Setup Instructions PDF file Acquiring images stored on the SD memory card The images are acquired from the SD memory card and recorded on the HDD You can confirm if data is being acquired from the SD memory in the Status display SD memory data acquisition is done once an hour at 15 minutes past the h...

Страница 91: ...der Network Settings Use the buttons on the recorder s front panel to do the network settings refer to the Setup Instructions PDF file 6 PC Network Settings Change the PC s network settings to match the recorder s settings refer to the Setup Instructions PDF file 7 Initialize HDDs To change HDD space management display disk configuration and initialize the HDD from the settings menu on the recorde...

Страница 92: ... mounting screws Rack Mounting EIA standard compliant product locally procured an EIA standard 19 rack depth 550 mm or more Remove rubber feet Handle for rack mounting bracket Rack mounting bracket Handle fixing screws for rack mounting bracket Washer Washer Rack mounting brackets provided Handle for rack mounting bracket Handle for rack mounting bracket Rack mounting bracket fixing screws provide...

Страница 93: ... the connection cables to the extension unit using the cable clamp provided If the connection is poor the system may become unstable and unable to record images Keep the cables as short as possible Looped cables or large distances between pieces of equipment may cause malfunctions Do not wind the cable in a coil Refer to the Setup Instructions PDF file to check the unit numbers of connected extens...

Страница 94: ...PC port Connecting the PC and the Camera Important Use a LAN straight cable to connect the recorder and PCs via a hub Do not use a LAN cross cable to connect the recorder and PCs Using a LAN cross cable for continuous operation may result in incorrect display and playback because depending on the type of PC transmission may not be steady Connectivity Advantages Ports Used 1 port Operation Used whe...

Страница 95: ... camera port are sent to the PC from the client PC port 2 Port Operation Important Connect the camera to the camera port and the PC to the client PC port Connect the devices correctly Otherwise the transmission rate may be lowered HUB PC PC Recorder Network camera HUB LAN cable Not provided 10BASE T 100BASE TX 1 000BASE T category 5e straight NTSC model category 7 straight PAL model ...

Страница 96: ...sult your network administrator about router settings Example of Connectivity with 1 Port Operation PC WAN Internet PC ADSL line ADSL router Commercially available Network camera Recorder HUB LAN cable Not provided 10BASE T 100BASE TX 1 000BASE T category 5e straight NTSC model category 7 straight PAL model ...

Страница 97: ...amera Recorder 1 Recorder area 1 HUB HUB LAN cable Not provided 10BASE T 100BASE TX 1 000BASE T category 5e straight NTSC model category 7 straight PAL model LAN cable Not provided 10BASE T 100BASE TX 1 000BASE T category 5e straight NTSC model category 7 straight PAL model ...

Страница 98: ...e of Connectivity with 2 Port Operation WAN Internet PC Recorder ADSL router Commercially available ADSL line PC Network camera HUB HUB LAN cable Not provided 10BASE T 100BASE TX 1 000BASE T category 5e straight NTSC model category 7 straight PAL model ...

Страница 99: ...ork camera Recorder 1 Recorder area 1 HUB HUB HUB LAN cable Not provided 10BASE T 100BASE TX 1 000BASE T category 5e straight NTSC model category 7 straight PAL model LAN cable Not provided 10BASE T 100BASE TX 1 000BASE T category 5e straight NTSC model category 7 straight PAL model ...

Страница 100: ...s requires the included connection cable Secure the connection cables to the extension unit using the cable clamp provided If the connection is poor or the connector is not secure the system may become unstable and unable to record images Do not wind the cable in a coil 4 5 Attach a cable clamp for each connection cable Secure connection cable 3 2 1 Connection Cable provided with extension unit Ne...

Страница 101: ...t input Canceling the alarm display Non voltage make contact input 5V pull up 150 kΩ 12 Emergency recording input Starting emergency recording signal input 13 Signal ground 14 Signal ground 15 Available disk space warning output Signal output for available disk space warning of the recording copy area Open collector output 24 V DC max 100 mA 16 HDD error output Signal output upon detection of a HD...

Страница 102: ...ut Non voltage make contact input 5V pull up 150 kΩ 23 Outage detection input Start of outage processing according to the signal input 24 External recording mode switching input Changeover to the external recording mode 25 5 V output 5 V output 200 mA max Connectivity for Emergency Recording Connectivity for Switching to External Recording Auto Adjustment Time Function Connection 1 Pin Number Name...

Страница 103: ...sounds the buzzer lights the indicator and indicates operating status when a signal is output An example of HDD error output pin 16 is shown below Auto Adjustment Time Function Connection 2 Important When Auto adjustment time is set to Slave time adjustment is not performed during emergency recording and event recording Connectivity for Control Output 20 13 Signal ground Time adjustment input ALAR...

Страница 104: ... is output from the Power outage recovery completion output to the UPS and the recorder is then ready to turn off power Uninterruptible Power Supply UPS Connectivity Important Be sure to use a UPS that provides a sine wave output Do not use a UPS that provides a square wave Doing so may damage the recorder Uninterruptible Power Supply UPS 13 23 19 Power Outage recovery complection output Outage de...

Страница 105: ...rmed according to the settings Non voltage make contact input 5 V pull up 150 kΩ 2 Alarm input 18 3 Alarm input 19 4 Alarm input 20 5 Alarm input 20 6 Alarm input 22 7 Alarm input 23 8 Alarm input 24 9 Alarm input 1 10 Alarm input 2 11 Alarm input 3 12 Alarm input 4 13 Signal ground 14 Signal ground 15 Alarm input 25 Event action will be performed according to the settings Non voltage make contact...

Страница 106: ...ra images are shown according to the settings When alarm devices such as a buzzer or indicator are installed externally connect them to the Alarm output Alarm Control connector pin 21 Alarm Connectivity ALARM 21 9 Alarm equipment Relays etc ALARM CONTROL Alarm input 17 Signal ground Sensor Door security switch Alarm input 1 Alarm output Attached when necessary Signal ground 13 1 14 ...

Страница 107: ... or more L active Emergency recording input 100 ms or more L active Available disk space warning output From the time of the error occurrence until the time of the error output duration L active HDD error output From the time of the error occurrence until the time of the error output duration L active Camera error output From the time of the error occurrence until the time of the error output dura...

Страница 108: ...F file 2 Turn off the POWER switch on the rear of the recorder after checking that the HDD indicators are off The operate indicator goes off Note Do not forget to start recording when you turn on the power 1 Click the STOP button on the HDD tab to stop playback refer to the Operating Instructions PDF file 2 Turn off the POWER switch on the rear of the recorder after checking that the HDD indicator...

Страница 109: ...r to page 41 for more information IP Address Information Screen Displays settings related to the network connection You can check various network settings such as the IP address or subnet mask Refer to page 42 for more information IP Address Settings Screen You can configure settings related to the network connection You can set various network settings such as the IP address or subnet mask Refer ...

Страница 110: ...mber about the recording system Check the settings by switching between screens using the following operations The LCD changes as follows when using the arrow buttons up or down Also pressing the arrow buttons left or right from PT 1 MAC address switches between the PT 2 and PT 3 screens Checking System Information SET ESC ...

Страница 111: ...ort settings are checked under the client PC port PT 2 The following shows the initial default values for the recorder network settings Check the settings by switching between screens using the following operations The LCD changes as follows when using the arrow buttons up or down Checking the IP Address Item Camera port Client PC port Maintenance port DHCP OFF IP address 192 168 0 250 192 168 1 2...

Страница 112: ...e arrow buttons left or right the PT 2 and PT 3 screens are displayed and you can select other ports 2 Move the cursor using the arrow buttons up or down and enter values using up or down 3 Press the ESC button to move the cursor to and check the settings You can lock the buttons on the front panel to prevent them from being operated Press the SET button on the Key Lock Setting screen to lock the ...

Страница 113: ...ives page 9 for information on how to handle HDDs Also note the following precautions Do not subject them to vibration or impact To install HDDs use a torque driver and tighten the screws to the specified torque Before touching an HDD ground yourself against a metal object to eliminate any static electricity Always hold the HDDs by the sides when carrying them Use an anti static mat and wristband ...

Страница 114: ...or information on compatible HDDs Operation is only guaranteed with recommended HDDs All the HDDs must be the same model Even if the capacity is the same the space may be smaller by a few percent if the HDD models are different Always install the HDDs in order starting with HDD 1 Disk slots in order from 1 to 9 starting on the left In RAID5 or RAID6 modes do not change the position of the HDD afte...

Страница 115: ...D status indicator lights green after formatting is complete Preformatted HDDs are recognized for playback only In this case the HDD status indicator blinks green Follow the instructions from step 4 to use the HDD for recording Note The HDD status indicator may light green before blinking orange when an HDD is inserted 4 Press the USE button for over 2 seconds A buzzer sounds Press the front panel...

Страница 116: ...stall the HDDs in the extension unit according to steps 1 to 2 in Installing HDDs page 46 to install HDDs Repeat steps 1 to 2 to install multiple HDD units Note When installing HDD units each HDD unit must be recognized Follow Step 1 and 2 Additional HDD units will not be recognized while the first unit is being recognized 2 The HDD is automatically recognized While the HDD is being recognized the...

Страница 117: ...ormation HDD capacity HDD remaining capacity Hour meter Disk operation mode Date range of video recorded on the HDD You can remove HDD units from the recorder while it is in operation 1 Insert the key included into the key hole and turn it while pressing in gently to open the front cover 2 Press the USE button for over 2 seconds A buzzer sounds Press the front panel buttons according to the direct...

Страница 118: ...the HDD unit 1 Press the knob on the HDD unit 2 Open the lever 3 Remove the HDD unit Remove the HDD carefully so you do not bump it be careful not to drop it 11 Close the front cover and lock it by lightly pressing and turning the key to the left Keep the key in a safe place 12 Check the disk information Check the following content related to the HDD under Disk information on the settings menu Ref...

Страница 119: ...th the arrow buttons up or down and then press the SET button 8 Select YES with the arrow buttons left or right and then press the SET button The extension unit stop process begins and all the HDD status indicators blink orange All the HDD status indicators go off once the stop process is complete If you stop the extension unit during recording recording switches to the HDD in another device Video...

Страница 120: ...ecessary to use the single mode as it is set up 1 Turn off the recorder Turn off the power according to Turning Off the Power page 39 2 Turn on any extension units first if any are connected 3 Insert the key included into the key hole and turn it while pressing in gently to open the front cover 4 Sets the operation mode with the RAID switch 5 Hold down the USE button and turn on the power to boot ...

Страница 121: ... HDD error malfunction During recovery Recorder Extension unit LCD RAID 1 DOWN 1down RAID 2 DOWN 2down RAID 3 DOWN only while in RAID6 mode 3down Note Only extension units are shown HDD access indicator Lights red Errors have occurred on HDD Data can be recovered by replacing the HDD When in RAID5 mode the first HDD has errors When using RAID6 the first two HDDs have errors Blinks red Errors have ...

Страница 122: ...ts as a guideline when inserting the new HDD unit into the empty slot Press the HDD unit s removal knob down and lift the lever and then insert it all the way into the disk slot 1 Hook the HDD unit s tab securely on the HDD bay slot 2 Press the lever down and push the HDD unit until the removal knob clicks 3 The HDD is automatically recognized and recovery starts When recovery starts the HDD acces...

Страница 123: ...Using the Front Panel for Operations 54 Press the SET button on the Manual Reboot screen to display the Manual Reboot ACCEPT screen Select YES and press the SET button to reboot Rebooting SET ...

Страница 124: ... dust has not collected on the vents Extension unit is not recognized When an extension unit is connected Make sure that the cable provided with the extension unit is being used page 31 Make sure that the connection cable is not loose page 31 Was the extension unit turned on before the main unit Reboot the system and turn on the extension unit first page 39 If you are using a breaker or other syst...

Страница 125: ...ternately even though recording or playback is not done Make sure that data is not recovered in RAID5 RAID6 mode page 52 The power cord insulation is damaged The power cord AC inlet or the power plug is damaged If you continue to use it a fire or an electric shock may occur Unplug the power cord immediately and refer servicing to qualified service personnel The power cord AC inlet or the power plu...

Страница 126: ...ns Weight When 1 HDD is installed 14 kg 30 9 lbs When 9 HDDs are installed 20 kg 44 15 lbs HDD Type function 3 5 HDD x 1 Up to 9 HDDs RAID5 mode available only when 3 or more HDDs are installed RAID6 mode available only when 4 or more HDDs are installed External storage High speed serial interface 1 5 Gbps theoretical value x5 Alarm Control connector Alarm input 8 16 1 Network error output 2 Alarm...

Страница 127: ...Label 2 1 pc Rack mounting brackets 2 pcs Rack mounting brackets fixing screw 6 pcs Handle for rack mounting bracket 2 pcs Handle fixing screw for rack mounting bracket 4 pcs Washer 4 pcs HDD canister 8 pcs HDD fixing screw for HDD canister 48 pcs 1 The CD ROM contains the operating instructions PDFs 2 This label is the same one found on the surface of this product Keep it in view when installing ...

Страница 128: ...ault tolerance 17 HDD recorded data 17 HDD replacement 16 45 53 HDD unit 14 16 44 High definition images 16 Host 20 Host authentication 20 HTTP port 20 42 43 HUB 25 I IP address 20 42 43 J JPEG 16 18 K Key Lock 43 L LAN 25 LGPL 10 Limit access 20 LINK ACT 12 LINK ACT1 12 LINK ACT2 12 Live monitoring 19 Live sequence display 19 M Maintenance 21 Maintenance port 42 Manual Reboot 54 Master 33 Mega pi...

Страница 129: ...f old products and used batteries please take them to applicable collection points in accordance with your national legislation and the Directives 2002 96 EC and 2006 66 EC By disposing of these products and batteries correctly you will help to save valuable resources and prevent any potential negative effects on human health and the environment which could otherwise arise from inappropriate waste...

Страница 130: ...fore attempting to connect or operate this product please read these instructions carefully and save this manual for future use Network Disk Recorder Setup Instructions Model No WJ ND400 1 2 3 4 5 6 7 8 9 ...

Страница 131: ...splay and close the operating window 15 Names and functions of components 17 Top page 17 Control button 18 Cam select button 19 Setup button 20 Status display area 21 Playback point operation area 22 HDD tab 22 CAM tab 24 Basic operations 25 Setup Quick settings 26 Settings 26 Language and time date settings 26 Network setup 27 Camera registration 28 Program settings 30 Basics 31 Basics 31 Time da...

Страница 132: ...Sequence 53 Server 55 NTP 55 FTP 56 Mail 58 Proxy 60 Network 61 Basics 61 DDNS 64 SNMP 65 Panasonic alarm protocol 66 User management 67 Basics 67 Administrator 68 Users 69 Editing user information 70 Deleting user information 70 Hosts 71 Editing host information 72 Deleting host information 72 User level 73 Maintenance 75 Recorder information 75 Disk information 76 Network information 78 Disk 79 ...

Страница 133: ...atting disks 86 Format 86 Pre event recording area formatting 88 Attachments About mail notification 90 Alarm mail notification 90 Warning mail notification 90 Troubleshooting 93 Problems 93 Message display 96 Glossary 97 Words used in the manual 97 Index 100 ...

Страница 134: ...ader is not installed on the PC download the latest Adobe Reader from the Adobe web site and install it In this manual and on the screen the ND400 and the recorder are shown as WJ ND400 Refer to the readme txt file on the CD ROM bundled with the recorder for information about the versions and types of separately available software and cameras supported The following abbreviations are used in this ...

Страница 135: ...sta Business 32 bit Microsoft Windows XP Professional SP2 Microsoft Windows XP Home Edition SP2 OS Language English French Spanish German Italian Russian Chinese CPU Pentium 4 3 0 GHz or faster Memory 1 GB or more 512 MB or more is required when using Microsoft Windows XP Monitor Resolution 1 024 x 768 pixels or more Color 24 bit True color or better Network interface 10 100 1 000 Mbps Ethernet po...

Страница 136: ...playing MPEG 4 image by designating time and date playback may start from a point several seconds before or after the designated time and date or from the first frame of the next record 4 When recording images 1 Time and date displayed on the recording event list actual start time of recordings may not exactly indicate the actual time of recording trigger event occurrence time start time of the sc...

Страница 137: ...ed into the recorder are automatically initialized Also set the HDD operation mode as necessary 5 Recorder Network Settings Set the network for the recorder using the buttons on the front panel page 11 6 PC Network Settings This section explains how to change PC network settings to match the settings of the recorder page 13 7 Initialize HDDs To change HDD area management display disk configuration...

Страница 138: ...nnel page 42 Special days Assign separate time tables for each day of the week for special days page 47 Camera NW camera Configure camera network settings including the camera address and port number page 48 Group Set the group title of a camera page 52 Sequence Set camera sequence operations page 53 Server NTP Configure settings such as the NTP server address for time adjustment based on the NTP ...

Страница 139: ...and hardware the MAC address serial number and the internal temperature of the recorder page 75 Disk information Displays information about recording the disk operational mode disk space capacity and the recording area page 76 Network information Display network information such as the camera address set on the recorder and the line speed of the recorder page 78 Disk Set operations for when the HD...

Страница 140: ...address subnet mask and default gateway from a DHCP server IP address When DHCP is Off specify the IP address Subnet mask When DHCP is Off specify the IP address Default gateway When DHCP is Off specify the default gateway subnet mask HTTP port Specify the HTTP port number to be used Normally this setting is 80 Setting item Camera port Client PC port Maintenance port DHCP Off IP address 192 168 0 ...

Страница 141: ...e screen of the item you want to set DHCP IP address Subnet mask Default gateway HTTP port Note You can only set the DHCP the gateway and the HTTP port to PT 2 6 After confirming that the cursor is press the SET button The cursor moves to the number area The cursor is shown as an underscore _ 7 Use the arrow buttons to change the setting 8 Press the ESC button to move the cursor to and check the s...

Страница 142: ... you are using the recorder s initial default settings IP address 192 168 1 250 set the IP address of the PC to 192 168 1 XXX where XXX is any value except 250 which is used by the recorder from 2 to 254 1 Log in to the PC as an administrator 2 Click Start and then select Control Panel 3 Click Network and Internet Connections This will display the Network and Internet Connections window 4 Click Ne...

Страница 143: ...ndow 8 Click Use the following IP address and then configure the IP address and subnet mask For the IP address set the same subnet mask area as the recorder Depending on the network configuration the default gateway setting is required For details about settings refer to your network administrator 9 Click the OK button to close the window ...

Страница 144: ...with the recorder can connect to the recorder For more information contact your system administrator Do not enter 0 on the front of the IP address when inputting it Example OK 192 168 0 50 NG 192 168 0 050 Refer to page 96 if a message appears in the information bar Important Refer to your system administrator for the user name and password set for you Refer to Users page 69 for information about ...

Страница 145: ...ions If WJ ND200 WJ ND300 ActiveX is already installed delete WebVideo ActiveX using Add or Remove Programs and then install WJ ND400 ActiveX When the install wizard is displayed again even after completing the installation of the ActiveX restart the PC 6 Close the web browser after operations and settings are finished Follow the on screen instructions for setting and ending functions Important Re...

Страница 146: ...s the recording and playback status 5 Current time display area Displays the current time 6 Image display Displays live and recorded images Displays the camera title in the upper left and the date time in the upper right current for live recorded for recorded images Click the camera title when viewing multiscreen to view the clicked image on a single screen 7 Playback point operation area page 22 ...

Страница 147: ...ec event list window Error log button Displays a log of the errors that occur Access log button Displays the log in log out time and date the user name or IP address Event log button Displays the event log when it occurred and a description Network log button Displays a log of the problems that occur on the network 7 Rec event list Number of events Displays the total number of events in a list If ...

Страница 148: ...mages from up to 4 cameras at the same time Switches between the four screens by each clicking the button following the preset camera combination page 50 2 Sequence box Switches the camera images automatically in a preset sequence The button indicator lights green during sequence page 53 3 El zoom box Displays the camera image at the magnification of the button clicked 4 Cam select box Displays th...

Страница 149: ...erminal alarm command alarm 5 Schedule button Displays a menu for setting recording event action for specified days and times 6 Camera button Displays a menu for setting the network group and sequence of cameras 7 Server button Displays a menu for setting the server 8 Network button Displays a menu for setting the network 9 User mng button Displays a menu for setting authentication 10 Maintenance ...

Страница 150: ...displayed 1x Approx 4x Approx 8x Approx 16x Approx 32x Approx 48x Approx 96x The sequence is being activated Normal recording area or event recording area of the HDD on the recorder is selected HDD copy area is selected SD memory data is currently being obtained RAID is being recovered Rec event list is filtered For details on filtering of recording event searches refer to the Operating Instructio...

Страница 151: ...uring playback or pause plays back one frame at a time reversely and then pauses 8 PAUSE button Clicking during playback pauses playback Clicking during pause restarts playback 9 STOP button Stops playback and displays live images from the camera 10 NEXT IMAGE button Clicking during playback or pause plays back one frame at a time forward and then pauses 11 Download TO PC box Downloads the image b...

Страница 152: ...erforming the playback operations again during playback skips ahead a few seconds Single Frame Reverse Not all recorded images are displayed Single frame reverse is performed at the refresh rate set for the camera at the time of recording Fast Forward Fast Reverse Not all recorded images are displayed Fast forward and fast reverse are performed at the refresh rate set for the camera at the time of...

Страница 153: ...ttons Click the buttons on the control pad to move the camera to the direction of the button pan tilt Also click in the control pad to adjust the horizontal vertical position pan tilt of the image The pan tilt movement increases if a clicked point gets farther from the center point of the control pad 5 Brightness box Click Dark or Bright to adjust the lens iris brightness Click Reset to reset the ...

Страница 154: ...e canceled if you move to another page without clicking the Set button Basic operations Important Activating the settings forcibly logs out any other users currently logged in to the recorder Changing the user management settings forcibly logs out all users Recording may not be possible for about four seconds immediately after the settings are saved The setup menu can be used by only one user The ...

Страница 155: ...item for network settings one item for Camera registration and one item for Program setup When you make the settings click the Set button and apply the settings to the recorder Quick settings 1 Initial default Settings Language and time date settings Important For around 4 seconds after changing the time and date for example when switching to summer time or when setting the time and date the live ...

Страница 156: ...amera port Client PC port DHCP Off On Specifies whether a DHCP server is used Select On to obtain the IP address subnet mask and default gateway from a DHCP server Select Off to enter these addresses manually IP address Address input 1 When DHCP is Off specify the IP address here Subnet mask Address input 1 When DHCP is Off specify the subnet mask here Default gateway Address input 1 When DHCP is ...

Страница 157: ...dress automatically Only when the DHCP setting of the recorder is Off are IP addresses automatically provided In the case of IP auto addressing set the subnet mask of the network port to 255 255 255 0 When automatically assigning IP addresses make sure the octets of the port selected in step 2 match the gateway Depending on the camera IP addresses cannot be assigned if it is not set Registering an...

Страница 158: ...ils refer to the operating instructions for the camera The compression format of registered cameras is set automatically to JPEG or M JPEG Quick settings 3 Initial default Important Execute Register the IP address automatically given by this unit to a detected camera to automatically provide IP addresses to all detected cameras Note that some cameras may already be operating Item Settings Descript...

Страница 159: ...Refer to Quick settings 4 table for details about the settings 3 Click the Set button Quick settings 4 Initial default Note Performing Camera registration sets both the live video rate and manual record rate of Program1 to Program8 to 1 ips Program settings Item Settings Description Program setup Program1 to Program8 Selects the recording program To check the details of the selected program click ...

Страница 160: ...assword 12345 Specifies a password for releasing LCD setup lock Sets the password of five single byte characters long Language Japanese English Français Español Deutsch Italiano Russian Chinese Specifies the language used in browser screens Go to last before 5s 10s 30s 1min 5min Specifies the time the image is displayed when the Go to last button is clicked on the operation window Buzzer Off 2s 5s...

Страница 161: ... displays the time as 15 00 Selecting 12h displays the time as 3 00 PM Time date 08 to 34 year Jan to Dec month 1 to 31 day 0 to 23 hour 0 to 59 minute Sets the current time and date Configure the year month day hour minute settings and then click the Set button Timekeeping starts from the time you set the moment you click the Set button Time zone GMT 12 00 to GMT 13 00 NTSC model GMT 5 00 PAL mod...

Страница 162: ...e summer time start and end time and date settings Clicking the Setup button displays the summer time switching window In specifies the summer time start time and date while Out specifies the end time and date Set the rightmost two digits of the year for the Year setting Up to 10 settings can be configured After configuring the settings you want click the Set button and then click the x button in ...

Страница 163: ...0s 20s 30s 1min 3min 5min 10min 30min Manual Continue Specifies the duration of emergency recording Selecting Manual records while the emergency recording input signal is being input Also recording is performed for a minimum of 8 seconds Selecting Continue causes recording to continue until the Alarm ALM button is clicked Model Shows the registered model numbers of the cameras Compression Shows th...

Страница 164: ...o recording for that camera channel is automatically set to Off Important When there is input of emergency recording to the recorder and when network communication is impossible between the recorder and cameras SD memory recording cannot be performed because the camera does not recognize emergency recording When Audio rec is set to On ensure that the audio mode of the camera is set to On Also set ...

Страница 165: ...rding to the SD memory card in the camera When the camera is set to not use SD memory cards or when an SD memory card is not inserted in the camera or inserted incorrectly an error message appears several times a day and recording is not done Acquiring images saved on the SD memory card The images are acquired from the SD memory card and recorded on the HDD You can confirm when data is being acqui...

Страница 166: ...ification of the time and date of an event is sent to registered e mail addresses when an event occurs A JPEG image can be attached to this e mail Up to 4 addresses can be registered to receive the alarm mail Refer to Mail page 58 for information about the settings Alarm signal output from the Alarm Control connector on the rear panel of the recorder Alarm output When an event occurs a signal is o...

Страница 167: ...the Set button Basic event settings Initial default Basics Item Settings Description Alarm output Off 2s 5s 10s 20s 30s 1min Ext Rec Specifies the alarm output duration Selecting Ext causes alarm output to continue until the Alarm ALM button is clicked Selecting Rec causes alarm output while event recording is in progress Buzzer duration Off 2s 5s 10s 20s 30s 1min Ext Rec Specifies buzzer duration...

Страница 168: ...configure the settings of a terminal that is not shown on the display click the terminal number range above the Set button to change the contents of the window Clicking a terminal number range will save the currently displayed camera settings 4 Click the Set button Terminal alarm settings Initial default Terminal alarm Item Settings Description Rec cam Cam 1 to Cam 64 Specifies the channel of the ...

Страница 169: ...utton to change the contents of the display Clicking a camera number range saves the currently displayed camera settings 4 Click the Set button Site alarm settings Initial default Site alarm Item Settings Description Site alarm Off On Specifies whether to validate the site alarm Port number from camera to ND400 Port number input 1818 Specifies the port number that receives the site alarm Site alar...

Страница 170: ...n on the display click the applicable command alarm number range above the Set button to change the contents of the display Clicking a command number saves the currently displayed command settings 4 Click the Set button Command alarm settings Initial default Command alarm Item Settings Description Rec cam Cam 1 to Cam 64 Specifies the channel of the recording camera Preset position Number input Bl...

Страница 171: ...tting window Button Functions 4 Configure the settings for each item Refer to Program settings table for details about the settings To configure the settings of a camera that is not shown on the display click the applicable camera number range above the Set button to change the contents of the display Clicking a camera number range will save the currently displayed camera settings 5 Click the Set ...

Страница 172: ...or manual recording Available settings differ according to the currently selected compression format Schedule rec Off 1 2 3 0 1ips 0 2ips 0 3ips 0 5ips 1ips 2ips 3ips 5ips 10ips 15ips All I Frame Specifies the recording rate for schedule recording Available settings differ according to the currently selected compression format Recorder setup Event rec Pre event Rate Off 1 2 3 1ips 2ips 3ips 5ips 1...

Страница 173: ...cept Off audio recording for that camera channel is automatically set to Off Important Recording at the set recording rate and for the set recording time may not be possible depending on the network environment or the size of image data When a pre event recording area has not been assigned to the HDD the maximum pre event recording time with audio on is 30 seconds We recommend setting the camera s...

Страница 174: ... phenomena described above Note Other users connected to the recorder are logged out automatically during measurement They are logged back in after measurement is complete Measurement results are for reference only They are subject to change in accordance with the network environment The target for measurement is the value after clicking Set Since the recorder uses a network network traffic and ot...

Страница 175: ...e table setup table for details about the settings 5 Click the Set button The set time table and program are reflected Programs are displayed by color Time table setup Time table Copy button Copies the settings of the currently selected day of the week View button Displays the contents of the currently selected program Item Settings Description Start 1 00 00 to 23 45 Specifies the recording start ...

Страница 176: ...lap Ext Special days Mon through Sun day of week Daily 1 Click the Schedule button on the setup menu 2 On the sub menu that appears click Special days This will display the special days setting window 3 Enter the date and day of the week of the special day 4 Click the Set button Alarm message Off On Specifies whether an event alert pop up should appear on the PC window of the administrator when an...

Страница 177: ...ameras the list of detected cameras can show up to 128 Registration will not be possible if more than 64 cameras are selected in the list Adjust the list so there are no more than 64 cameras selected If multiple cameras have the same IP address the IP address and MAC address will be displayed in red In this case change the IP address for one of the cameras and make sure that the same IP address is...

Страница 178: ...a s subnet mask and default gateway are set to the same values as the camera s network port subnet mask and default gateway When the Execute button is clicked and the IP addresses of the cameras are changed the checkboxes of the detected cameras 1 64 on the Camera Search Result window will be checked When the Execute button of Start IP Address is clicked the unit will automatically find an unused ...

Страница 179: ...a registration setup window The setup is shown below To configure the settings of a camera that is not shown on the display click the applicable camera number range above the Set button to change the contents of the display Switch cameras 4 screen display setting Important When you camera channel number is changed it is also changed for the following settings Emergency recording page 34 Program pa...

Страница 180: ...ame time will change the rate setting to Off Address Address input Blank For entering the address of the camera Port number Port number input 80 For setting the HTTP port used by the camera in the range of 1 to 65535 Group G1 to G8 Specifies the group to which the camera belongs Camera title Title input Camera 1 1 to Camera 64 64 Specifies the camera title which is displayed on the Cam select box ...

Страница 181: ...oup title Refer to Group settings table for details about the settings 4 Click the Set button Group settings Initial default Group Item Settings Description Group title Title input Group 1 G1 to Group 8 G8 Specifies the group title of a camera The group title can be made up of up to 16 single byte numerals and symbols or 16 two byte characters The following characters are not allowed as symbols _ ...

Страница 182: ...ngs for each item Refer to Sequence display type settings table for details about the settings Clicking the Setup button will display an advanced settings window for the selected sequence 4 Click the Set button Note You must change the camera number when you change the 4 screen live sequence display page 50 When the camera image compression format specified for the selected camera channel is MPEG ...

Страница 183: ...4 Specifies the camera images displayed for each step Selecting causes the step to be skipped Preset position Signal input Blank Specifies the camera preset position 1 to 256 When this setting is blank the camera does not move to a preset position Dwell time 2s 3s 5s 10s 20s Specifies the amount of time until a switch is made to the next step in the sequence Item Settings Description Dwell time 2s...

Страница 184: ...her an NTP server is used NTP server address Address input Blank Enter the name or IP address of the NTP server When entering a server name you must use the DNS Enter up to 255 single byte alpha numeric characters including hyphen and period Important Time adjustment may not operate when the recorder s DHCP setting is On and operating and the time setting for NTP server and recorder are more than ...

Страница 185: ...luding ampersand and spaces Mode Active Passive Specifies the mode when sending images to the FTP server When send is not possible with Passive change to Active Image transmission by periodic timer Set the following items to periodically transmit live images Setting whether or not to transmit live images to the FTP server can be set for scheduled time periods with Time table page 46 Server directo...

Страница 186: ... 1 second units Specify the time of the pre event image to be sent Transmission of images to the FTP server may not be possible for Duration Pre when the image compression method of the selected camera channel is MPEG 4 Duration Post Off 1 s to 10 s Settable in 1 second units 5s Specify the time of the post event image to be sent Transmission of images to the FTP server may not be possible for Dur...

Страница 187: ...nd for warning mail notification 1 Click the Server button on the setup menu 2 On the sub menu that appears click Mail This will display the Mail setup window 3 Configure the settings for each item Refer to Mail settings table for details about the settings 4 Click the Set button Mail ...

Страница 188: ...or IP address of the POP server receiving the mail Enter up to 255 single byte alpha numeric characters including hyphen and period When entering a server name you must use the DNS Authentication Type None POP before SMTP SMTP Specifies the type of authentication when sending e mails User name Name input Blank Enter the user name log in name used for authentication Enter up to 32 single byte alpha...

Страница 189: ...ed configure the Server address Port number and Exceptions settings Server address Address input Blank Enter the name or IP address of the proxy server When entering a server name you must use the DNS Enter up to 255 single byte alpha numeric characters including hyphen and period Port number Port number input 80 Enter the proxy server port number Exceptions Address input Blank Specifies cameras t...

Страница 190: ...pears click Basic This will display the basic network setting window 3 Configure the settings for each item Refer to Network settings table for details about setting items If you want to configure port forwarding do the operations from step 5 4 Click the Set button 5 Click the port forwarding Setup button This will display the Port forwarding window 6 Configure the port number settings and then cl...

Страница 191: ...79 80 105 110 123 161 162 546 547 995 10001 10002 10003 10004 10005 10006 10007 Network setup Camera port Client PC port DHCP Off On Specifies whether a DHCP server is used Select On to obtain the IP address subnet mask and default gateway from a DHCP server Select Off to enter them manually IP address Address input 1 When DHCP is Off specify the IP address here Subnet mask Address input 1 When DH...

Страница 192: ...er is slow Once the address has been obtained from the DHCP server the error is resolved Item Settings Description Port forwarding Off On Specifies whether port forwarding is enabled Port number Port number input Camera 1 60001 to camera 64 60064 When port forwarding is On specifies camera port numbers in the range of 1 to 65535 Do not specify any of the following numbers for an HTTP port number F...

Страница 193: ...L M N O P Q R S T U V W X Y Z a b c d e f g h i j k l m n o p q r s t u v w x y z 0 1 2 3 4 5 6 7 8 9 _ DDNS Item Settings Description DDNS Off On Specifies whether a DDNS is used User name Name input Blank Enter the user name to be registered on the DDNS Enter up to 32 single byte alphanumeric characters and symbols 1 Password Password input Blank Enter the password for the above user name Enter ...

Страница 194: ...racters and symbols A B C D E F G H I J K L M N O P Q R S T U V W X Y Z a b c d e f g h i j k l m n o p q r s t u v w x y z 0 1 2 3 4 5 6 7 8 9 _ SNMP Item Settings Description Community Name input Blank Enter the community name to be monitored Enter up to 32 single byte alphanumeric characters and symbols 1 System name Name input Blank Enter a name to be used by the SNMP system to manage the reco...

Страница 195: ...l Settings window 3 Configure the settings for each item Refer to Panasonic alarm protocol settings table for details about the settings 4 Click the Set button Panasonic alarm protocol settings Initial default Panasonic alarm protocol Item Settings Description Port number to PC Port number input 1818 Enter the port number to be used for Panasonic alarm protocol Retry 1 to 30 2 Specifies the number...

Страница 196: ...lays the basic user management settings window 3 Configure the settings for each item Refer to Basic user management settings table for details about the settings 4 Click the Set button Basic user management settings Initial default Basics Item Settings Description User authentication Off On Specifies whether user authentication should be performed Host authentication Off On Specifies whether host...

Страница 197: ...rd Retype new password Enter password Blank Enters the password Enter between 5 and 8 single byte alphanumeric characters Use a password that is not easily guessable by another person Also take care that you do not forget the password To ensure security change passwords periodically Level LV1 Shows the user level The level of the administrator is LV1 which cannot be changed For operations that can...

Страница 198: ...change passwords periodically Level LV1 LV2 LV3 LV4 Specifies the user level For operations that can be performed at each level refer to User level page 73 Access priority 1 to 16 Specifies the priority sequence for operations when multiple users are logged in on the recorder at the same time Default screen Cam 1 to Cam 64 Cam 1 4 Cam 5 8 to Cam 61 64 Seq Specifies the live image display immediate...

Страница 199: ...er to User setups table for details about the settings 6 Click the Registration button 7 Click the Set button This will close the User edit window 1 Click the User mng button on the setup menu 2 On the sub menu that appears click User This will display the User settings window 3 In User edit delete select the name of the user you want to delete 4 Click the Delete button 5 Click the Set button Edit...

Страница 200: ...vel refer to User level page 73 Access priority 1 to 16 Specifies the priority sequence for operations when multiple users are logged in on the recorder at the same time Default screen Cam 1 to Cam 64 Cam 1 4 Cam 5 8 to Cam 61 64 Seq Specifies the live image display immediately after log in Selecting Cam 1 to Cam 64 displays the images of the selected cameras on a 1 image screen Selecting Cam 1 4 ...

Страница 201: ...ngs table for details about the settings 6 Click the Registration button 7 Click the Set button 1 Click the User mng button on the setup menu 2 On the sub menu that appears click Host This will display the Host setting window 3 In Host edit delete select the name of the host you want to delete 4 Click the Delete button 5 Click the Set button Editing host information Deleting host information Impor...

Страница 202: ... window 3 Configure the settings for each item Refer to User level settings table for details about the settings 4 Click the Set button Note The functions that can be used at each user level are as follows at default User level LV1 Level of the administrator who can perform all operations for the camera and recorder LV2 High level operator with limits who can view recorder settings and logs and re...

Страница 203: ... Unchecked 2 3 4 Modification of setup menu Maintenance settings allowed Camera control Checked 1 2 3 Unchecked 4 Pan tilt and other camera control allowed Error log status Checked 1 2 Unchecked 3 4 Error log access allowed refer to the Operating Instructions PDF file Access log status Checked 1 2 Unchecked 3 4 Access log access allowed refer to the Operating Instructions PDF file Event log status...

Страница 204: ... Description Version information Software version 1 Shows the Software 1 version Software version 2 Shows the Software 2 version Hardware version Shows the hardware version Software version of extension units Ext 1 to 5 Shows the software versions of Extension units 1 to 5 MAC address Camera port Shows the MAC address of the Camera port Client PC port Shows the MAC address of the Client PC port Ma...

Страница 205: ... hour meter 1 Click the Maintenance button on the setup menu 2 On the sub menu that appears click Disk information This will display the Disk information window 3 Check the items you want Refer to Disk information table for details about the settings 4 Click the recording information Display button The Recording information window shows the time and date ranges of the images recorded on each HDD 5...

Страница 206: ...tted for event recording area Pre event HDD formatted for pre event recording area Copy HDD formatted for copy area Remove Faulty HDD removed from operations Error Error has occurred on this HDD during formatting N Used HDD formatted on different ND400 for normal recording area recording not possible playback only possible E Used HDD formatted on different ND400 for event recording area recording ...

Страница 207: ... you want Refer to Network information table for details about the settings Network information Network information Item Description Network Information Address Shows the IP addresses of each recorder port and connected device In the case of a camera connected via a proxy server the IP address of the proxy server is displayed as the camera address Line speed Shows the line speed Login user User Sh...

Страница 208: ...ll while Continue is selected the oldest data is sequentially overwritten with new data When the event recording area becomes full while Stop is selected recording stops Copy area Continue Stop Specifies operations when the copy area becomes full When the copy area becomes full while Continue is selected the oldest data is sequentially overwritten with new data When the copy area becomes full whil...

Страница 209: ...7days 8days 9days 10days 14days 30days 1month 45days 60days 90days 120days 150days 180days Specifies automatic image data deletion after the specified period passes The execution time of the auto delete operation is 00 05 00 Manual delete for normal recording area 08 to 34 Year Jan to Dec Month 1 to 31 Day Deletes image data in the normal recording area until the day before the specified date Afte...

Страница 210: ...Refer to Settings management table for details about each item Settings management Settings management Item Description User setup save Saves user setup data to the recorder User setup load Loads user setup data saved on the recorder Reset to the default Initializes settings Important Even if you perform User setup load Reset to the default the following settings cannot be loaded or initialized NW...

Страница 211: ...itialized as normal recording area Unformatted HDDs inserted into the recorder are automatically initialized as normal recording area However if you remove an HDD operating in an area other than normal video and audio recording see the basic manual any unformatted HDD inserted into that spot is formatted the same as the previous HDD Recording playback is not possible if only the Pre event recordin...

Страница 212: ...details about the window items Disk partition information Important When the Config page is displayed all operations recording playback etc except disc configuration stop Displaying the config window forcibly logs out any other users currently logged in to the main unit Also installing or removing HDD or HDD units from the front panel forcibly logs out any other users logged in to the main unit To...

Страница 213: ...RAID5 RAID6 is operating the HDD1 capacity is displayed Formatted areas are shown as follows Normal HDD formatted for normal recording area Event HDD formatted for event recording area Pre event HDD formatted for pre event recording area Copy HDD formatted for copy area Remove Faulty HDD removed from operations Error Error has occurred on this HDD during formatting N Used HDD formatted on differen...

Страница 214: ...layed back Also you cannot playback data recorded while encryption was enabled even if you disable encryption Encryption settings Initial default 1 You can enter the following single byte alpha numeric characters and symbols A B C D E F G H I J K L M N O P Q R S T U V W X Y Z a b c d e f g h i j k l m n o p q r s t u v w x y z 0 1 2 3 4 5 6 7 8 9 _ Encryption settings Important When the Config pag...

Страница 215: ... the OK button This will display the configuration settings top window Disk Information window 3 On the configuration settings top window Disk Information window click Format This will display the Format window 4 Select the HDD to be formatted and select the check boxes of the recording areas to be allocated Selection of multiple HDDs is supported 5 Click the Format button A Format result window w...

Страница 216: ...he Cam select window Note Multiple recording areas cannot be allocated to a single HDD The copy area can be allocated to an HDD plugged into the main unit s HDD8 or HDD9 positions only during single operation A copy area cannot be allocated to HDD 1 to 7 or to an extension unit HDD Copy areas cannot be set during RAID5 RAID6 ...

Страница 217: ...ing Important When the Config page is displayed all operations recording playback etc except disc configuration stop Displaying the config window forcibly logs out any other users currently logged in to the main unit Also installing or removing HDD or HDD units from the front panel forcibly logs out any other users logged in to the main unit To exit the disk config window click the Main button Cli...

Страница 218: ... allocated Pre event recording areas can be created for up to 64 channels on a single HDD A camera channel that is already specified for a pre event recording area on another HDD cannot be selected If an HDD formatted for pre event recording area from another ND400 is recognized channels pre set on the HDD cannot be selected Set at least 5 GB of space for the pre event recording area of each camer...

Страница 219: ...e displayed HDD capacity warning 1 Anything other than FULL NORMAL HDD CAPACITY REMAINS EVENT HDD CAPACITY REMAINS COPY HDD CAPACITY REMAINS is remaining capacity FULL EVENT HDD FULL COPY HDD FULL Power outage detection POWER LOSS Recover from a power outage POWER RECOVERED NW camera error detection CAM COMMUNICATION ERROR is camera channel NW camera error recovery CAM COMMUNICATION RECOVERED is c...

Страница 220: ...6 2 DOWN Extension unit EXTx RAID6 2 DOWN x is unit number RAID6 3 DOWN Recorder MAIN RAID6 3 DOWN Extension unit EXTx RAID6 3 DOWN x is unit number Camera SD memory card error CAM xx SD ERR is camera channel Camera SD memory card starting write error CAM xx SD START ERR is camera channel Camera SD memory card ending write error CAM xx SD END ERR is camera channel Camera SD memory card list reques...

Страница 221: ...ach time 1 of the available disk space is reduced and a warning mail with the FULL content will be sent when there is no available disk space 2 The HDD smart warning mail is not sent in the RAID5 mode or the RAID6 mode RAID6 mode format failure Recorder MAIN RAID6 FORMAT ERROR Extension unit EXTx RAID6 FORMAT ERROR x is unit number HDD remove error Recorder MAIN y SWAP WARNING Extension unit EXTx ...

Страница 222: ... on the same subnet it is recommended to set the recorder s address to Don t Use Proxy For These Addresses Buttons on browser window are not displayed correctly The browser s display may have troubles if you change the font settings from the initial settings Use the initial font settings Some information does not appear on browser window Press F5 on the keyboard to refresh the window Image is not ...

Страница 223: ...ndow opens Check the user name and password page 69 Cannot play back downloaded images Download is stopped when the settings are changed When this happens the downloaded image cannot be played back Please wait is always displayed on window ActiveX control is not installed Install ActiveX control page 96 Audio is not recorded Audio is not be played correctly Is Mic input selected for Audio mode on ...

Страница 224: ...tion Active Directory Register trusted sites and add the security setting 1 Start up Internet Explorer and click on Tools 2 Click Internet options 3 Click the Security tab and select Trusted sites 4 Set Low for This zone s security level lowering the security level lowers the security level of the PC being used 5 Click Site Do Add to URL of the recorder When you do this check that the Must check a...

Страница 225: ...tion bar and select Install ActiveX Control A security warning window appears click the Install button The following message appears in the information bar Internet Explorer has blocked the file being downloaded to your computer from this site as a security measure Click here to display options Click the information bar and select Download file If you cannot download the file even after doing the ...

Страница 226: ...vice used as a gateway for networks such as a local network to access PCs on an external network Data is sent using the default gateway if a gateway is not specified in the destination IP address Disk Configuration Configure the HDD after replacing removing or adding a HDD Disk Configuration is the menu for configuring the HDD Electronic Zoom Enlarges live images and playback images during playbac...

Страница 227: ...June 2003 as IEEE802 3af PoE Supplied Hub A switching hub that provides PoE functionality A maximum of 48 V 15 4 W of power can be supplied to cameras and other devices Port Number A sub address set below the IP address to connect multiple parties simultaneously for communication TCP UDP etc on the Internet Primary Server DNS servers usually have more than 2 system and the primary server is the ma...

Страница 228: ...e Function that automatically switches the camera image in a preset order Sequence is available on the recorder when live images are displayed Subnet A small network used as a unit of administration when a larger network is divided into smaller networks Large networks in corporations for example the network can be broken down into smaller networks called subnets to make the network more manageable...

Страница 229: ...up title 52 H HDD auto delete 80 HDD capacity warning 79 90 HDD tab 22 Host authentication 67 Host IP address 71 Hosts 71 Hour meter 77 Hour meter warning 79 HTTP port 11 HTTP port number 62 I Image display 17 Image transmission by alarm 57 Image transmission by periodic timer 56 Information bar 96 Interval 56 IP address 11 15 27 49 62 L Language 26 31 LCD setup lock 31 Level 73 Line speed 27 62 7...

Страница 230: ...Status display 21 Subnet mask 11 27 62 Summer time daylight saving 33 System administrator 15 T Terminal alarm 39 Time date 26 Time adjustment 55 Time display format 32 Time zone 32 51 Timetable 46 Total capacity 77 84 U URL 15 User authentication 67 User mng 20 User name 15 Users 69 V Version 10 Version information 75 W Warning mail notification 90 Web browser 15 ...

Страница 231: ...f old products and used batteries please take them to applicable collection points in accordance with your national legislation and the Directives 2002 96 EC and 2006 66 EC By disposing of these products and batteries correctly you will help to save valuable resources and prevent any potential negative effects on human health and the environment which could otherwise arise from inappropriate waste...

Страница 232: ... of the operation described above When installing 2 or more HDD units perform HDD recognition unit by unit Notes for RAID5 RAID6 recovery Never turn off the power during the RAID5 RAID6 recovery Failure to observe this may fail to retrieve the data The following cases obstruct the start of RAID5 RAID6 recovery Case that the failed HDD unit is replaced in the power off state and then the power of t...

Страница 233: ...for compression method and 2 Mbps for bit rate refresh interval 1 sec Number of cameras Live image transmission rate Recording rate Number of channels for audio use Number of channels for VMD search use Number of PCs 64 ALL ALL 0 0 4 48 ALL ALL 0 16 4 48 ALL ALL 16 0 4 32 ALL ALL 16 16 4 Measured values shall be used at 128 Mbps or less of the bit rate Refer to the Setup Instructions PDF The setti...

Отзывы: