Chapter 24 – Changing pre-programmed data
Page 403 of 536
Option 11C Compact
Planning, Installation, Fault Clearing and CCBR Guide
6
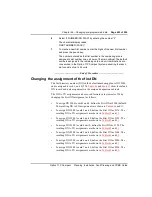
Select “2 NUMBERING PLAN” by entering the number “2”.
The character display reads
FIRST NUMBER (XXXX)?
7
To create a new first number, enter the digits of the new first number
and press the pound key.
The number entered as the first number in the numbering plan is
assigned to slot number one, unit zero of the main cabinet. The default
numbers assigned to the remaining card and unit combinations are
consecutive in the Option 11C Compact system assuming that each
slot consists of up to 24 units.
—————————— End of Procedure ——————————
Changing the assignment of the first DN
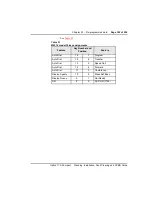
The first directory number (DN) in the default numbering plan is DN 2200
and is assigned to card 1, unit 0 (TN).
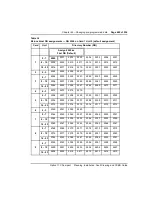
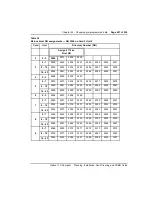
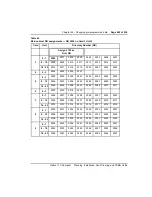
and
show the default
DN to card and unit assignments in the main and expansion cabinets.
The DN to TN assignment can be moved forward in increments of 24 by
changing the First DN assignment as follows:
•
To assign DN 2200 to card 1 unit 0, define the First DN as 2200 (default).
The resulting DN to TN assignments are shown in
•
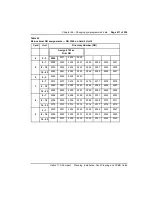
To assign DN 2200 to card 2 unit 0, define the First DN as 2176. The
resulting DN to TN assignments are shown in
and
•
To assign DN 2200 to card 3 unit 0, define the First DN as 2152. The
resulting DN to TN assignments are shown in
and
•
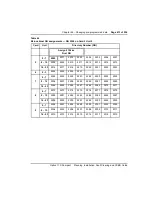
To assign DN 2200 to card 4unit 0, define the First DN as 2128. The
resulting DN to TN assignments are shown in
and
•
To assign DN 2200 to card 5 unit 0, define the First DN as 2104. The
resulting DN to TN assignments are shown in
and
•
To assign DN 2200 to card 6 unit 0, define the First DN as 2080. The
resulting DN to TN assignments are shown in
and
•
To assign DN 2200 to card 7 unit 0, define the First DN as 2056. The
resulting DN to TN assignments are shown in
and
Содержание Meridian Meridian 1
Страница 3: ...553 3121 210 Standard 3 0 January 1999 ...
Страница 17: ...xiv Contents 553 3121 210 Standard 3 0 January 1999 ...
Страница 89: ...Page 70 of 536 Chapter 6 Bracing cabinets against earthquakes 553 3121 210 Standard 3 0 January 1999 ...
Страница 97: ...Page 78 of 536 Chapter 8 Installing a new system 553 3121 210 Standard 3 0 January 1999 ...
Страница 107: ...Page 88 of 536 Chapter 10 Installing the system ground 553 3121 210 Standard 3 0 January 1999 ...
Страница 113: ...Page 94 of 536 Chapter 11 Installing the power supply 553 3121 210 Standard 3 0 January 1999 ...
Страница 125: ...Page 106 of 536 Chapter 12 Adding an expansion cabinet 553 3121 210 Standard 3 0 January 1999 ...
Страница 139: ...Page 120 of 536 Chapter 13 Installing the circuit cards 553 3121 210 Standard 3 0 January 1999 ...
Страница 157: ...Page 138 of 536 Chapter 15 Installing and connecting SDI and Ethernet ports 553 3121 210 Standard 3 0 January 1999 ...
Страница 175: ...Page 156 of 536 Chapter 16 Starting up and testing the system 553 3121 210 Standard 3 0 January 1999 ...
Страница 209: ...Page 190 of 536 Chapter 18 Connecting the trunks 553 3121 210 Standard 3 0 January 1999 ...
Страница 323: ...Page 304 of 536 Chapter 21 Installing Hospitality 553 3121 210 Standard 3 0 January 1999 ...
Страница 419: ...Page 400 of 536 Chapter 23 Pre programmed data 553 3121 210 Standard 3 0 January 1999 ...
Страница 455: ...Page 436 of 536 Chapter 24 Changing pre programmed data 553 3121 210 Standard 3 0 January 1999 ...
Страница 555: ...Page 536 of 536 Chapter 25 Fault locating and clearing 553 3121 210 Standard 3 0 January 1999 ...


