Chapter 12 – Adding an expansion cabinet
Page 101 of 536
Option 11C Compact
Planning, Installation, Fault Clearing and CCBR Guide
14
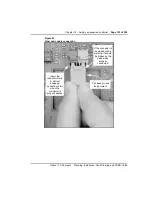
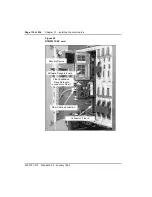
Connect the fiber optic cable to the Fiber Expansion
Daughterboard on the NTMW01 SSC card as shown in
Remove the two protective plugs from the connectors on the Fiber
Expansion Daughterboard.
Connect the fiber optic cable to the Fiber Expansion Daughterboard
making sure that the ‘V’ shaped groove on the cable connector is
facing outward and that the connector is fully seated. The mark (if
equipped) on the connector should not be visible when properly
connected. See
.
15
Insert the NTMW01 SSC card in the CPU slot of the main cabinet.
16
Set the circuit breaker on the power supply in main cabinet to ON.
The Option 11C Compact system reloads (SYSLOAD) and service is
restored.
Check the fiber related LEDs on the SSC card.
•
The LED for the Expansion Daughterboard should be green.
•
If it is red (disabled indication);
Load overlay program 135 and enter ENL FL1 to enable
expansion cabinet.
•
If the LED is yellow (fault indication):
Check the fiber optic cable to make sure that it is properly
connected and not damaged.
Check system time and date using LD 2. Reset if required.
17
Reinstall covers.
—————————— End of Procedure ——————————
WARNING
The fiber optic interface product used in the Option 11C Compact
system is considered safe. However, as a precaution do not view the
optical port or the end of fiber optic cable. Under certain conditions
(such as during cable testing or under light magnification) the cable or
port may expose the eye beyond the limits of Maximum Permissible
Exposure recommended in some jurisdictions. Do not remove
protective caps or plugs until ready to connect the cable.
Содержание Meridian Meridian 1
Страница 3: ...553 3121 210 Standard 3 0 January 1999 ...
Страница 17: ...xiv Contents 553 3121 210 Standard 3 0 January 1999 ...
Страница 89: ...Page 70 of 536 Chapter 6 Bracing cabinets against earthquakes 553 3121 210 Standard 3 0 January 1999 ...
Страница 97: ...Page 78 of 536 Chapter 8 Installing a new system 553 3121 210 Standard 3 0 January 1999 ...
Страница 107: ...Page 88 of 536 Chapter 10 Installing the system ground 553 3121 210 Standard 3 0 January 1999 ...
Страница 113: ...Page 94 of 536 Chapter 11 Installing the power supply 553 3121 210 Standard 3 0 January 1999 ...
Страница 125: ...Page 106 of 536 Chapter 12 Adding an expansion cabinet 553 3121 210 Standard 3 0 January 1999 ...
Страница 139: ...Page 120 of 536 Chapter 13 Installing the circuit cards 553 3121 210 Standard 3 0 January 1999 ...
Страница 157: ...Page 138 of 536 Chapter 15 Installing and connecting SDI and Ethernet ports 553 3121 210 Standard 3 0 January 1999 ...
Страница 175: ...Page 156 of 536 Chapter 16 Starting up and testing the system 553 3121 210 Standard 3 0 January 1999 ...
Страница 209: ...Page 190 of 536 Chapter 18 Connecting the trunks 553 3121 210 Standard 3 0 January 1999 ...
Страница 323: ...Page 304 of 536 Chapter 21 Installing Hospitality 553 3121 210 Standard 3 0 January 1999 ...
Страница 419: ...Page 400 of 536 Chapter 23 Pre programmed data 553 3121 210 Standard 3 0 January 1999 ...
Страница 455: ...Page 436 of 536 Chapter 24 Changing pre programmed data 553 3121 210 Standard 3 0 January 1999 ...
Страница 555: ...Page 536 of 536 Chapter 25 Fault locating and clearing 553 3121 210 Standard 3 0 January 1999 ...


