BenchMike Pro Instruction Handbook: Setup
4-23
4.9.6
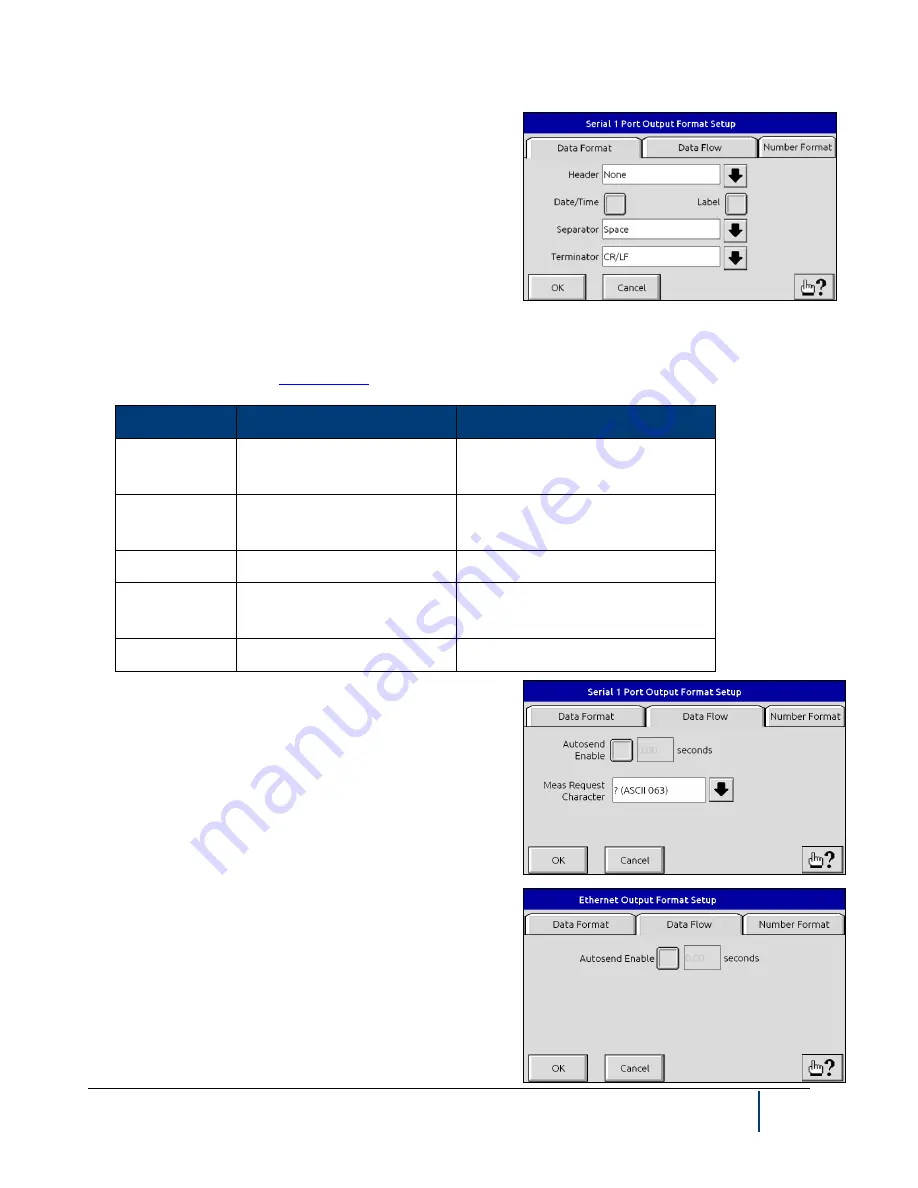
Serial Data Out Format
The
Serial Data Out Format
menu also accesses the Data
Format, Data Flow, and Number Format tabs, which allow the
format of serial output to be easily changed. Many data values
can be transmitted through the serial ports, as listed below:
NOTE: Serial output data values are selected from the Setup -
Data... Menu, and each item has its own menu. Check the de-
sired option from that menu to enable transmission of the item
from the serial port.
Parameter options from the Data Format tab are listed below. Note that the serial port #1 or the serial USB must
be set up as described under
Item
Description
Options
Label
Name of transmitted data
(Deviation, Size, etc.)
Enabled, Disabled
Header
Character sent at beginning
of each line
None, SOH (ASCII 001), STX (AS-
CII 002), ! (ASCII 033)
Date/Time
Current date and time
Enabled, Disabled
Separator
Inserted between multiple
columns of data
Space, Comma, Semicolon, CR,
LF, CR/LF, Tab
Terminator
Sent after last output
None, CR, LF, CR/LF, (ASCII 003)
The second tab under
Serial Output Format
allows you to con-
trol the flow of data to the serial output. You can enable or disa-
ble the Autosend feature, specify a minimum time period for Au-
tosend, and select a request character from default settings. The
Measurement Request Character can be sent to the BenchMike
Pro to remotely start the measurement process. This function
must be enabled in the serial port settings from the Setup
→
System
→
Communication Ports Menu. Options for Measure-
ment Request Character are:
•
CR (ASCII 013)
•
ENQ (ASCII 005
•
? (ASCII 063)
NOTE: The Meas Request Character option only appears for the
Serial 1 or Serial USB option, not for Ethernet connections, as
shown.
Содержание BenchMike Pro 2025
Страница 4: ......
Страница 14: ......
Страница 22: ......
Страница 40: ...2 18 BenchMike Pro Instruction Handbook Installation 11 Select a Make of Raw then select Add printer ...
Страница 44: ...2 22 BenchMike Pro Instruction Handbook Installation 20 Verify the report ...
Страница 50: ...2 28 BenchMike Pro Instruction Handbook Installation 10 Choose the Raw Make then click Continue ...
Страница 51: ...BenchMike Pro Instruction Handbook Installation 2 29 11 Choose the Raw Queue en Model then click Add Printer ...
Страница 112: ......
Страница 150: ......
Страница 156: ......
Страница 160: ...BenchMike Pro Instruction Handbook Index Units 4 25 Universal Slide Fixture 3 3 Ventilation Requirements 2 1 ...


