4-4
BenchMike Pro Instruction Handbook: Setup
4.2
Mode Icon and Menu
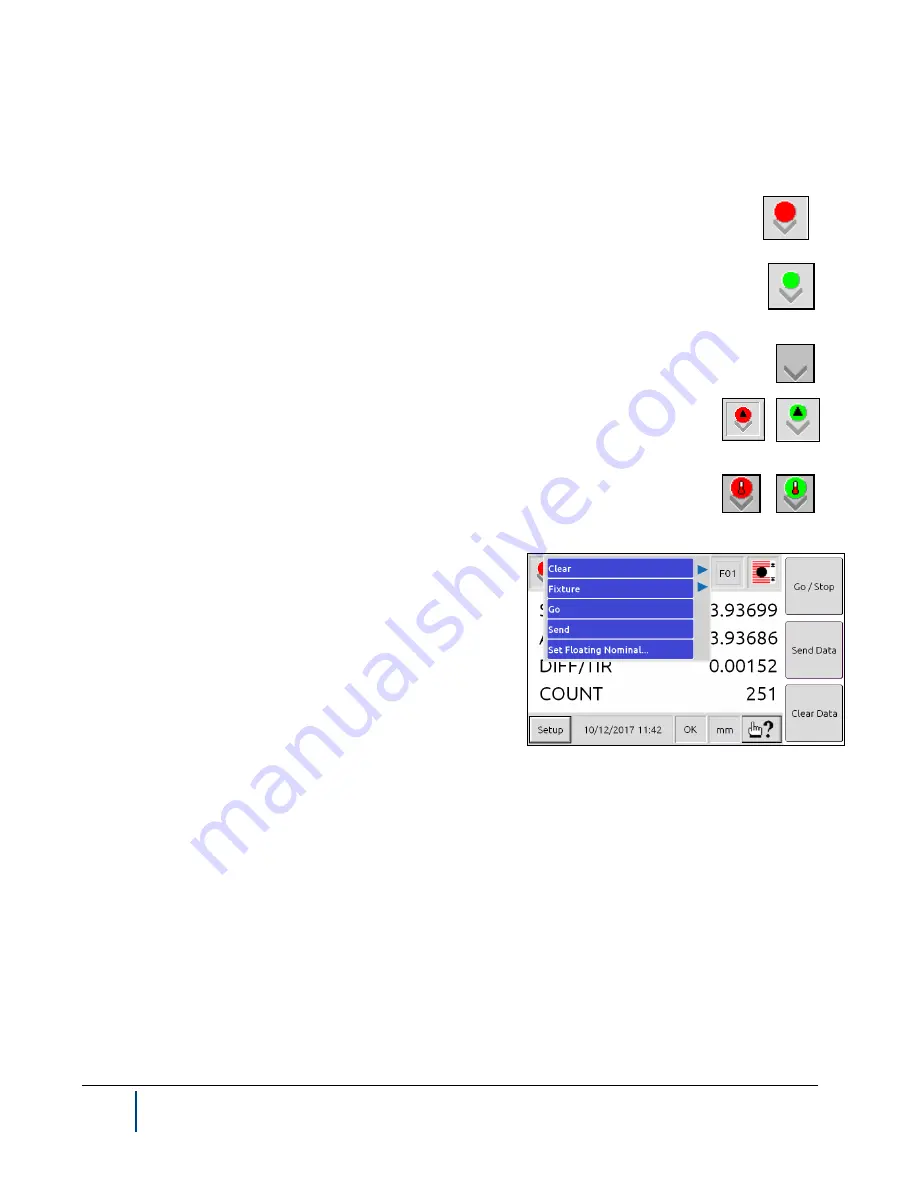
Note that the Mode icon changes based on the measurement mode in operation.
This icon indicates that measurements are not being taken and the BenchMike Pro has detected the
correct number of part edges or
segments.
This icon pulsates at the measurement update rate, indicating that measurements are being taken.
This icon indicates that no part is detected in the measurement area or the BenchMike Pro has detect-
ed an incorrect number of part edges or segments.
The black triangle in the red or green circle indicates the BenchMike Pro has been remas-
tered. See the section on Re-mastering.
If you’ve entered a non-zero value for Thermal Compensation, the red or green circle will
change to show a thermometer.
By touching the Mode icon in the upper left hand corner of the
screen, you access several frequently-used functions of the
BenchMike Pro, as shown to the right.
NOTE: Some options are only available with certain fixtures.
When the
Clear
command line is selected, three options can be
selected. You can clear all accumulated data, clear the last
measurement, or clear all latched alarm outputs. You will be
asked to confirm this selection before the values are erased.
The
Fixture
menu allows you to zero the current position and return motorized fixtures to the home position.
When
Go
is selected, measurements are either started or stopped. The displayed measurement data will change
as data is updated and processed. This function can also be accessed by pressing the Go data button on the
front of the BenchMike Pro. Note that this option is displayed as Stop when the BenchMike Pro is in Go mode.
When the
Next Feature
command line is selected, the feature number increases by one. For example, if Feature
01 is selected, touching Next Feature will select Feature 02.
When the
command line is selected, sample or batch reports are transmitted to the serial port or printer port.
This option will appear grayed out if no printed reports have been selected.
Содержание BenchMike Pro 2025
Страница 4: ......
Страница 14: ......
Страница 22: ......
Страница 40: ...2 18 BenchMike Pro Instruction Handbook Installation 11 Select a Make of Raw then select Add printer ...
Страница 44: ...2 22 BenchMike Pro Instruction Handbook Installation 20 Verify the report ...
Страница 50: ...2 28 BenchMike Pro Instruction Handbook Installation 10 Choose the Raw Make then click Continue ...
Страница 51: ...BenchMike Pro Instruction Handbook Installation 2 29 11 Choose the Raw Queue en Model then click Add Printer ...
Страница 112: ......
Страница 150: ......
Страница 156: ......
Страница 160: ...BenchMike Pro Instruction Handbook Index Units 4 25 Universal Slide Fixture 3 3 Ventilation Requirements 2 1 ...


