background image

Image Optimization 5-75 

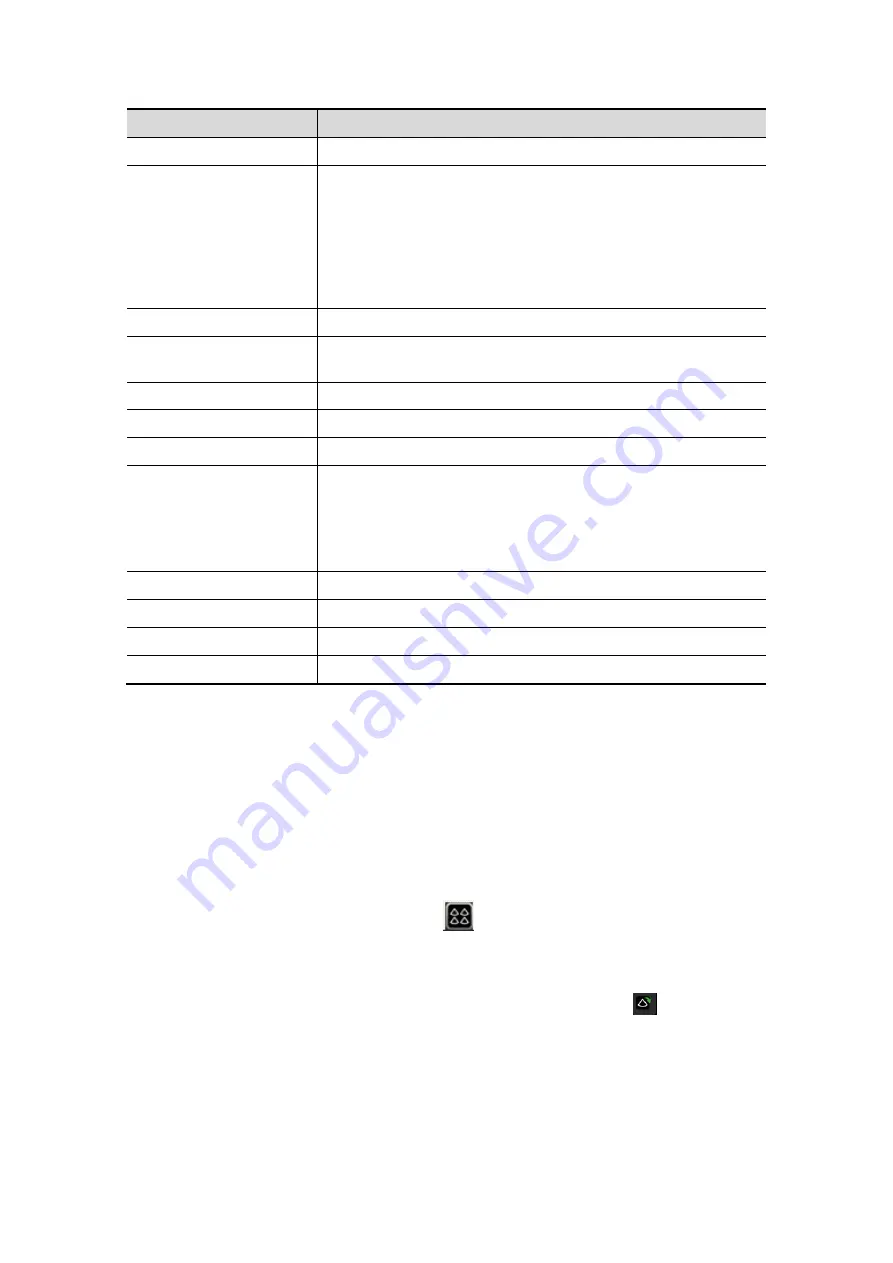
Selection 

Description 

Last   

Go to “last” Clips. 

Text “On”/“Off” 

Function that turns on screen graphic text “On”/“Off”. The 
function is the same as Labels on/off icon on the top of the 
screen. 
Information includes: name of level, name of view, heart rate, 
time stamp acquisition, timers, frame slider, loop ID, clip 
control. For the cine without distributed view, name of level, 
name of view are displayed in “---”.   

Apply edit all   

Clip edit applied to all clips taken.   

Bookmark 

For continuous acquisition, when bookmark is set “On”, only 
the selected loops for the current view can be displayed. 

Clip Length 

Set the clip length: Systole, User Defined. 

Save Selected   

Saves only the selected clips for the study. 

Save All 

Saves all the clips acquired for the study.   

Suspend 

Pause the stress echo exam but not end the stress echo 
exam. 
When stress echo exam is suspended, the user can perform 
image acquisition of all other imaging modes, or perform 
operations like measurement. 

End 

End the stress echo exam. 

Stage 

To find the stage and press it to select.   

View 

To find the view and press it to select. 

Full Screen 

Select whether to display all loops of the exam or not.   


5.13.5  Review Mode 

Review mode is used by cardiologist to evaluate clips for cardiac wall motion 
abnormalities. Different views, from different stages, will be selected to display to compare 
in a wide variety of combinations. The most common workflow is to compare “same views” 
but at “different stages” of the exam (Example: PSLA view, Rest stage compared to PSLA 
view, Post exercise stage). 

  Enter review mode 

Select the Review Mode


toolbar button 

  at the top of the screen. Or, click 

[Review] on the lower left corner of the screen. 

  To restrict the display to a selected phase or view 

1.  Set [Shuffle] as “On”


on the soft menu, or select shuffle mode icon 

  on the 

monitor. 

2.  Select the label of the phase or view (for example, Rest or Long Axis). 

The system displays all loops that represent the selected phase or view. 

Содержание M5 Exp

Страница 1: ...M6 M6T M6 Exp M6s M6 Pro M55 M58 M5 Exp Diagnostic Ultrasound System Operator s Manual Basic Volume...

Страница 2: ......

Страница 3: ...2 Meaning of Signal Words 1 2 1 3 Meaning of Safety Symbols 1 2 1 4 Safety Precautions 1 3 1 5 Latex Alert 1 11 1 6 Warning Labels 1 11 2 System Overview 2 1 2 1 Intended Use 2 1 2 2 Contraindication...

Страница 4: ...connecting a Probe 3 6 3 5 Connecting the Footswitch 3 7 3 6 Connecting Removing a USB Memory Device 3 7 3 7 Graph Text printer 3 8 3 8 Video Printer 3 9 3 9 Basic Screen and Operation 3 11 3 9 1 Basi...

Страница 5: ...on 5 15 5 5 3 Color Mode Image Optimization 5 16 5 6 Power Mode Image Optimization 5 21 5 6 1 Power Mode Exam Protocol 5 21 5 6 2 Power Mode Image Parameters 5 21 5 6 3 Power Mode Image Optimization 5...

Страница 6: ...Loops Select Mode 5 74 5 13 5 Review Mode 5 75 5 13 6 Wall Motion Scoring and Reports 5 78 5 13 7 Maintenance and Protocol 5 80 5 13 8 Saving Stress Echo Data 5 83 5 13 9 Exiting the Stress Echo Featu...

Страница 7: ...Live Capture 6 7 6 6 Cine Memory 6 8 6 6 1 Cine Memory Setting 6 8 6 7 Cine Settings 6 8 7 ECG 7 1 7 1 ECG Operation Basic Procedures 7 2 7 2 ECG Setting 7 2 7 3 Parameter Description 7 3 7 4 ECG Revi...

Страница 8: ...Images to USB Flash Drive 10 4 10 2 6 Quickly Saving Full Screen Image to the System 10 4 10 2 7 Thumbnails 10 4 10 2 8 Image Review and Analysis 10 5 10 2 9 iVision 10 7 10 2 10Sending Image File 10...

Страница 9: ...ion of Each Part of the Probe 12 4 12 1 2 Orientation of the Ultrasound Image and the Probe Head 12 5 12 1 3 Procedures for Operating 12 6 12 1 4 Wearing the Probe Sheath 12 8 12 1 5 Probes Cleaning a...

Страница 10: ...am Modes 14 12 14 3 Image Preset 14 13 14 4 Measure Preset 14 13 14 5 Body Mark Preset 14 13 14 5 1 Preset Body Mark for Exam Mode 14 13 14 5 2 User defined Body Marks 14 14 14 5 3 Body Mark Softkey P...

Страница 11: ...Ultrasonic Output Parameters 16 5 16 7 2 Limits of Acoustic Output 16 5 16 7 3 Differences between Actual and Displayed MI and TI 16 5 16 8 Measurement Uncertainty 16 6 16 9 References for Acoustic Po...

Страница 12: ......

Страница 13: ...rotected by copyright or patents and does not convey any license under the patent rights or copyright of Mindray or of others Mindray intends to maintain the contents of this manual as confidential in...

Страница 14: ...ospital or organization that employs this equipment to carry out a reasonable service maintenance plan Neglect of this may result in machine breakdown or personal injury Warranty THIS WARRANTY IS EXCL...

Страница 15: ...201 995 8000 Toll Free 1 800 288 2121 Fax 1 800 926 4275 Manufacturer Shenzhen Mindray Bio Medical Electronics Co Ltd Address Mindray Building Keji 12th Road South High tech industrial park Nanshan Sh...

Страница 16: ...air performed by personnel other than those designated by Mindray 6 The purpose of this system is to provide physicians with data for clinical diagnosis It is the physician s responsibility for diagno...

Страница 17: ...ontent varies depending upon the software version options and configuration of the system Hardcopy Manuals Operator s Manual Basic Volume Describes the basic functions and operations of the system saf...

Страница 18: ...g box and some basic operations Buttons The angular bracket indicates buttons knobs and other controls on control panel Items in menu and buttons in dialog box The square bracket indicates items in me...

Страница 19: ...s belong to IPX7 Footswitch 971 SWNOM belongs to IP68 Footswitch SP 997 350 3 pedal belongs to IPX8 According to the degree of safety of application in the presence of a FLAMMABLE ANESTHETIC MIXTURE W...

Страница 20: ...ates a potentially hazardous situation that if not avoided may result in minor or moderate injury NOTE Indicates a potentially hazardous situation that if not avoided may result in property damage Tip...

Страница 21: ...ly method provided by Mindray other power supply modes e g using a UPS may result in electric shock 2 Connect the protective grounding conductor before turning ON the system Disconnect the grounding c...

Страница 22: ...Only use the ECG leads provided with the ECG module otherwise electric shock may result 13 When moving the system you should first fold the LCD display disconnect the system from other devices includ...

Страница 23: ...uch as cellular phones transceivers and radio controlled products in the room placing the system If a person brings a device that generates radio waves near the system ask him her to immediately turn...

Страница 24: ...d exam mode combinations Apply the probe only for a period of time required for the purpose of diagnosis 9 The system and its accessories are not disinfected or sterilized prior to delivery The operat...

Страница 25: ...after being turned OFF the system may not be rebooted properly and could malfunction 5 When using or placing the system keep the system horizontal to avoid imbalance 6 Remove ultrasound gel from the...

Страница 26: ...o the patient 3 Do not subject the probe to shock A defective probe may cause electric shock to the patient 4 Do not disassemble the probe to avoid the possibility of electric shock 5 Never immerse th...

Страница 27: ...ded in this operator s manual otherwise Mindray will not be liable for damage caused by other solutions If you have any questions please contact Mindray Customer Service Department or sales representa...

Страница 28: ...mbient conditions ambient temperature 0 40 relative humidity 30 85 no condensation atmospheric pressure 700 hPa 1060 hPa Use the L16 4Hs and D7 2s probe under the following ambient conditions ambient...

Страница 29: ...vices issued on March 29 1991 1 6 Warning Labels The warning labels are attached to this system in order to call your attention to potential hazards The symbol on the warning labels indicates safety p...

Страница 30: ...1 12 Safety Precautions No Warning Labels Meaning 3 CONFORMS TO AAMI STD 60601 1 IEC STD 60601 2 37 IEC STD 60601 2 18 CERTIFIED TO CSA STD C22 2 NO 60601 1 60601 2 37 60601 2 18...

Страница 31: ...tal cephalic adult cephalic trans rectal trans vaginal musculo skeletal conventional musculo skeletal superficial cardiac adult cardiac pediatric Trans esoph Cardiac peripheral vessel and urology exam...

Страница 32: ...ppler Special Imaging Smart 3D Static 3D 4D iScape TDI Color M Stress Echo Contrast Imaging Elastography 2 4 2 Power supply Voltage 100 240V AC adapter 220 240V 50 60Hz when configured with mobile tro...

Страница 33: ...060hPa 700hPa 1060hPa 2 4 4 External Dimensions and Weight External dimensions 361mm H 357mm L 75mm W Net weight 6 5Kg including batteries and 4D board no power adapter 2 5 System Configuration 2 5 1...

Страница 34: ...l peripheral vascular Body surface L14 6s Linear Pediatric small organ breast thyroid testes neonatal cephalic musculo skeletal conventional superficial peripheral vascular Body surface P4 2s Phased A...

Страница 35: ...4Hs Linear Abdominal intra operative abdominal thoracic and vascular pediatric small organ breast thyroid testes neonatal cephalic musculo skeletal conventional superficial peripheral vessel Body sur...

Страница 36: ...1 3s NGB 018 metal needle detachable 15 25 35 14G 16G 18G 20G 22G C6 2Gs NGB 024 Metal needle detachable 7 25 35 14G 16G 18G 20G 22G DE11 3s NGB 027 Metal needle un detachable 1 7 16G 17G 18G 2 5 2 2...

Страница 37: ...exam mode comments measurements body marks and report 26 DICOM Basic module including task management DICOM storage DICOM print DICOM storage commitment DICOM media storage including DICOM DIR and etc...

Страница 38: ...is configured 41 Pack 42 Dust proof cover 43 Wireless adapter 2 5 2 3 Peripherals Supported Item Model Black white video printer SONY UP D897 SONY UP X898MD MITSUBISHI P95DW N SONY UP D898MD Color vid...

Страница 39: ...sed for carrying the system 5 Probe port Connects a probe to the main unit or connects a probe extend module 6 Transducer locking lever Locks or unlocks the probe connected with the main unit locked s...

Страница 40: ...outlets with the same circuit breakers and fuses that control the current to devices such as life support systems If the trolley or the system malfunctions and generates over current or when there is...

Страница 41: ...System Overview 2 11 UMT 200 UMT 300...

Страница 42: ...artment for placing ECG module or B W printer 9 Compartment for placing color printer 10 Caster Used for securing or moving the system 11 Display support arm Supports the display module for adjusting...

Страница 43: ...supply If connected with mains power and the breaker is on the indicator illuminates in green color If not connected with mains power or the breaker is off the indicator does not illuminate 4 Power o...

Страница 44: ...g to the right side of the system when you are facing to the front of the system b Toggle the lock lever to the top position CAUTION You must turn off the ultrasound system before connecting or discon...

Страница 45: ...o record images 8 Remote control port Connects the control port of the video printer 9 Composite video output port Used for receiving the output image signal of the video printer or DVD recorder 10 DV...

Страница 46: ...2 3 4 No Name Function 1 2 Audio input port Used for audio signal input 3 Composite video input port Used for composite signal video input Reserved 4 Separate video input port Used for separate signa...

Страница 47: ...onnection to the I O extend module Name Function ECG lead port Used for ECG signal input Connection Connect the ECG module to the main unit via the I O extend module see 2 8 2 I O extend module for de...

Страница 48: ...bsequent contents for specific functions 2 Soft menu controls 2 Press to select the soft menu items displayed on the bottom of the screen Refer to the subsequent contents for specific functions 3 Soft...

Страница 49: ...nter help status 10 Report Report Press to open or close the diagnosis reports 11 iStation Press to enter or exit the patient information management system 12 F1 F4 User defined key You can assign a f...

Страница 50: ...ure Measurement Press to enter or exit the measurement state 35 Update Press to change the currently active window Or start stop image acquisition in iScape or 3D 4D 36 Set Set Press to confirm an ope...

Страница 51: ...If connected the indicator illuminates in green color 52 Indicator 2 Indicates the current status of the batteries When the system is supplied with power by the batteries and the power capacity is lo...

Страница 52: ...mbol Probe connection locked symbol I O extend port USB port Network port S VIDEO signal interface VIDEO signal interface Pencil probe port reserved Battery installation position indicator ECG functio...

Страница 53: ...mperature 3 2 Power Supply This system can work normally only when it is connected to the external power supply or the battery capacity is sufficient 3 2 1 Connecting the External Power Supply 1 Conne...

Страница 54: ...system is turned on No Check Item 1 The temperature relative humidity and atmospheric pressure shall meet the requirements of operating conditions See 2 4 3 Environmental Conditions for details 2 Ther...

Страница 55: ...ge 3 There shall be no evident excessive noise discontinuous absent or black artifacts in the B mode image 4 Check if there is abnormal heat on the surface of the probe during an ultrasound procedure...

Страница 56: ...n once on the upper right corner of the control panel The Shutdown Confirm screen appears Shut down To power off the system normally Standby Click to enter the standby status Cancel to cancel the oper...

Страница 57: ...ere is still no operation the system enters standby after the waiting time for standby Press the power button and select Standby When the system enters the standby status the power button backlight tu...

Страница 58: ...ace defects cracks and peeling Using a defective probe may cause electric shock 1 Keep the cable end of the probe to the right side of the system and insert the connector into the port of the system a...

Страница 59: ...evice otherwise the USB memory device and or the system may be damaged When connecting a USB memory device to the ultrasound system via a USB port 1 You can hear a sound if it is connected successfull...

Страница 60: ...as required 1 Connect the two USB ports of the printer and the system with the USB cable of the printer 2 Power on the system and the printer 3 Install the printer driver Setup Peripheral Preset Print...

Страница 61: ...the network configuration manager in case of failure NOTE When you install the printer s driver you must specify the specific path for installation otherwise vague path may result in longer time for...

Страница 62: ...re mainly used for image print refer to DICOM chapter for DICOM image print Modify print service a Select a printer service in the list b Select the printer type in the Property box c Set print proper...

Страница 63: ...ays manufacturer logo hospital name exam date time acoustic power MI TI freeze icon patient information probe model current exam mode ECG icon if ECG module is connected and accession etc To preset wh...

Страница 64: ...through the Patient Info screen ECG icon Displays ECG icon which consists of a heart icon and heart rate e g 75bpm Accession Serial number used in DICOM or the manually entered serial number in Patien...

Страница 65: ...operate the menu Press the knob to open the menu rotate the knob to navigate through the items one by one and press it to select the item Depending on the item types the multifunctional knob can For a...

Страница 66: ...e in image Cursor area The status icon area indicates the current cursor status such as in cineloop status Help information area The help information area displays various help information or progress...

Страница 67: ...r of the item System status area This area displays the relevant system icons such as USB memory device printer network connection and current system time etc Click to see the hidden status icons None...

Страница 68: ...r uncheck the item Entry box enter characters manually via the keyboard Position the cursor into the box and then enter the letters or characters Drop down list box click to show the list and select a...

Страница 69: ...s paused within 24 hours and continue the exam For details please refer to 4 5 Activate Continue an Exam General procedure for an exam Enter the patient information Select an exam mode and probe Choos...

Страница 70: ...ot permitted Tips Patient ID of an activated exam within 24 hours can be modified Auto generate ID Select Auto generated ID through the path Setup System Preset General System will automatically popul...

Страница 71: ...format as that of the system 2 Exam Type Exam application type You can select among 8 types ABD Abdomen OB Obstetrics GYN Gynecology CARD Cardiac VAS Vascular URO Urology SMP Small Part and PED Pediat...

Страница 72: ...calculate the GA and EDD EDD after you enter EDD the system will calculate and display GA and LMP Gravida Times of pregnancy Ectopic Times of abnormal pregnancy e g extrauterine pregnancy Gestations...

Страница 73: ...operator drop down list select Del single or Del All to delete the information of the operator Ref Physician the people who requires the ultrasound exam and are not permitted The system remembered th...

Страница 74: ...ge of the selected data source will be displayed 3 Set the searching condition Define the searching item Name ID DOB or Exam Date and then enter the related keyword Select Find in results the system w...

Страница 75: ...all the patient exam records in the server are listed out 2 Set the searching condition Enter the period which includes the exam date and click Query to search Enter patient ID patient name accession...

Страница 76: ...ve use and the system will support corresponding exam modes related to the application software refer to 2 5 2 Options for details the system also supports user defined exam modes The system supports...

Страница 77: ...1 Press Exam to open the dialog box 2 Click Save to save the image parameters of the current image mode as setup data A dialogue box pops up to prompt you that the operation will cover the current ima...

Страница 78: ...ntinue an exam with data in an external memory database you have to first allow the system to load the patient data to the system s patient database 4 6 Pause Exam and End Exam 4 6 1 Pause an Exam Som...

Страница 79: ...exam and clear the exam data 4 7 Cancel an Exam An undergoing exam can be stopped by clicking Cancel Exam in the Patient Info screen 1 Press Patient to enter Patient Info screen 2 Click Cancel Exam 3...

Страница 80: ...ut patient info in Setup System Preset General When saving an image the system pops up the Patient Info screen to ask for the patient information Enter the information and click OK to save the image a...

Страница 81: ...B Mode key press to enter B Mode M Mode key press to enter M Mode PW Mode key press to enter PW Mode In 3D 4D mode press to enter 3D image in single window CW Mode key press to enter CW Mode Color Mo...

Страница 82: ...in B mode Decrease the FOV in B mode Decrease Line Density Turn on High FR in harmonic mode To increase frame rate of color imaging Decrease ROI in Color Power mode Turn on B C Wide in Color Power mod...

Страница 83: ...ve the cursor to the certain soft menu item and then press Set or rotate the multifunctional knob to adjust Adjustment through image parameter area The image parameter area is located in the upper lef...

Страница 84: ...will display the real time parameter values as follows Display F 5 0 D 17 6 G 50 FR 40 IP 4 DR 60 Parameter Frequency Depth Gain Frame Rate B IP B Dynamic Range Items that appear in the menu or the s...

Страница 85: ...ppears Effects Adjust the signal gain for the certain image area to get a balanced image Frequency Description This function is used to select the operating frequency of the current probe the real tim...

Страница 86: ...moving the probe or changing the sampling position FOV Field of View Change the scan range through the FOV item in the soft menu or menu You can get a much larger field of view when selecting a larger...

Страница 87: ...he iClear item in the soft menu or menu Effects The bigger the value the more clearly the profile of the image Impacts This function is optional Smooth Description This function is to reject image noi...

Страница 88: ...tion through the Img Merge item in the soft menu or menu Impacts Image Merge is available only for linear probes Gray Map Description This function applies the gray correction to obtain the optimum im...

Страница 89: ...to reject image signals less than a certain gray scale then the rejected signal corresponding area turns black Click Gray Rejection in the soft menu or menu to adjust The adjusting range is 0 5 Curve...

Страница 90: ...display or hide the scale Patient Temperature Description If the current active probe is P7 3Ts the parameter will display under the B mode menu You can enter the patient temperature by this function...

Страница 91: ...d at all times in B mode images and pressing M will directly enter M mode 5 4 2 M Mode Parameters In M mode scanning the image parameter area in the upper left corner of the screen displays the real t...

Страница 92: ...n or off the function through Time Mark item in the soft menu or menu Effects When time mark is displayed on the M mode image it s much easier to identify the cardiac cycles and detect more details Di...

Страница 93: ...r menu The system provides 10 different maps to be selected among Post Process Description Post process is used to apply modifications to the image in order to optimize overall image quality Post proc...

Страница 94: ...Dynamic Range Description This function is used to adjust the B image resolution to compress or expand the gray display range The real time dynamic range value will be displayed in the image paramete...

Страница 95: ...anning to obtain optimized images 4 Perform other operations e g measurement and calculation if necessary 5 5 2 Color Mode Image Optimization In Color mode scanning the image parameter area in the upp...

Страница 96: ...en the solid line and the dotted line status You can set the default ROI position and size in System Preset Image Preset Color Impacts The larger the ROI box the lower the frame rate and the lower the...

Страница 97: ...tifunctional knob to adjust Values of steering angles vary by probes Effects This function is used to adjust the scan angle of linear probes so as to change the angle between the transmitting beam and...

Страница 98: ...s function is used to adjust the speed range of color flow which is adjusted through PRF in the system The real time PRF value will be displayed in the image parameter area in the upper left corner of...

Страница 99: ...ription Color IP is a combination of several image processing parameters which is used for a fast image optimization The IP combination number is displayed in the image parameter area in the upper lef...

Страница 100: ...d can be used to analyze the tissue blood supply condition Operations Set HR Flow on the menu in the top left corner of the screen to On to turn on HR Flow status The parameters in HR Flow mode are in...

Страница 101: ...in the upper left corner of the screen displays the real time parameter values as follows Display F 2 5 G 38 IP 1 WF32 PRF 0 3k Parameter Frequency Power Gain Power IP Power Wall Filter Pulse Repetiti...

Страница 102: ...tes the display effect of power image The maps in Power mode image are grouped into two categories Power maps and Directional Power maps Operation Select the map through the Map item in the soft menu...

Страница 103: ...n the left part of the screen as follows The sampling correction angle value will be displayed above the image as described in the following table PW Sampling Line Adjustment SV Size SV 3 0 Angle Angl...

Страница 104: ...d together to be introduced here Items that appear in the menu or the soft menus are dependent upon preset which can be changed or set through Setup Image Preset please refer to 5 16 Image Preset for...

Страница 105: ...pacts Aliasing may occur if low velocity scale is used and high velocities are encountered Low velocities may not be identified when a high velocity scale is used iTouch Description To optimize image...

Страница 106: ...PW mode imaging Operation Adjust the speed through the Speed item in the soft menu or menu Effects Changing the speed makes it easier to identify the cardiac cycles and to detect more details T F Res...

Страница 107: ...All Trace Smooth To set the smooth level when tracing Change the effect through the Trace Smooth item in the soft menu or menu Trace Sensitivity This function is used to set the sensitivity of tracin...

Страница 108: ...e baseline Angle Description This function is used to adjust the angle between Doppler vector and flow to make the velocity more accurate The real time adjusting angle value is displayed on the right...

Страница 109: ...ft menu or menu to adjust Curve To manually enhance or restrain the signal in the certain scale Click Curve in the soft menu or menu to open the dialogue box to adjust Drag the curve node to increase...

Страница 110: ...des B Color Power and TVI mode 5 8 1 1 Imaging Shortcut key for Free Xros M mode Assign a user defined shortcut key for Free Xros M Setup System Preset Key Config Please refer to 14 1 7 Key Config for...

Страница 111: ...the M mark Lines Description To switch between the M mark lines in Free Xros M mode Operation Press Set to switch between the M mark lines or press Cursor to show the cursor The activated M mark line...

Страница 112: ...int and activate the preview point the system updates the time motion curve in real time The sample line is displayed in green and each point is marked with a number in sequence 6 Repeat Step 4 and 5...

Страница 113: ...DI function 5 9 1 TDI Exam Protocol Enter TDI User defined shortcut key a Assign a user defined shortcut key for TDI the setting path is Setup System Preset Key Config Please refer to 14 1 7 Key Confi...

Страница 114: ...as follows TVI Display F 3 3 G 38 IP1 PRF 0 4k WF 3 Parameter Frequency Gain TVI IP PRF WF Wall Filter TEI Display F 3 3 G 38 IP1 PRF 0 4K WF 3 Parameter Frequency Gain TEI IP PRF WF Wall Filter TVD D...

Страница 115: ...to adjust L M H 5 9 4 TDI Quantitative Analysis QA CAUTION TDI Quantitative Analysis results are provided for reference only not for confirming a diagnosis Please compare the results with that of oth...

Страница 116: ...image of the same moment roll the trackball to review the images in the two cineloop windows Sample areas are linked in the TVI cineloop window and B cineloop window 3 Displays analysis curve Y axis...

Страница 117: ...in the image display area The ROI height width and angle can be adjusted by Std Height Std Width and Std Angle on the soft menu 3 The last generated or selected ellipse is considered the active ROI an...

Страница 118: ...culating the mean intensity value When the user repositions an ROI the old trace data is erased from the plot and the trace data for the new position re plotted Hide Show Click Hide or Show on the sof...

Страница 119: ...r Flow M mode click TDI in the soft menu or press the user defined TDI key 5 10 2 Exit Color M Mode Press Color or M on the control panel to exit Color M mode Or press B on the control panel to return...

Страница 120: ...line by moving the trackball left and right and set the ROI position by moving the trackball up and down Set the ROI size by moving the trackball up and right Press Set to switch between the cursor s...

Страница 121: ...B tangent plane and scanning technique Smart3D The following description uses the fetal face imaging as an example the other parts imaging are as the same Fetal Condition Gestational age Fetuses of 2...

Страница 122: ...to image any structure where a view can t be achieved by standard 2D mode to improve understanding of complex structures 4D provides continuous high volume acquisition of 3D images 4D adds the dimensi...

Страница 123: ...the screen A line shown in the following figure that shows the cut plane position of VOI is inside ROI ROI size and position Roll the trackball to change the ROI size and position press the Set to tog...

Страница 124: ...VOI vary View Curved VOI U D At the upper part of curved VOI D U At the lower part of curved VOI L R At the left part of curved VOI R L At the right part of curved VOI F B Displays as a dot B F Displa...

Страница 125: ...ciple of 3D imaging is to render a 3D image from multiple 2D image information The following describes the spatial relation of 3 sectional planes A B and C and the 3D image The sectional plane can be...

Страница 126: ...e mother s head then the fetus posture is head down in the 3D image you can make the fetus head up by rotating the 3D image by clicking Quick Rot to be 180 in the soft menu Wire cage When you view a 3...

Страница 127: ...1 3 2 Menu Preset Open the Menu Preset screen via Setup Image Preset Menu Preset 1 Select the probe type and imaging mode Smart3D Static 3D or 4D 2 Set the soft menu items for Smart3D Static 3D or 4D...

Страница 128: ...b Preset interface see the following figure 1 Name move the cursor to the Name column and enter the preset package name 2 General parameters preset Render select image rendering mode Direction select...

Страница 129: ...witch to Smart 3D imaging by clicking Smart 3D on the soft menu and define the ROI as well as curve VOI 6 Select a parameter package set parameters like Direction Method including the range or angle t...

Страница 130: ...aying mode only for 4D imaging or viewing mode Selection Single Dual Quad Method Function select the image acquisition method Selection Fan Linear Linear mode during the sweep the probe may not be mov...

Страница 131: ...n Low noise of the AF area 2 Set ROI Region of Interest on the 2D image 3 Roll the trackball to change the ROI size and position and VOI curve press the Set to toggle between setting the ROI size or p...

Страница 132: ...ft menu or Pressing Update or Freeze on the control panel or Wait until the 3D acquisition automatically completed In 3D image viewing the system supports the following functions View the section imag...

Страница 133: ...yscale of the image so as to enhance observation for low echo region applicable for vessel cyst and etc When the function is turned on the rendering mode parameters change into the corresponding inver...

Страница 134: ...Select Quad system displays four images The upper left one is section A image the lower left one is sectional C image the upper right one is section B image and the lower right one is 3D image Or dir...

Страница 135: ...mage roll the trackball to move the control point Section Image Viewing The principle of 3D imaging is to render a 3D image from multiple 2D image information You can move the MPR line to view the dif...

Страница 136: ...t A as the current window and roll the trackball MRP lines indicating the position of section A in the B and C windows move and image in A window changes Tips In actual system displaying different col...

Страница 137: ...ange in real time with the rotation of 3D image Axial rotation Axial rotation is to rotate the 3D image around the X Y or Z axis Procedures a Set 3D image window as the current window The procedures a...

Страница 138: ...3D image window as current window Press Zoom on the control panel to enter the image magnification status rotate the multifunctional knob to increase or decrease the magnification factor Range The mag...

Страница 139: ...u want to cut Outside Contour removes all portions of the image that fall outside your traced region Rect In Displays a box you can use to define the portion of the image you want to cut Inside Rect r...

Страница 140: ...marking with ROI VOI and progress bar 2 Adjust the ROI VOI in size and position for details please refer to Adjust VOI 3 Set first frame end frame roll the trackball to view to a certain 2D image cli...

Страница 141: ...e as usual 4 Enter 3D 4D imaging preparation status Press the user defined key on the control panel or Click in the bottom left corner of the screen to enter the 3D 4D imaging mode 5 Switch to 4D imag...

Страница 142: ...acquisition the probe performs swinging in the defined range of angle automatically 5 11 5 4 4D Real time Display In 4D real time display status the following operations can be performed for the deta...

Страница 143: ...n the system enters Static 3D imaging mode During the scanning the probe performs the scanning automatically 5 11 6 1 Basic Procedures for Static 3D Imaging To perform Static 3D imaging 1 Select the a...

Страница 144: ...eparation status are the same as that of Smart 3D and 4D for details please refer to the corresponding contents in Smart 3D and 4D 5 11 6 3 Static 3D Image Acquisition Image acquisition operations are...

Страница 145: ...ts in the iScape mode Smooth even speed will help produce optimal image results Tips iScape is an optional module the function is available only if the module has been installed on the ultrasound syst...

Страница 146: ...isplayed menu and soft menu items in image capture iScape viewing and image review refer to section 5 16 2 Soft Menu and Menu Preset for details 5 12 3 Image Acquisition To create an iScape image you...

Страница 147: ...age acquisition the system performs image splicing and then enters the iScape viewing mode In iScape viewing mode you can perform the following functions Image parameters setting for details please re...

Страница 148: ...nded for well trained ultrasound operators or physicians The operator must recognize image artifacts that will produce a sub optimal or unreliable image The following artifacts may produce a sub optim...

Страница 149: ...mage viewing mode Press Save with user defined saving function to save the extended image to the default position in the format of FRM Click Save Cine item in the soft menu to save the extended image...

Страница 150: ...n be selected only in the configured order Acquisition is retrospective when you click Save Clip key or press Save on the control panel the system saves the previously acquired images For an alternati...

Страница 151: ...letion of acquisition for each stage the system advances to the next stage If the stage is non continuous then the system displays the views of the stage When image acquisition is completed for all vi...

Страница 152: ...ilable when stress echo acquisition is not yet complete Select Mode enables selection of preferred loops Review Mode return to stress echo review Wall Motion Scoring Mode assign wall motion scores to...

Страница 153: ...the exam Home Selects first loop in currently displayed view To Left Selects previous loop in currently displayed view To Right Selects the next loop in currently displayed view End Selects last loop...

Страница 154: ...the first view in the protocol for non continuous stages If the first stage is continuous then the system displays the first set of acquired loops for that stage 2 Select the loop Use the buttons dis...

Страница 155: ...orm image acquisition of all other imaging modes or perform operations like measurement End End the stress echo exam Stage To find the stage and press it to select View To find the view and press it t...

Страница 156: ...indicate activation 2 Select the loop again The system displays the loop in full screen format 3 To display the loop in its initial size select the loop again Description of review mode pertinent keys...

Страница 157: ...ar button at the top of the screen highlighted The system plays the displayed loops in one direction from beginning systole to end systole When the last frame is played the system restarts playback fr...

Страница 158: ...u can insert text for indication 1 Select Indication on the soft menu 2 Click Insert Text on the Indication dialog box to pop up the Select Text to Insert dialogue box 3 Select the available texts Bes...

Страница 159: ...ll motion score WMS to the currently selected loop Select Set Current Nomal on the soft menu or click on the right part of the screen To switch the position of WMS schemas and the clips Select on the...

Страница 160: ...cted Select the Print toolbar button at the top of the screen To exclude stage s report from printing click the printer icon set it as gray in color at the left side of the stage 5 13 7 Maintenance an...

Страница 161: ...et table To reset the QT time table QT Time Table Operation To add an entry Enter a heart rate and the referring systolic duration and then click Update To delete an entry Select the required heart ra...

Страница 162: ...ht of the Protocol Editor dialog box 2 Enter the protocol name in the Protocol Name box at the top 3 For each phase in the protocol Select new in the Stage list Enter a phase name in the Description b...

Страница 163: ...9 Click Save to save changes and then click Quit to remove the Protocol Editor dialog box from the screen Method two 1 Click an available protocol on the Select Protocol screen 2 Click Protocol Editor...

Страница 164: ...r review of the stress echo data is required then you must save the stress echo data before exiting the Stress Echo feature To exit the Stress Echo feature Select the Exit toolbar button Or Press End...

Страница 165: ...contrast imaging start with an optimized B image and have the target region in mind To perform contrast imaging 1 Select an appropriate probe and exam mode Perform 2D imaging to obtain the target ima...

Страница 166: ...he elapsed time is displayed Image Optimization To adjust the contrast image as well as the tissue image use the left right keys of soft menu controls 4 to switch between the menus of tissue image and...

Страница 167: ...be changed Use the left right keys of soft menu controls 4 to switch between the menus of tissue image and contrast image so that you can adjust the corresponding parameter Tip In dual live mode the s...

Страница 168: ...rding to the experience and actual situation 5 Adjust the image parameters to obtain the optimized image and necessary information 6 Adjust the ROI on the frozen image if necessary 7 Save the image or...

Страница 169: ...Single E Description To switch between the B E dual window and the single E window E represents the Elastography image Operation Click Single E on the soft menu When the button is highlighted in gree...

Страница 170: ...to demonstrate the steps of preset as in Adult ABD exam B THI mode for the L7 3s probe for special imaging modes Free Xros M 3D 4D iScape please refer to the relevant sections of each mode 1 Press Set...

Страница 171: ...depth in B mode Frequency Drop down list To set the default frequency of the probe FOV Drop down list To set the default FOV in B mode Focus Position Drop down list To set the default focus position...

Страница 172: ...lick Load Factory to restore the settings to the original factory default 5 Exit Click OK to save the settings and exit Click Cancel to abandon the settings and exit 5 16 2 Soft Menu and Menu Preset C...

Страница 173: ...lect all items in the Available Item list to the soft menu Withdraw the item s Select an item in the soft menu page and click to delete the item in the soft menu Click to delete all the selected items...

Страница 174: ...screen to begin the setting Add withdraw item s Click to add the selected item in the Available Item list to Menu page or double click the item in the Available Item list continuously to add the item...

Страница 175: ...s NOTE Zooming an image changes the frame rate which tends to change thermal indices The position of the focal zones may also change which may cause the peak intensity to occur at a different location...

Страница 176: ...he setting 2 Open the image or the under scanning image press the user defined iZoom key once to zoom in image in the way of the first type and then press the key again to zoom in the image in the way...

Страница 177: ...de Press Freeze in dual quad splitting display mode When enters freeze mode the default activated window is the real time window before frozen Other image windows display the corresponding cine memori...

Страница 178: ...eview status To exit cine review Press Freeze again the system will return to image scanning and exit cine review Press Cine or Esc the images are still frozen but the system exits cine review status...

Страница 179: ...ay to set the value except 0 then the system enters the auto cine status and use this control to adjust speed d Click Auto Play again or roll the trackball to enter manual review status or press Cine...

Страница 180: ...screen 1 Activate the feature by selecting Enable Play in the path Setup System Preset General 2 Enter Review screen 3 Select different values for Layout to change cine file display 4 Select Play Spee...

Страница 181: ...e user defined key again to return to freeze mode press Freeze to go to image scanning Tips image compare only can be performed on single format B C mode images only 6 4 Cine Saving In freeze mode cli...

Страница 182: ...ly distributed as per splitting number as shown in the following table Taking B images in low density as an example the capacity of B cine memory is N frames Imaging Mode Split Single B Color Dual Qua...

Страница 183: ...CG electrode cable must be connected to the system first Only after the cable is connected to the system can the patient be connected to the ECG electrodes Failure to follow these instructions may sub...

Страница 184: ...or the multifunctional knob 3 Select ECG to be On and the heart shaped symbol appears on the upper right part of the screen 4 Switch the imaging modes and display formats and adjust relevant parameter...

Страница 185: ...unction to control the display of ECG trace in live status Value On Off On is to display the trace while Off is to hide the trace In scanning mode turn off ECG display will stop ECG signal acquisition...

Страница 186: ...es are reviewed with the ECG electrodes connected the ECG waveform is the reference for time After the images are frozen all real time images are in the status of linked review The frame position mark...

Страница 187: ...ent data will be lost the application measurement data are stored in the report 2 If the system is turned off or End Exam is pressed during a measurement the data not saved will be lost 3 In Dual B im...

Страница 188: ...he distance between each pair of parallel lines in a sequence Trace Length Measures the length of a curve on the image Distance Ratio Measures the lengths of any two line segments and the calculated r...

Страница 189: ...ime interval between any two points HR N intervals n 8 are measured to calculate a PW mode derived HR value in Beats Per Minute BPM D Velocity On the Doppler mode image measure velocity PG pressure gr...

Страница 190: ...e fetus can be evaluated through growth graph analysis and fetal biophysical profile Cardiac measurements Used for left ventricle function measurements and measurements of main artery and vein paramet...

Страница 191: ...n Within 3 Table 2 Volume Measurements Parameter Value Range Error Volume Full screen Within 10 or when the measured value is less than 64 cm3 the error is less than 6 4 cm3 Table 3 Time Motion Measur...

Страница 192: ...Lateral Resolution mm 1 Depth 80 2 80 Depth 130 1 Depth 40 2 Depth 60 3 Depth 80 4 80 Depth 160 2 Depth 60 1 Depth 40 1 Depth 60 Expected Longitudinal Resolution mm 1 Depth 80 2 80 Depth 130 1 Depth 6...

Страница 193: ...Depth 80 Expected Max Detect Depth mm 80 80 180 180 80 80 Table 6 iScape Parameter Probe Error Distance DE11 3s 6LB7s_C 6LB7s_L C11 3s 6C2s V10 4s V10 4Bs 6CV1s Within 10 P4 2s P7 3s P12 4s 2P2s With...

Страница 194: ...al Resolution mm 10 5 10 5 Expected Area Relative Deviation within 20 NOTE Within the selected field range the measurement accuracy is ensured within the range mentioned above The accuracy specificati...

Страница 195: ...esponding letter or numeral is displayed besides the cursor Press the Arrow to enter the arrow adding status Tips when the system entered comment status the default characters entered are uppercase Yo...

Страница 196: ...he current exam mode When entered the comment status the system displays the customized comment text library for the current exam If there is no customized comment text library for the current exam it...

Страница 197: ...iew the comments one by one c Press the knob again to add the selected item onto the image comment added in an editable state d Rotate the multifunctional knob to search for the next part and press th...

Страница 198: ...the left side of the cursor 3 Roll the trackball or press the Set or the multifunctional knob to confirm the modification and to exit the edit status and the color of the comments turns yellow Modifyi...

Страница 199: ...Urology SMP Small Part Vascular EM Emergency and Nerve For details please refer to 2 5 System Configuration You can preset body marks for specific exam modes customize the body marks and import export...

Страница 200: ...u can move the body mark graphics to any desired position within the image area 1 Roll the trackball to move the cursor onto the body mark The cursor changes into indicating you can move the pictogram...

Страница 201: ...data if you DO NOT follow suggested backup procedures 10 1 Patient Information Management 10 1 1 Enter Patient Information The general patient information and exam information are entered through the...

Страница 202: ...i frame file format you can perform manual or auto cine review and perform measurements or add comments for the reviewed images After you open a stored CIN file the system automatically enters cine re...

Страница 203: ...inter Clip can be sent to DICOM storage 10 2 4 Saving Images to the System To save a single frame image in the system 1 Set the user defined key in the path Setup System Preset Key Config 2 Press the...

Страница 204: ...2 Press the user defined key to save the cineloop 10 2 6 Quickly Saving Full Screen Image to the System This function can save the current full screen image to the system with the image in real time...

Страница 205: ...urrent patient information you can review the images of the latest exam Select an exam of a patient in the iStation screen and press Review to enter the Review screen to review the images of the patie...

Страница 206: ...end To click to send the selected image to other location DICOM server printer MedSight devices and etc Delete click to delete the selected image Compare click to enter cine compare in review mode Ref...

Страница 207: ...n pages click to delete or click to send a selected image 10 2 9 iVision iVision function is used for demonstration of the images stored Image files are played according to file names one by one inclu...

Страница 208: ...s in the catalog when performs demonstration Operate the catalog by the buttons on the right Add File to add files to the file list Add Catalog to add catalog to the file list Delete to delete the sel...

Страница 209: ...lect the DICOM Storage or Print server For a video printer send images to the video printer connected with the system For a graph text printer send the images to the default graph text printer 10 3 Re...

Страница 210: ...can select paper size for the report in the path Setup Peripheral Preset Printing report Use a connected graph text printer to print a report Please refer to 14 7 Peripheral Preset for details about d...

Страница 211: ...cines exam state backed up or not Info Select an exam of a patient click Info on the right side to display the patient information of this exam Report After you select an exam of a patient click Repo...

Страница 212: ...m The Send To button on the right side of the thumbnail area below the patient list is used for sending selected images Send patient exam data to USB devices DVD RW DVD RW drive network storage Send i...

Страница 213: ...xam After you select a patient data or exam in the iStation screen click the New Exam to enter the Patient Info screen where you can select a new exam mode and click OK to begin a new exam Activate ex...

Страница 214: ...print tasks are finished the print icon will disappear from the screen if not please check the manager to see if there is any failure task To delete a print task Select the print task in the list and...

Страница 215: ...ct in the Disc Option dialogue box Tips Writing data using Send To supports PC format transfer function while CD DVD written by Backup supports only system relevant formats The symbol indicates that t...

Страница 216: ...iStation and click Backup Send to external devices including DVD RW and USB devices select exam data or images in iStation or Review screen click Send To Network Storage task MedSight storage task In...

Страница 217: ...stem without entering password But they can t modify or delete the password 10 9 2 Setting Access Control The system administrator can preset the access control that is if an operator has the right to...

Страница 218: ...n to pop up the following dialogue box 2 Click Change User to pop up the Login dialogue box 3 Enter the user name and password in the field box 10 9 4 Add Delete a User The system administrator can ad...

Страница 219: ...n list administrator or operator 6 Click OK to confirm the setting and exit the dialogue box then the new user will appear on the User List Delete a User Premise you must log on the system as the syst...

Страница 220: ...modified except emergency operator in User List click Change Password to open the dialogue box see the figure below 3 Enter new password and confirm password then click OK Session Manage page general...

Страница 221: ...R review DICOM Worklist MPPS Modality Performed Procedure Step Structured Report SR DICOM Query Retrieve Workflows of DICOM preset and application are briefly described as follows 1 DICOM preset Local...

Страница 222: ...ps you need to restart the system to make the modification effective press the power button and select Shut Down to power off the system and then wait for a while to power on the system Click to open...

Страница 223: ...set the gateway IP OK Click to confirm parameter setting Cancel Click to cancel parameter preset Tips The IP address of the system should not be occupied by other devices in the network or the DICOM...

Страница 224: ...disk OK Click to confirm parameter setting Cancel Click to cancel parameter setting Enter AE Title Port PDU according to the actual situation and then click OK to exit the screen Tips AE Title should...

Страница 225: ...e Click to delete the selected server s in the device list Exit Click to exit the DICOM Server screen Tips If the currently entered name has already existed the system will pop up The server name exis...

Страница 226: ...e default service 2 Select an item in the service list and click Verify to verify the connection 3 Click Exit to confirm the setting and exit the page DICOM storage setting items are described as foll...

Страница 227: ...item in the service list click Default and you can see Y in the Default column Verify Click to verify if the two DICOM application entities are normally connected Exit Click to exit the screen Tips RL...

Страница 228: ...ers to times that the system performs retrying connection the adjusting range is 0 9 Interval Time s Reserved feature Timeout Refers to time after which the system will stop trying to establish a conn...

Страница 229: ...each image on the film Yes or No Add Add the DICOM service to the service list Cancel Click to cancel the parameter setting Update Select an item in the service list change the parameters in the abov...

Страница 230: ...aximum Retries Reserved feature Interval Time Sec Reserved feature Timeout Sec Refers to time after which the system will stop trying to establish a connection to the service Value 5 60s in increments...

Страница 231: ...both Scheduled Station AE Title and AE Title in the ultrasound system configuration should be M6 11 1 4 4 MPPS Setting 1 Enter the MPPS page Setup Network Preset DICOM Service MPPS Select device enter...

Страница 232: ...104 by default Here the port should be consistent with that of the MPPS server Maximum Retries Reserved feature Interval Time s Reserved feature Timeout Value 5 60s in increments of 5s and 15 by defa...

Страница 233: ...ease refer to 11 1 3 DICOM Server Setting Click Add to add the service to the Service list Select an item in the service list change the parameters in the above area and click Update to update the ite...

Страница 234: ...Update Select an item in the service list change the parameters in the above area and click Update to update the item in the service list Delete Click to delete the selected service in the service li...

Страница 235: ...er port Maximum Retries Reserved feature Interval Time s Reserved feature Timeout Value 5 60s in increments of 5s and 15 by default Add Add the DICOM service to the service list Cancel Click to cancel...

Страница 236: ...t all the SCPs can support verification please consult SCP belongings to confirm whether SCP can support this service If not the verification won t pass 11 3 DICOM Service If the system is configured...

Страница 237: ...To set default server a Enter the Storage page Setup Network Preset DICOM Service Setting Storage b Select the desired server in the server list and click Default c Click Exit to confirm the settings...

Страница 238: ...task To send images by shortcut key You can send single frame image to DICOM server by shortcut key 1 Define the shortcut key for Send Image to DICOM Server in the path Setup System Preset Key Config...

Страница 239: ...led patients which meet the criteria are displayed in the lower part of the screen d After the first query you can perform the second query based on the previous results The scheduled patients in the...

Страница 240: ...ther the exam is undergoing or ended If the sending fails the system resend automatically The status information is described as follows When you begin an exam the system sends status information In P...

Страница 241: ...rmation about the successful image storage In the iStation screen you will see a tick marked on in the list below Storage commitment is confined to the whole exam while each image sending will not be...

Страница 242: ...more patient records according to the actual situation Click Select All to select all the patient records listed Click Deselect All to deselect all the patient records listed 7 Click Retrieve to retr...

Страница 243: ...pace otherwise backup may fail due to space shortage Media review 1 Connect the external media with DCM files to the system 2 Select the data source in iStation screen and the visible data will be sho...

Страница 244: ...uctured report SR When record or store the exam that has a structured report to the external media DICOMDIR the structured report can be backed up together 11 6 Showcase Recording Showcase software ca...

Страница 245: ...ion for disinfected probes or sterilized probes and brackets please refer to Technical standard for Disinfection of Medical and Health Structures 12 1 Probe The system supports the following probes Pr...

Страница 246: ...12 2 Probes and Biopsy V10 4B s CW5s 4CD4s P12 4s 7L4s L12 4s P7 3s L14 6Ns P4 2s CW2s...

Страница 247: ...Probes and Biopsy 12 3 6C2s P7 3Ts L7 3s 7LT4s 3C5s C11 3s 2P2s DE11 3s 6CV1s D7 2s L14 6s For details of probe P7 3Ts please refer to P7 3Ts Ultrasonic Transducer Operator s Manual...

Страница 248: ...meanwhile it will receive the ultrasound signal and then convert the received signal into electrical signal The lens on the surface is the acoustic lens Apply ultrasound gel on the acoustic lens 2 Nee...

Страница 249: ...Head The orientation of the ultrasound image and the probe are shown as below The Mark side of the ultrasound image on the monitor corresponds to the mark side of the probe Check the orientation befo...

Страница 250: ...ng with biopsy function Inspection before examination Connection to the ultrasonic diagnostic system Examinations Biopsy procedure Wiping off the ultrasound gel Washing the transducer with water Drain...

Страница 251: ...rsion into disinfectant Removing the transducer from disinfectant Rinsing the transducer into sterile water Draining drying Inspection after use Storage Disinfection Disconnection to the ultrasonic di...

Страница 252: ...ing examination If the package of a probe sheath is open or broken the sterilization of the probe sheath may not be sufficient DO NOT use such a probe sheath 2 The cover contains natural rubber latex...

Страница 253: ...the instructions in the manual for cleaning WARNING Never immerse the probe connector into liquid such as water or disinfectant Immersion may cause electrical shock or malfunction CAUTION 1 When perfo...

Страница 254: ...the transducer 4 Dry the transducer using a sterile cloth or gauze after rinsing Do not dry the transducer by heating it Disinfecting with Sprays CAUTION Use protective eyewear when disinfecting using...

Страница 255: ...the rinsing method recommended by the disinfectant manufacturer to rinse the transducer Wipe off the water on the transducer with sterile cloth or gauze after rinsing it Do not dry the transducer by h...

Страница 256: ...lization solution Trade Name Chemical Name Procedures Cidex Activated Glutaraldehyde Solution 2 2 2 7 Glutaraldehyde Soak the transducer into the activated solution for 10 hours 20 25 Please refer to...

Страница 257: ...60 hPa Store and transport the D7 2s probe under the following ambient conditions Ambient temperature 10 C 60 C Relative humidity 30 95 no condensation Atmospheric pressure 700 hPa 1060 hPa Store and...

Страница 258: ...be injured If an abnormality is found on the needle guided bracket immediately stop using it and contact MINDRAY Customer Service Department or sales representative 4 DO NOT use a needle guided bracke...

Страница 259: ...ct in the image it may not actually have done so When the target for biopsy is small dispersion of the ultrasound beam may lead to image deviate from the actual position Pay attention to this If the t...

Страница 260: ...Biopsy menu click Verify to enter the Verify menu to verify the guide line After the verification click Save on the menu to save the parameter setting And then click Exit to return to Biopsy menu Tip...

Страница 261: ...s contact MINDRAY Customer Service Department or sales representative For biopsy or treatment ultrasound guided biopsy procedures can be performed using the probe in combination with a needle guided b...

Страница 262: ...e probe 2 Groove and tab of the needle guided bracket Respectively matches with the tab and groove of the probe 3 Angle adjusting base There are 3 types of angles available to be adjusted 4 Angle shif...

Страница 263: ...be Plastic needle guided bracket No Name Description 1 Support of needle guided bracket Used for installing the needle guided bracket on the probe 2 Angle block Used for determining the angle of the b...

Страница 264: ...knob of fixing needle guided bracket 5 Needle distance scales Indicate distance between needle and the transducer head surface 6 Guiding block Used for installing biopsy needle there are five specific...

Страница 265: ...f needle guided bracket Used for installing the needle guided bracket on the probe 4 Knob of fixing needle guided bracket Used for fixing the needle guided bracket on the probe 5 Specification of guid...

Страница 266: ...sting base Groove Clamp Pinch nut Angle pinch nut Angle shift sign Angle adjusting base Angle block V shaped cover V shaped guiding block Guiding hole Needle guide rack Needle guide hole Grip knob Loc...

Страница 267: ...iopsy angle 30 40 50 5 Angle pinch nut Used for fixing the angle lock at a chosen angle 6 Angle block Determines the angle of the biopsy different specifications of blocks can be used 7 Guiding block...

Страница 268: ...etaining nut Groove Slot Angle adjusting base Needle guide hole Guiding block Guiding block specification Angle shift sign Angle adjusting base Angle pinch nut Pinch nut of bracket Angle block Groove...

Страница 269: ...s displayed 2 Click to select a bracket model on the Bracket Model list 3 Click OK to confirm the setting and return to Setup menu Parameter preset To set if to display hide guide line and dot type 1...

Страница 270: ...curely mounted in the correct position Installing the Needle guided Bracket NGB 004 1 Put on the sterile probe sheath 2 Open the retaining clamp align the needle guided bracket with the probe to locat...

Страница 271: ...the block f Insert a biopsy needle with the same specification as that of the guiding block into the hole of the guiding block Plastic needle guided bracket a Put on the sterile probe sheath b Hold th...

Страница 272: ...he guiding block to the desired position then turn tightly the knob of fixing the guiding block to fix the guiding block on the support of needle guided bracket 4 Insert a biopsy needle with the same...

Страница 273: ...be head 2 Turn the grip knob at the tail of the needle guided bracket tightly NGB 015 1 Put on the sterile transducer sheath 2 Hold the transducer by one hand select the proper needle guided bracket a...

Страница 274: ...opriate guiding block and fit it into the groove on the angle block 5 Screw the nut on the guiding block to secure the guiding block with the needle guided bracket 6 Insert the needle of the same spec...

Страница 275: ...e with the tab of the transducer Mount the bracket onto the transducer 3 Rotate the clamping nuts of the guided bracket on right and left side to fix the bracket and the transducer Rotate the needle t...

Страница 276: ...probe Tighten the nut to lock the biopsy arrow s direction CAUTION Ensure that all guide parts are seated properly prior to performing a biopsy 12 2 5 Biopsy Menu Move the cursor onto the image menu...

Страница 277: ...guide line will be adjusted Select through B mode image menu Biopsy to display or hide the guide line Biopsy Kit to select bracket angle Preset the two items through Setup Image Preset Menu Preset 12...

Страница 278: ...e screen 2 Click iNeedle to enter the status available adjusting parameters are displayed on the menu To exit iNeedle Press the user defined key or click iNeedle to exit the status and enter B mode Ne...

Страница 279: ...yed at almost the same position as the selected needle mark Adjust guide line position Move the cursor onto Position press Set to move it linearly or press and rotate the multifunctional knob This is...

Страница 280: ...2 Separate the residual part of the needle guided bracket and the probe from the needle 3 Screw the pinch nut of the bracket and remove the needle guided bracket from the probe Plastic needle guided b...

Страница 281: ...dle guided bracket NGB 015 1 Pull the lock pin and open up the V shaped cover to expose the needle 2 Separate the bracket and the transducer from the needle 3 Screw the pinch nut to release the needle...

Страница 282: ...parate the needle from pressure position of the needle 2 Separate the bracket and the transducer from the needle 3 Rotate the clamping nuts of the needle guided bracket on right and left side followin...

Страница 283: ...cer into the activated solution for 10 hours 20 25 Before safety and performance is affected plastic bracket NGB 007 can be sterilized by Cidex Activated Glutaraldehyde Solution for at least 233 times...

Страница 284: ...rsion sterilization do not affect the bracket dual life and the dual life is affected by the daily application of the bracket Please check the appearance of the bracket before using 12 2 10 Storage an...

Страница 285: ...Line in the image menu to turn on the function The middle line is a vertical dotted line located in the middle of the screen the position and direction of which cannot be changed There is a mark icon...

Страница 286: ......

Страница 287: ...asound system and insert an available DVD disc or make sure there is memory in the hard disc 2 Enter Setup Peripheral Preset Input Display preset the output setting For details please refer to 14 7 Pe...

Страница 288: ......

Страница 289: ...nu select Setup in the Other menu to enter the Setup On Probe Exam selection page click Exam Preset to enter Exam Preset page To exit Setup Select Return on the Setup menu or press ESC to close the Se...

Страница 290: ...n the following page Page Description Region To set the hospital name language time zone time format system date time logo and so on General To set patient information exam setup patient management st...

Страница 291: ...and 24 Hour Date Format To set the date format among DD MM YYYY MM DD YYYY and YYYY MM DD System Date To set the system date Posit the cursor into the corresponding field and enter the data through th...

Страница 292: ...in a saved cine Value 1 16 JPG Compress To set the compression ratio H M L File system type To set the file system type when record data to a CD UDF ISO Prospective Cine Length To set the cine length...

Страница 293: ...bit of distinguishing flow direction Cine Memory To set the cine memory splitting type Auto Split iScape Ruler Display To set if to display the iScape ruler on iScape imaging mode 14 1 4 Meas Open the...

Страница 294: ...put Print Advanced Features Measurement and Other Functions are described as follows Type Function Description Output Save Image to hard drive To save an image to the system in the system relevant for...

Страница 295: ...o save image parameters iTouch Turn on or off iTouch function Dual Probe To switch between the dual probes Measurement Trend Dig To open the obstetric growth curve SD To display hide the standard devi...

Страница 296: ...ge to DICOM Printer Send Image to DICOM Printer Print Service List The connected or the configured printers display here Digital B W Print Digital Color Print Use the user defined key to print after p...

Страница 297: ...ast entered word iZoom To enter exit full screen zoom status iVision iVision Freeze To freeze the image Exit To exit from the current screen Other Settings Item Description Key Lightness To set the li...

Страница 298: ...led option Trial Select the option item in the list to see the information on the Comment region on the right For functions that are not configured you can use the function for free for 3 months Click...

Страница 299: ...d by the system i e Exam Library Select the exam from the Exam Library on the left and click to add it to the Exam Selected Click to add the exams which Exam Library has but Exam Selected doesn t have...

Страница 300: ...pen the screen to load the parameters of the exam mode Click Export All to open the screen to store the parameters of all exam modes for the current probe In addition you can preset measurements comme...

Страница 301: ...image parameters for each imaging mode Image parameters can be divided into the following three categories Imaging mode relevant parameters Parameters pertinent to both exam mode and probe Other image...

Страница 302: ...Up and Down to adjust the sequence of the items in Selected Items 6 Preset the probe mark of the selected body mark in Selected Items Move the cursor onto the probe mark of the body mark in Probe are...

Страница 303: ...hown in the figure below You can edit delete or export a user defined graphic In addition you can create a Body Mark graphic with a draw tool or add it from loading The file format is Bin Adding new b...

Страница 304: ...ress Set adjust the position with the trackball and direction with the multifunctional knob c After the drawing of a body mark is completed click OK to save it and exit the user defined body mark stat...

Страница 305: ...on the left into Selected Items on the right to add all the softkey in Available Items on the left into Selected Items on the right to withdraw the selected item in Selected Items to withdraw all the...

Страница 306: ...into Selected Items on the right Click to add all items in Available Items on the left into Selected Items on the right 5 Change position of the selected items select an item on the right side box and...

Страница 307: ...in 2 5 System Configuration you do not need to install them For printers that need to install the driver please refer to 3 7 Graph Text printer 3 8 Video Printer for details NOTE If you use the user...

Страница 308: ...o confirm that a device is connected User Name User name for entering the shared PC server which is decided by the server Password Password for entering the shared PC server which is decided by the se...

Страница 309: ...ettings The Manage Settings page is used to import or export the setup data or restore factory setup data 14 9 1 Exporting Setup Data This function is used to write all setup data of the system into a...

Страница 310: ...ns If you require these functions please contact Mindray Customer Service Department or sales representative Through the menu you can perform net update remote desktop system test log operation etc 14...

Страница 311: ...icrowave oven or pressurized container 10 If the batteries emit an odor or heat are deformed or discolored or in a way appear abnormal during use charging or storage immediately remove them and stop u...

Страница 312: ...8 When the batteries will not be used for 10 days or over take them out of the system and store the batteries with caution DO NOT wrap them with conductive material store them in shady cool and dry p...

Страница 313: ...full When the power capacity is not enough the system will pop up a prompt Warning Battery is out of power Please insert the Adapter or system will be shut down in one minute Connect the power adapte...

Страница 314: ...power the system by the batteries until the system automatically shuts down 4 The powering time of the batteries indicates the battery performance If the powering time of the battery is much shorter...

Страница 315: ...hough there are no confirmed biological effects on patients caused by exposures from present diagnostic ultrasound instruments the possibility exists that such biological effects may be identified in...

Страница 316: ...temperature rise may be up to several times higher than the displayed TI value MI Mechanical Index The mechanical bioeffects are the result of compression and decompression of insonated tissues with...

Страница 317: ...minimum amounts needed for effective diagnosis NOTE If there is a value of MI or TI exceeds 1 0 you must be careful to practice the ALARA principle The display precision is 0 1 16 5 Acoustic Power Set...

Страница 318: ...he system controls to limit the ultrasound output and to adjust the quality of the images There are three categories of system controls relative to output They are controls that have direct effect on...

Страница 319: ...nt because intensity is proportional to the square of pressure Although the attenuation coefficient chosen 0 3 dB cm MHz is significantly lower than any specific solid tissue in the body this value wa...

Страница 320: ...sure is affected by the actual attenuation caused by tissue in the path between the transducer and the focal point Again all solid tissues within the body have higher attenuation than the proscribed 0...

Страница 321: ...when the HR is in the range of 30 250 bmp or when the QRS wave amplitude is between 0 5 5 mV NOTE 1 The system needs special precautions regarding EMC and needs to be installed and put into service ac...

Страница 322: ...emissions CISPR 11 Group 1 The system uses RF energy only for its internal function Therefore its RF emissions are very low and are not likely to cause any interference in nearby electronic equipment...

Страница 323: ...ne s 2 kV line s to earth 1 kV line s to line s 2 kV line s to earth Mains power quality should be that of a typical commercial or hospital environment Voltage dips Short interruptions and voltage var...

Страница 324: ...by an electromagnetic site survey should be less than the compliance level in each frequency range Interference may occur in the vicinity of equipment marked with the following symbol Radiated RF IEC...

Страница 325: ...bove the recommended separation distanced in meters m can be determined using the formula applicable to the frequency of the transmitter where P is the maximum output power rating of the transmitter i...

Страница 326: ...instructions may cause harmful interference to radio communications However there is no guarantee that interference will not occur in a particular installation If this equipment does cause harmful int...

Страница 327: ...G Before cleaning the system be sure to turn off the power and disconnect the power cord from the outlet If you clean the system while the power is On it may result in electric shock CAUTION Do not sp...

Страница 328: ...ise the button may be blocked by dirt and the system will be buzzing while the button makes no response Cleaning the control panel Tools dry soft cloth mild soapy water Method Use dry soft cloth to cl...

Страница 329: ...ape See the figures below b Cleaning Clean the lens slightly using the tissue until there is no foreign matter Then clean the other parts and the dust excluder Make sure to exert force properly when c...

Страница 330: ...ured can be skipped Content Description Color and B W video printer First wipe off dust or stain attached to the cover of printer with soft dry cloth then clean the inside of printer Be sure to do the...

Страница 331: ...o looseness or rupture The connection of plug is reliable 18 1 4 Checking Appearance Check if there is any crack in the covers Ultrasound system covers Probe appearance External appearance of ECG lead...

Страница 332: ...rast back to factory defaults 3 The monitor displays the characters but no images The transmission power overall gain or TGC controls are improperly set Verify that a probe is connected and or fully c...

Страница 333: ...OR ICU CCU as it may interfere with other devices 4 When wireless LAN function is turned on the ultrasound system may be interfered with by other equipment even if that other equipment complies with C...

Страница 334: ...on turns after connected Disconnect select the target network and click to disconnect Refresh click to update the wireless network list Configure click to enter the Local TCP IP Setting screen Show De...

Страница 335: ...the service engineer b Press Setup to enter the Setup menu c Move the cursor onto Network Preset select Setup Wireless Driver to open the screen as shown in the figure below d Select the path for inst...

Страница 336: ......

Страница 337: ...into the locking slot of the ultrasound system as shown in the following figure 3 Release the button and scramble the dials To change the password 1 Use a strong needle or pen to turn the reset button...

Страница 338: ......

Страница 339: ...diation provided by class 2 laser CAUTION Ensure the information acquired by barcode reader is consistent with the actual information There are 2 operation modes Hand held mode press the trigger to de...

Страница 340: ...to the host 1 Cable interface port 2 Interface cable modular connector C 1 3 Setting The reader has factory settings please refer to A 4 for details The reader supports some user defined functions as...

Страница 341: ...full ASCII character set To enable or disable Code 39 Full ASCII scan the appropriate barcode below I 2 of 5 symbols setting Select this option to decode only I 2 of 5 symbols containing a selected l...

Страница 342: ...of the symbol see the figure below 3 Upon successful decode the reader beeps and the LED turns green Tips Do not hold the reader directly over the barcode Laser light reflecting directly back into th...

Страница 343: ...s on the flexible neck fit securely in the grooves in the base C 1 5 2 Mounting the Stand optional You can attach the base of the reader s stand to a flat surface using two screws or double sided tape...

Страница 344: ...l it is secure C 1 5 3 Scanning in Hands Free Mode When the reader is seated in the stand s cup the reader s built in sensor places the reader in hands free mode When you remove the reader from the st...

Страница 345: ...the host C 2 2 2 Removing the Interface Cable 1 Using the tip of a screwdriver or some other tools with a sharp head depress the cable s modular connector clip 2 Carefully slide out the cable C 2 3 S...

Страница 346: ...39 which pairs characters to encode the full ASCII character set To enable or disable Code 39 Full ASCII scan the appropriate barcode below I 2 of 5 symbols setting Select this option to decode only...

Страница 347: ...lows positioning the barcode or object within the field of view If necessary the digital imager reader turns on its red LEDs to illuminate the target barcode 4 Center the symbol in any orientation wit...

Страница 348: ...reader can also read a barcode presented within the aiming pattern but not centered The top examples in show acceptable aiming options while the bottom examples cannot be decoded C 2 5 Scanning in Han...

Страница 349: ...for the information Patient ID Patient Name Age Birth Gender Set the start and end position of each item Note 1 Length of birth month and data are of 2 letters 2 If one item of information is not inc...

Страница 350: ...t Lengths for I 2 of 5 14 I 2 of 5 Check Digit Verification Disable Transmit I 2 of 5 Check Digit Disable Convert I 2 of 5 to EAN 13 Disable Codabar NW 7 Codabar Enable Set Lengths for Codabar 5 to 55...

Страница 351: ...in to exit iScanHelper D 2 Use iScanHelper for Reference 1 Perform ordinary scanning procedure 2 Press the user defined key for entering iScanHelper to enter iScanHelper status 3 Rotate the trackball...

Страница 352: ...ing picture Ordinary scanning tips can be observed here including posture probe mark probe swing sweep techniques Scanning tips You can read tissue related anatomical information and adjacent tissue i...

Страница 353: ...ifications to the procedure Follow the instructions of the analyzer manufacturer The electrical safety inspection should be periodically performed every two years The safety analyzer also proves to be...

Страница 354: ...ories No unusual noises e g a rattle inside the case No unusual smells e g burning or smoky smells particularly from ventilation holes No taped notes that may suggest device deficiencies or operator c...

Страница 355: ...rmal Condition normal polarity with open neutral Single Fault Condition reverse polarity with open neutral Single Fault Condition normal polarity with open earth Single Fault Condition reverse polarit...

Страница 356: ...F applied parts 5000 A E 9 Patient Auxiliary Current Patient Auxiliary currents are measured between any selected Applied Part connector and the remaining Applied Part connectors All measurements may...

Страница 357: ...P N 046 008768 00 V1 0...

Отзывы: