2882 Quick Start Guide
93
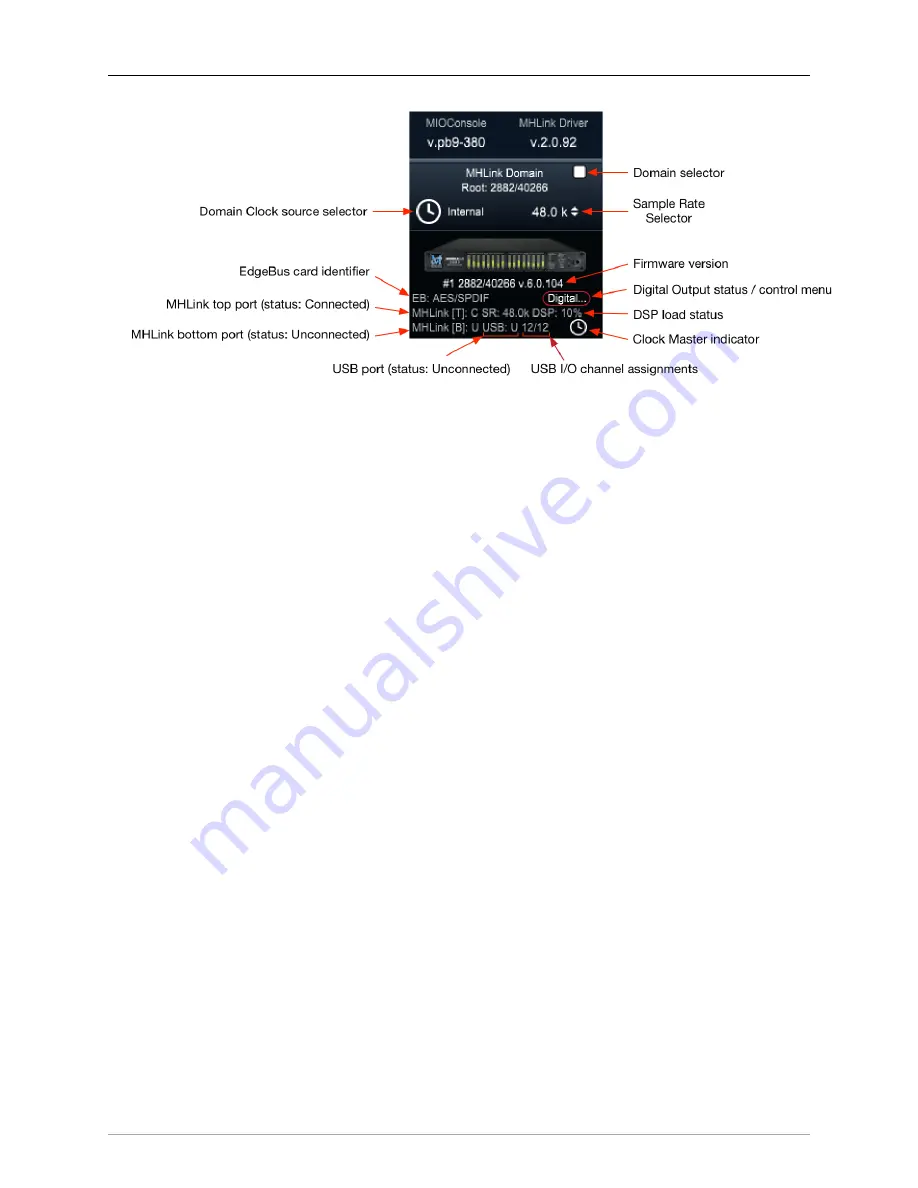
Figure 4.4: 2882 System and Unit Status display
The System Status Pane displays critical information for every 3d MH device visible to your computer.
The Status Pane header lists the current MIOConsole version and MHLink Driver version. When the
version number turns orange, there is a new version available: click to download and install.
The MHLink Domain “Root” box (your 2882 connected directly to the host computer) is listed next
and also occupies the #1 spot in the
Unit Status Display
directly below. Click the sample rate indicator
to the right select your system sample rate, and the clock icon to the left to set your clock source
(currently defaulted to “Internal”).
Below the 2882 icon is the box ID label and current firmware version. As with the Console and Driver
displays in the Status Pane header, when the firmware version turns orange, click to download and
install the new version.
Click on the
“Digital...”
label (circled in red below the firmware version) to open the
Digital I/O Status
window for this box.
You’ll see a pop-up with that device’s type and serial number, with Clock Lock status for each digital
audio port and a selector to choose “ADAT” or “TOSLINK” as the output format for the 2882’s
built-in optical port. Note that the optical input port automatically senses ADAT/SMUX or TOSLINK
formats and is independent of the output format.
This window will also identify any digital audio ports present on the EdgeBus Card (abbreviated
“EB”) installed in the unit.
Other status info shown the example above - the MHLink Top port is Connected, MHLink Bottom
port is Unconnected and the USB port is Unconnected. We can also see that the sample rate on the
DSP card is 48K, the current DSP load is 10%, and the small clock icon in the lower right indicates
that this box is the Clock Master for the domain.
Each 3d box in your domain will have a similar Unit Status Display.
2. Directly below the Unit Status Displays is a currently empty field for
controls, which
we will get more into later.
3. The
section, including “Selected Strips”, is at the bottom. With “Selected Strips”
checked, shift- or command-click to select a few random faders in the mixer. You now have an
“Selected Strips” link group of just those selected faders.
Содержание 3d Upgrade Board Set
Страница 1: ...Metric Halo 3d Users Guide...
Страница 111: ...2882 Specifications 171...
Страница 183: ...Installation and Registration 183 Figure 9 7 Security Privacy Privacy tab Allow MIOConsole3d access to Microphone...
Страница 456: ...The DSP Toolchest 456 Parameters F 10 20k Sets the crossover frequency in Hz of the bandsplit...


