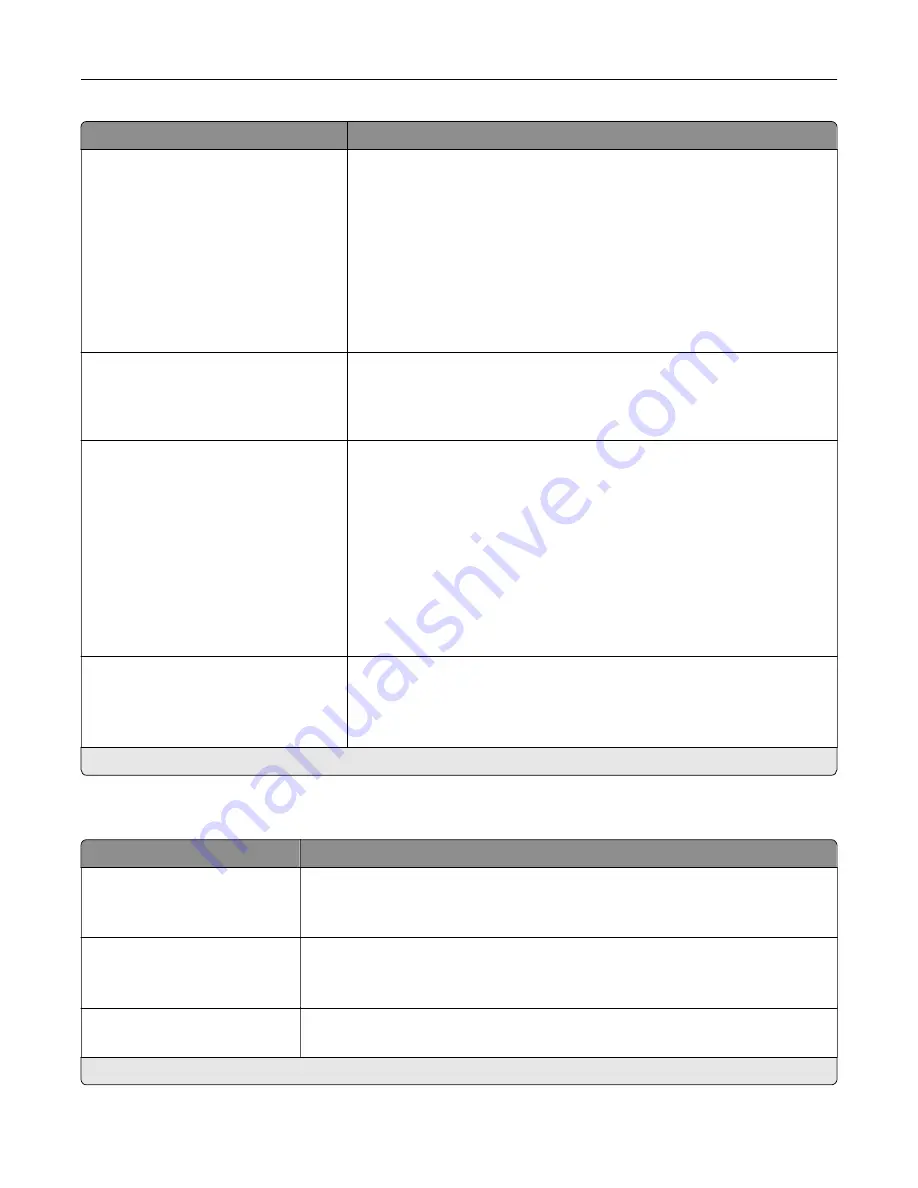
Menu item
Description
Low
‑
Speed Printer Usage
Max Speed
Max Yield*
Determine how the color imaging kit operates during low
‑
speed printing.
Notes:
•
When set to Max Yield, the color imaging kit slows or stops while
printing groups of black-only pages.
•
When set to Max Speed, the color imaging kit always runs while
printing, whether color or black pages are being printed.
•
This setting only changes printer behavior when the print engine is
running at a 25 pages per minute process speed. It has no effect
when the print engine is running at faster process speeds.
Download Target
RAM*
Disk
Specify where to save all permanent resources that have been
downloaded to the printer.
Note:
This menu item appears only when a hard disk or an ISD is
installed.
Resource Save
Off*
On
Determine what the printer does with downloaded resources when it
receives a job that requires more than the available memory.
Notes:
•
When set to Off, the printer retains downloaded resources only until
memory is needed. Resources associated with the inactive printer
language are deleted.
•
When set to On, the printer preserves all the permanent
downloaded resources across all language switches. When
necessary, the printer shows memory full messages instead of
deleting permanent resources.
Print All Order
Alphabetical*
Newest First
Oldest First
Specify the order when you choose to print all held and confidential jobs.
Note:
This menu item appears only when a hard disk or an ISD is
installed.
Note:
An asterisk (*) next to a value indicates the factory default setting.
Quality
Menu item
Description
Print Mode
Black and White
Color*
Set how the printer generates color content.
Print Resolution
4800 CQ*
1200 dpi
Set the resolution for the printed output.
Note:
4800 CQ provides high
‑
quality output at maximum speed.
Toner Darkness
1 to 5 (4*)
Determine the lightness or darkness of text images.
Note:
An asterisk (*) next to a value indicates the factory default setting.
Use printer menus
87
Содержание C4342
Страница 46: ...4 Install the ISP into its housing Set up install and configure 46 ...
Страница 47: ...5 Attach the housing to the controller board shield Set up install and configure 47 ...
Страница 48: ...6 Connect the ISP extended cable to the ISP connector in the controller board Set up install and configure 48 ...
Страница 52: ...Set up install and configure 52 ...
Страница 55: ...Set up install and configure 55 ...
Страница 56: ...3 Install the wireless module into its housing Set up install and configure 56 ...
Страница 57: ...4 Attach the wireless module to the controller board shield Set up install and configure 57 ...
Страница 58: ...5 Connect the wireless assembly to the ISP connector in the controller board Set up install and configure 58 ...
Страница 122: ...Replacing parts and supplies Replacing a toner cartridge 1 Open door B Maintain the printer 122 ...
Страница 123: ...2 Remove the used toner cartridge 3 Unpack the new toner cartridge Maintain the printer 123 ...
Страница 124: ...4 Insert the new toner cartridge 5 Close door B Maintain the printer 124 ...
Страница 125: ...Replacing the black imaging unit 1 Open door B Maintain the printer 125 ...
Страница 127: ...3 Remove the toner cartridges Maintain the printer 127 ...
Страница 128: ...4 Disconnect the imaging kit cable Maintain the printer 128 ...
Страница 132: ...9 Insert the imaging kit Maintain the printer 132 ...
Страница 134: ...Replacing the color imaging kit 1 Open door B Maintain the printer 134 ...
Страница 136: ...3 Remove the toner cartridges Maintain the printer 136 ...
Страница 137: ...4 Disconnect the imaging kit cable Maintain the printer 137 ...
Страница 138: ...5 Remove the used imaging kit Maintain the printer 138 ...
Страница 141: ...8 Insert the black imaging unit into the new imaging kit Maintain the printer 141 ...
Страница 142: ...9 Insert the new imaging kit Maintain the printer 142 ...
Страница 144: ...Replacing the waste toner bottle 1 Open door B Maintain the printer 144 ...
Страница 153: ...2 Remove the used separator bracket 3 Unpack the new separator bracket Maintain the printer 153 ...
Страница 200: ...Jam locations 1 Standard bin 2 Door A 3 Trays 4 Multipurpose feeder Troubleshoot a problem 200 ...
Страница 203: ...2 Remove the jammed paper Note Make sure that all paper fragments are removed 3 Open door A1 Troubleshoot a problem 203 ...


