Icon
Function
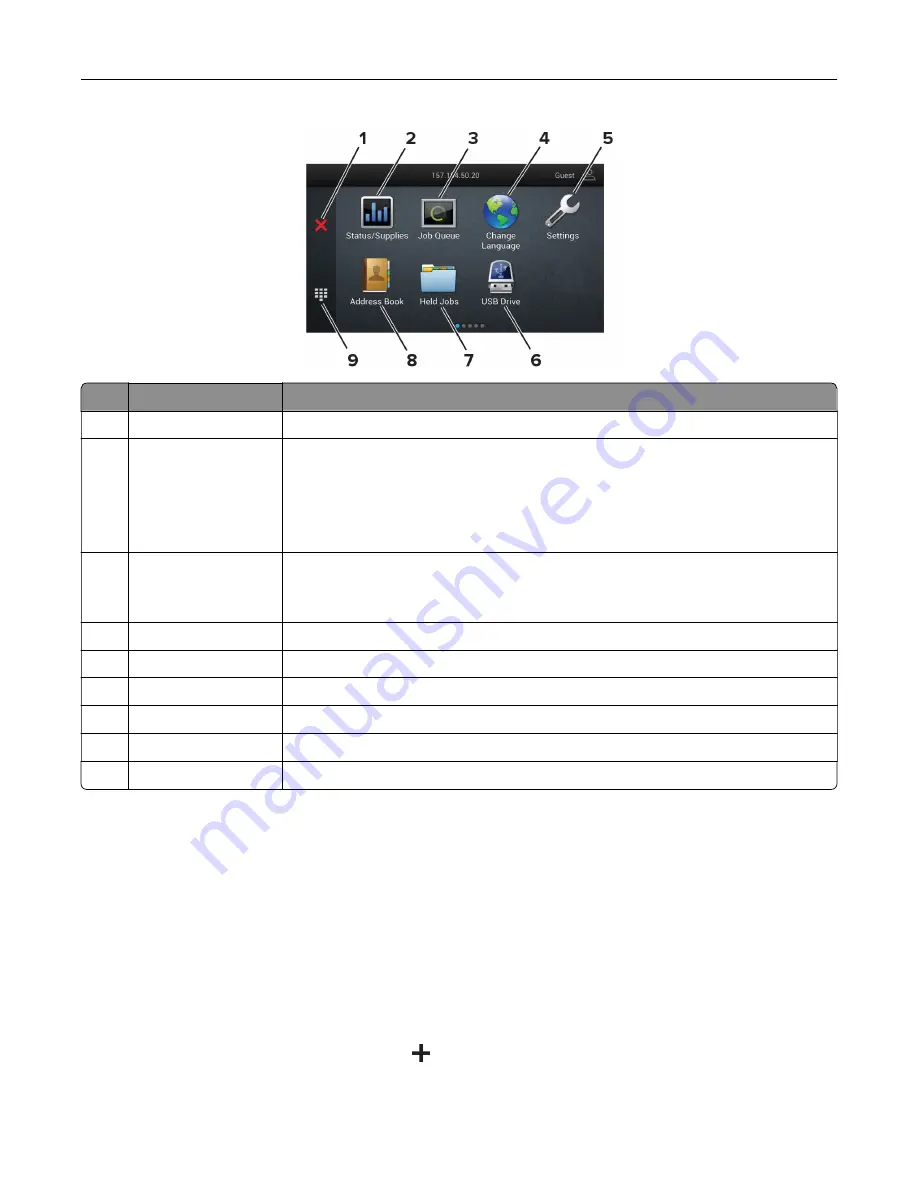
1
Stop or Cancel button Stop the current printer task.
2
Status/Supplies
•
Show a warning or error message whenever the printer requires intervention to
continue processing.
•
View more information on the printer warning or message and how to clear it.
Note:
You can also access this setting by touching the top section of the home
screen.
3
Job Queue
Show all the current print jobs.
Note:
You can also access this setting by touching the top section of the home
screen.
4
Change Language
Change the language on the display.
5
Settings
Access the printer menus.
6
USB Drive
Print photos and documents from a flash drive.
7
Held Jobs
Show the print jobs that are held in the printer memory.
8
Address Book
Manage a contact list that other applications on the printer can access.
9
On
‑
screen keypad
Enter numbers or symbols in an input field.
Customizing the home screen
1
Open a web browser, and then type the printer IP address in the address field.
Notes:
•
View the printer IP address on the printer home screen. The IP address appears as four sets of
numbers separated by periods, such as 123.123.123.123.
•
If you are using a proxy server, then temporarily disable it to load the web page correctly.
2
Click
Settings
>
Device
>
Home Screen Customization
.
3
Do one or more of the following:
•
To add an icon to the home screen, click
, select the app name, and then click
Add
.
•
To remove a home screen icon, select the app name, and then click
Remove
.
•
To customize an app name, select the app name, click
Edit
, and then assign a name.
Set up, install, and configure
21
Содержание C4342
Страница 46: ...4 Install the ISP into its housing Set up install and configure 46 ...
Страница 47: ...5 Attach the housing to the controller board shield Set up install and configure 47 ...
Страница 48: ...6 Connect the ISP extended cable to the ISP connector in the controller board Set up install and configure 48 ...
Страница 52: ...Set up install and configure 52 ...
Страница 55: ...Set up install and configure 55 ...
Страница 56: ...3 Install the wireless module into its housing Set up install and configure 56 ...
Страница 57: ...4 Attach the wireless module to the controller board shield Set up install and configure 57 ...
Страница 58: ...5 Connect the wireless assembly to the ISP connector in the controller board Set up install and configure 58 ...
Страница 122: ...Replacing parts and supplies Replacing a toner cartridge 1 Open door B Maintain the printer 122 ...
Страница 123: ...2 Remove the used toner cartridge 3 Unpack the new toner cartridge Maintain the printer 123 ...
Страница 124: ...4 Insert the new toner cartridge 5 Close door B Maintain the printer 124 ...
Страница 125: ...Replacing the black imaging unit 1 Open door B Maintain the printer 125 ...
Страница 127: ...3 Remove the toner cartridges Maintain the printer 127 ...
Страница 128: ...4 Disconnect the imaging kit cable Maintain the printer 128 ...
Страница 132: ...9 Insert the imaging kit Maintain the printer 132 ...
Страница 134: ...Replacing the color imaging kit 1 Open door B Maintain the printer 134 ...
Страница 136: ...3 Remove the toner cartridges Maintain the printer 136 ...
Страница 137: ...4 Disconnect the imaging kit cable Maintain the printer 137 ...
Страница 138: ...5 Remove the used imaging kit Maintain the printer 138 ...
Страница 141: ...8 Insert the black imaging unit into the new imaging kit Maintain the printer 141 ...
Страница 142: ...9 Insert the new imaging kit Maintain the printer 142 ...
Страница 144: ...Replacing the waste toner bottle 1 Open door B Maintain the printer 144 ...
Страница 153: ...2 Remove the used separator bracket 3 Unpack the new separator bracket Maintain the printer 153 ...
Страница 200: ...Jam locations 1 Standard bin 2 Door A 3 Trays 4 Multipurpose feeder Troubleshoot a problem 200 ...
Страница 203: ...2 Remove the jammed paper Note Make sure that all paper fragments are removed 3 Open door A1 Troubleshoot a problem 203 ...


