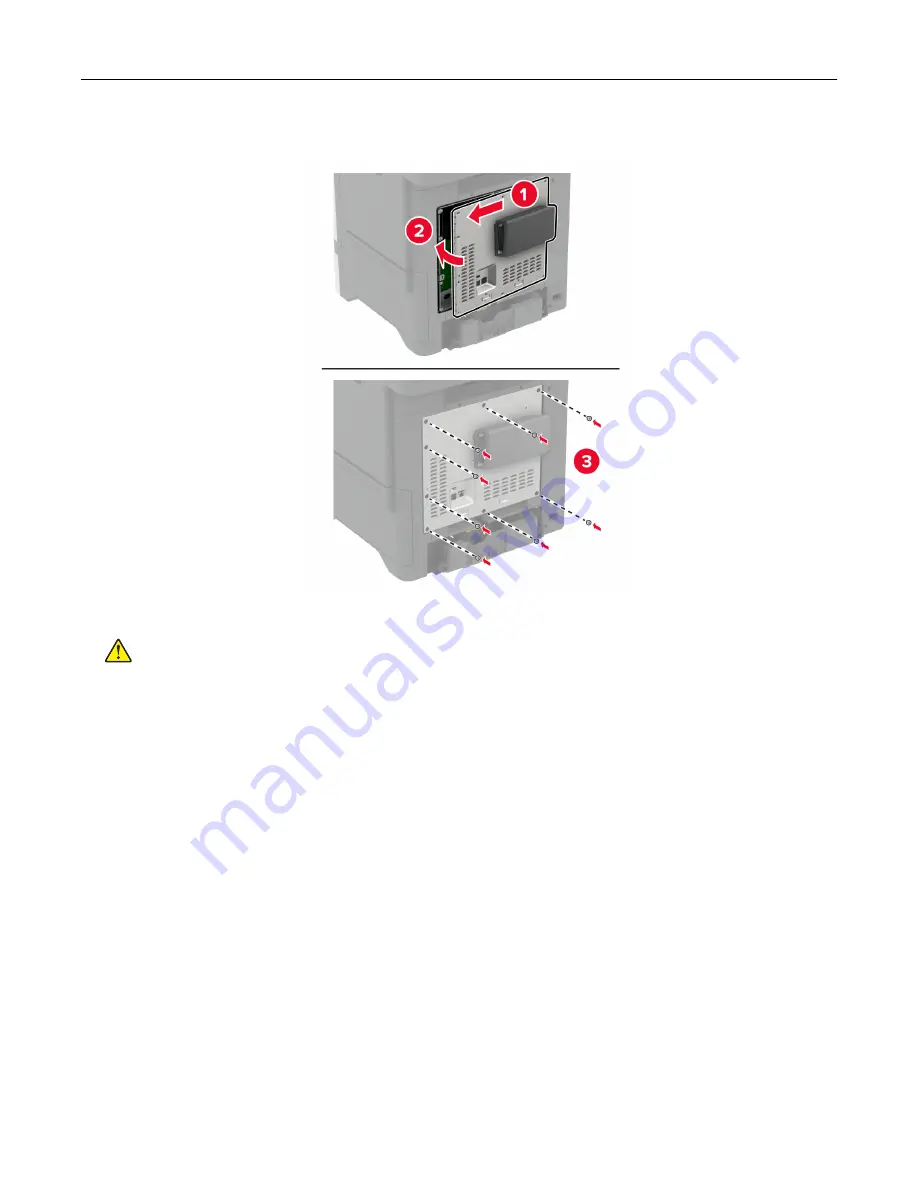
7
Attach the controller board shield.
8
Connect the power cord to the electrical outlet, and then turn on the printer.
CAUTION—POTENTIAL INJURY:
To avoid the risk of fire or electrical shock, connect the power cord
to an appropriately rated and properly grounded electrical outlet that is near the product and easily
accessible.
Changing the printer port settings after installing an internal solutions port
Notes:
•
If the printer has a static IP address, then do not change the configuration.
•
If the computers are configured to use the network name instead of an IP address, then do not change
the configuration.
•
If you are adding a wireless internal solutions port (ISP) to a printer previously configured for an Ethernet
connection, then disconnect the printer from the Ethernet network.
For Windows users
1
Open the printers folder.
2
From the shortcut menu of the printer with the new ISP, open the printer properties.
3
Configure the port from the list.
4
Update the IP address.
5
Apply the changes.
Set up, install, and configure
49
Содержание C4342
Страница 46: ...4 Install the ISP into its housing Set up install and configure 46 ...
Страница 47: ...5 Attach the housing to the controller board shield Set up install and configure 47 ...
Страница 48: ...6 Connect the ISP extended cable to the ISP connector in the controller board Set up install and configure 48 ...
Страница 52: ...Set up install and configure 52 ...
Страница 55: ...Set up install and configure 55 ...
Страница 56: ...3 Install the wireless module into its housing Set up install and configure 56 ...
Страница 57: ...4 Attach the wireless module to the controller board shield Set up install and configure 57 ...
Страница 58: ...5 Connect the wireless assembly to the ISP connector in the controller board Set up install and configure 58 ...
Страница 122: ...Replacing parts and supplies Replacing a toner cartridge 1 Open door B Maintain the printer 122 ...
Страница 123: ...2 Remove the used toner cartridge 3 Unpack the new toner cartridge Maintain the printer 123 ...
Страница 124: ...4 Insert the new toner cartridge 5 Close door B Maintain the printer 124 ...
Страница 125: ...Replacing the black imaging unit 1 Open door B Maintain the printer 125 ...
Страница 127: ...3 Remove the toner cartridges Maintain the printer 127 ...
Страница 128: ...4 Disconnect the imaging kit cable Maintain the printer 128 ...
Страница 132: ...9 Insert the imaging kit Maintain the printer 132 ...
Страница 134: ...Replacing the color imaging kit 1 Open door B Maintain the printer 134 ...
Страница 136: ...3 Remove the toner cartridges Maintain the printer 136 ...
Страница 137: ...4 Disconnect the imaging kit cable Maintain the printer 137 ...
Страница 138: ...5 Remove the used imaging kit Maintain the printer 138 ...
Страница 141: ...8 Insert the black imaging unit into the new imaging kit Maintain the printer 141 ...
Страница 142: ...9 Insert the new imaging kit Maintain the printer 142 ...
Страница 144: ...Replacing the waste toner bottle 1 Open door B Maintain the printer 144 ...
Страница 153: ...2 Remove the used separator bracket 3 Unpack the new separator bracket Maintain the printer 153 ...
Страница 200: ...Jam locations 1 Standard bin 2 Door A 3 Trays 4 Multipurpose feeder Troubleshoot a problem 200 ...
Страница 203: ...2 Remove the jammed paper Note Make sure that all paper fragments are removed 3 Open door A1 Troubleshoot a problem 203 ...


