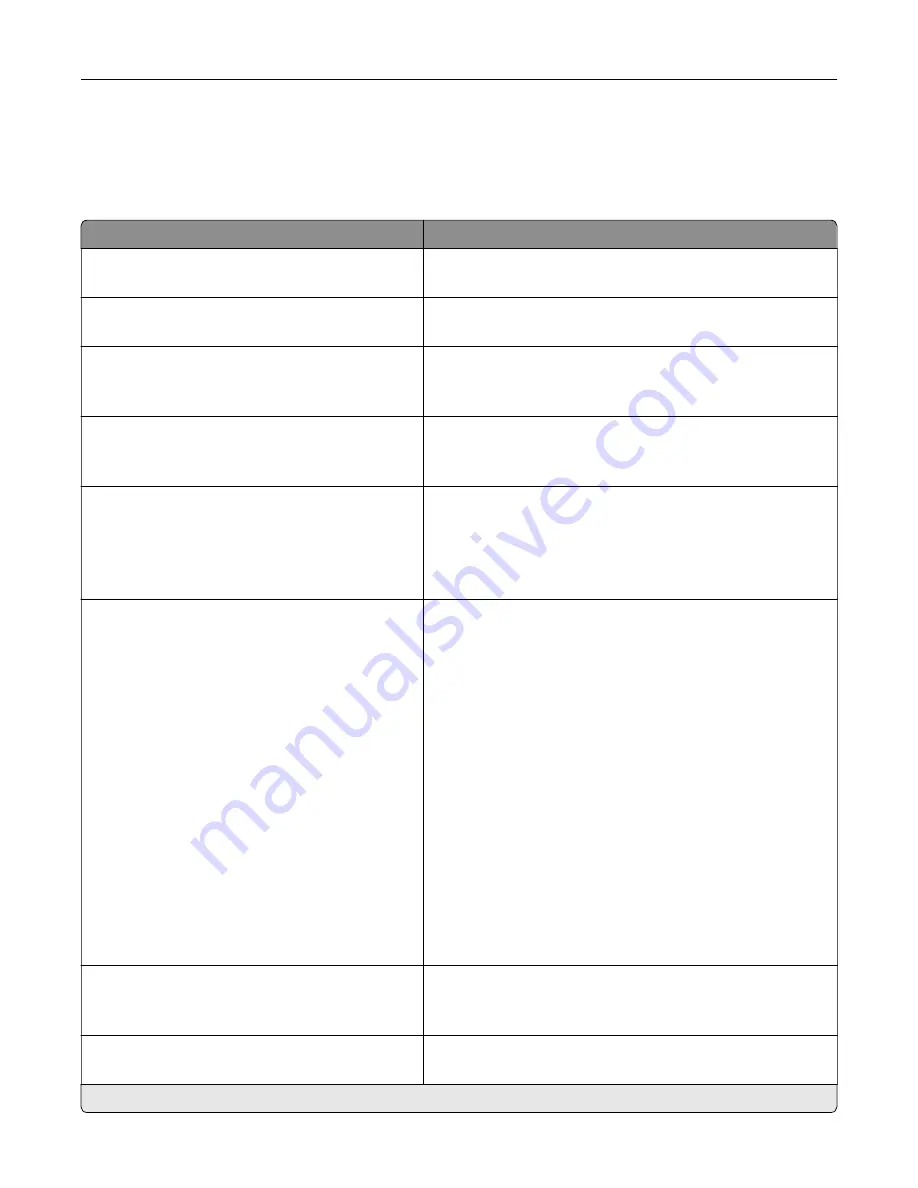
Device
Preferences
Menu item
Description
Display Language
[List of languages]
Set the language of the text that appears on the display.
Country/Region
[List of countries or regions]
Identify the country or region where the printer is configured
to operate.
Run initial setup
Off*
On
Run the setup wizard.
Keyboard
Keyboard Type
[List of languages]
Select a language as a keyboard type.
Note:
All the Keyboard Type values may not appear or may
require special hardware to appear.
Displayed information
Display Text 1 (IP Address*)
Display Text 2 (Date/Time*)
Custom Text 1
Custom Text 2
Specify the information to appear on the home screen.
Date and Time
Configure
Current Date and Time
Manually Set Date and Time
Date Format
Time Format (12 hour A.M./P.M.*)
Time Zone
UTC (GMT) Offset
DST Start
DST End
DST Offset
Network Time Protocol
Enable NTP (On*)
NTP Server
Enable Authentication (None*)
Key ID
Password
Configure the printer date and time and network time protocol.
Notes:
•
MM
‑
DD
‑
YYYY is the U.S. factory default setting. DD-MM-
YYYY is the international factory default setting.
•
UTC (GMT) Offset, DST Start, DST End, and DST Offset
appear only when Time Zone is set to (UTC+user)
Custom.
•
Key ID and Password appear only when Enable
Authentication is set to MD5 key.
Paper Sizes
US
Metric
Specify the unit of measurement for paper sizes.
Note:
The country or region selected in the initial setup
wizard determines the initial paper size setting.
Screen Brightness
20–100% (100*)
Adjust the brightness of the display.
Note:
An asterisk (*) next to a value indicates the factory default setting.
Use printer menus
75
Содержание C4342
Страница 46: ...4 Install the ISP into its housing Set up install and configure 46 ...
Страница 47: ...5 Attach the housing to the controller board shield Set up install and configure 47 ...
Страница 48: ...6 Connect the ISP extended cable to the ISP connector in the controller board Set up install and configure 48 ...
Страница 52: ...Set up install and configure 52 ...
Страница 55: ...Set up install and configure 55 ...
Страница 56: ...3 Install the wireless module into its housing Set up install and configure 56 ...
Страница 57: ...4 Attach the wireless module to the controller board shield Set up install and configure 57 ...
Страница 58: ...5 Connect the wireless assembly to the ISP connector in the controller board Set up install and configure 58 ...
Страница 122: ...Replacing parts and supplies Replacing a toner cartridge 1 Open door B Maintain the printer 122 ...
Страница 123: ...2 Remove the used toner cartridge 3 Unpack the new toner cartridge Maintain the printer 123 ...
Страница 124: ...4 Insert the new toner cartridge 5 Close door B Maintain the printer 124 ...
Страница 125: ...Replacing the black imaging unit 1 Open door B Maintain the printer 125 ...
Страница 127: ...3 Remove the toner cartridges Maintain the printer 127 ...
Страница 128: ...4 Disconnect the imaging kit cable Maintain the printer 128 ...
Страница 132: ...9 Insert the imaging kit Maintain the printer 132 ...
Страница 134: ...Replacing the color imaging kit 1 Open door B Maintain the printer 134 ...
Страница 136: ...3 Remove the toner cartridges Maintain the printer 136 ...
Страница 137: ...4 Disconnect the imaging kit cable Maintain the printer 137 ...
Страница 138: ...5 Remove the used imaging kit Maintain the printer 138 ...
Страница 141: ...8 Insert the black imaging unit into the new imaging kit Maintain the printer 141 ...
Страница 142: ...9 Insert the new imaging kit Maintain the printer 142 ...
Страница 144: ...Replacing the waste toner bottle 1 Open door B Maintain the printer 144 ...
Страница 153: ...2 Remove the used separator bracket 3 Unpack the new separator bracket Maintain the printer 153 ...
Страница 200: ...Jam locations 1 Standard bin 2 Door A 3 Trays 4 Multipurpose feeder Troubleshoot a problem 200 ...
Страница 203: ...2 Remove the jammed paper Note Make sure that all paper fragments are removed 3 Open door A1 Troubleshoot a problem 203 ...


