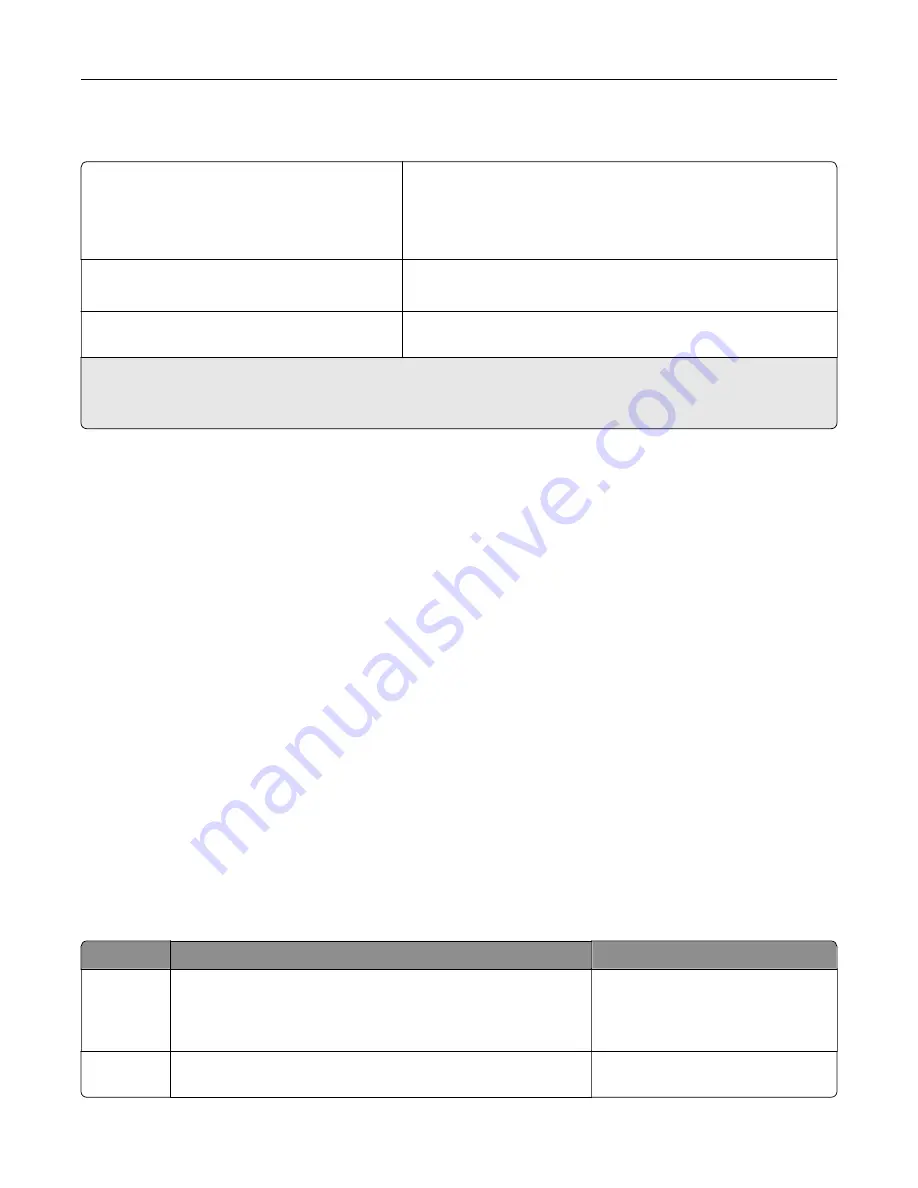
Temperature information
Operating temperature and relative humidity
10 to 32.2°C (50 to 90°F) and 15 to 80% RH
15.6 to 32.2°C (60 to 90°F) and 8 to 80% RH
Maximum wet-bulb temperature
2
: 22.8°C (73°F)
Non-condensing environment
Printer / cartridge / imaging unit long-
term storage
1
15.6 to 32.2°C (60 to 90°F) and 8 to 80% RH
Maximum wet-bulb temperature
2
: 22.8°C (73°F)
Printer / cartridge / imaging unit short-term
shipping
-40 to 40°C (-40 to 104°F)
1
Supplies shelf life is approximately 2 years. This is based on storage in a standard office environment at 22°C (72°F)
and 45% humidity.
2
Wet-bulb temperature is determined by the air temperature and the relative humidity.
Laser notice
The printer is certified in the U.S. to conform to the requirements of DHHS 21 CFR, Chapter I, Subchapter J for
Class I (1) laser products, and elsewhere is certified as a Class I laser product conforming to the requirements
of IEC 60825-1: 2014.
Class I laser products are not considered to be hazardous. The laser system and printer are designed so there
is never any human access to laser radiation above a Class I level during normal operation, user maintenance,
or prescribed service conditions. The printer has a non-serviceable printhead assembly that contains a laser
with the following specifications:
Class: IIIb (3b) AlGaAs
Nominal output power (milliwatts): 12
Wavelength (nanometers): 770–800
Power consumption
Product power consumption
The following table documents the power consumption characteristics of the product.
Note:
Some modes may not apply to your product.
Mode
Description
Power consumption (Watts)
Printing
The product is generating hard
‑
copy output from electronic
inputs.
One
‑
sided: 610 (CS730de, C4342);
740 (CS735de, C4352)
Two
‑
sided: 510 (CS730de, C4342);
610 (CS735de, C4352)
Copy
The product is generating hard
‑
copy output from hard
‑
copy
original documents.
N/A
Notices
224
Содержание C4342
Страница 46: ...4 Install the ISP into its housing Set up install and configure 46 ...
Страница 47: ...5 Attach the housing to the controller board shield Set up install and configure 47 ...
Страница 48: ...6 Connect the ISP extended cable to the ISP connector in the controller board Set up install and configure 48 ...
Страница 52: ...Set up install and configure 52 ...
Страница 55: ...Set up install and configure 55 ...
Страница 56: ...3 Install the wireless module into its housing Set up install and configure 56 ...
Страница 57: ...4 Attach the wireless module to the controller board shield Set up install and configure 57 ...
Страница 58: ...5 Connect the wireless assembly to the ISP connector in the controller board Set up install and configure 58 ...
Страница 122: ...Replacing parts and supplies Replacing a toner cartridge 1 Open door B Maintain the printer 122 ...
Страница 123: ...2 Remove the used toner cartridge 3 Unpack the new toner cartridge Maintain the printer 123 ...
Страница 124: ...4 Insert the new toner cartridge 5 Close door B Maintain the printer 124 ...
Страница 125: ...Replacing the black imaging unit 1 Open door B Maintain the printer 125 ...
Страница 127: ...3 Remove the toner cartridges Maintain the printer 127 ...
Страница 128: ...4 Disconnect the imaging kit cable Maintain the printer 128 ...
Страница 132: ...9 Insert the imaging kit Maintain the printer 132 ...
Страница 134: ...Replacing the color imaging kit 1 Open door B Maintain the printer 134 ...
Страница 136: ...3 Remove the toner cartridges Maintain the printer 136 ...
Страница 137: ...4 Disconnect the imaging kit cable Maintain the printer 137 ...
Страница 138: ...5 Remove the used imaging kit Maintain the printer 138 ...
Страница 141: ...8 Insert the black imaging unit into the new imaging kit Maintain the printer 141 ...
Страница 142: ...9 Insert the new imaging kit Maintain the printer 142 ...
Страница 144: ...Replacing the waste toner bottle 1 Open door B Maintain the printer 144 ...
Страница 153: ...2 Remove the used separator bracket 3 Unpack the new separator bracket Maintain the printer 153 ...
Страница 200: ...Jam locations 1 Standard bin 2 Door A 3 Trays 4 Multipurpose feeder Troubleshoot a problem 200 ...
Страница 203: ...2 Remove the jammed paper Note Make sure that all paper fragments are removed 3 Open door A1 Troubleshoot a problem 203 ...


